Picture this: you’ve spent hours meticulously crafting a stunning acrylic masterpiece, only to have it spoiled by annoying bubbles when you try to glue it together. Talk about frustrating. But fear not, my friend. We’re here to spill the beans on how to achieve flawless, bubble-free adhesion for your beloved acrylic creations.
Acrylic is a true marvel – its unrivaled clarity and versatility make it a top choice in various industries. Whether you’re an artist creating breathtaking artwork or an engineer assembling intricate prototypes, achieving seamless bonds with this thermoplastic wonder is key.
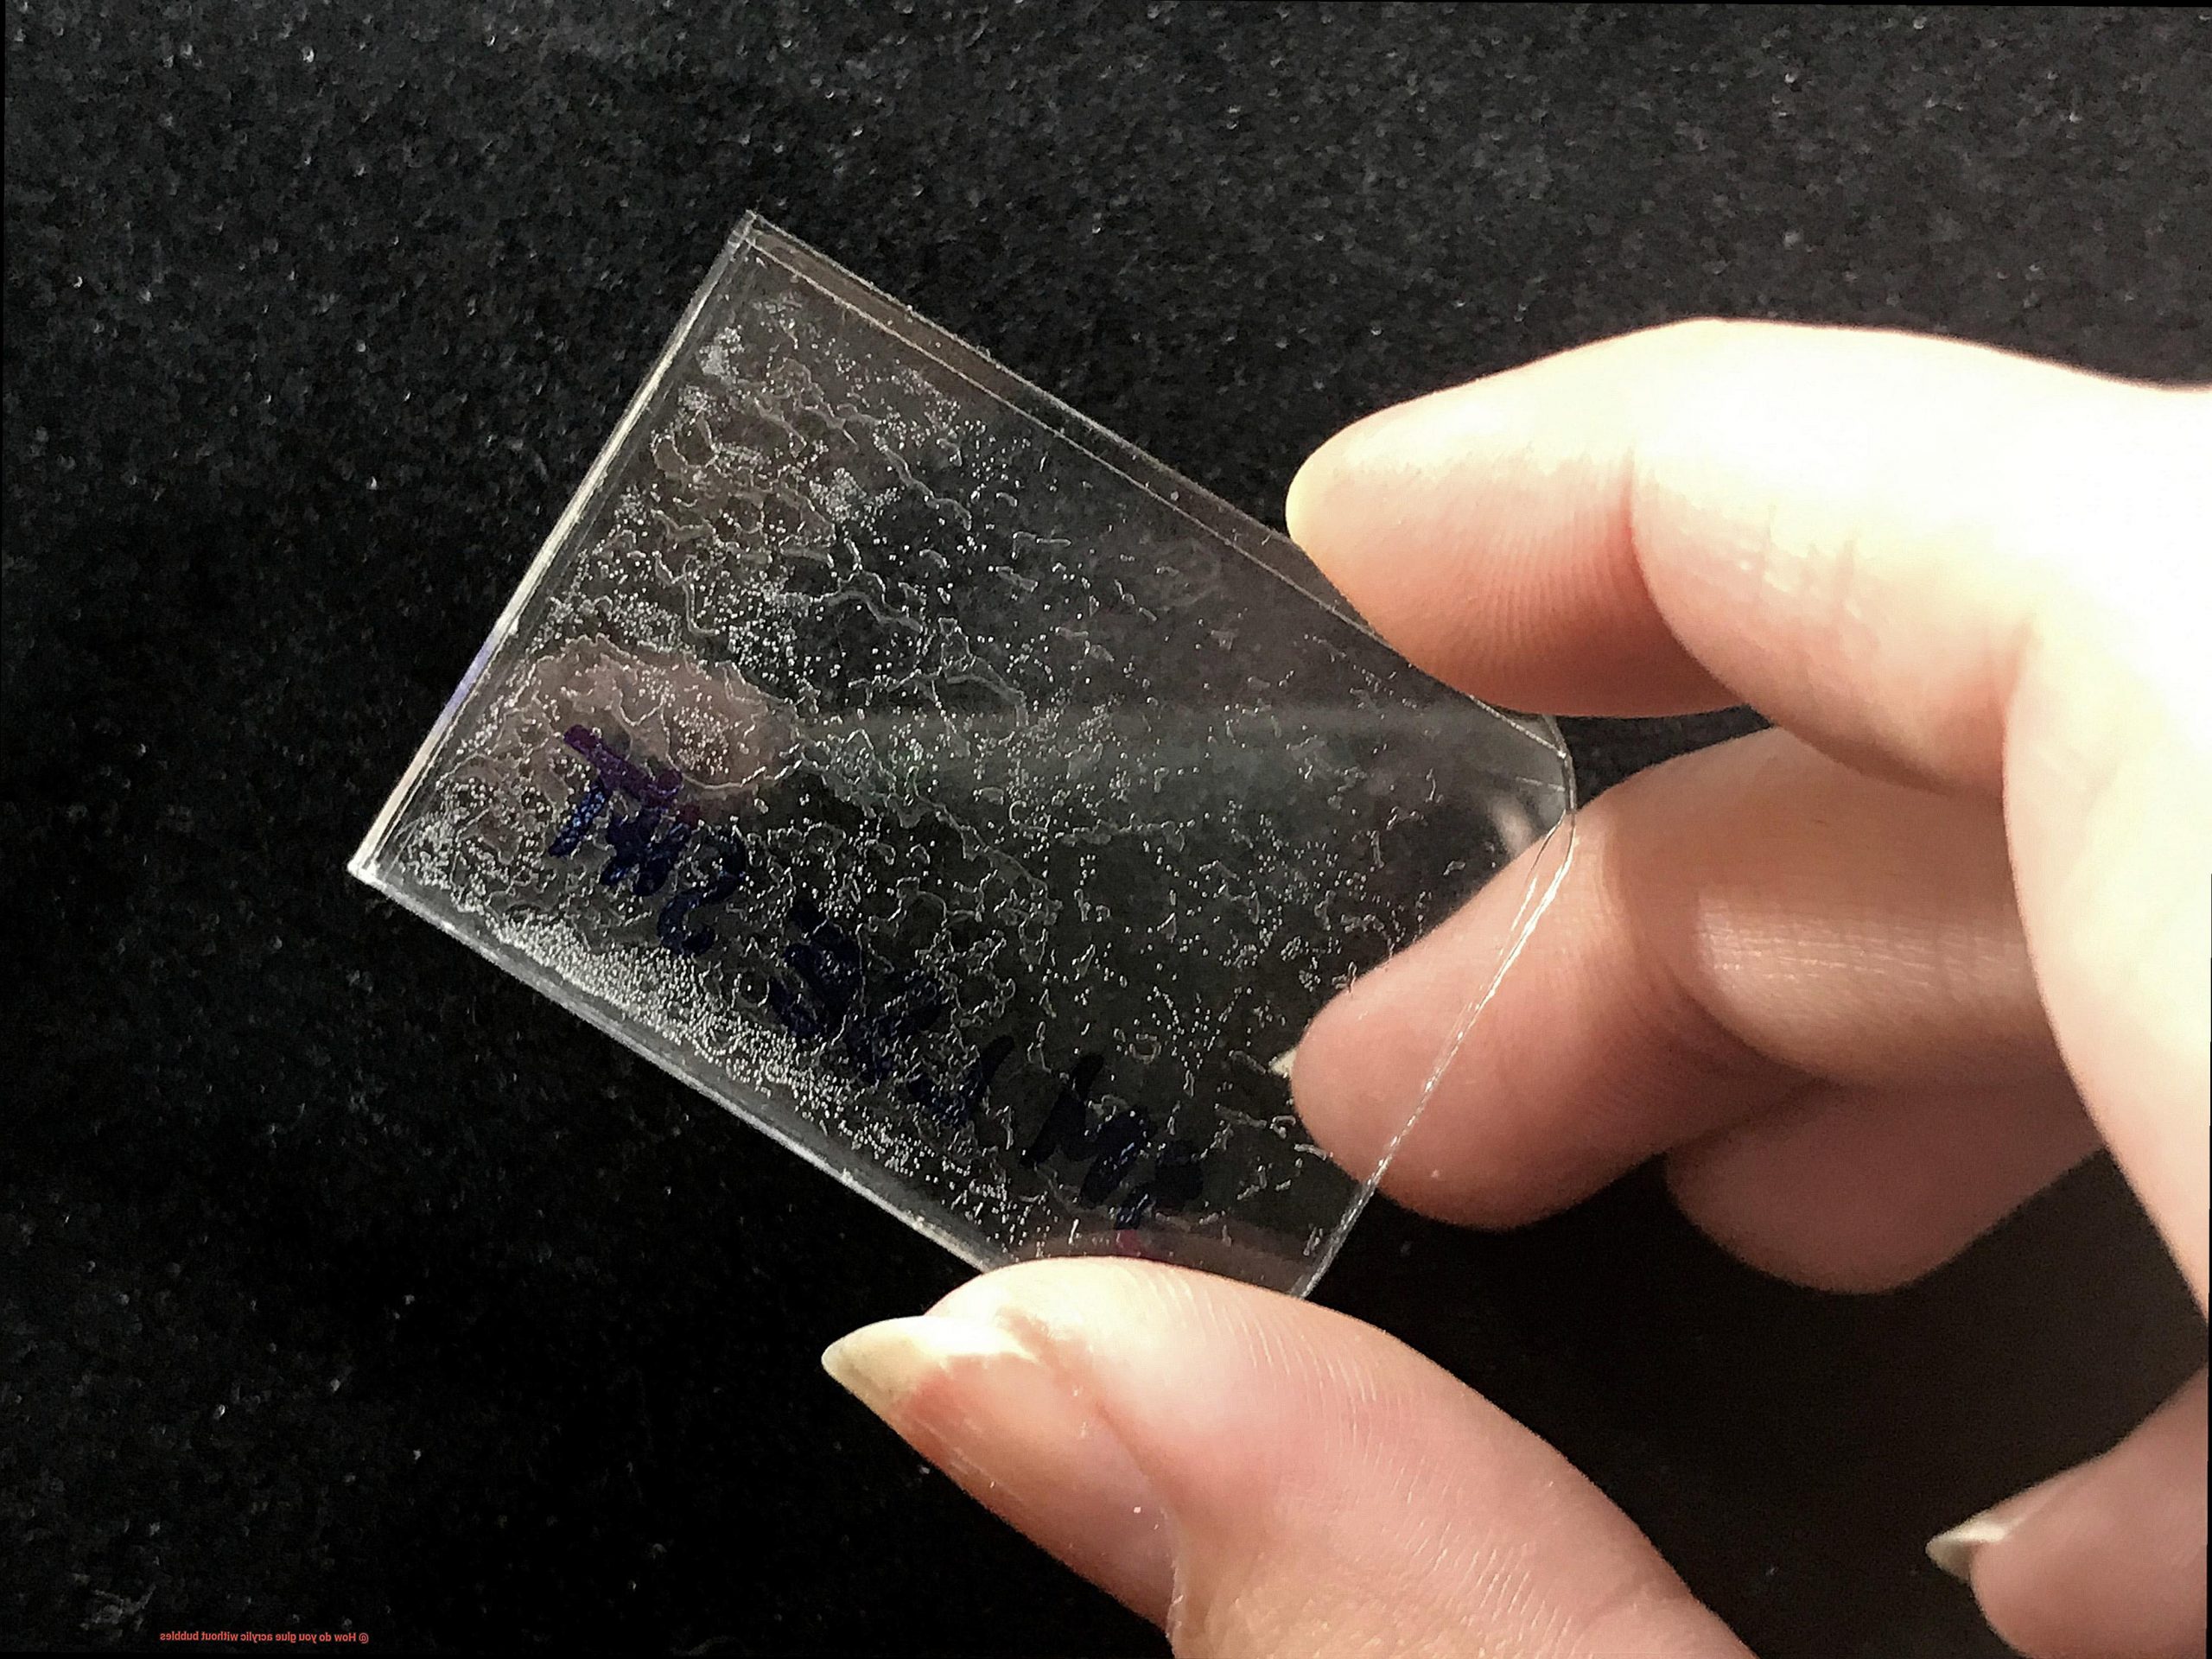
Now, let’s get to the heart of the matter – why do those pesky bubbles even form? Well, it all boils down to how you apply the adhesive. Those unwanted air pockets love sneaking their way between the acrylic surfaces, ruining your hard work and obscuring its beauty.
But fret not. In this comprehensive guide, we’ll unravel the secrets behind achieving flawless acrylic bonding without any interference from those troublesome bubbles. Whether you’re a seasoned acrylic enthusiast or just starting out on your creative journey, we’ve got your back.
Throughout this article, we’ll dive into crucial tips, tricks, and techniques that guarantee bubble-free adhesive connections every single time. We’ll explore everything from prepping your surfaces like a pro to selecting the perfect adhesive and nailing the application process for stellar results. And hey, we won’t leave you hanging – we’ve got some expert advice on clamping techniques, curing time optimization, and troubleshooting tips too.
So if you’re ready to unlock the hidden treasures of perfect acrylic bonding, keep reading. Say goodbye to unsightly bubbles and let your imagination soar as your projects reach new levels of excellence.
Choosing the Right Adhesive for Gluing Acrylic
Contents
- 1 Choosing the Right Adhesive for Gluing Acrylic
- 2 Preparing the Acrylic Surfaces for Gluing
- 3 Applying the Adhesive to Create a Bubble-Free Bond
- 4 Aligning and Joining the Acrylic Pieces
- 5 Maintaining Pressure During Curing Period
- 6 Removing Excess Adhesive After Gluing
- 7 Using a Thin Applicator or Needle for Precise Application
- 8 Allowing Sufficient Curing Time for a Strong Bond
- 9 Conclusion
Gluing acrylic can be a challenging task, especially if you want to avoid those annoying bubbles. However, fear not. By selecting the appropriate adhesive and following proper techniques, you can achieve a robust and bubble-free bond. In this article, we will delve into the importance of choosing the right adhesive for gluing acrylic, offering step-by-step instructions for a successful outcome.
Importance of Choosing the Right Adhesive:
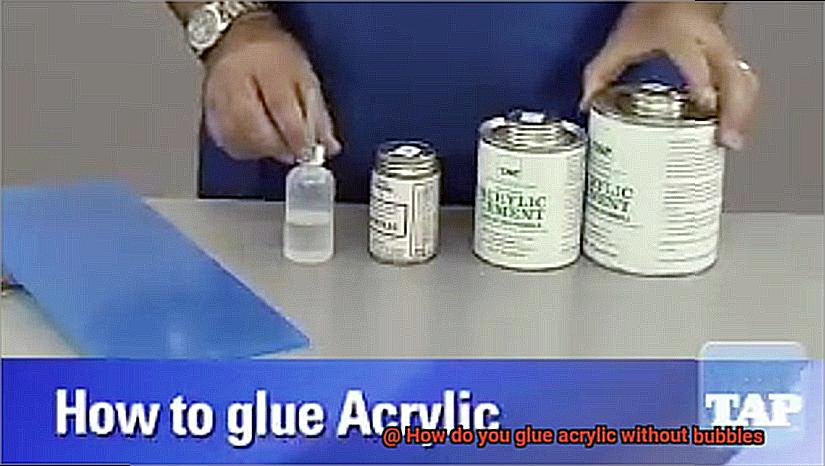
- Compatibility: Acrylic requires a specialized adhesive. Opting for an adhesive explicitly designed for acrylic ensures compatibility and guarantees a strong bond.
- Low Viscosity: Acrylic adhesives like cyanoacrylate (super glue) or solvent-based adhesives possess low viscosity. This characteristic allows the adhesive to flow effortlessly into tight spaces, minimizing any air entrapment and bubble formation.
- Clean Bonding Surface: The adhesive alone won’t suffice. To prevent air bubbles during the gluing process, ensure a clean and smooth bonding surface. Eliminate dirt, dust, or imperfections on the acrylic that could compromise the bond by trapping air.
Steps for a Successful Bond:
- Prepare the Surfaces: Begin by thoroughly cleaning the surfaces to be bonded with a gentle detergent or acrylic cleaner. This step eradicates any dirt, grease, or fingerprints that might hinder the adhesive’s effectiveness. Rinse with water and pat dry with a lint-free cloth.
- Choose the Right Adhesive: Select an adhesive explicitly formulated for acrylic, such as solvent cement or acrylic-based glue. Thoroughly read the label and instructions to confirm compatibility with acrylic.
- Apply a Thin Layer of Adhesive: Utilize a brush or applicator to apply a thin, even layer of adhesive onto one of the acrylic surfaces. Avoid excessive application, as excess glue can lead to more air bubbles.
- Align and Join the Surfaces: Carefully align the two acrylic surfaces, applying gentle pressure. Refrain from sliding or shifting the pieces, as this can trap air between them. If necessary, seek assistance from another person for precise alignment.
- Maintain Consistent Pressure: Once the surfaces are joined, maintain consistent pressure for several minutes to allow the adhesive to set. Clamps or heavy objects can be employed to facilitate this process. Avoid disturbing or moving the pieces during the curing period.
Preparing the Acrylic Surfaces for Gluing
Today, we embark on a journey to unlock the secrets of preparing acrylic surfaces for gluing. If you’re aiming for a bond that’s strong and bubble-free, ready to elevate your project to new heights, then you’ve come to the right place. So, grab your favorite beverage and get ready to dive into the fascinating world of acrylic surface preparation.
Step 1: Cleaning – The Foundation of Success
To lay the groundwork for a flawless bond, we must first ensure our acrylic surfaces are pristine. Dust, dirt, or grease are unwelcome guests that can sabotage our adhesion process. Armed with a mild detergent or soap and water, we embark on a cleansing mission. Gently removing any impurities, we take care to avoid harsh chemicals and solvents that could tarnish our precious acrylic.
Step 2: Drying – Say Goodbye to Moisture
With our acrylic surfaces now sparkling clean, it’s time to bid farewell to any lingering moisture. Armed with a lint-free cloth or paper towel, we delicately pat-dry the surfaces. This crucial step ensures no water droplets remain, as they have a knack for causing those dreaded bubbles during the gluing process. And let’s face it – nobody wants bubbles spoiling their masterpiece.
Step 3: Sanding – Rough is Tough
Now it’s time to unleash our inner roughness – but in a controlled manner. Lightly sanding the acrylic surfaces creates an enticingly rough texture that amplifies the bonding strength of our adhesive. Armed with fine-grit sandpaper, we embark on a circular sanding motion. But beware. We mustn’t exert excessive pressure or sand too aggressively; scratches and damage are not on our agenda.
Step 4: Dust Off – Adhesion Enemies Be Gone
With our sanding prowess complete, we turn our attention to banishing those pesky sanding particles. Armed with a soft brush or a burst of compressed air, we sweep away any loose remnants. Our mission is clear: eliminate all contaminants that could dare to interfere with our bonding process. With enemies vanquished, our bond can thrive.
Applying the Adhesive to Create a Bubble-Free Bond
Now that we’ve mastered the art of preparing acrylic surfaces for gluing, let’s dive into the exciting world of applying adhesive to create a bubble-free bond. Get ready for a seamless and professional finish.
First and foremost, cleanliness is key. Dust, dirt, and grease are enemies of a strong bond. So grab some mild soap and water or isopropyl alcohol and scrub those surfaces until they’re squeaky clean. Don’t forget to remove any residue or cleaning agents completely.
Now that our surfaces are clean, it’s time to choose the perfect adhesive. We highly recommend acrylic adhesives or cyanoacrylate adhesives (also known as super glue). These options are specially formulated for bonding acrylic and offer excellent adhesion strength.
But before we apply the adhesive, make sure those surfaces are dry. Moisture is not our friend when it comes to a bubble-free bond. Grab a clean cloth or paper towel and thoroughly dry the surfaces.
Alright, let’s get to the fun part – applying the adhesive. But hold on, we need to be careful with the amount we use. Too much adhesive can lead to excess trapped air and those pesky bubbles. On the other hand, too little adhesive won’t provide enough coverage for a strong bond. Follow the manufacturer’s instructions closely on how much adhesive to apply.
For an even distribution of adhesive and to prevent bubbles from forming, opt for a thin applicator like a needle or syringe. This allows for precise control over the amount of adhesive being applied and minimizes the chances of air getting trapped.
Now it’s time to put that adhesive to work. Start at one end of the surface and work your way towards the other end in a smooth and consistent motion. Take your time and ensure that the adhesive is evenly spread across the entire surface. Remember, no excessive pressure. We want to avoid any extra bubbles.
Once the adhesive is applied, it’s time to join the surfaces together. Carefully align the pieces and press them firmly together. Applying even pressure ensures that the adhesive spreads evenly and helps eliminate any trapped air or bubbles. If needed, use clamps or weights to hold everything in place while the adhesive cures.
Now all we have to do is let the adhesive do its magic. Follow the manufacturer’s instructions on curing time and resist the temptation to disturb or move the bonded pieces during this period. Patience pays off in achieving a bubble-free bond.
Aligning and Joining the Acrylic Pieces
Aligning and joining acrylic pieces requires precision and attention to detail. To ensure a flawless finish without any pesky bubbles, it is crucial to follow these expert tips and techniques. Let’s dive in and discover the art of aligning and joining acrylic pieces.
First and foremost, creating a clean and flat surface is paramount. Dust and debris can wreak havoc on the bonding process, leading to unsightly bubbles. Take the time to thoroughly clean your acrylic surfaces before you begin. Trust me, this step will make all the difference.
Before you reach for the glue, it’s essential to test fit your acrylic pieces. This preliminary step allows you to check if any adjustments are needed before applying the adhesive. After all, we want everything to align perfectly, don’t we?
Now, let’s explore different methods for aligning and joining acrylic pieces. One popular technique involves using clamps or tape to hold the pieces in place while the glue sets. This ensures that the pieces remain aligned throughout the bonding process. Say goodbye to wonky edges.
Another ingenious trick involves using alignment pins or dowels. These tiny but mighty tools are inserted into pre-drilled holes in both acrylic pieces, providing precise alignment and preventing any shifting during gluing. Precision is key when it comes to achieving a professional finish.
Choosing the right adhesive is crucial for a bubble-free bond. Solvent-based adhesives such as methyl methacrylate (MMA) or chloroform-based adhesives are highly recommended. Their low viscosity allows them to penetrate the acrylic surfaces and create a strong bond without leaving behind any unsightly bubbles.
When applying the adhesive, it is vital to follow the manufacturer’s instructions meticulously. Apply a thin layer of adhesive to both surfaces that need to be bonded together. Remember, less is more. Applying too much adhesive can lead to excess bubbles, which we definitely want to avoid.
Now, brace yourself for the exciting part – joining the acrylic pieces. Gently press them together, ensuring proper alignment. Applying even pressure across the entire surface is crucial for achieving a uniform bond and minimizing the formation of bubbles. Get ready for that seamless finish.
To further minimize the risk of bubbles, consider applying controlled heat during the bonding process. A heat gun or placing the assembled acrylic pieces in an oven at a low temperature can do the trick. The heat reduces the adhesive’s viscosity, allowing it to flow more easily and preventing the formation of bubbles.
Maintaining Pressure During Curing Period
In the pursuit of flawlessly bonded acrylic joints, every step is crucial. In our previous article, we uncovered the secrets to creating seamless joins without those pesky bubbles. Today, we delve deeper into the curing period and explore the art of maintaining pressure during this critical stage. So, gather your clamps, vacuum presses, and specialized tools as we embark on a journey to achieve bubble-free perfection.
Method 1: Clamp It Down:
Clamps, the unsung heroes of the acrylic gluing world, hold immense power. By evenly distributing pressure along the edges of your acrylic pieces, they eliminate gaps and ensure a tight bond. However, remember not to tighten excessively. Too much pressure can distort or damage your precious acrylic masterpiece.
Method 2: Vacuum Press: Magic in a Bag.
For larger or uniquely shaped acrylic pieces where clamps may not suffice, enter the vacuum press—an ingenious tool that works wonders. This marvel employs a bag or membrane placed over your acrylic masterpiece. Then, a vacuum is applied, creating an unstoppable suction force that holds everything together. With even pressure distribution, bubbles stand no chance against this magical contraption.
Method 3: Specialized Tools for Special Projects:
Sometimes, small and intricate acrylic pieces demand a more delicate touch. Enter pressure-sensitive adhesive tape—the knight in shining armor. This remarkable tape bonds to the surface, creating a seal that exerts gentle pressure on the glued area. Perfect for conquering those hard-to-reach corners and intricate details that require utmost precision.
Remember: Pressure Alone Isn’t Enough.
While maintaining pressure is crucial during the curing period, it’s essential to consider other factors to achieve bubble-free adhesion. The choice of adhesive and proper surface preparation play pivotal roles in ensuring success. Be sure to select an adhesive specifically designed for acrylic bonding and diligently follow the manufacturer’s instructions for application and curing.
Removing Excess Adhesive After Gluing
Now, let’s tackle the next challenge: removing excess adhesive. In this comprehensive guide, we’ll equip you with expert tips and techniques to achieve a flawless finish. Say goodbye to sticky situations and hello to professional results.
Step 1: The Power of Patience
Before diving into adhesive removal, exercise patience. Allow the adhesive to fully dry, maximizing its strength. Rushing this step can lead to unwanted smears and spread, compromising the desired outcome. So take a breath and give it time.
Step 2: Gentle Scraping for Success
Once the adhesive is dry, arm yourself with a plastic scraper or putty knife. With a delicate touch, scrape away any excess adhesive. Remember, avoid metal scrapers that could scratch or damage the acrylic surface. Our goal is perfection.
Step 3: The Solvent Savior
For stubborn adhesive remnants, it’s time to unleash the power of solvents. Acetone or isopropyl alcohol are superb choices for dissolving and removing adhesives without harming acrylic surfaces. Apply a small amount of solvent to a clean cloth or cotton swab and gently rub it over the adhesive until it dissolves like magic.
Step 4: Testing for Triumph
Before applying any solvent or cleaner to your precious acrylic, conduct a test in an inconspicuous area. This precaution ensures that you won’t encounter discoloration, cloudiness, or damage caused by the solvent. Better safe than sorry.
Step 5: Cleansing with Care
After bidding farewell to excess adhesive, it’s time for some tender loving care. Employ mild soap and water to cleanse the acrylic surface, removing any residue or lingering traces of adhesive. Remember to use a soft cloth or sponge, avoiding abrasive materials that could mar the acrylic’s flawless nature. Treat it gently.
Step 6: Reviving Brilliance
If you notice any faint marks or dullness on the acrylic surface post-adhesive removal, fear not. Embrace the power of specialized acrylic polish or a polishing compound. Apply a small amount onto a clean cloth and gently buff the surface in circular motions. Witness the revival of its smooth and glossy glory.
Using a Thin Applicator or Needle for Precise Application
Prepare to elevate your craftsmanship with the mastery of precise application using a thin applicator or needle. Bid farewell to those pesky bubbles and welcome flawless results. In this comprehensive guide, we will delve into the secrets of using these tools to glue acrylic without any sticky situations.
Unleashing the Power of Thin Applicators and Needles:
When it comes to gluing acrylic without bubbles, a thin applicator or needle becomes your ally, your secret weapon. These tools offer unparalleled control and precision during application, significantly reducing the risk of troublesome air bubbles. Additionally, they possess the ability to effortlessly access tight corners and minute areas that would otherwise challenge a regular applicator.
The Right Tools: Choosing Excellence:
To achieve accurate glue placement, an applicator or needle with a fine point is paramount. Equally crucial is selecting a tool that matches the scale of your project and the required amount of adhesive. Remember, precision is the key that unlocks perfection.
Preparation Prowess:
Before diving into the world of gluing, devote a moment to meticulously clean your thin applicator or needle. Eliminating any residue or remnants of previous uses will prevent contamination that may compromise the quality of your bond or introduce unwanted bubbles.
Technique Tips: A Journey Towards Bubble-Free Brilliance:
As you embark on gluing with your trusty thin applicator or needle, commence from one end of the acrylic piece and gracefully traverse towards the other end. This smooth and controlled technique minimizes the possibility of trapping air between the acrylic and adhesive, ensuring a bond free from unsightly bubbles.
Applying Even Pressure: The Symmetry of Success:
As your thin applicator or needle glides across the surface, remember to maintain even pressure throughout. This critical step guarantees the uniform spread of adhesive, leaving no room for gaps or bubbles to mar your masterpiece.
Allowing Sufficient Curing Time for a Strong Bond
In our previous discussion, we uncovered the secrets to gluing acrylic without those pesky bubbles. Today, we embark on another crucial journey towards perfection – understanding the significance of allowing sufficient curing time for a strong bond. So grab your glue and brace yourself for a fascinating exploration.
The Essence of Curing Time
Let’s start by unraveling the mystery behind “curing time.” It is the precious period required for the adhesive to dry completely and establish a steadfast connection between the acrylic pieces. Picture it as the glue’s moment to shine, saying, “I am ready to unite.”
Unlocking the Power of Instructions
Every adhesive has its own unique curing time. Hence, it is paramount to consult the manufacturer’s instructions specific to your chosen adhesive. By heeding these guidelines, you guarantee that your bond has ample time to reach its pinnacle of strength.
Temperature’s Impact
Prepare to be amazed – temperature holds immense sway over the curing process. Higher temperatures can accelerate it, while lower temperatures may decelerate it. To create an ideal environment for curing, ensure that you keep the temperature within the recommended range prescribed by the adhesive manufacturer.
Humidity’s Role
Humidity dances intricately with curing time. Increased levels of moisture can extend the drying process, hence it is advisable to work in a well-ventilated space with controlled humidity levels. This way, you foster optimal conditions for your bond to flourish.
Tackling Thickness Challenges
Ah, thickness – it emerges as a crucial factor here as well. Thicker layers of adhesive demand more time to dry thoroughly compared to their thinner counterparts. Thus, remember to apply the glue evenly, avoiding excessive amounts that could unnecessarily prolong the curing process.
Section 6: Embracing the Virtue of Patience
Rushing the curing time is an absolute taboo. Attempting to manipulate or stress the bond prematurely will result in weakened or failed connections. Therefore, exercise unwavering patience, granting the adhesive sufficient time to cure naturally. Remember, good things come to those who wait.
OqjWPdZe-wk” >
Conclusion
To achieve a flawless bond when gluing acrylic, it is crucial to eliminate those pesky bubbles that can ruin the final result. But fear not, for I am here to guide you through this process and ensure a bubble-free outcome.
The key to success lies in proper preparation. Begin by thoroughly cleaning the surfaces you intend to glue. Any dust, dirt, or grease can hinder the adhesive’s ability to bond effectively and may contribute to bubble formation.
Next, choose an adhesive specifically designed for acrylic bonding. Opt for a high-quality acrylic cement or adhesive that is clear and dries transparently. This will not only provide a strong hold but also maintain the aesthetic appeal of your project.
Before applying the adhesive, make sure both surfaces are completely dry. Moisture can create bubbles during the bonding process. So take your time and ensure everything is moisture-free before proceeding.
Now it’s time for the actual gluing process. Apply a thin layer of adhesive evenly onto one of the surfaces using a brush or applicator. Be careful not to use too much adhesive as excess can lead to bubbling issues.
Once the adhesive is applied, carefully align and press both surfaces together firmly but gently. Avoid any unnecessary movement during this step as it can introduce air bubbles into the bond.
To further minimize the risk of bubbles, consider using clamps or weights to hold the pieces in place while the adhesive cures. This will help maintain even pressure throughout and reduce any potential gaps where bubbles could form.
Finally, exercise patience as you allow ample time for the adhesive to cure fully. Follow the manufacturer’s instructions regarding drying times and avoid disturbing or manipulating the glued pieces until they have completely set.
By following these steps diligently, you can ensure a seamless and bubble-free bond when gluing acrylic.