Ever found yourself rocking a killer hairstyle with hair glue, only to dread the removal process later? Don’t fret. We’ve got your back with an all-inclusive guide on how to safely and effortlessly dissolve hair glue from your precious locks.
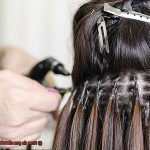
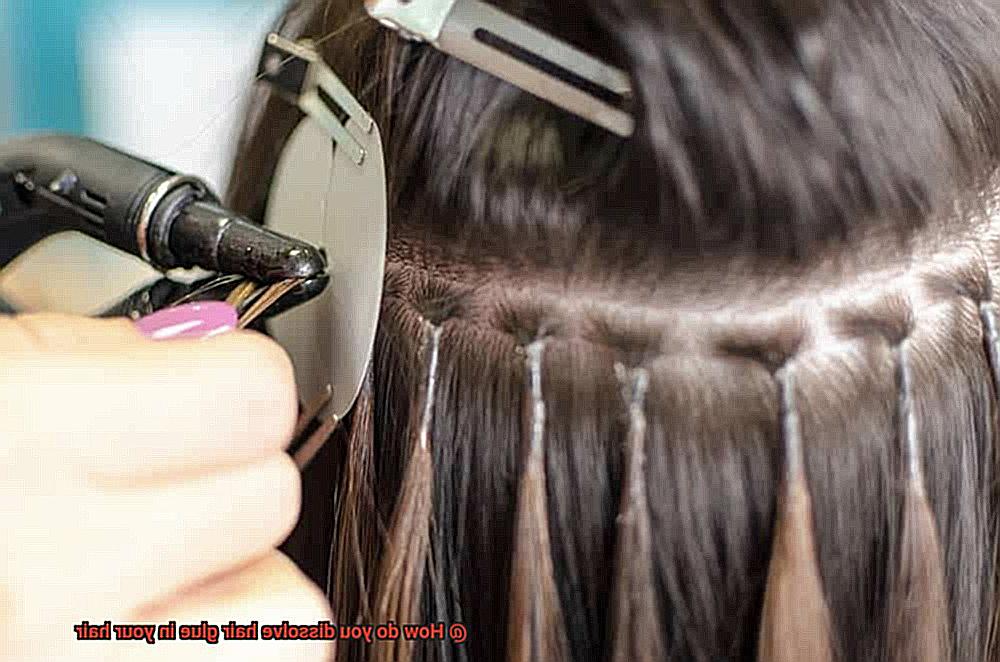
Hair glue is like a superhero adhesive, perfect for achieving gravity-defying styles or flawlessly securing wigs and extensions. But when it’s time for a change or if you accidentally get some glue on your natural hair, removing it can feel like a never-ending struggle. Yanking, tugging, or resorting to drastic measures can lead to damage and breakage – something we definitely don’t want for our fabulous mane.
In this blog post, we’ll take you by the hand and walk you through each step of dissolving hair glue in your hair without causing any harm. So whether you’re a DIY enthusiast or just want to be well-prepared before heading to the salon, get ready to bid farewell to hair glue with confidence and finesse.
Understanding the Basics of Hair Glue Removal
Contents
- 1 Understanding the Basics of Hair Glue Removal
- 2 Using an Oil-Based Solution to Dissolve Hair Glue
- 3 Steps for Removing Hair Glue with an Oil-Based Solution
- 4 Using Acetone as a Solvent to Dissolve Hair Glue
- 5 Steps for Removing Hair Glue with Acetone
- 6 Important Considerations When Removing Hair Glue
- 7 Professional Help for Stubborn Hair Glue
- 8 Conclusion
Embarking on the journey of hair glue removal may seem like a daunting task, especially for those who wear hair extensions or wigs. However, armed with the right knowledge and techniques, you can easily and safely dissolve and remove hair glue without causing any damage to your precious locks. In this comprehensive guide, we will walk you through each step and provide valuable tips to ensure a successful glue removal process.
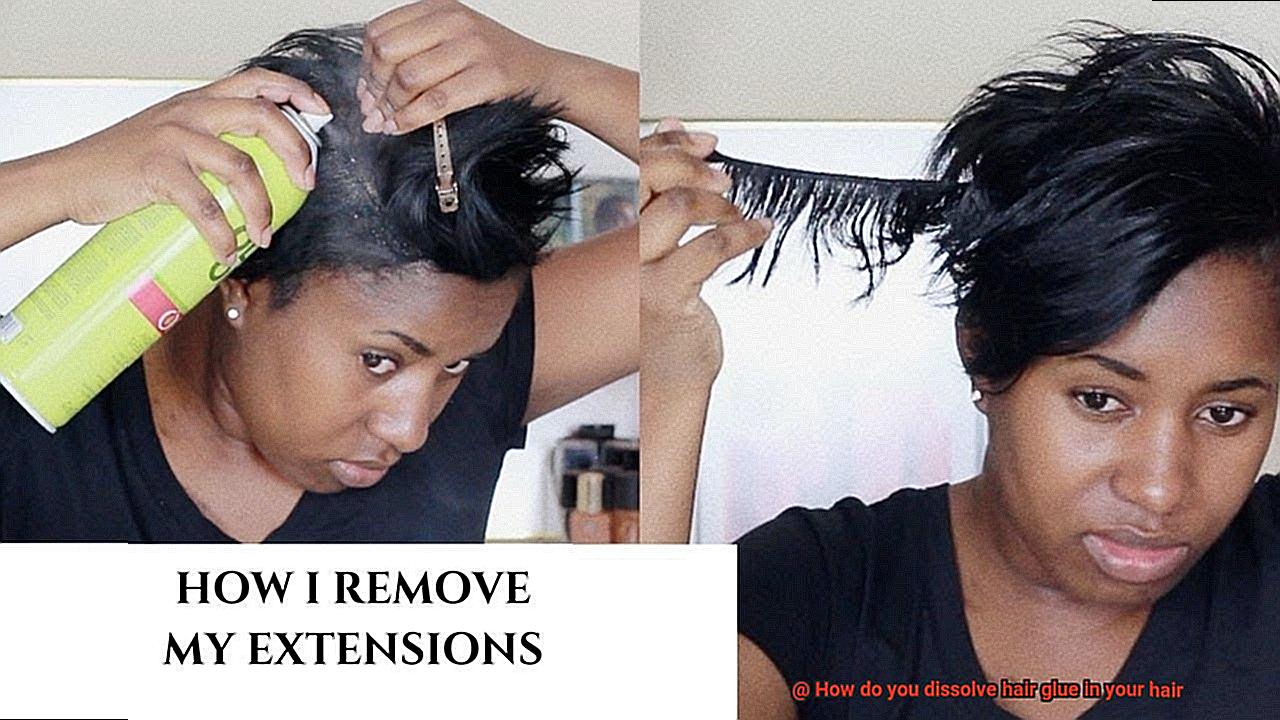
Step 1: Assemble Your Arsenal
Before diving into the hair glue removal process, it’s critical to have all the necessary tools at your disposal. These include a high-quality solvent or adhesive remover, soft cotton balls or pads, a wide-tooth comb for detangling, a fine-tooth comb for meticulous work, and a clarifying shampoo or gentle cleanser. Don’t forget to have a towel or old cloth handy to protect surfaces from any potential spills.
Step 2: Tame the Tangles
Using a wide-tooth comb, gently detangle your hair to eliminate any pesky knots or tangles that may have formed due to the presence of glue. This preliminary step will make it easier to navigate through your hair during the subsequent removal process.
Step 3: Unleash the Power of Solvent
Soak a cotton ball or pad generously with your chosen solvent or adhesive remover. With utmost care, gently rub the soaked cotton ball onto the area where the hair glue is residing. Employ a gentle circular motion to allow the solvent to work its magic, but be cautious not to exert excessive pressure.
Step 4: Embrace Patience and Let It Soak
After applying the solvent, grant it a few minutes to permeate your hair strands and dissolve the stubborn adhesive. The timing may vary depending on the specific type of glue you’re dealing with. To ensure accuracy, adhere to the instructions provided by the manufacturer or consult a professional hairstylist for expert guidance.
Step 5: Untangle the Web
Once the glue has softened, utilize a fine-tooth comb to delicately comb through your hair. This crucial step will aid in breaking down any lingering glue residue and ensure a thorough removal process. Exercise patience and refrain from pulling or tugging on your hair to prevent any unwanted breakage or damage.
Step 6: Purify and Revitalize
After meticulously combing through your hair, cleanse it with a clarifying shampoo or gentle cleanser. This final touch will eliminate any remaining traces of adhesive and restore the hair’s natural cleanliness and vitality. Follow up with a nourishing conditioner or deep conditioning treatment to replenish moisture and keep your tresses healthy.
Using an Oil-Based Solution to Dissolve Hair Glue
If you’ve ever found yourself battling with the stubborn remnants of hair glue, you know how infuriating it can be. But fear not, for there is a simple and natural solution – an oil-based product. Using oils like coconut oil, olive oil, or almond oil can effectively dissolve hair glue while being gentle on your precious locks.
Step 1: Warm up the oil
Start by warming up a small amount of your chosen oil until it transforms into a liquid concoction. You can achieve this by immersing the oil jar in warm water or giving it a quick zap in the microwave. Just remember not to overheat the oil, as we’re aiming for warm and cozy, not boiling hot.
Step 2: Apply the oil
Once your oil has reached its liquid state, generously apply it directly to the area of your hair that is plagued by stubborn glue. Gently massage the oil into your tresses, paying particular attention to the spots where the glue is clinging on for dear life. The warmth of the oil will work its magic in breaking down the adhesive properties of the glue.
Step 3: Let it marinate
After massaging the oil into your hair, give it some time to work its wonders. Allow the oil to sit and penetrate for about 15-20 minutes. To enhance its effectiveness, consider covering your hair with a shower cap or towel, trapping in the heat and creating a cozy cocoon of dissolution.
Step 4: Comb through
Once you’ve given the oil enough time to do its job, gently comb through your hair using a wide-toothed comb. This will help dislodge any loosened glue from your strands. Remember to handle your hair with care to avoid causing any damage or breakage.
Step 5: Repeat if necessary
Depending on the amount of glue present in your hair, you may need to repeat the process multiple times until all traces of hair glue are dissolved and banished from your locks. Patience and thoroughness are key in achieving the best results.
It’s important to note that coconut oil is not the only hero in this tale. Other oil-based solutions like olive oil and almond oil can also be used to dissolve hair glue effectively. These oils work in a similar fashion, allowing you to apply and massage them into your hair for successful removal of the glue.
After using an oil-based solution to dissolve hair glue, it’s crucial to give your hair some extra love and care. Thoroughly wash and condition your hair to remove any residue and restore moisture. If you have sensitive scalp or skin conditions or if you’re uncertain about using oil-based solutions, it’s always wise to seek professional assistance.
Steps for Removing Hair Glue with an Oil-Based Solution
Removing hair glue can be a frustrating and tedious task. However, with the right steps and an oil-based solution, you can easily say goodbye to that stubborn glue and hello to soft, smooth, and glue-free hair. Here’s a detailed guide on how to remove hair glue using an oil-based solution:
Step 1: Gather all the necessary materials. You will need:
- A bottle of oil (olive oil, coconut oil, or baby oil)
- A wide-toothed comb or brush
- A towel or old cloth
- A shampoo specifically designed for removing adhesive or glue
- Step 2: Apply a generous amount of oil to the affected area. Make sure to saturate your hair completely with the oil, paying extra attention to the areas where the glue is most concentrated. This will help loosen the adhesive bond and make it easier to remove.
- Step 3: Massage the oil into your hair and scalp. Take your time and be thorough in this step, ensuring that the oil penetrates deep into the strands to dissolve the glue effectively.
- Step 4: Cover your head with a towel or old cloth. This creates a warm and moist environment that aids in breaking down the glue. Leave the towel on for at least 30 minutes to let the oil work its wonders.
- Step 5: After the waiting period, use a wide-toothed comb or brush to gently comb through your hair. Start from the ends and work your way up to the roots, being careful not to tug or pull on any knots or tangles. The oil should have loosened the glue enough for it to easily detach from your hair strands.
- Step 6: As you comb through, you may notice small clumps of glue coming off. Use your fingers or a tissue to remove these clumps from your hair. Avoid forcing or pulling on any remaining glue, as this could cause damage.
- Step 7: Wash your hair with a shampoo specifically designed for removing adhesive or glue. Follow the instructions on the bottle and make sure to thoroughly rinse your hair afterward.
- Step 8: Gently pat your hair dry with a towel. Avoid rubbing or vigorously towel-drying your hair, as this can cause damage or frizz. Instead, gently squeeze out any excess water and allow your hair to air dry or use a blow dryer on a low heat setting.
- Step 9: If there is still residual glue left in your hair, repeat the process until it is fully dissolved. Some hair glues may be more stubborn and require multiple treatments.
- Step 10: After all the glue has been removed, it’s important to nourish and moisturize your hair. Apply a leave-in conditioner or hair mask to restore moisture and repair any damage caused by the glue removal process.
Using Acetone as a Solvent to Dissolve Hair Glue
Fear not. In this comprehensive guide, we will embark on a journey into the enchanting realm of acetone, a formidable solvent capable of dissolving even the most resilient hair glue. So, gather your trusty cotton balls and wield your wide-tooth comb as we delve into the art of effortlessly bidding adieu to sticky situations.
Why Acetone?
Acetone, a versatile solvent celebrated for its adhesive-breaking prowess, is renowned in various industries, including beauty and hair care. Often found in nail polish removers, acetone rises to the challenge of removing hair glue with equal flair. Its mighty powers lie in its ability to dismantle the chemical bonds within the glue, rendering it susceptible to dissolution and removal from your precious tresses.
Precautions:
Before embarking on your acetone adventure, it is vital to exercise caution. Given its potential to dry out hair, conducting a patch test on a small strand is imperative to ensure compatibility. By doing so, you can ascertain whether any adverse reactions will occur. Additionally, don’t forget to pamper your tresses with deep conditioning treatments post-removal to replenish moisture and nourishment.
The Dissolving Process:
Now, let us embark on an odyssey through the steps required to harness acetone’s magic and dissolve hair glue:
Gather your arsenal: Equip yourself with acetone, cotton balls or pads, and a wide-tooth comb.
- The saturation station: Imbue a cotton ball or pad with acetone and gently dab it onto the area adorned by hair glue. Allow a few minutes for acetone to penetrate and dismantle the adhesive bonds.
- The comb’s gentle dance: With finesse, glide a wide-tooth comb through your hair, coaxing the loosened glue to relinquish its grip. Remember, patience and gentleness are essential to prevent damage.
- Repeat the enchantment: Should stubborn remnants of glue persist, repeat the process until they succumb entirely to acetone’s dissolving charm.
Post-Glue Removal Care:
Congratulations on achieving liberation from the clutches of hair glue. However, an additional step awaits to ensure your strands remain resilient and lustrous. Wash your hair meticulously with a clarifying shampoo, banishing any trace of acetone or residual glue. Follow this with a sumptuous deep conditioning treatment to restore moisture and vitality to your magnificent mane.
Steps for Removing Hair Glue with Acetone
Well, fret no more. Let me guide you through the simple steps for removing hair glue with acetone. Acetone, a powerful solvent, will break down the adhesive properties of the glue and set you free from those sticky situations. So, let’s dive in.
First and foremost, it’s crucial to protect your skin and scalp. Apply a thin layer of petroleum jelly or a barrier cream around the hairline to prevent any irritation or dryness.
Now, grab a cotton ball or pad and saturate it with acetone. Gently dab it onto the areas where the hair glue is stubbornly clinging. Allow the acetone to work its magic for a few minutes, penetrating and dissolving the adhesive.
Once the glue has softened, it’s time to loosen it up. Use a fine-tooth comb or your nimble fingers to gently comb through the hair, freeing it from the clutches of the glue. Repeat this process until you’ve eradicated all traces of hair glue.
Now, rinse your hair thoroughly with warm water. This will remove any residue left behind by the acetone, leaving your locks fresh and clean.
But wait, we’re not done just yet. To replenish moisture and nourishment in your hair, apply a deep conditioning treatment. This will combat any dryness caused by the acetone and restore your locks to their lustrous glory.
Congratulations. You’ve successfully bid farewell to hair glue with acetone. Your fabulous mane is now ready to shine with confidence. As a word of caution, always prioritize safety when using acetone and consult a professional if you have any concerns.
Important Considerations When Removing Hair Glue
Hair glue can be a lifesaver when it comes to creating fabulous hairstyles, but when it comes time to remove it, things can get messy. The key to safely and effectively removing hair glue lies in understanding the type of glue used, considering the condition of your natural hair, and taking necessary precautions. In this article, we will delve into the important considerations and provide you with expert tips on how to remove hair glue like a pro.
Understanding the Type of Glue:
Hair glues come in different forms, with solvent-based and water-based glues being the most common. Solvent-based glues are tougher to remove and require specific solvents or adhesive removers designed for hair glue removal. Water-based glues, on the other hand, can be removed with warm water and gentle shampoo. Knowing which type of glue you’re dealing with is essential as it determines the best removal method.
Consider Your Natural Hair:
Before attempting to remove hair glue, assess the condition of your natural hair. If your hair is already damaged or weak, it’s crucial to strengthen it beforehand by using deep conditioning treatments and protein treatments. This will help minimize breakage during the removal process and ensure the health of your hair.
Patience is Key:
Removing hair glue takes time and patience. Rushing through the process can result in unnecessary damage or breakage. Work in small sections, gently loosening the glue with your fingers or a wide-tooth comb. Take breaks if needed and always prioritize the health of your hair over speed.
Protect Your Scalp:
While removing hair glue, it’s important to protect your scalp from irritation or injury. Avoid scratching or picking at the glue as this can lead to discomfort. If you experience any irritation or discomfort, stop immediately and seek professional assistance.
Thoroughly Cleanse and Condition:
After successfully removing the hair glue, it’s crucial to cleanse and condition your hair thoroughly. Residual glue or adhesive removers can leave a sticky residue, so using a clarifying shampoo is recommended to remove any leftover residue. Follow up with a deep conditioning treatment to restore moisture and nourish your hair.
Professional Help for Stubborn Hair Glue
When it comes to stubborn hair glue that seems impossible to remove, seeking professional help is the way to go. Professional hairstylists and hair care specialists have the knowledge and experience to tackle even the most stubborn cases. They know just what products and techniques to use to safely dissolve that adhesive without causing any harm to your precious locks.
One secret weapon in their arsenal is the use of specialized solvents designed specifically for hair glue removal. These solvents are carefully applied to the affected areas of your hair, allowing them to penetrate and break down that stubborn adhesive. And the best part? Professionals have access to high-quality combs and tools that are both gentle and effective in removing the glue without causing any breakage or damage.
In some cases, heat may also be applied during the removal process. Professionals use top-of-the-line hair dryers or specialized heating tools to soften the glue, making it easier to dissolve and remove. This technique requires precision and expertise, ensuring that your hair stays intact while bidding farewell to that pesky glue.
But it doesn’t stop there. Professionals also provide valuable aftercare advice. They can recommend products and routines that will help restore and protect your hair after the removal process. It’s like a complete package deal – glue removal and hair restoration all in one.
fLfTTt3Dw6g” >
Also Read: How To Remove Glue In Hair Extensions?
Conclusion
In conclusion, fear not the task of removing hair glue from your precious locks. Armed with knowledge, techniques, and tools, you can effortlessly dissolve hair glue without causing damage or breakage.
Whether you opt for a solvent or adhesive remover, an oil-based solution like coconut oil or acetone, follow the step-by-step process outlined in this guide. Assemble your arsenal of tools, gently comb through your hair, and thoroughly cleanse and condition afterward. Each step plays a vital role in achieving successful glue removal.
Consider important factors such as understanding the type of glue used, assessing the condition of your natural hair, practicing patience throughout the process. Seek professional help if needed. These considerations ensure that you approach hair glue removal with care and achieve optimal results.
Prioritize the health of your hair throughout the process. Deep conditioning treatments, protein treatments, and nourishing products will restore moisture and vitality after removing the glue.
Bid adieu to hair glue woes confidently and gracefully.