Picture this: you’re embarking on a thrilling construction or woodworking project, and suddenly, you find yourself faced with the challenge of attaching wood to concrete. Whether you’re constructing a deck that will host unforgettable summer gatherings, installing baseboards that will add a touch of elegance to your home, or building a sturdy shed foundation for all your storage needs, knowing how to securely fasten wood to concrete is crucial.
Now, I know what you might be thinking – it sounds like an intimidating task. But fear not. In this guide, we’ll unravel the secrets and empower you with step-by-step instructions on how to affix wood to concrete like a seasoned pro.
We’re not here to bore you with dry explanations or leave you feeling overwhelmed by technical jargon. Nope. We’ve got your back with an arsenal of techniques that are both effective and surprisingly simple. From tried-and-true methods like adhesive bonding, anchor bolts, and concrete screws, to cutting-edge solutions involving epoxy resins and mechanical connectors – we’ve got options galore for every type of concrete surface.
But wait, there’s more. We won’t just stop at showing you the methods. We’ll also delve into the importance of pre-drilling (a game-changer in its own right), ensuring perfect alignment for flawless results, and safety precautions that will keep your fingers intact throughout the process.
So buckle up, my friend. Join us as we embark on this exhilarating journey into the world of attaching wood to concrete. Together, we’ll unlock the secrets behind achieving rock-solid connections that stand the test of time. Grab your trusty tools because it’s time to dive headfirst into mastering the art of wood-to-concrete fastening.
What is Affixing Wood to Concrete?
Contents
Affixing wood to concrete is crucial for creating a strong and durable connection in construction and design projects. Whether you’re installing flooring, building walls, or creating decorative elements, knowing the right method is essential. In this guide, we will explore two main methods: adhesive and mechanical fasteners.
Method 1: Adhesive
Prepare the surface:
- Remove dust and debris by sweeping or vacuuming.
- Eliminate stubborn stains or dirt with a damp cloth.
Choose the right adhesive:
- Look for construction adhesives designed for bonding wood to concrete.
- Opt for epoxy adhesives known for their strong and durable bonds.
Apply the adhesive:
- Follow manufacturer’s instructions for application and drying time.
- Ensure even coverage on both surfaces with an appropriate amount of adhesive.
Press wood onto concrete:
- Firmly press wood onto the concrete surface, aligning it properly.
- Apply even pressure for a strong bond.
Method 2: Mechanical fasteners
Prepare the surface:
Drill holes:
- Use a masonry drill bit to create holes in the concrete at suitable intervals.
- Pre-drill corresponding holes in the wood material.
Insert anchors:
Secure wood with screws or bolts:
- Align wood with anchor holes and insert screws or bolts through both materials.
- Tighten securely, avoiding overtightening.
Additional tips:
- Use metal connectors or brackets for added support in high-stress areas.
- Choose the appropriate method based on project requirements and load-bearing capacity.
- Consult professionals or follow manufacturer guidelines for proper installation.
Adhesive Bonding Method
If you’re seeking a reliable and efficient way to create a robust bond between these two materials, adhesive bonding is the go-to solution. Let’s dive into a step-by-step guide to help you master this technique.
- Step 1: Select the perfect adhesive for your project. Options abound, including epoxy, polyurethane, and construction adhesive. Consider your project’s specific needs and choose an adhesive that meets your requirements.
- Step 2: Prepare the surfaces meticulously. Cleanliness is paramount. Ensure both the wood and concrete surfaces are devoid of dust, dirt, and debris. Give that concrete surface a thorough scrub with a wire brush or scraper to eliminate any loose material. If necessary, lightly sand or roughen the wood surface to enhance adhesion.
- Step 3: Follow the manufacturer’s instructions when applying the adhesive. Grab a trowel, brush, or recommended applicator and spread the adhesive evenly on both the wood and concrete surfaces. Ensure sufficient coverage for a robust bond.
- Step 4: Press the wood firmly onto the concrete surface. Utilize clamps or weights to hold everything in place until the adhesive cures completely. Apply even pressure for optimal contact between the materials.
- Step 5: Exercise patience. Allow ample time for the adhesive to cure fully before subjecting the bond to any stress or load. Protect it from excessive moisture or temperature fluctuations during this curing process to guarantee top-notch performance.
There you have it. You’ve successfully bonded wood to concrete using the power of adhesives.
Now, let’s delve into the benefits and drawbacks of this method. Adhesive bonding offers convenience, versatility, and durability, making it an excellent choice for various applications, from construction projects to furniture making. However, it’s crucial to select an adhesive tailored specifically to your needs and follow proper surface preparation and curing techniques.
Choosing an Adhesive
Choosing the right adhesive is paramount when it comes to affixing wood to concrete. The adhesive acts as the superhero, holding everything together and creating a strong and durable bond between these two materials. So, what factors should you consider when selecting an adhesive for this task?
Strength is of utmost importance. Look for an adhesive that boasts high bonding strength to ensure your wood stays firmly in place on the concrete surface. It should be able to withstand any external forces or stresses that may be applied to the bond.
Drying time is another crucial factor to consider. Some adhesives dry quickly, allowing you to move on with your project efficiently. Others may take longer to cure, requiring you to wait before proceeding. Choose an adhesive that aligns with your project timeline and requirements.
Compatibility is key. Ensure the adhesive is formulated to work well with both wood and concrete surfaces. Some adhesives are designed for exterior use or high-moisture environments, so keep your specific needs in mind.
Consider the application method as well. Some adhesives come in tubes, making them easy to apply with a caulking gun. Others require mixing before use. Choose an application method that suits your skills and preferences.
Don’t overlook surface preparation. Cleaning and roughening both the wood and concrete surfaces will enhance adhesion and create a stronger bond. Follow the manufacturer’s instructions regarding surface prep and curing time to achieve optimal results.
Lastly, think about your project requirements. Are you looking for load-bearing capacity or flexibility? These factors will help you determine the best adhesive for your wood-to-concrete bonding adventure.
Applying the Adhesive
In the world of construction, a powerful adhesive is like a reliable sidekick that holds everything together when it comes to joining wood and concrete. In this article, we will explore the fascinating process of applying adhesive when affixing wood to concrete, unlocking the secrets to a strong and durable connection that can withstand the test of time.
Choosing the Right Adhesive:
The key to a successful wood-to-concrete bond lies in selecting the right adhesive. Construction adhesive is a popular choice due to its ability to bond porous and non-porous materials. Look for a high-quality construction adhesive in a tube or cartridge, easily applied using a caulking gun.
Surface Preparation:
To ensure a strong bond, proper surface preparation is crucial. Both the wood and concrete surfaces should be clean, dry, and free from dust, debris, or grease. Use a wire brush or scraper to remove any loose particles or paint from the concrete surface.
Applying with Precision:
Now it’s time to unleash the power of your adhesive. Apply a generous amount of construction adhesive onto the concrete surface in a zigzag pattern. This ensures even coverage and allows air pockets to escape as you press the wood onto the concrete.
Firm Pressure for Bonding:
Pressing the wood onto the adhesive-covered concrete surface requires precision and care. Align the wood correctly before applying firm pressure. To prevent any movement or shifting during bonding, use clamps or weights to hold the wood in place while the adhesive cures.
Allowing for Proper Curing:
While our superhero adhesive works its magic, it needs time to cure properly. Curing time can vary based on temperature and humidity, so follow the manufacturer’s instructions. It’s recommended to allow at least 24 hours for the adhesive to fully cure before subjecting it to any stress or load.
Exploring Alternative Adhesive Options:
Construction adhesive is not the only option in our superhero arsenal. Epoxy adhesives, polyurethane adhesives, and specialized wood-to-concrete adhesives offer unique properties and strengths. Choose the right adhesive based on your specific project requirements to achieve the best results.
Mechanical Fasteners
When it comes to joining wood and concrete, mechanical fasteners are the unsung heroes of construction. These reliable connectors provide a secure and durable bond that can withstand the test of time. In this article, we will explore the different types of mechanical fasteners used to attach wood to concrete and delve into their installation processes. Let’s dive in.
Concrete Anchors:
Concrete anchors are the backbone of fastening wood to concrete, providing stability and strength. There are several types of concrete anchors available:
- Wedge Anchors: These mighty anchors expand within the concrete when tightened, creating a tight fit that ensures a strong connection.
- Sleeve Anchors: With their expandable sleeves, these anchors grip the concrete upon installation, providing a secure bond.
- Expansion Anchors: As their name suggests, these anchors expand within the concrete when installed, creating a hold that won’t budge.
Concrete Screws:
Concrete screws offer a convenient alternative to traditional screws when working with concrete surfaces. Their unique thread design allows them to grip into the concrete tightly, providing a secure attachment. Many concrete screws also come with special coatings or treatments to prevent corrosion and increase durability.
Other Mechanical Fasteners:
In addition to anchors and screws, there are other mechanical fasteners suitable for attaching wood to concrete:
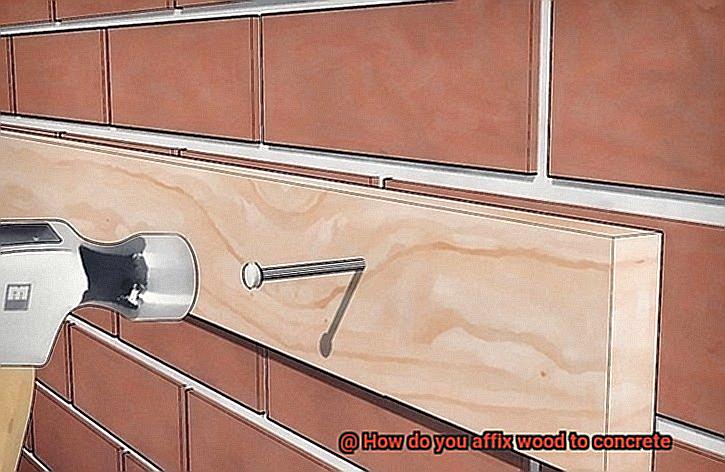
- Concrete Nails: These tough nails are driven directly into the concrete using a hammer or nail gun, ensuring a quick and reliable connection.
- Concrete Bolts: For a strong and secure bond, concrete bolts require pre-drilled holes in both the wood and concrete surfaces for installation.
Installation Process:
Proper installation is crucial for the effectiveness of mechanical fasteners. Here are some general guidelines:
- Follow Manufacturer’s Instructions: Always refer to the manufacturer’s instructions for specific installation requirements, ensuring you achieve optimal results.
- Surface Preparation: Before installation, make sure both the wood and concrete surfaces are clean and free from dust or debris. This ensures a smooth and secure attachment.
- Choose the Right Fastener: Consider factors such as load requirements, moisture exposure, and environmental conditions when selecting the appropriate fastener. This ensures that your fastener can withstand the specific demands of your project.
- Drilling Holes: Depending on the type of fastener, you may need to drill holes in the wood and/or concrete surfaces. Properly sized and positioned holes are essential for a secure and strong connection.
- Apply Correct Torque or Pressure: Follow the recommended torque or pressure specifications during installation to achieve a secure connection. This ensures that the fastener is tightened properly without causing any damage.
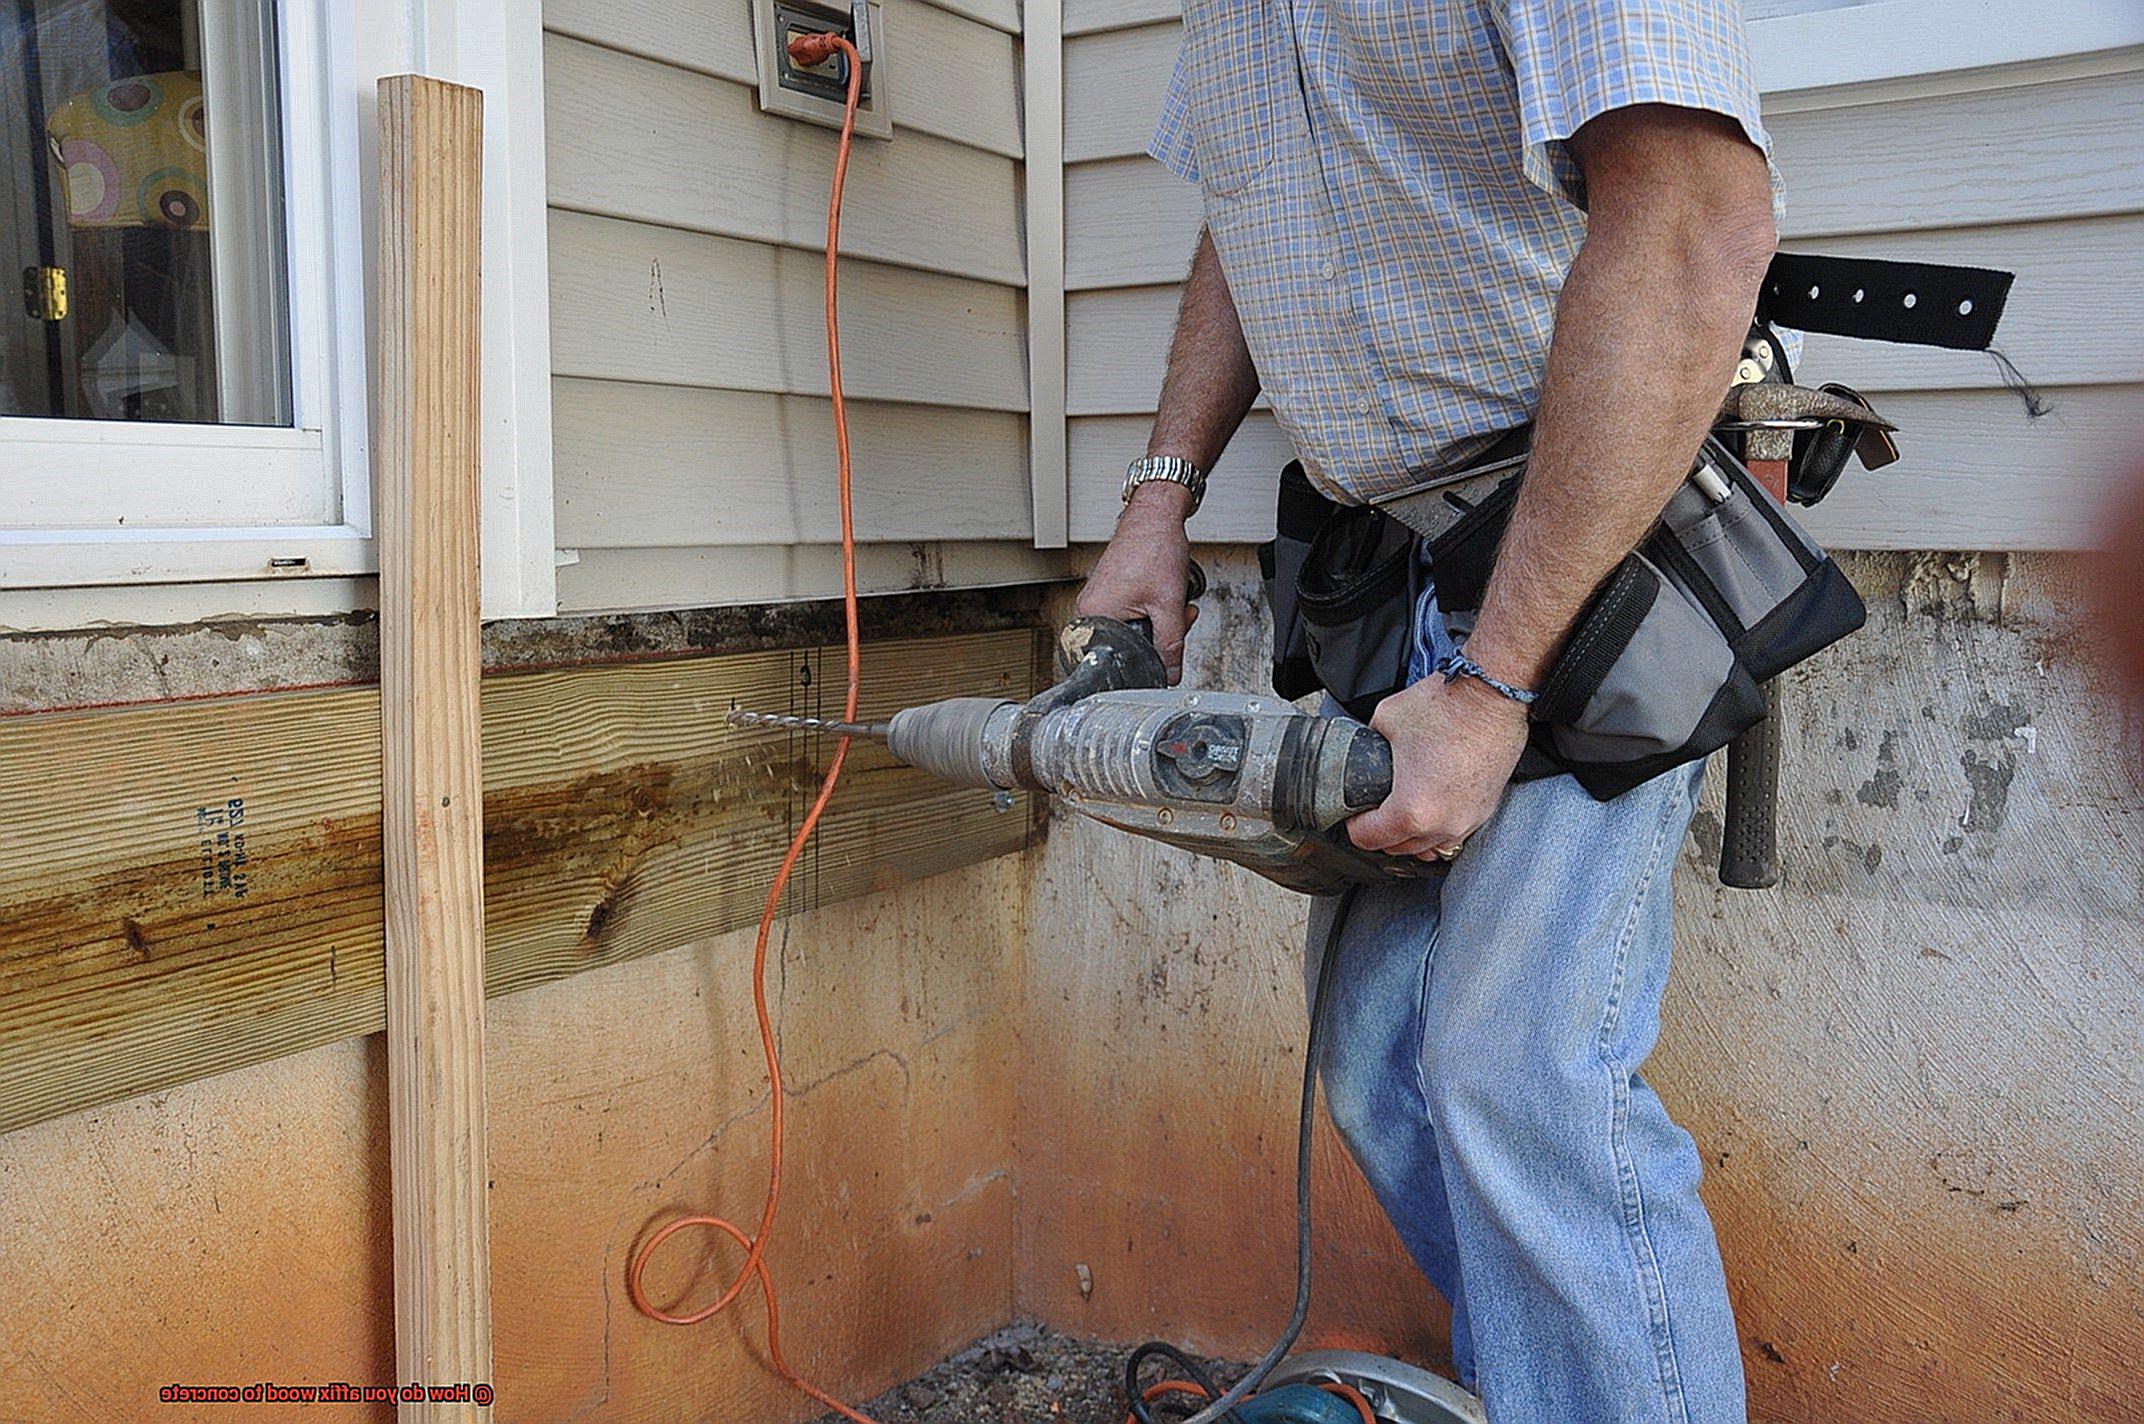
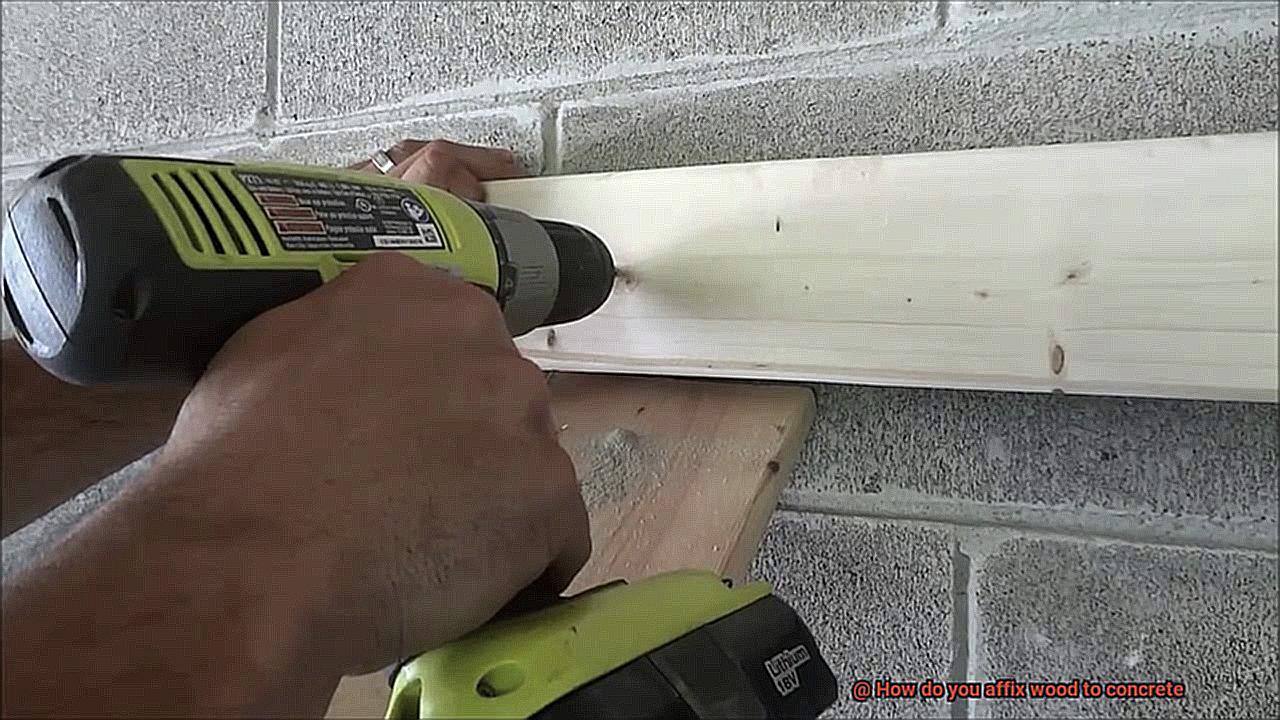
Drilling Holes and Inserting Anchors
Step into the world of drilling holes and inserting anchors, where wood and concrete unite in a symphony of strength. Whether you’re an avid DIYer or a seasoned pro, this comprehensive guide will take you on a journey through the process, guaranteeing secure and long-lasting results. So grab your tools and let’s dive in.
Essential Tools:
Before embarking on this adventure, make sure you have the right gear. Equip yourself with a trusty hammer drill, masonry drill bits, anchors, screws, a screwdriver, and a measuring tape. Remember to select the appropriate size of drill bit and anchor based on the thickness of your wood and the type of anchor you’re using. And don’t forget to prioritize safety by wearing goggles and gloves during this hands-on experience.
Locating Studs:
Just like treasure hunters rely on maps, we need to locate our studs. Tap into the wood surface or employ a stud finder to mark their positions on the concrete. This step guarantees that our holes are drilled precisely where they’re needed for optimal support.
The Drilling Experience:
Now it’s time to unleash the power of our hammer drill. Attach the correct drill bit size and position it perpendicular to the wood surface. Apply steady pressure while drilling, keeping in mind that drilling through concrete demands patience and persistence. Maintain a consistent drilling speed and let the drill work its magic.
Cleaning House:
Once our holes are drilled, it’s time for some spring cleaning. Clear away any dust or debris from the holes using a reliable vacuum cleaner or brush. We want those anchors to glide in effortlessly without any obstructions.
Inserting Anchors:
Now comes the satisfying part – inserting our anchors. Gently tap them into the holes using a hammer until they sit flush with the wood surface. Ah, the sound of progress.
Securing the Connection:
Place the wood over the anchors, aligning it precisely to your desired position. Grab your screwdriver or power drill with a screwdriver bit and drive those screws through the wood and into the anchors. Remember, tighten them securely without going overboard – we want a strong connection, not a cracked concrete surface.
Choose Your Anchor Wisely:
Just like people, anchors come in all shapes and sizes. There are expansion anchors, sleeve anchors, and wedge anchors, each with its own installation instructions and weight-bearing capacities. Be sure to select the right anchor type based on your project’s weight and load requirements.
Additional Reinforcement
Look no further. In this guide, we’ll explore the exciting world of additional reinforcement strategies, uncovering the methods and products that will give your projects that extra support they need.
Concrete Screws and Anchors:
Concrete screws and anchors are like trusty sidekicks when it comes to additional reinforcement. These mighty screws are specially designed to be used with concrete, providing a secure attachment point for wood. Sleeve anchors, wedge anchors, and tapcon screws are just a few examples of the different types available, each suited for specific applications. Imagine them as superheroes, ensuring a reliable bond between wood and concrete.
Proper Surface Preparation:
Before diving into action, proper surface preparation is crucial. Drill holes into the concrete, making sure they match the screw size and depth requirements. This step is essential for a solid connection and prevents any future mishaps. Once the holes are ready, position your wood over them and insert those screws with ease using a power drill. Remember not to overtighten them, as we don’t want any damage to our beloved wood or concrete.
Adhesive Products:
But wait, there’s more. Enter the world of adhesives, where chemistry meets creativity. Adhesive products specifically designed for bonding wood to concrete are another fantastic option for additional reinforcement. Epoxy, polyurethane, or construction adhesive – you name it. These products create a strong chemical bond between wood and concrete surfaces, sealing the connection with confidence.
Surface Preparation and Application:
To get started with adhesives, cleanliness is key. A squeaky clean surface is vital for a strong bond. Remove any dirt or debris that could hinder adhesion. Apply a generous amount of adhesive onto one surface – either wood or concrete – and then press the two surfaces together firmly. You can use clamps or other support mechanisms to hold them in place while the adhesive cures. Picture the adhesive as a superhero glue, bringing wood and concrete together in an unbreakable embrace.
The Power of Combination:
Now here’s an insider tip: sometimes, combining the power of concrete screws and adhesive can create an even stronger bond. This dynamic duo is perfect for heavy loads or when dealing with uneven or damaged concrete surfaces. With this tag team approach, you’ll achieve a bond that’s as solid as a rock.
Conclusion:
So there you have it – the methods and products to reinforce your wood-to-concrete connection. Concrete screws and anchors, along with adhesive products, are your secret weapons for achieving a strong and durable bond. Just remember to follow instructions, choose the right products for your project, and prepare the surface like a pro.
Factors to Consider When Choosing a Method
When it comes to choosing a method for affixing wood to concrete, there are several important factors to consider. These factors will help ensure a strong and durable connection that meets the specific needs of your project. Here are the key factors to keep in mind:
- Strength and Durability: The method you choose should provide a bond that can withstand the test of time. While screws and bolts may offer a stronger connection, adhesive options have improved significantly and can now provide impressive strength and durability.
- Load-Bearing Capacity: Consider the weight-bearing requirements of your project. Will the wood need to support heavy loads or weight-bearing structures? Choose a method that can handle the expected weight without compromising the bond. Look for adhesives specifically formulated for high load-bearing applications.
- Moisture Resistance: If your installation will be exposed to water or high humidity levels, choose an adhesive with good moisture resistance. There are products designed for outdoor or wet environments that will ensure your bond stays strong even in damp conditions.
- Flexibility: In some cases, the wood may expand or contract due to temperature changes. Choose a flexible adhesive with some elasticity to accommodate this natural movement without compromising the bond. This is especially important for long-term durability.
- Aesthetics: Consider how visible you want the affixing method to be once installed. Adhesives can offer a clean and seamless look compared to surface-mounted brackets or connectors, making them a preferred choice for a more discreet appearance.
- Ease of Installation: Consider your own skills and resources when choosing a method. Some methods require specialized tools or skills, while others are more accessible for DIY enthusiasts. Glue, in particular, is often easy to work with and suitable for both professionals and beginners.
- Reversibility: If you anticipate the need to remove or disassemble the wood from the concrete in the future, choose a method that allows for easy undoing without causing damage. Certain adhesives or mechanical fasteners can offer this flexibility, making them ideal for temporary installations or situations where modifications are expected.
5cp-ZsLZQnk” >
Conclusion
Affixing wood to concrete can be a challenging task, but with the right techniques and materials, it is definitely achievable. One method is using adhesive, such as construction adhesive or epoxy, to bond the wood to the concrete surface. Before applying the adhesive, make sure both surfaces are clean and free from dust and debris. Apply a generous amount of adhesive onto the concrete and press the wood firmly against it. Use clamps or weights to hold the wood in place until the adhesive dries completely.
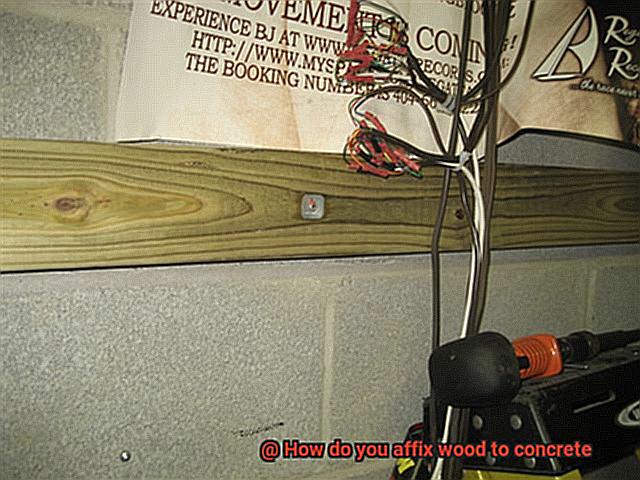
Another option is to use mechanical fasteners like screws or nails. To do this, you will need to pre-drill holes into the wood and then use a masonry drill bit to create corresponding holes in the concrete. Insert anchors into these holes and then secure the wood by driving screws or nails through it and into the anchors. This method provides a strong and reliable connection between the wood and concrete.
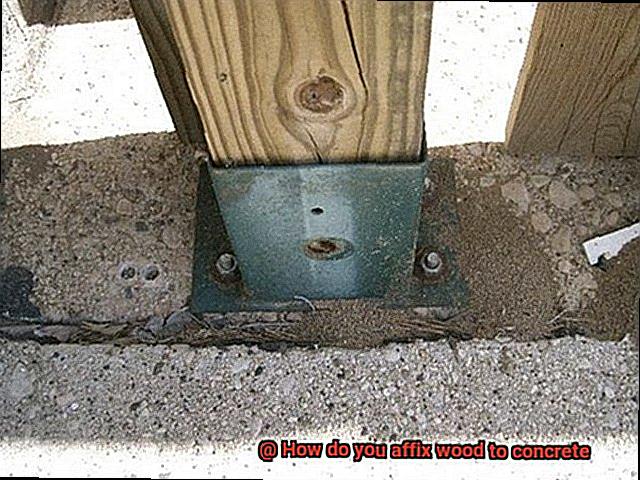
For added stability, you can also consider using brackets or metal connectors specifically designed for attaching wood to concrete. These can be installed by drilling pilot holes into both materials and then securing them together using screws or bolts.
No matter which method you choose, it’s important to ensure that your wood is properly treated with weather-resistant coatings or sealants before affixing it to concrete. This will help protect it from moisture damage and prolong its lifespan.
In conclusion, affixing wood to concrete requires careful preparation, proper materials, and precise execution. Whether you opt for adhesives, mechanical fasteners, or specialized connectors, following these steps will help you achieve a secure attachment that withstands the test of time.