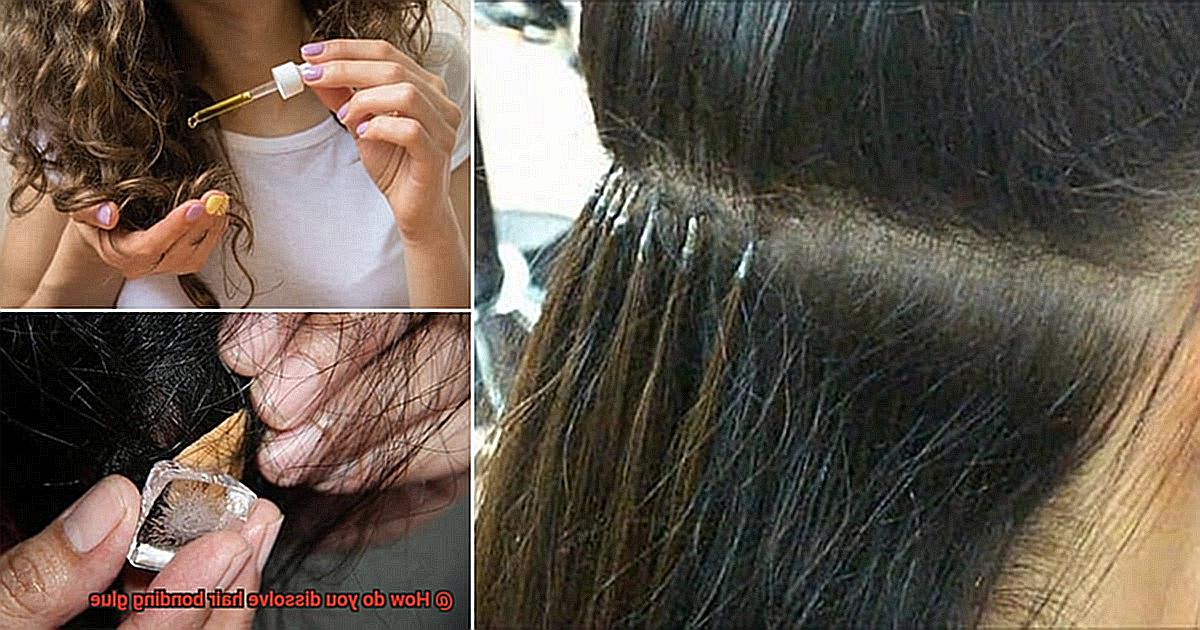
Ever found yourself in a sticky situation, desperately trying to dissolve hair bonding glue? Trust me, you’re not alone.
Whether you’re a pro stylist or just a hair enthusiast, we’ve all been there. But fear not, my friend.
In this blog post, we’ll explore the magical world of hair bonding glue removal. We’ll break it down for you with easy-to-follow methods and solutions that actually work.
Let’s jump right in and find the perfect solution to dissolve hair bonding glue.
What is Hair Bonding Glue?
Contents
- 1 What is Hair Bonding Glue?
- 2 Why Is It Important to Remove Hair Bonding Glue?
- 3 Different Methods for Dissolving Hair Bonding Glue
- 4 Acetone as a Solvent for Removing Hair Bonding Glue
- 5 Applying Acetone to Dissolve Hair Bonding Glue
- 6 Removing the Extensions or Wig After Dissolving the Glue
- 7 Cleanse the Hair and Scalp After Removal
- 8 Follow Up with a Deep Conditioning Treatment
- 9 Conclusion
Look no further than hair bonding glue, a magical adhesive that can work wonders on your locks. In this article, we will explore the world of hair bonding glue, its purpose, types, advantages, and considerations. Get ready to embark on a journey of stunning hair transformations.
What is Hair Bonding Glue?
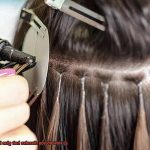
Hair bonding glue is an adhesive specifically formulated to attach hair extensions or hairpieces to your natural hair. It is a game-changing technique that allows you to experiment with different hairstyles without making permanent changes. This glue, composed of fast-drying cyanoacrylate and other chemicals, creates a strong and durable bond between your natural hair and the extensions or hairpiece.
Types of Hair Bonding Glue:
- Black Hair Bonding Glue: Tailored for individuals with dark or black hair, this glue seamlessly blends in with their natural hair color.
- Clear Hair Bonding Glue: Designed for those with lighter or colored hair, clear glue provides an inconspicuous attachment while ensuring secure placement of the extensions.
Uses and Advantages:
- Versatility: Hair bonding glue opens up a realm of styling possibilities. Whether you desire flowing tresses, voluminous waves, or an elegant updo, this adhesive allows you to effortlessly experiment with various hairstyles.
- Durability: When applied correctly and maintained properly, hair bonding glue can withstand regular washing, styling, and daily activities without compromising the bond’s strength.
- Non-permanent: Unlike permanent methods like fusion or weaving, hair bonding glue offers the flexibility to remove extensions or wigs whenever desired, allowing you to switch up your look as often as you like.
Disadvantages and Considerations:
- Professional Application: To ensure the health of your natural hair, it is crucial to have hair bonding glue applied by a professional with experience in its use. This helps prevent any potential damage.
- Regular Touch-ups: Depending on your hair’s growth rate and the bond’s durability, occasional touch-ups may be required to maintain a secure attachment.
- Proper Removal: Removing hair bonding glue requires careful attention to prevent damage. While acetone can be used to dissolve the glue, caution must be exercised as it can be harsh on the hair and scalp.
Why Is It Important to Remove Hair Bonding Glue?
Hair bonding glue may seem like a convenient solution for attaching extensions or weaves to your natural hair, but it is crucial to remove it properly. Leaving the glue on for too long can have detrimental effects on your hair, causing breakage, thinning, and discomfort. Additionally, failing to remove the glue completely can lead to irritation, itching, and even infections on the scalp.
The presence of residual glue also poses challenges when it comes to styling and caring for your hair. It interferes with washing, conditioning, and applying other hair products, making it difficult to maintain healthy and manageable hair.
Removing hair bonding glue allows for a fresh start and gives your hair a chance to breathe and thrive. It promotes healthy growth and overall hair health by eliminating the weight and build-up caused by the glue.
To remove the bonding glue, there are various methods available. You can use adhesive removers specifically designed for this purpose or try natural oils like coconut or olive oil. Some people swear by DIY home remedies such as baking soda or vinegar. However, it is essential to follow proper instructions and take precautions to avoid further damage. If you are unsure about safely removing the glue yourself, it is best to seek professional help from a hairstylist or hair care expert who has the expertise and tools needed for safe removal.
Different Methods for Dissolving Hair Bonding Glue
I’m here to share some valuable insights on different methods to dissolve that pesky glue and liberate your locks. Let’s dive right in.
- Acetone: This mighty solvent is a go-to option for breaking down hair bonding glue. But tread carefully, my friends. Acetone can be potent, so use it sparingly and avoid contact with your skin or other parts of your hair. Handle with care.
- Oil-based substances: If you prefer a gentler approach, try using the nourishing powers of coconut oil or olive oil. These natural oils work wonders in loosening the glue and making it easier to comb out. Simply apply the oil, wait a few minutes, and gently work through those tangled strands.
- Alcohol-based products: Rubbing alcohol or even vodka, besides being good for cocktails, can also come to your rescue in dissolving hair bonding glue. These products effectively break down the glue, but remember to use them judiciously as they can be drying on your hair and scalp.
- Trial and error: Different glues may require different removal methods, so don’t be afraid to experiment a little. However, if you’re unsure about what you’re doing, it’s always wise to consult a professional hairstylist or extension specialist for guidance.
Remember, folks, taking proper care of your hair and scalp throughout this process is crucial. So, if you feel overwhelmed or uncertain, seek professional help to minimize any potential damage.
In conclusion, there’s no need to remain trapped in a gluey nightmare. With acetone, oil-based substances, alcohol-based products, and a sprinkle of expert advice, you can dissolve that hair bonding glue and give your hair the fresh start it deserves. So go ahead and break free from the clutches of that sticky mess. Your hair will thank you.
Acetone as a Solvent for Removing Hair Bonding Glue
Look no further. In this article, we will explore the wonders of acetone as a solvent for removing hair bonding glue. Whether you’re a professional hairstylist or simply looking for a DIY solution, we’ve got you covered.
The Solvent Powerhouse:
Acetone, a widely used solvent, is a force to be reckoned with when it comes to dissolving adhesives. Its remarkable ability to break down tough bonds makes it the go-to solution for many glue-related conundrums. When it comes to removing hair bonding glue, acetone is like a superhero swooping in to save the day.
Precautions and Guidelines:
Before embarking on your hair glue removal journey with acetone, it is crucial to take certain precautions. Working in a well-ventilated area is essential to prevent inhaling the strong fumes. Additionally, donning a pair of gloves will protect your delicate skin from direct contact with the powerful solvent. Remember, safety first.
Step-by-step Process:
Apply a small amount of acetone directly onto the bonded area. Avoid using excessive amounts to prevent damage to your natural hair and scalp.
Gently massage the acetone into the bonded area, allowing it to penetrate and break down the adhesive. Picture those strong bonds melting away under the magic touch of acetone.
After a few minutes, start gently peeling or sliding the bonded hair extensions or wigs away from your natural hair. It’s like watching a satisfying unraveling as the glue loosens its grip.
If the glue does not easily come off, apply more acetone and continue massaging until the adhesive surrenders completely.
Thoroughly wash your hair with a gentle shampoo and conditioner to remove any residue of acetone or remaining glue. Imagine the refreshing feeling of clean, glue-free hair.
Consider deep conditioning your hair afterward to restore moisture and nourishment. Give your locks some extra pampering after their heroic battle with hair bonding glue.
Cautionary Note:
While acetone is generally effective in dissolving hair bonding glue, it’s important to note that it may not be suitable for all types of hair extensions or wigs. Synthetic hair materials can be sensitive to acetone and may be damaged by its use. When in doubt, consult a professional hairdresser or stylist for alternative removal methods. Don’t let the villainous acetone harm your beloved synthetic tresses.
Applying Acetone to Dissolve Hair Bonding Glue
Well, fear not, because acetone is here to save the day. Acetone is a powerful solvent that can dissolve hair bonding glue and free your hair from its sticky clutches. But before you rush to the store and grab a bottle, let’s go over the proper steps to ensure a safe and effective glue removal process.
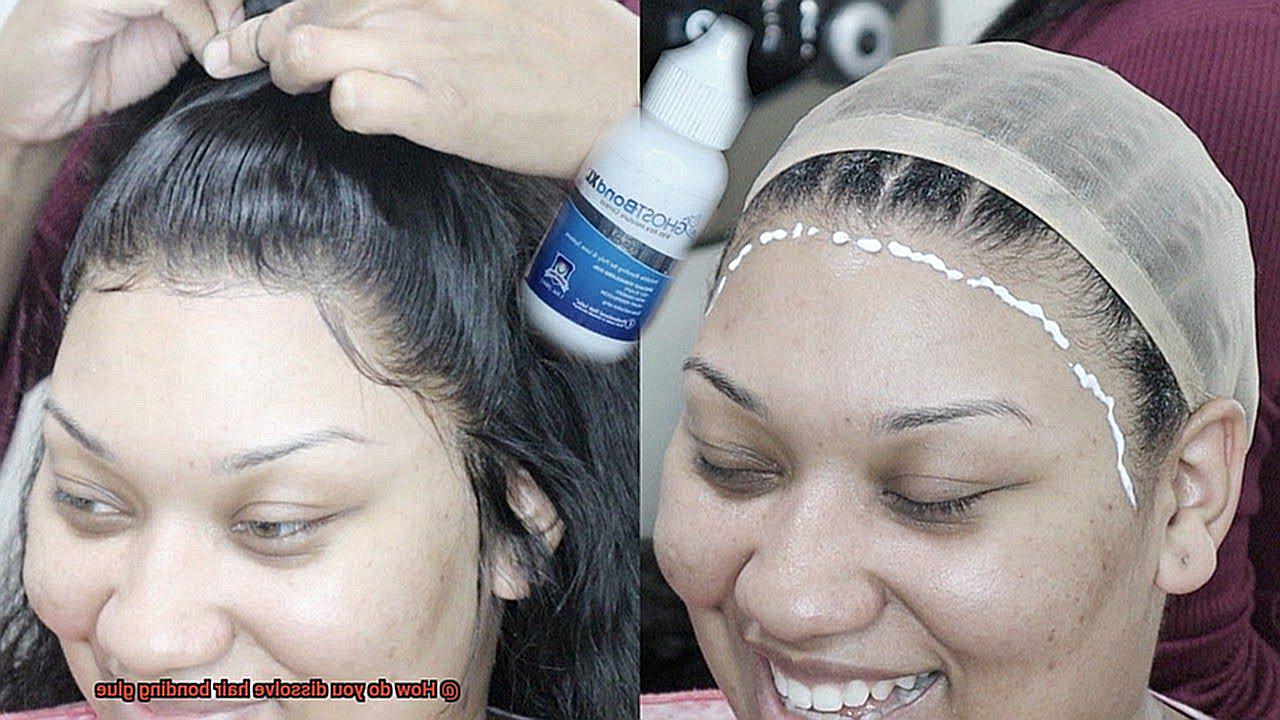
Step 1: Protect Your Skin and Scalp
Before applying acetone to your hair, it’s crucial to protect your skin and scalp from any potential harm. Apply a barrier cream or petroleum jelly around your hairline to create a protective layer. This will prevent the acetone from coming into contact with your skin and causing any irritation.
Step 2: Soak a Cotton Ball or Pad
Next, grab a cotton ball or pad and soak it with acetone. Make sure it’s saturated but not dripping, as excess acetone can be harmful. Gently press the soaked cotton ball onto the bonded area of your hair. Avoid rubbing or scrubbing, as this can cause damage to your hair.
Step 3: Let It Sit
Once the acetone is applied, give it some time to work its magic. Allow it to sit on the hair bonding glue for a few minutes. This will give the acetone enough time to penetrate and break down the adhesive.
Step 4: Separate the Hair
After the acetone has had enough time to work, try gently separating the bonded hair using a comb or your fingers. If the hair doesn’t easily come apart, don’t worry. Just apply more acetone and let it sit for a few more minutes. The key here is patience.
Step 5: Wash and Condition
Congratulations. You’ve successfully dissolved the hair bonding glue. Now it’s time to wash and condition your hair to remove any remaining residue from the acetone. Use lukewarm water and a gentle shampoo to cleanse your hair thoroughly. Follow up with a deep conditioning treatment to restore moisture, as acetone can be drying to the hair and scalp.
Step 6: Seek Professional Help if Needed
In some cases, acetone may not completely dissolve all types of hair bonding glue. If you find yourself in this sticky situation, it’s best to seek professional assistance from a hairstylist or salon. They have the expertise and proper tools to remove the glue without causing any damage to your hair.
Remember, acetone is a superhero when it comes to dissolving hair bonding glue, but it should not be used on synthetic hair or extensions. These materials require special removal methods, so consult with a professional for the best approach.
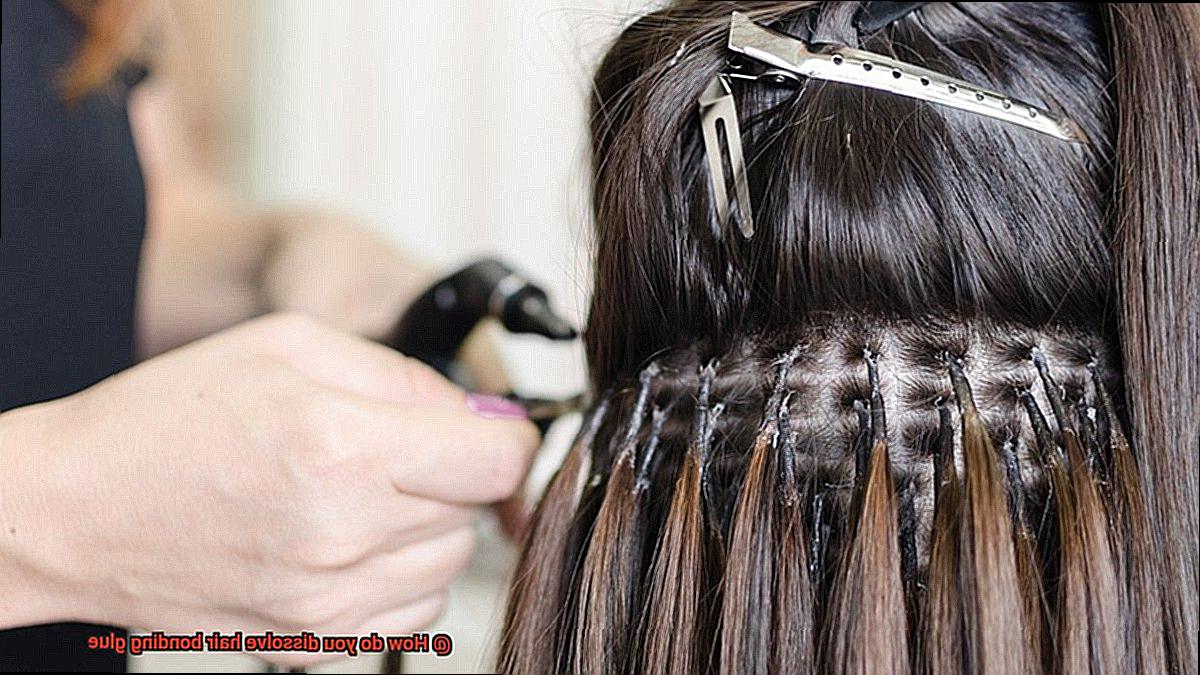
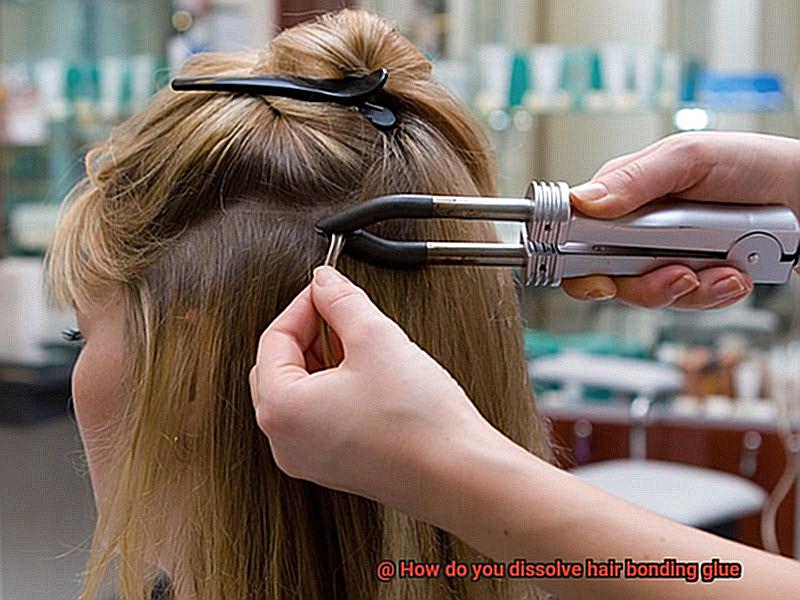
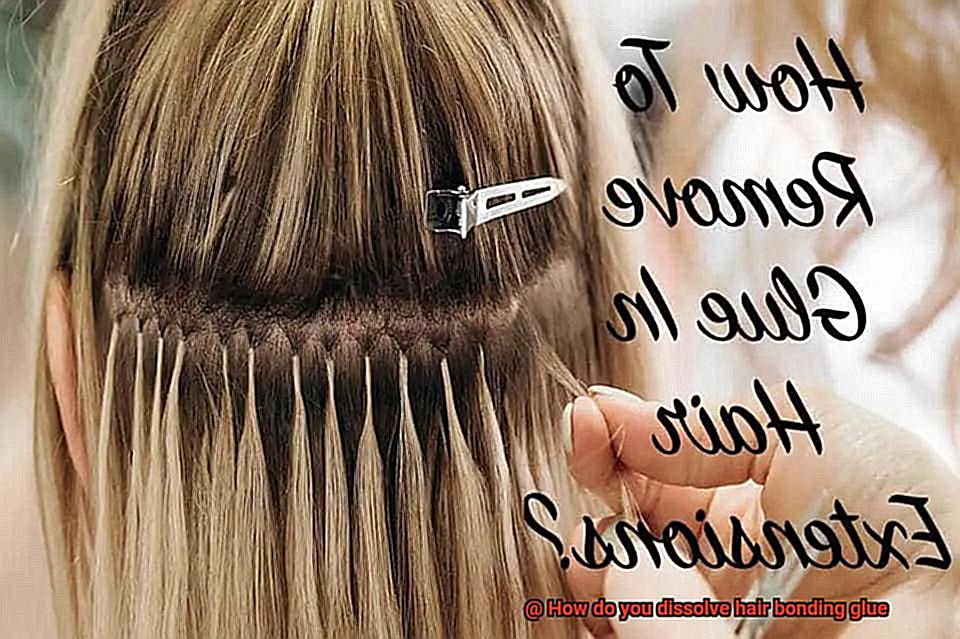
Removing the Extensions or Wig After Dissolving the Glue
You’ve successfully dissolved the hair bonding glue and now it’s time to remove those extensions or wig. But hold your horses, we’re about to embark on a safe and gentle journey. Your natural hair will thank you.
Step 1: Detangle like a Pro
Grab your wide-toothed comb or brush and gently comb through your hair. Say goodbye to tangles and knots, making the removal process a breeze.
Step 2: Loosen with Love
Starting from the nape of your neck, delicately loosen the extensions or wig from your scalp. Take it slow and be patient – Rome wasn’t built in a day, and neither is a flawless hair removal process.
Step 3: Tackle Resistance with Care
If you encounter resistance, apply a small amount of adhesive remover to the bonded area. Let it work its magic for a few minutes, loosening the glue without causing damage.
Step 4: Massage Away the Glue Blues
Now that the adhesive remover has done its job, gently massage the bonded area to further break down the remaining glue. Embrace hair liberation, not a wrestling match.
Step 5: Slow and Steady Wins the Race
Continue lifting the extensions away from your scalp, taking your time and being patient. Rushing can lead to hair breakage or damage, so breathe deeply and embrace your inner Zen master.
Step 6: Stubborn Glue? No Problem.
If stubborn residue refuses to budge, reapply a small amount of adhesive remover and let it sit for a few more minutes. The most stubborn glue surrenders to your determination.
Step 7: Cleanse and Condition
After removing all the extensions or wig pieces, give your scalp and natural hair some TLC. Use a gentle adhesive residue removal shampoo to cleanse thoroughly. Follow up with a moisturizing conditioner to replenish lost moisture.
Step 8: The Final Touches
Allow your natural hair to air dry or use a low heat setting on your blow dryer. Say no to unnecessary heat damage. Once dry, style as desired or proceed with your usual hair care routine – you’ve earned it.
Cleanse the Hair and Scalp After Removal
Cleansing the hair and scalp after removing hair bonding glue is a crucial step in maintaining healthy and clean hair. By following a few simple steps, you can ensure that any residue from the glue is completely eliminated, leaving your natural hair looking fabulous.
- Start with a clarifying shampoo: Begin the cleansing process by using a clarifying shampoo that is specifically designed to remove product buildup, including hair bonding glue. Look for a shampoo that contains sulfates, as these ingredients help break down and dissolve any residue left behind by the glue. Gently massage the shampoo into your hair and scalp, ensuring a thorough cleanse.
- Follow up with a moisturizing conditioner: After using the clarifying shampoo, your hair may feel stripped of its natural oils. To replenish moisture and restore balance, use a moisturizing conditioner. Apply it generously, focusing on the ends of your hair where dryness is often more pronounced.
- Incorporate a deep cleansing treatment: For an extra boost in removing stubborn residue, consider using a deep cleansing treatment. These treatments penetrate deeper into the hair shaft and scalp, ensuring that no glue residue is left behind. Look for products containing tea tree oil or salicylic acid, as they have antimicrobial properties and help break down any remaining glue.
- Rinse thoroughly: Don’t underestimate the power of a good rinse. Make sure to rinse your hair with warm water until all traces of shampoo, conditioner, and deep cleansing treatment are completely removed. Leaving any product residue behind can weigh down your hair and lead to further buildup over time.
- Dry and style gently: After rinsing, gently towel-dry your hair or allow it to air dry naturally. Avoid using excessive heat from blow dryers or styling tools immediately after removing hair bonding glue, as your hair and scalp may be more sensitive and prone to damage. Once your hair is dry, use a wide-toothed comb or a brush with soft bristles to detangle and style it gently.
Follow Up with a Deep Conditioning Treatment
Congratulations on using hair bonding glue to achieve your desired hairstyle. But before you start strutting your stuff with confidence, there’s one crucial step you must not overlook – a deep conditioning treatment. Trust me, your hair will thank you for it. In this article, we’ll explore why following up with a deep conditioning treatment after using hair bonding glue is absolutely essential for maintaining healthy and glamorous locks.
Restoring Moisture and Nourishment:
Hair bonding glue can be a double-edged sword. While it helps create that sleek and polished look, it can also strip your hair of its natural oils, leaving it dry and brittle. That’s where a deep conditioning treatment comes to the rescue. These treatments are specially formulated to replenish moisture and nourish your strands from within, providing the tender loving care they need.
Choosing the Right Treatment:
Now that we understand the importance of deep conditioning treatments, let’s discuss how to choose the right one for your hair. With an array of options like masks, oils, and leave-in conditioners available in the market, it’s crucial to consider your hair’s specific needs. If you have chemically treated or damaged hair, opt for a treatment that addresses those concerns. Look for products that penetrate deep into the hair shaft, providing intensive hydration.
Application Tips for Maximum Effectiveness:
To make the most out of your deep conditioning treatment, here are some application tips. Generously apply the treatment to your hair, paying extra attention to the ends and any dry or damaged areas. Allow it to work its magic for the recommended time (usually 10-20 minutes) while covering your hair with a shower cap or warm towel. The added heat helps open up your hair’s cuticles, allowing the conditioner to penetrate deeper and work its wonders.
Rinsing and Maintenance:
After the recommended time, rinse out the treatment thoroughly with lukewarm water. Avoid hot water, as it can strip away the moisture you just restored. Then, proceed with your regular shampoo and conditioner routine or opt for a sulfate-free shampoo for a gentler cleanse. Incorporating a deep conditioning treatment into your hair care routine at least once a week or as needed will keep your locks looking their best.
Beyond Deep Conditioning:
While deep conditioning treatments are crucial, maintaining overall hair health requires more than external care. Remember to hydrate from within by drinking plenty of water and consuming a balanced diet rich in vitamins and minerals. Minimize heat styling and chemical treatments to prevent unnecessary damage, allowing your hair to thrive naturally.
fLfTTt3Dw6g” >
Also Read: How To Remove Glue In Hair Extensions?
Conclusion
Removing hair bonding glue can be a challenging task, but fear not. There are effective methods to dissolve this sticky situation. Whether you’ve accidentally glued your fingers together or need to remove extensions, we’ve got you covered. Say goodbye to the pesky adhesive with these tried-and-true techniques.
One option is using acetone, a powerful solvent commonly found in nail polish remover. Soak a cotton ball in acetone and gently apply it to the bonded area. Allow the acetone to work its magic for a few minutes, then start peeling away the glue. Remember to be patient and take your time – rushing could damage your hair or skin.
Another solution is utilizing olive oil or coconut oil. These natural oils work wonders in loosening hair bonding glue without causing harm. Simply massage the oil onto the affected area and let it sit for about 15 minutes. As the oil seeps into the adhesive, it will gradually weaken its grip, allowing for easy removal.
For those seeking an alternative method, try using rubbing alcohol or isopropyl alcohol. Moisten a cloth or cotton pad with alcohol and gently dab it onto the bonded area. The alcohol will break down the glue’s chemical structure, making it easier to detach from your hair or skin.
If you’re dealing with particularly stubborn bonding glue, heat can be your secret weapon. Grab a blow dryer and set it on low heat. Direct warm air towards the bonded area while simultaneously pulling apart the glued surfaces. The heat will soften the adhesive, facilitating its release.
Remember that caution is key when dissolving hair bonding glue. Avoid excessive force or aggressive pulling as this can lead to damage or discomfort. Instead, opt for gentle yet persistent techniques that prioritize preserving your hair’s health.
In conclusion, removing hair bonding glue doesn’t have to be a nightmare anymore. With options like acetone, olive oil, rubbing alcohol, and heat at your disposal, you can bid farewell to the sticky situation.