Do you know that sinking feeling when your favorite ceramic object breaks into a million pieces? It’s like losing a dear friend. But don’t despair, because there’s a solution to repair your broken ceramic pieces – glue. However, not all glues are created equal. In fact, using the wrong adhesive can do more harm than good and leave you with an unsightly mess.
So what is the best glue to repair broken ceramic? Well, it depends on several factors such as the size and type of your ceramic object, the temperature and weight it will be exposed to, and how visible the adhesive will be after repair. But fear not, we’re here to guide you through the world of ceramic glue.
In this blog post, we’ll explore the various types of adhesives available for repairing ceramics. We’ll scrutinize their benefits and drawbacks and provide tips on how to apply them effectively. By the end of this post, you’ll be well-equipped to give your precious ceramic keepsakes a new lease on life.
Are you ready to learn about the best glue for repairing broken ceramics? Let’s dive in.
Types of Glue for Repairing Broken Ceramics
Contents
- 1 Types of Glue for Repairing Broken Ceramics
- 2 Advantages and Disadvantages of Epoxy
- 3 Advantages and Disadvantages of Super Glue
- 4 Advantages and Disadvantages of Specialized Ceramic Adhesive
- 5 Preparing the Surface for Repairing Broken Ceramics
- 6 How to Use Epoxy to Repair Broken Ceramics
- 7 How to Use Super Glue to Repair Broken Ceramics
- 7.1 Preparation:
- 7.2 Application:
- 7.3 Filling gaps:
- 7.4 Trimming excess glue:
- 7.5 Curing time:
- 7.6 It’s essential to use a high-quality super glue specifically designed for ceramic repair and to follow proper application techniques for best results. Using too much glue or applying too much pressure when pressing the broken pieces together can cause further damage or misalignment.
- 8 How to Use Specialized Ceramic Adhesive to Repair Broken Ceramics
- 9 Conclusion
Breaking a ceramic item can be a heart-wrenching experience, but with the right type of glue, it can be fixed and restored to its former glory. However, not all types of glue are created equal, and choosing the right one is crucial for a long-lasting and strong bond. Let’s explore the different types of glue that can be used to repair broken ceramics.
Epoxy Glue
This type of glue is the most durable and strongest option for repairing ceramics. It consists of two parts – resin and hardener, which when mixed together create a permanent bond that is resistant to water, heat, and chemicals. Epoxy glue is ideal for repairing ceramic items that are used for cooking or holding liquids.
Super Glue
Also known as cyanoacrylate glue, super glue is a fast-drying adhesive that creates a strong bond between ceramic surfaces. It works by bonding the surfaces together through a chemical reaction that occurs when it comes in contact with moisture in the air. Super glue is best suited for small cracks or breaks in ceramic items.
Silicone Adhesive
If you need to repair a ceramic item that will be exposed to moisture or extreme temperatures, silicone adhesive is the way to go. It creates a flexible and waterproof bond that can withstand expansion and contraction due to temperature changes. Silicone adhesive is ideal for repairing outdoor ceramic items such as garden ornaments.
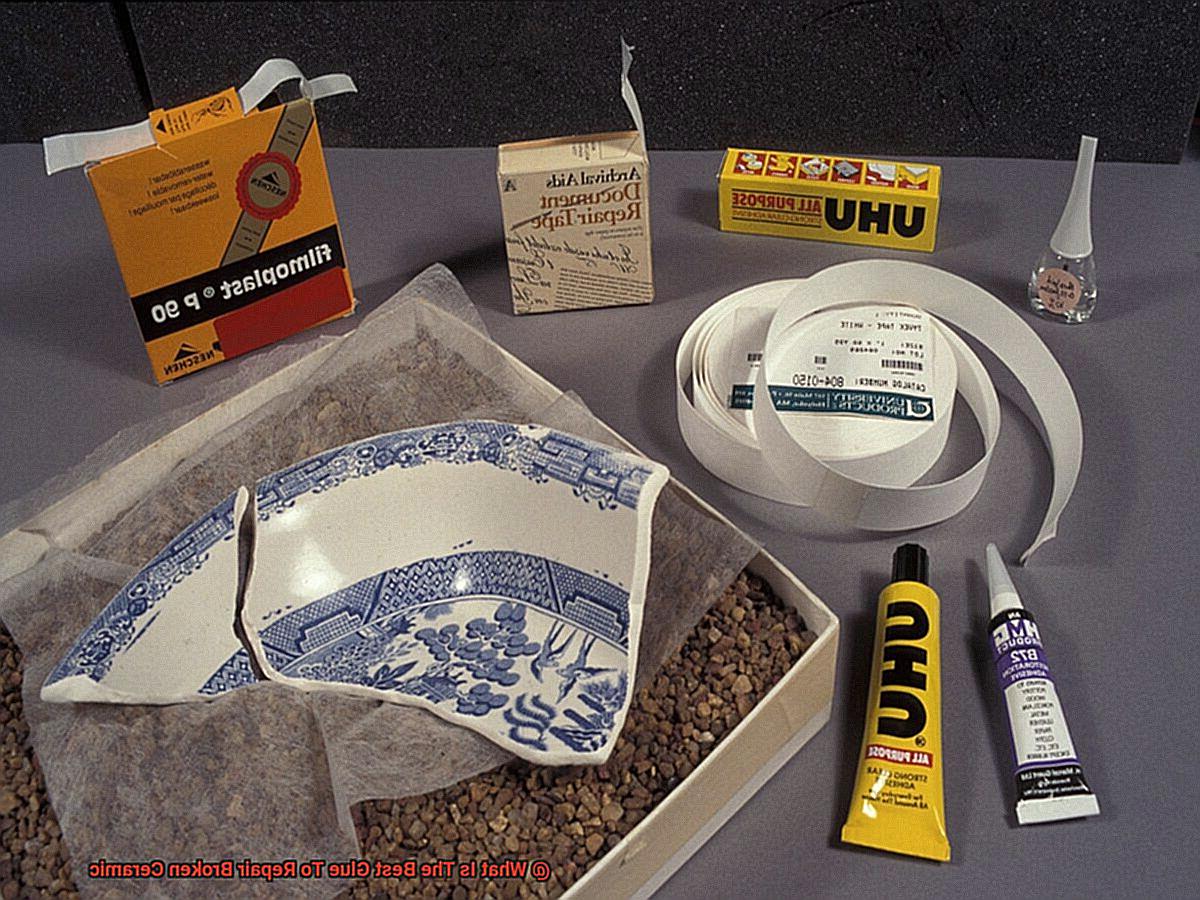
Polyurethane Glue
This versatile adhesive can be used to repair a variety of materials, including ceramics. It creates a strong and flexible bond that can withstand impact and vibration while remaining water-resistant. Polyurethane glue can be sanded or painted over once it dries making it ideal for repairing decorative ceramic items.
Before applying any type of glue, ensure that the surface of the ceramic is clean and free from any dirt or dust particles. Proper surface preparation increases the chances of achieving a successful repair. Additionally, consider factors such as the size and weight of the broken pieces, the conditions the repaired ceramic will be exposed to, and the level of durability required when selecting a glue.
In conclusion, choosing the right type of glue is crucial when repairing broken ceramics. Epoxy glue, super glue, silicone adhesive, and polyurethane glue are some of the best options available in the market for repairing ceramics.
Advantages and Disadvantages of Epoxy
Epoxy might just be the solution you need, with its exceptional bonding properties. However, before you start gluing your pieces together, it’s crucial to consider the advantages and disadvantages of using this adhesive.
One of the most significant advantages of using epoxy is its strong bonding capabilities. It creates a robust bond that can hold even the heaviest ceramic pieces together with ease. Not only that, but once cured, epoxy becomes water-resistant, making it perfect for use in areas that may come into contact with moisture. Another remarkable thing about epoxy is its versatility – it can bond an array of materials, including ceramics, metals, plastics, and wood.
However, epoxy also comes with its share of drawbacks that you should be aware of. One of the most significant disadvantages is its long curing time. The glue can take several hours to cure completely, which can be inconvenient if you need to use the repaired ceramic piece soon. Additionally, epoxy can emit toxic fumes during the curing process, making it essential to use it in a well-ventilated area and take proper safety precautions. Finally, once epoxy has cured, it can be challenging to remove if you need to make any changes or repairs to the ceramic piece.
Advantages and Disadvantages of Super Glue
If you’re looking for a quick and easy solution to fix your broken ceramics, super glue may seem like the perfect superhero adhesive. But before you reach for that little tube, let’s take a closer look at its advantages and disadvantages.
One of the biggest advantages of super glue is its strong bonding properties. It’s capable of holding even the tiniest pieces of ceramic together, making it an ideal choice for repairing delicate objects. Plus, it dries quickly within seconds, allowing you to complete your repair work quickly and efficiently.
Another advantage of super glue is that it’s readily available at any hardware or craft store, making it a convenient option for emergency repairs.
However, there are some drawbacks to using super glue. One of the major ones is that it creates a brittle bond. If the ceramic object is dropped or exposed to sudden temperature changes, the bond may break easily.
Another disadvantage of super glue is that it’s not waterproof. This means that it may not be suitable for objects that will be exposed to water or moisture. Additionally, it emits toxic fumes during the curing process that can be harmful if inhaled. It’s important to use super glue in a well-ventilated area and avoid prolonged exposure.
Advantages and Disadvantages of Specialized Ceramic Adhesive
If so, specialized ceramic adhesive may be the solution you need. However, as with any product, there are advantages and disadvantages to using this type of adhesive.
One of the most significant advantages of specialized ceramic adhesive is its exceptional strength and durability. This adhesive creates a bond that can withstand high temperatures and harsh conditions, making it perfect for repairing ceramic cookware or other items exposed to heat. Furthermore, its quick drying time allows you to use your repaired item sooner than with other adhesives.
On the other hand, specialized ceramic adhesive can be more expensive than other types of adhesives due to its specialized ingredients. Additionally, it can be brittle once it dries, which limits its use in repairs that require flexibility or movement. Removing the adhesive after it has dried can also be a challenge if you make a mistake or need to reposition your item.
Despite these disadvantages, specialized ceramic adhesive is an excellent choice for repairing broken ceramic items. Its strength and heat resistance make it ideal for repairing cookware and other items exposed to high temperatures. Moreover, its quick drying time ensures that you can use your repaired item again soon after repairing it.
Preparing the Surface for Repairing Broken Ceramics
Preparing the surface for repair is equally important to achieve a successful fix. In this post, I’ll share with you the necessary steps to prepare the surface for repairing broken ceramics.
To start, gather your materials: a soft cloth, rubbing alcohol or acetone, and a toothbrush. These items are essential to ensure that the surface is properly cleaned and ready for repair.
Begin by gently wiping the broken edges of the ceramic with a soft cloth to remove any loose debris or dust. This initial step ensures that there are no obstacles preventing the glue from adhering properly.
Next, use rubbing alcohol or acetone to clean the surface thoroughly. This step is crucial as it removes any oils, dirt or other contaminants that may be present on the surface. Without proper cleaning, the glue won’t bond effectively, leading to an incomplete repair.
After cleaning, inspect the surface for any small cracks or chips that may have been missed. Use a toothbrush to gently scrub away any remaining debris in these areas. By doing so, you can ensure that the glue will have a smooth and even surface to bond with.
It’s worth noting that certain types of ceramics may require special preparation before applying glue. For example, if you are repairing a glazed ceramic, you may need to roughen up the surface slightly with sandpaper to help the glue adhere better.
How to Use Epoxy to Repair Broken Ceramics
Fear not, epoxy is here to save the day. Epoxy is a two-part adhesive that creates a powerful bond when mixed together. It’s well-known for its strength and durability, making it the perfect choice for repairing ceramic objects that will be used frequently. Let’s dive into the steps for using epoxy to repair broken ceramics:
Step 1: Clean the Broken Pieces
Before applying the epoxy, it’s critical to ensure that the broken pieces are clean and free from any dirt, dust, or debris. Use warm water and mild detergent to remove any dirt or debris from the broken pieces. Dry them completely before proceeding.
Step 2: Mix the Epoxy
Follow the instructions on the epoxy package to mix the resin and hardener together thoroughly. Mixing them well is crucial to ensure that they are properly combined for a strong bond.
Step 3: Apply the Epoxy
Use a toothpick or small brush to apply a small amount of epoxy to one of the broken pieces. Be careful not to apply too much as excess glue can seep out when the pieces are pressed together.
Step 4: Press the Pieces Together
Gently press the broken pieces together and hold them in place for several minutes until the epoxy sets. Avoid moving or manipulating the pieces while the epoxy is setting as this can weaken the bond.
Step 5: Remove Excess Glue
Once the epoxy has set, use acetone or rubbing alcohol to remove any excess glue. Use a small brush or cotton swab to apply solvent and gently rub away any excess glue. This step is crucial because once epoxy has dried, it can be challenging to remove.
Step 6: Sand and Finish
Once the epoxy has fully cured, sandpaper can be used to smooth out any rough edges or excess glue. You can also paint or decorate the repaired ceramic as desired.
It’s important to note that not all types of ceramics are compatible with epoxy. Therefore, it’s advisable to test its compatibility on a small inconspicuous area before proceeding with the repair. Moreover, it’s vital to prepare the surface of the ceramic carefully before beginning the repair process. This may involve cleaning the area with alcohol or sanding down any rough edges to ensure a smooth surface for the glue to adhere to.
How to Use Super Glue to Repair Broken Ceramics
Fear not. With the right glue and technique, you can restore your ceramics to their former glory. Super glue, also called cyanoacrylate adhesive, is a popular choice for repairing ceramics due to its strong bonding properties.
Preparation:
To use super glue for ceramic repair, first ensure that the broken pieces are clean and dry. Clean them with warm soapy water, rinse thoroughly and dry them completely. This will help the glue to adhere better to the surface.
Application:
Apply a small amount of super glue to one of the broken pieces, then carefully press the pieces together. Hold the pieces in place for at least 30 seconds while the glue dries. It is important to only use a small amount of super glue as excess glue can cause a messy and unsightly appearance.
Filling gaps:
If there are gaps or spaces between the broken pieces, fill them with a small amount of super glue or use a filler such as baking soda or cornstarch mixed with super glue. This will create a stronger bond and prevent any air pockets from forming.
Trimming excess glue:
Once the glue has dried, sand down any excess glue or filler using a fine-grit sandpaper until the surface is smooth and even. Be careful not to sand too hard or you may damage the ceramic.
Curing time:
It is important to allow the glue to fully cure before using or handling the repaired ceramic piece. This typically takes between 24-48 hours. Rushing this step may cause the bond to weaken and break again.
It’s essential to use a high-quality super glue specifically designed for ceramic repair and to follow proper application techniques for best results. Using too much glue or applying too much pressure when pressing the broken pieces together can cause further damage or misalignment.
It’s important to note that super glue may not be suitable for all types of ceramics. Porous ceramics such as terracotta may require a different type of adhesive such as epoxy or silicone glue.
How to Use Specialized Ceramic Adhesive to Repair Broken Ceramics
If you have a broken ceramic item that you want to restore, using specialized ceramic adhesive is the way to go. It is a two-part epoxy that provides a strong and durable bond, specifically designed for ceramics, porcelain, and glass materials. To use this adhesive effectively, follow these steps:
Step 1: Clean the surfaces
The first step is crucial. Clean both surfaces that will be bonded with soap and water or rubbing alcohol. This removes any dirt, dust, or grease that can compromise the bond of the adhesive. Ensure the surfaces are completely dry before moving on.
Step 2: Mix the adhesive
Next, mix the two parts of the adhesive thoroughly and evenly, according to the manufacturer’s instructions. Take your time to avoid making any mistakes.
Step 3: Apply the adhesive
Using a small brush or toothpick, apply a small amount of adhesive to one of the broken pieces. Be careful not to use too much as this can weaken the bond.
Step 4: Press the pieces together
Once you have applied the adhesive, carefully align the broken pieces and press them together firmly. Hold in place for several minutes until the adhesive sets.
Step 5: Remove excess adhesive
After the adhesive has set, remove any excess with a razor blade or sharp tool. Do this carefully to avoid disturbing the bond or damaging the ceramic.
Step 6: Allow to dry
Finally, allow the repaired ceramic item to dry completely in a well-ventilated area before using or displaying it.
It is important to note that specialized ceramic adhesive should not be used on food or drink containers due to its chemical composition. Only use it for non-food related items like decorative pieces or trinkets.
Also Read: How To Glue Ceramic Back Together?
Conclusion
In conclusion, the key to repairing broken ceramics lies in selecting the right glue for the job. Fortunately, several excellent options are available on the market, including epoxy glue, super glue, silicone adhesive, and polyurethane glue. Each type of adhesive has its own unique advantages and disadvantages depending on various factors such as the size and type of ceramic object being repaired and the conditions it will be exposed to.
Of course, before applying any type of glue, it’s crucial to prepare the surface of the ceramic thoroughly. This entails cleaning it meticulously and ensuring that no dust or dirt particles remain. By doing so, you can significantly increase your chances of achieving a successful repair.
Whether you opt for epoxy, super glue or specialized ceramic adhesive for your repair project, always follow proper application techniques and allow sufficient time for the adhesive to dry completely before using or displaying your restored ceramic piece.