Want to create architectural wonders or add a touch of elegance to your home? Connecting glass panels is the secret sauce. Whether you’re building a fancy glass wall, a chic display case, or a sleek glass table, knowing how to securely join those panels is crucial for that polished and professional finish.
In this guide, we’ll take you on a journey through the step-by-step process of connecting glass panels flawlessly. From prep work to execution, we’ll explore all the techniques and tools you need for picture-perfect connections every single time. So, let’s dive right in and discover how to elevate your design projects with jaw-dropping glass connections.
Adhesives for Glass Bonding
Contents
Adhesives for glass bonding are essential for creating secure and effective connections between glass panels. When it comes to joining glass, traditional methods like mechanical fasteners or welding simply won’t cut it due to the fragile nature of the material. That’s where adhesives come in, offering a reliable solution for creating strong bonds between glass surfaces.
One popular choice for glass bonding is silicone-based adhesives. These adhesives are known for their excellent flexibility, high resistance to temperature extremes, and superior UV resistance. Not only do they provide good adhesion to glass surfaces, but they also offer a transparent bond, ensuring the aesthetic appeal of the final product. It’s worth noting, however, that silicone adhesives may have lower bond strength compared to other options and can be more expensive.
UV-curable adhesives are another common choice for glass bonding. Composed of a liquid monomer that cures rapidly when exposed to ultraviolet light, these adhesives offer numerous advantages. They boast fast curing times, high bond strength, and excellent optical clarity, making them particularly suitable for industries like electronics, optics, and automotive manufacturing. The only downside is that they require specific curing equipment and may be more expensive.
Epoxy adhesives also find application in glass bonding due to their exceptional strength and durability. They form strong bonds capable of withstanding heavy loads and resisting environmental factors such as moisture and chemicals. Epoxy adhesives excel at gap-filling capabilities, making them suitable for bonding uneven or irregular glass surfaces. However, some epoxy adhesives may yellow over time when exposed to sunlight, affecting the appearance of the bonded glass panels.
Lastly, there are hybrid adhesives available that combine the best properties of different adhesive chemistries. These hybrids aim to strike a balance between flexibility, strength, and resistance to various environmental conditions. They’re often formulated to bond not only glass but also other materials like metal or plastic, offering versatility in application.
When selecting an adhesive for glass bonding, it’s crucial to consider factors such as the specific application requirements, the type of glass being bonded, and the environmental conditions the bonded glass panels will face. Adhesive manufacturers typically provide detailed technical information and guidelines on their product’s suitability for glass bonding applications. It’s highly recommended to consult with adhesive experts or manufacturers to ensure the most appropriate adhesive is chosen for your specific bonding needs.
UV-Curing Adhesive
UV-Curing adhesive is a remarkable solution for connecting glass panels together, offering a range of advantages and a straightforward application process. Let’s explore this captivating topic in more detail.
Advantages of UV-Curing Adhesive for Connecting Glass Panels:

- Fast and Efficient Bonding: Time is of the essence, and UV-Curing adhesive understands that. Unlike other adhesives that take hours or days to cure, UV-Curing adhesive can harden within seconds or minutes when exposed to UV light. This speedy process allows for faster assembly and increased productivity.
- Transparent Bond: In the world of glass, clarity is key. UV-Curing adhesive ensures that the bond between glass panels remains crystal clear, maintaining the appearance and visibility of the glass. No hazy interference here.
- Excellent Bonding Strength: When it comes to durability, UV-Curing adhesive takes the prize. It forms a robust bond between glass panels, capable of withstanding temperature changes, moisture, and various environmental conditions without compromising its strength.
Application Process of UV-Curing Adhesive for Connecting Glass Panels:
- Surface Preparation: Before applying UV-Curing adhesive, clean those glass surfaces. Removing contaminants like oils or dirt is essential for optimal bonding performance and a strong connection between the panels.
- Applying the Adhesive: Get ready to brush, apply, or dispense the liquid resin of the UV-Curing adhesive onto one of the glass panels. The key is to ensure an even layer of adhesive for uniform bonding.
- Aligning the Panels: Precision and attention to detail come into play as you carefully position the second glass panel on top of the first, aligning them perfectly. The result? A seamless connection between the panels that will make you smile.
- Curing with UV Light: Time to let the magic happen. Apply UV light to initiate the curing process. As the light hits the liquid resin, it undergoes a mesmerizing transformation called polymerization, solidifying and creating a strong bond between the panels.
- Checking and Finishing: After the curing process, take a moment to inspect the bonded area for imperfections or inconsistencies. Any excess adhesive can be removed using appropriate tools or solvents. With the finishing touches complete, your bonded glass panels are now ready for further processing or finishing according to your specific application requirements.
Silicone Sealants
Introducing silicone sealants – the unsung heroes of the glass panel world. These remarkable adhesives are like the glue that holds everything together, providing a secure and durable connection between glass panels. Whether you’re a DIY enthusiast or a professional in the field, silicone sealants are your go-to solution for all your glass panel bonding needs.
So, what makes silicone sealants the perfect choice for connecting glass panels? Let’s break it down:
- Adhesive Power: Silicone sealants are renowned for their excellent adhesive properties. They form a strong bond between glass surfaces, ensuring a secure connection that can withstand the test of time.
- Temperature Resistance: Glass panels can experience extreme temperature changes, especially when exposed to the elements. Silicone sealants are designed to handle these temperature variations with ease. They can withstand both scorching heat and freezing cold without losing their adhesive strength.
- Moisture Barrier: Water infiltration is a big no-no when it comes to glass panel connections. Silicone sealants create a watertight barrier, preventing any moisture from seeping through and causing damage or compromising the connection.
- UV Protection: Sunlight can be harsh on materials, causing them to degrade over time. But fear not. Silicone sealants are formulated to resist UV rays, ensuring that your glass panels stay securely bonded even under direct sunlight.
- Easy Application: Applying silicone sealants is a breeze. They come in various forms, from cartridges to squeeze tubes, making it convenient for any project. Simply apply the sealant along the edges of the glass panels and let it work its magic.
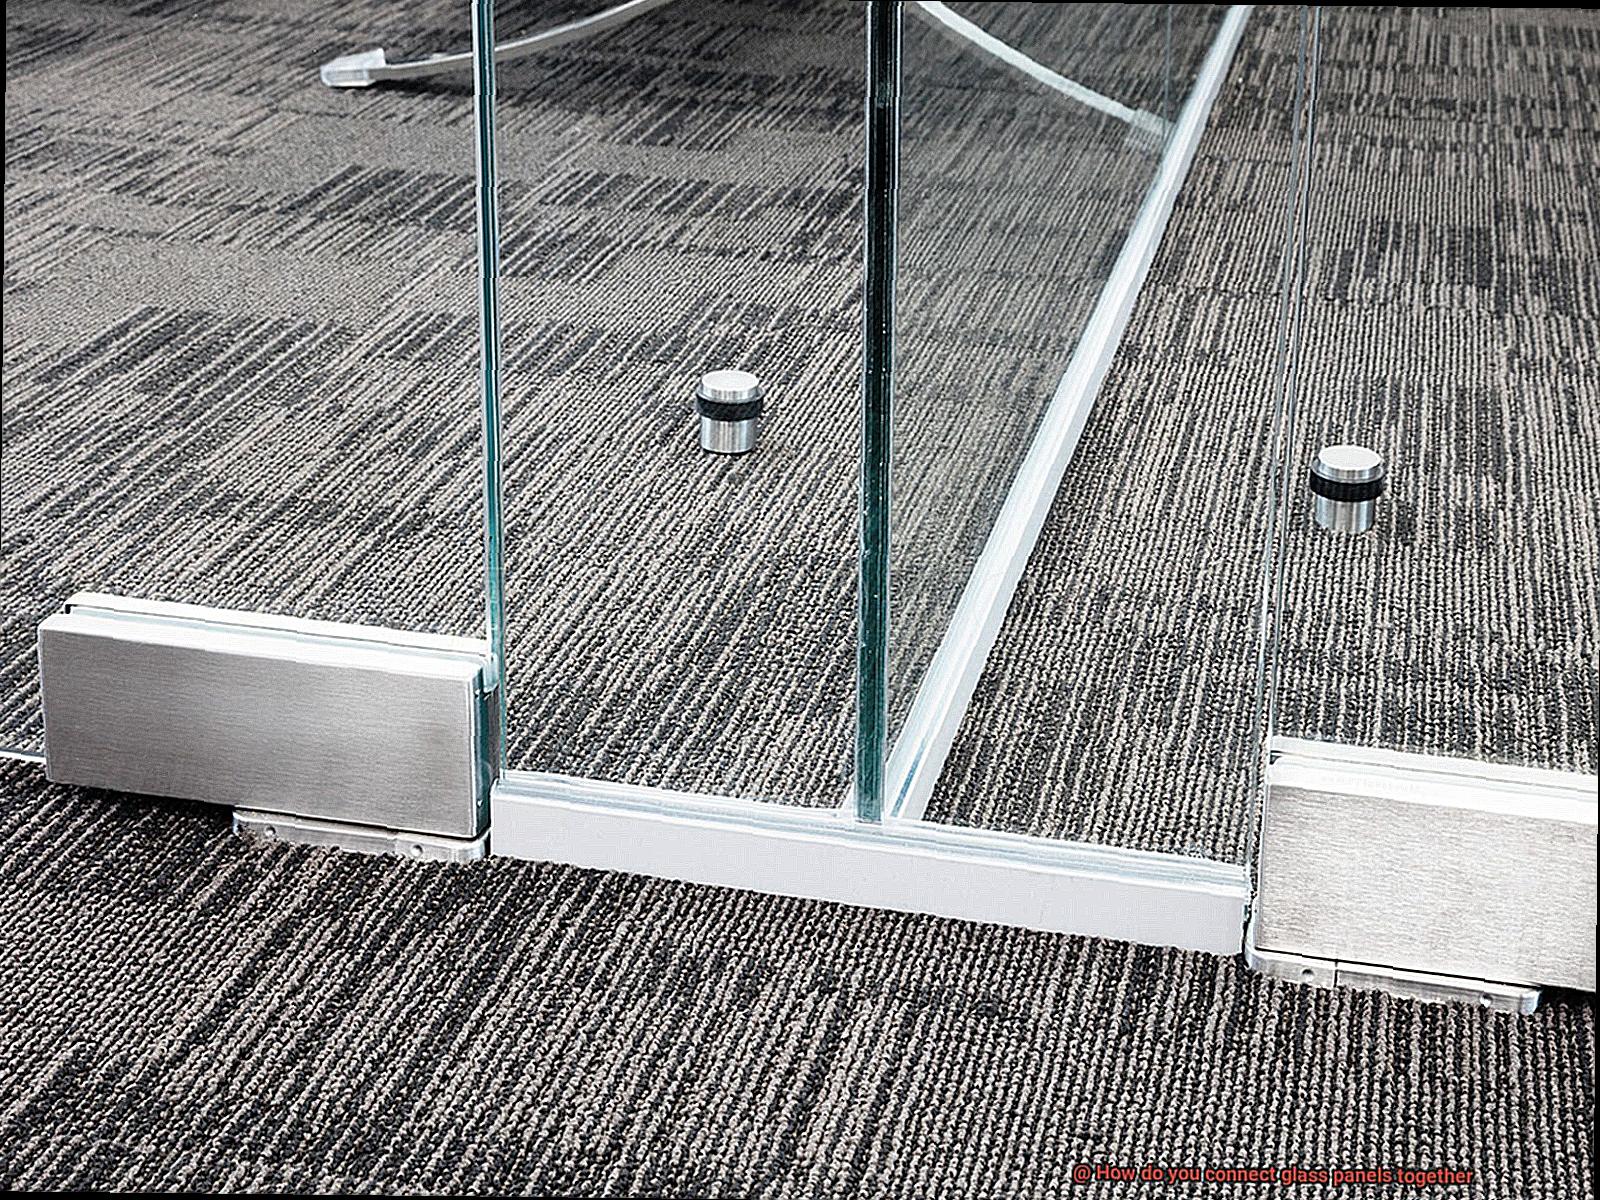
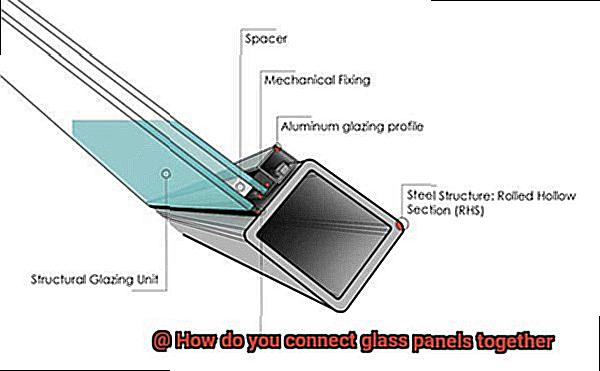
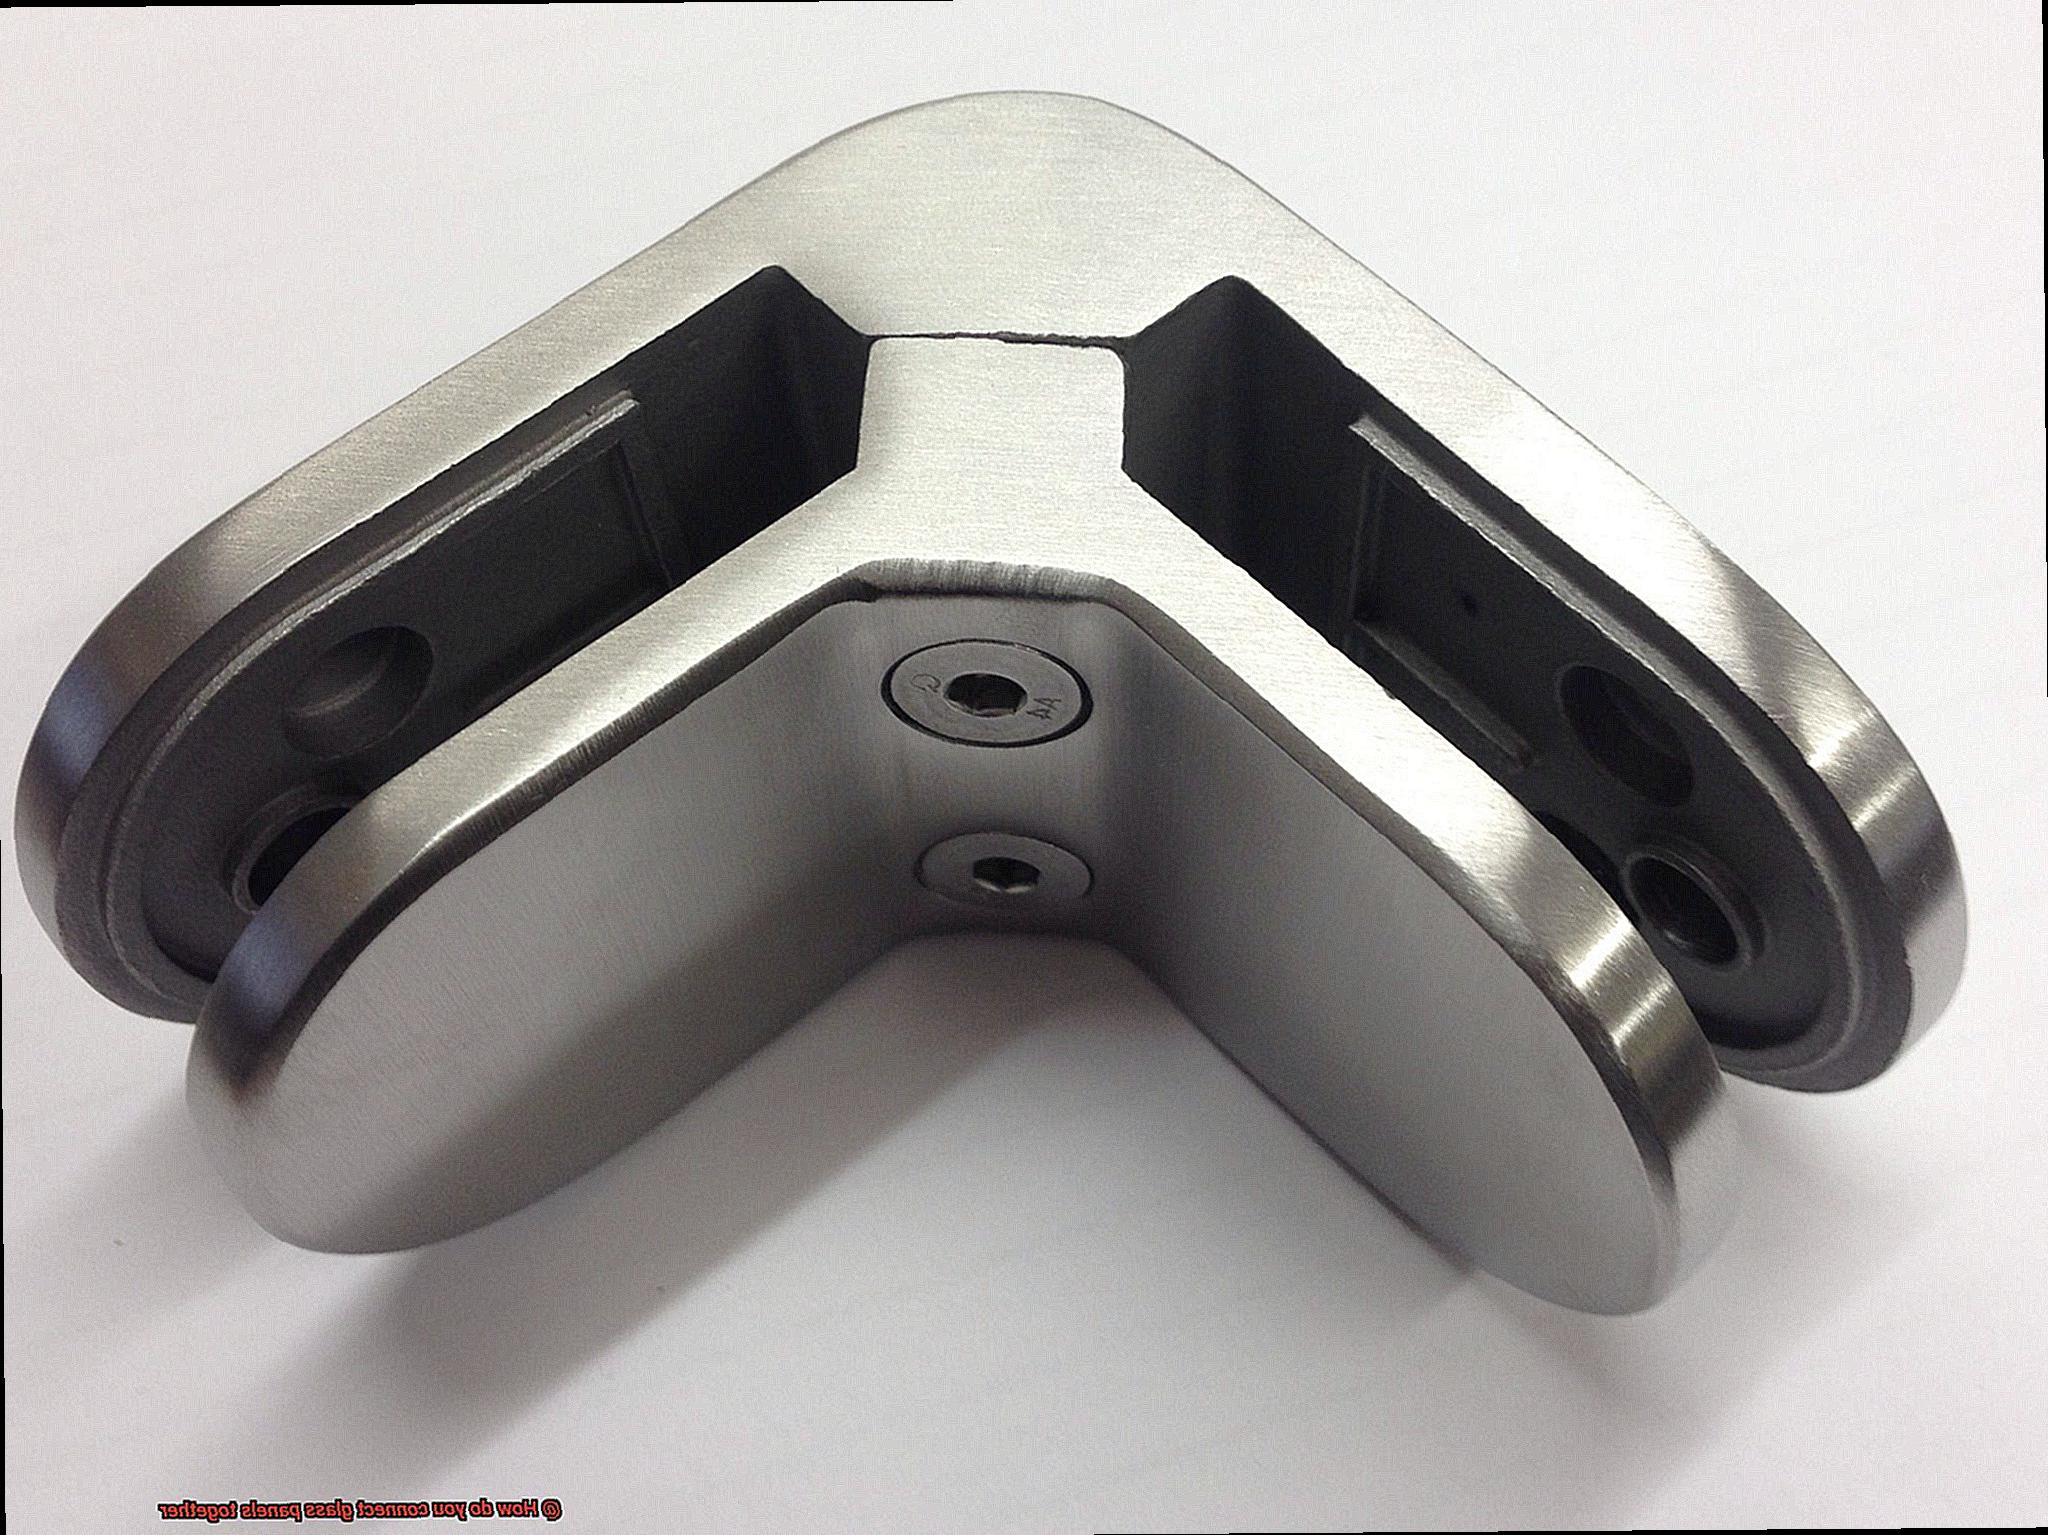
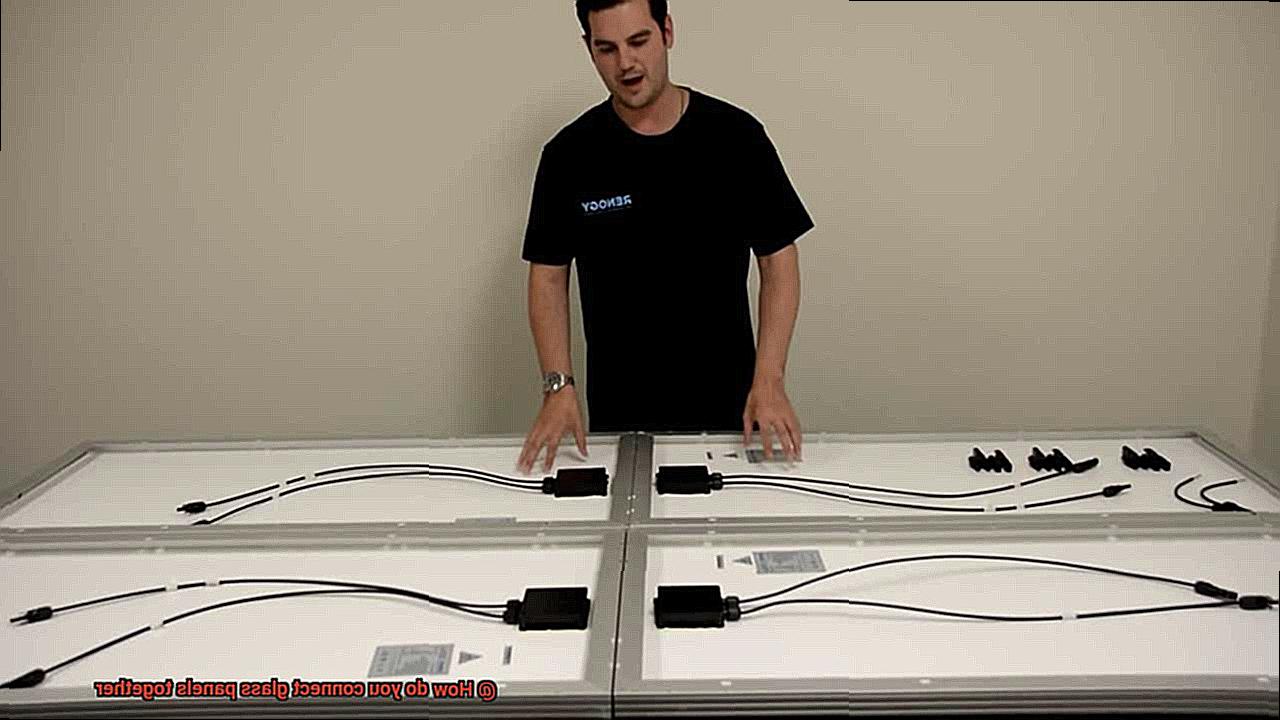
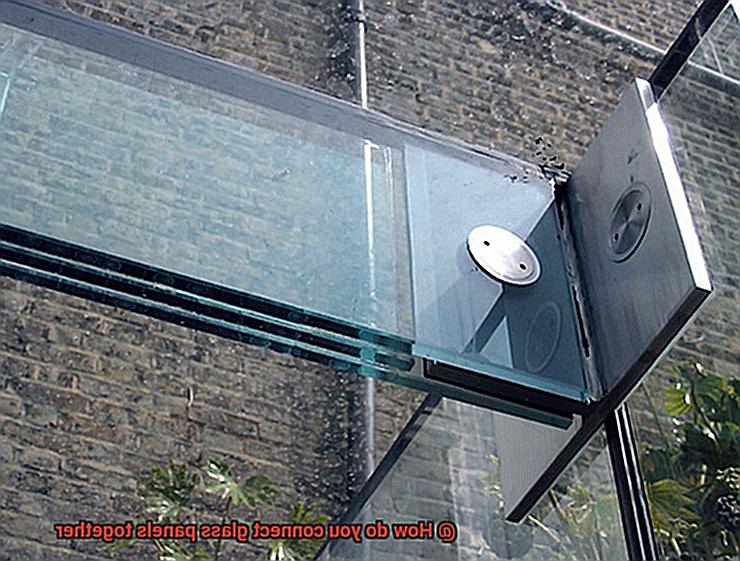
Mechanical Fasteners
Mechanical fasteners are the unsung heroes of glass panel connections, providing a strong and secure bond that withstands the test of time. These fasteners come in various shapes and sizes, each with its own unique advantages and disadvantages. Let’s explore the world of mechanical fasteners and the magic they bring to glass panel installations.
First up, we have the glass clamps. Crafted from durable materials like stainless steel, these clamps firmly hold the glass panels in place while adding an aesthetic touch. To accommodate the clamps, holes are drilled into the glass panels, creating a tight and stable connection when the screws are tightened. Glass clamps offer flexibility, allowing for easy adjustments or removal if needed.
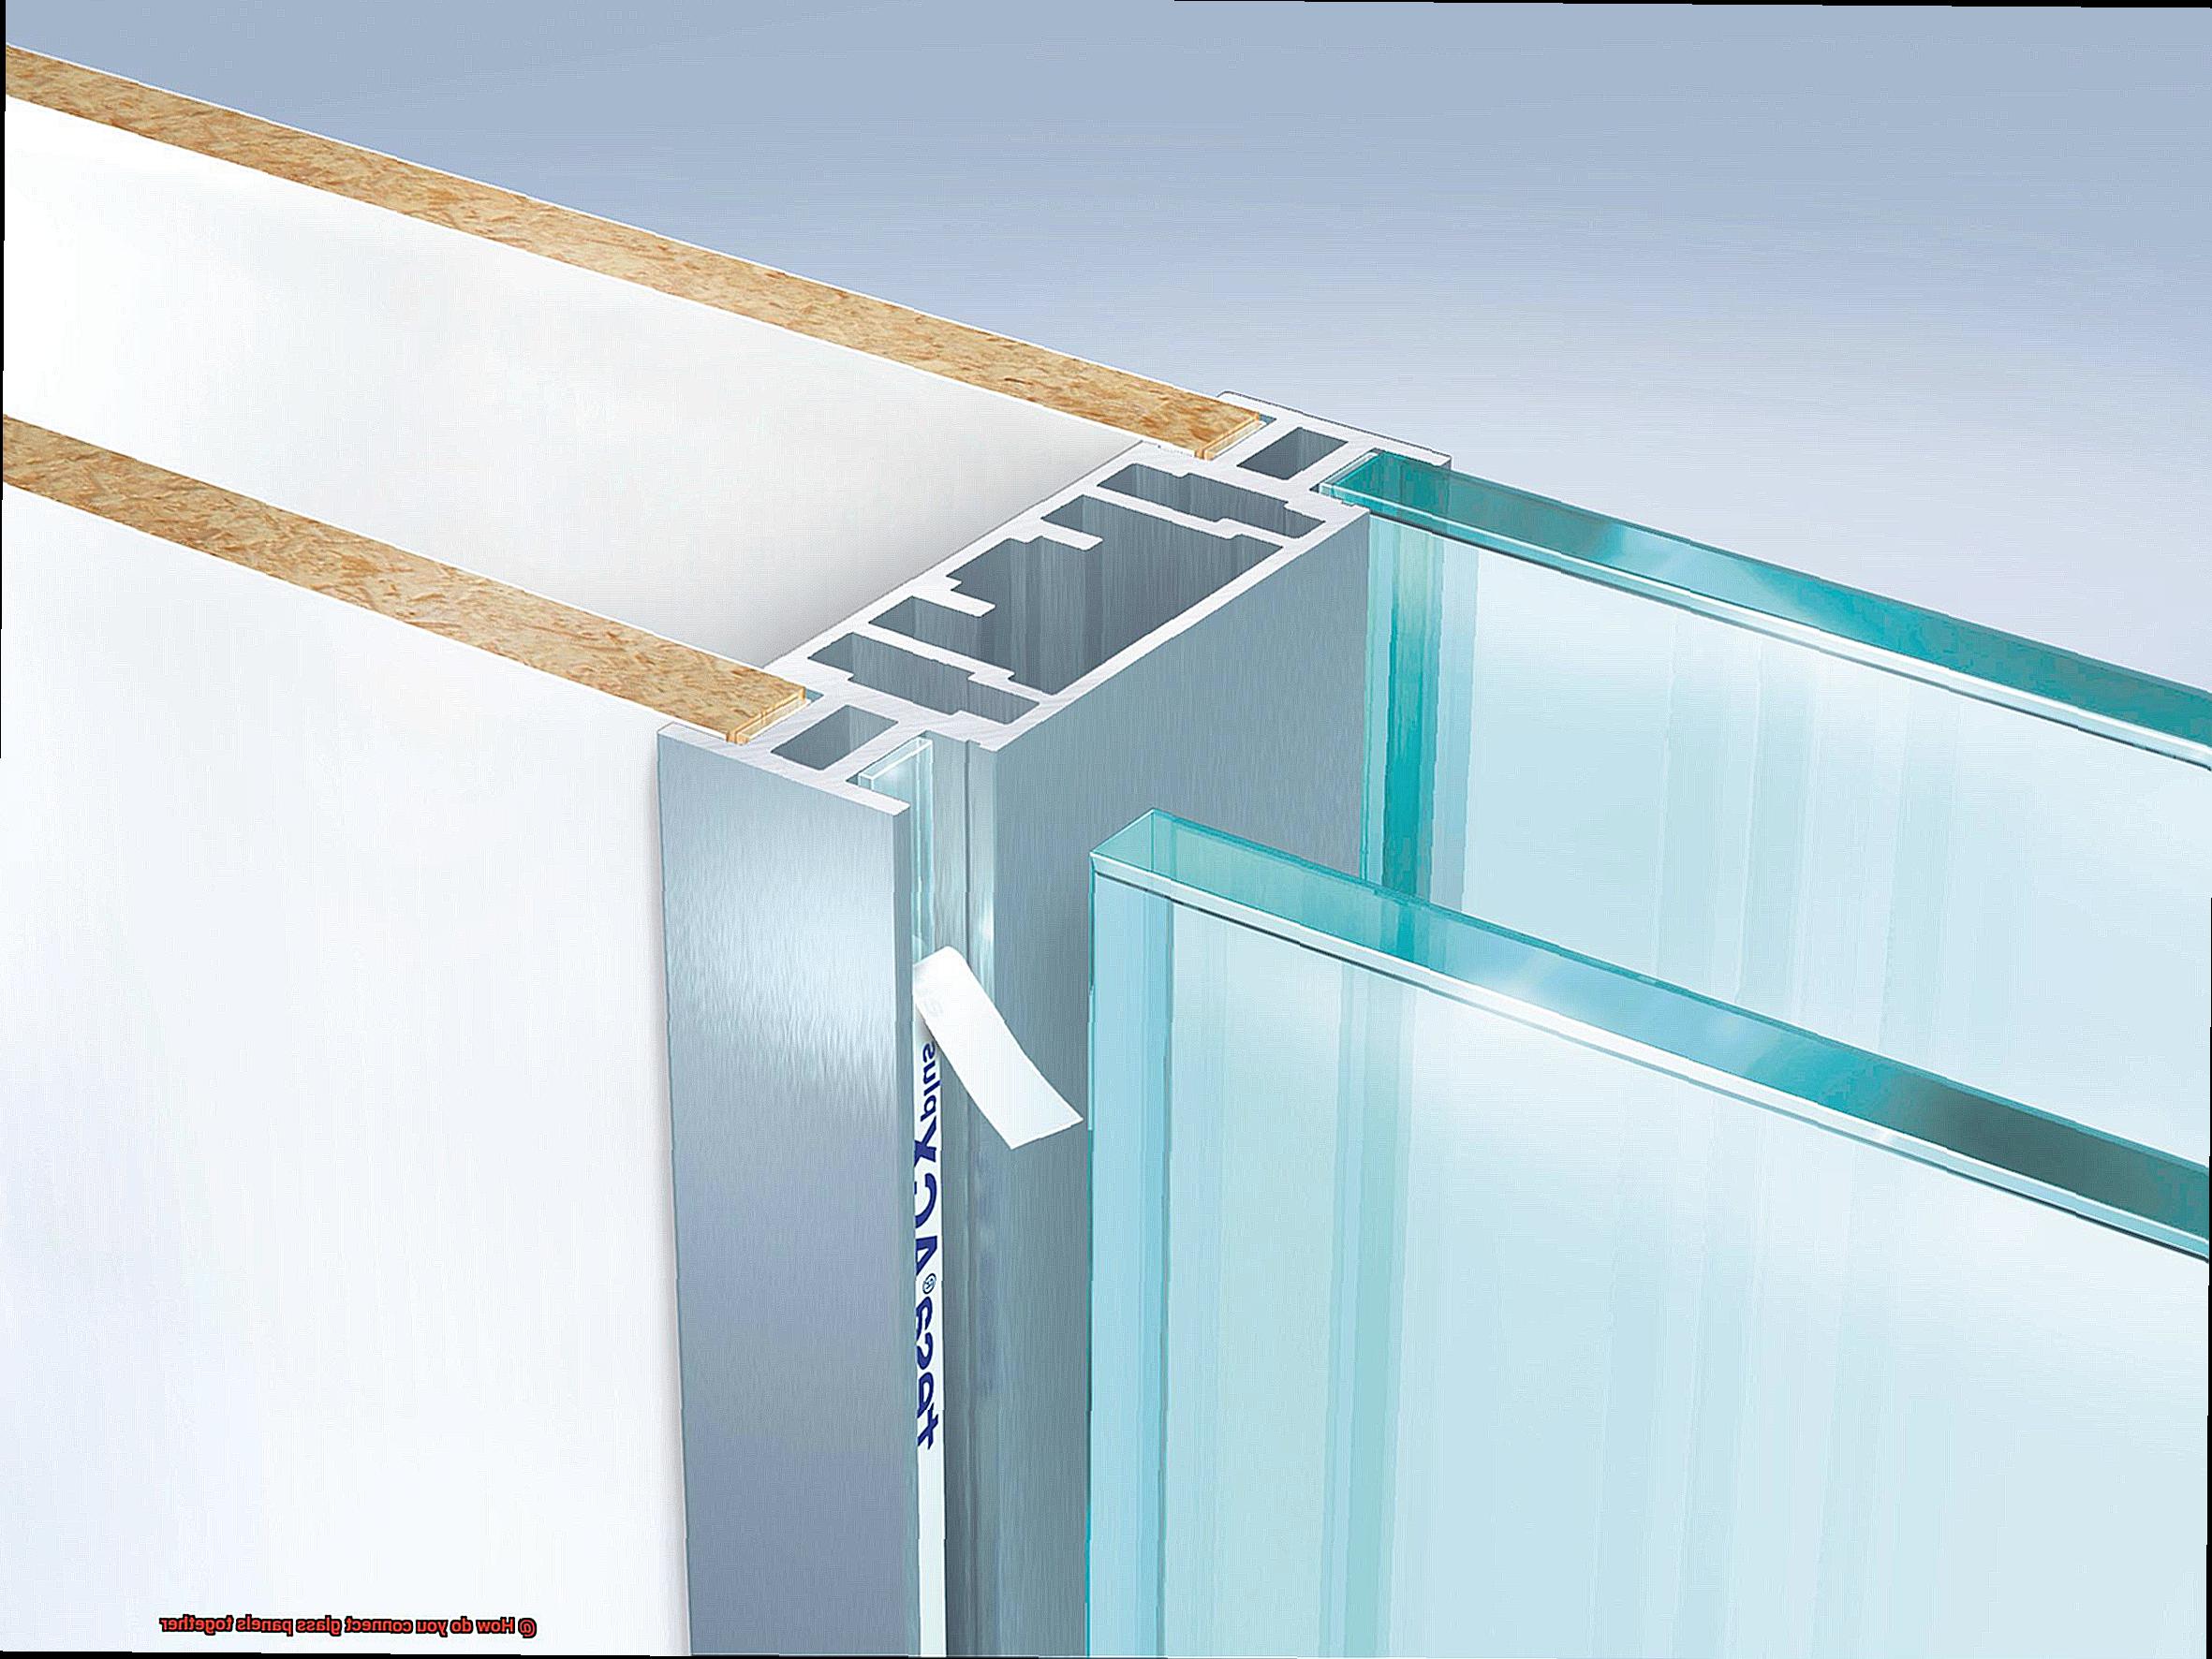
Next on our list are the mighty glass connectors. Made from aluminum or steel, these connectors are perfect for joining larger glass panels or creating continuous glass walls. Sliding over the edges of the panels, they create a seamless connection that exudes elegance. Once secured with screws, the connectors provide stability and can handle hefty loads.
For those seeking a touch of sophistication, standoff systems are the answer. These systems consist of metal posts or brackets that hold the glass panels away from the mounting surface, creating an air gap. This not only enhances visual depth but also improves insulation. Standoff systems are easily maintained and allow for effortless cleaning behind the panels.
Last but certainly not least, we have spider fittings. These sleek metal brackets are designed for connecting glass panels in structural glass walls or facades. Spider fittings bring maximum transparency to the table while ensuring stability and load-bearing capacity. Although they may require professional installation and regular maintenance, their modern look is worth every penny.
The importance of proper installation cannot be overstated when it comes to mechanical fasteners. It guarantees safety by securely holding the glass panels in place, reducing the risk of accidents or breakages. Additionally, proper installation ensures durability, allowing the connection to withstand the test of time. And let’s not forget aesthetics – a well-installed fastener creates a visually appealing connection that enhances the overall appearance of any space.
Surface Preparation for a Strong Bond
Achieving a strong and durable bond between glass panels requires meticulous surface preparation. The process involves several key steps to ensure that the glass surface is clean, free from contaminants, and optimized for adhesion. Here’s a detailed breakdown of the surface preparation techniques for a strong bond:
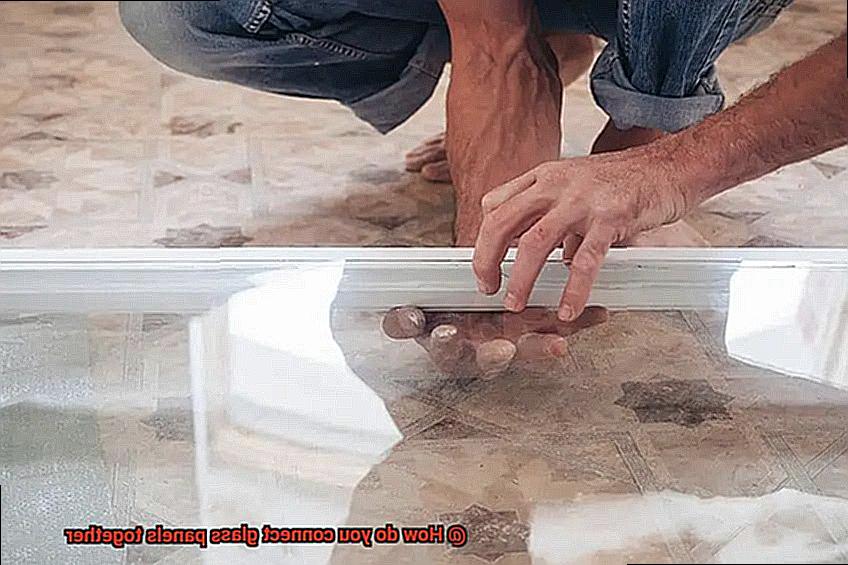
- Cleaning: Begin by thoroughly cleaning the glass surface to remove any dirt, dust, or grease. Use a mild detergent or glass cleaner along with a lint-free cloth to wipe the surface. Ensure that all areas are covered and pay attention to corners and edges. Rinse the surface with clean water and allow it to dry completely before proceeding to the next step.
- Degreasing: Glass surfaces can sometimes have oily residues that are difficult to remove with regular cleaning. In such cases, it is recommended to use a specialized degreasing agent or solvent. Apply the degreaser onto a clean cloth and wipe the surface in a circular motion, ensuring complete coverage. Rinse the glass thoroughly with clean water and let it dry.
- Abrasion: To enhance adhesion between glass panels, creating a roughened surface is essential. This can be achieved by using fine-grit sandpaper or an abrasive pad to lightly scuff the glass surface. The goal is not to remove a significant amount of material but rather to create micro-scratches that provide better grip for the adhesive. Be cautious not to apply too much pressure or sand too aggressively, as this can damage the glass.
- Priming: Depending on the type of adhesive being used, applying a primer may be necessary to enhance bonding strength. A primer acts as an intermediary layer between the glass and the adhesive, promoting adhesion and preventing potential issues such as delamination or weakening of the bond over time. It is crucial to select a primer specifically designed for bonding glass and follow the manufacturer’s instructions for application.
- Masking: In certain cases, where precise alignment or specific areas need to be bonded, masking can be employed. Masking tapes or films can be applied to the glass surface to create barriers or define specific bonding areas. This helps in preventing excess adhesive from spreading and allows for cleaner and more accurate bonding.
Choosing the Right Method for Your Application
Choosing the right method for connecting glass panels together requires careful consideration of various factors. Here are some key points to keep in mind when making this decision:
- Intended Application: Consider the purpose of the glass panels and how they will be used. Are they for decorative purposes or structural support? The application will help determine the strength requirements and durability needed.
- Aesthetics: If a seamless and transparent connection is desired, adhesive bonding or UV bonding may be the best options. These methods provide a clean and invisible bond, perfect for applications where aesthetics are important.
- Strength Requirements: Depending on the size and weight of the glass panels, mechanical fastening or fusion bonding may be necessary. Mechanical fastening using screws, bolts, or clamps provides a secure connection for heavy or large panels. Fusion bonding, on the other hand, offers maximum strength and durability without visible joints or seams.
- Environmental Conditions: Consider the environment in which the glass panels will be installed. If they will be exposed to moisture or extreme weather conditions, channeling with a gasket or sealant may be necessary to create a watertight and weatherproof connection.
- Expert Advice: Consulting with a professional or expert in glass panel installation can provide valuable insights and guidance. They can assess your specific needs and recommend the most suitable method for your application.
In terms of glue as a connection option, adhesive bonding and UV bonding are popular choices. Adhesive bonding involves using a specialized adhesive that is applied to the edges of the glass panels. When it cures, it forms a strong and durable bond. UV bonding is similar but uses ultraviolet light to cure the adhesive quickly. Both methods provide transparent and seamless connections, making them ideal for applications where aesthetics are important.
Pros and Cons of Various Connecting Methods
When it comes to connecting glass panels together, there are several methods to choose from, each with its own pros and cons. Let’s explore these methods in more detail.
Adhesive bonding:
- Pros: Adhesive bonding creates a strong and permanent bond between the glass panels, ensuring a secure connection that can withstand various stresses and forces. It is also relatively easy to apply and does not require specialized equipment.
- Cons: One drawback of adhesive bonding is that the adhesive may be visible between the panels, which can affect the overall aesthetic appeal. This may not be a major concern for certain applications, such as industrial or commercial settings, but can be an issue in residential or architectural designs where visual perfection is desired. Additionally, adhesive bonding may not be suitable for certain types of glass, such as tempered or laminated glass, as the adhesive may not adhere properly to these surfaces.
Mechanical fasteners:
- Pros: Using mechanical fasteners like bolts, screws, or brackets provides a secure connection and can be more visually appealing as the fasteners can be hidden. This method is especially suitable for thicker and heavier glass panels that require extra support.
- Cons: One drawback of using mechanical fasteners is that drilling holes in the glass for the fasteners can weaken its structural integrity. Additionally, professional installation may be required to ensure proper alignment and stability.
UV bonding:
- Pros: UV bonding involves using ultraviolet light to cure a special adhesive that bonds the glass panels together. It offers a strong bond with minimal visibility of the adhesive.
- Cons: UV bonding requires specialized equipment and expertise to ensure proper curing and bonding. This method may not be suitable for DIY projects or small-scale applications.
In some cases, a combination of methods can be used to connect glass panels together. For example, adhesives can be used along with mechanical fasteners to provide added strength and stability.
When choosing a connecting method for glass panels, it is important to consider factors such as the intended use, size, weight, aesthetics, and professional advice. Consulting with professionals or experts in glass installation can help determine the most suitable method for specific needs.
Tips for Successful Glass Panel Connection
Connecting glass panels together successfully and securely requires careful attention to detail and proper execution. Here are some tips to ensure a strong and lasting connection:
Choose the right adhesive
Selecting the appropriate adhesive is crucial for a successful glass panel connection. Look for a high-quality adhesive specifically designed for bonding glass. These adhesives are formulated to provide excellent bonding strength and long-term stability. Consider factors such as the type of glass, application requirements, and environmental conditions when choosing the adhesive.
Prepare the surfaces
Before applying the adhesive, thoroughly clean and prepare the surfaces of the glass panels. Use a glass cleaner and a lint-free cloth to remove any dirt, debris, or grease that could hinder the bonding process. Additionally, lightly roughen the surface with fine-grit sandpaper to improve adhesion.
Apply adhesive evenly
When applying the adhesive, ensure an even and consistent coverage on both surfaces of the glass panels. This will help distribute the load evenly and maximize bond strength. Use a spatula or an applicator recommended by the adhesive manufacturer to spread the adhesive smoothly over the surfaces.
Allow proper curing time
After connecting the glass panels, it is important to allow sufficient time for the adhesive to fully set and strengthen the bond. Follow the manufacturer’s instructions regarding curing time and conditions, as they can vary depending on the type of adhesive used. Rushing this process can result in a weak bond that may fail over time.
Consider additional mechanical fixings
Depending on the size and weight of the glass panels, using mechanical fixings such as clamps or brackets in conjunction with adhesive may provide extra support and reinforcement. This can be particularly useful for larger glass panels or applications where added strength is needed.
AcXq4SOYGGk” >
Conclusion
Connecting glass panels together requires careful consideration and the use of appropriate techniques.
One common method is to use silicone adhesive, which provides a strong and durable bond. The panels are first cleaned and prepared, ensuring that any dirt or residue is removed.
Then, a bead of silicone adhesive is applied along the edges of the panels, creating a seal that holds them together securely. Another option is using metal connectors or brackets specifically designed for glass panel installation.
These connectors are attached to the edges of the panels, providing structural support and allowing for easy connection. Additionally, some glass panels may have interlocking mechanisms built into their design, allowing them to be seamlessly connected without the need for additional materials.
Whichever method you choose, it’s important to follow proper safety precautions and consult with professionals if needed.