Marble, the epitome of elegance and timeless beauty in interior design and architecture. But what happens when you need to join two separate pieces of this magnificent material? How do you achieve flawless bonds that do justice to its splendor? Get ready for an enlightening journey as we dive into the art of marble bonding, revealing the secrets behind creating seamless connections that seem almost magical.
- Surface Preparation: Meticulousness is key when it comes to successful bonding. Discover the essential steps involved in cleaning and prepping the marble for optimal adhesion.
- Adhesive Selection: Different adhesives serve different purposes. From epoxy resins to polyester and polyurethane-based glues, explore their unique properties and suitability for various applications.
- Techniques and Tools: Let’s delve into best practices and the tools required for precise bonding. Uncover the intricacies of the process while picking up tips and tricks along the way.
- Finishing Touches: A flawless bond deserves a seamless finish. Learn about polishing, sanding, and varnishing techniques that seamlessly integrate bonded marble into its surroundings.
From foundational steps to finishing touches, this guide unlocks the secrets behind bonding two pieces of marble with finesse and precision. Get ready to turn your creative visions into reality as we embark on this captivating journey through the realm of marble bonding excellence.
What is Marble?
Contents
Marble, a mesmerizing natural stone forged from limestone under intense heat and pressure, stands as a testament to elegance, durability, and versatility. From the awe-inspiring architecture of ancient Greece and Rome to the opulent interiors of modern luxury designs, marble has transcended time as a cherished choice for countless applications. In this captivating article, we will explore the enchanting characteristics of marble, unravel its bonding techniques, and emphasize the vital role of meticulous care and maintenance in preserving its innate beauty.
Enchanting Characteristics of Marble:
- Mesmerizing Veining Patterns: During its formation, mineral impurities interweave to create intricate veins that meander across the surface, boasting an array of captivating colors and intensities.
- Kaleidoscope of Colors: From pristine whites and charismatic grays to classic blacks and alluring pinks and greens, marble offers an extensive palette of hues to ignite boundless design possibilities.
- Crystalline Composition: At its core lies calcium carbonate, endowing marble with its crystalline structure that catches the light with sublime radiance.
- Susceptibility to Etching and Staining: The delicate nature of marble renders it vulnerable to etching and staining when exposed to acidic substances. Hence, utmost care and vigilance are essential for maintaining its pristine allure.
Masterful Bonding Techniques for Marble:
Adhesive Bonding:
- Epoxy Resin: A formidable two-component adhesive blending resin and hardener crafts a robust bond suitable for fusing large or weighty marble pieces together.
- Polyester Resin: Another remarkable two-component adhesive encompassing resin and catalyst excels in uniting smaller or thinner marble elements harmoniously.
- Pristine Surface Preparation: A meticulous pursuit of cleanliness and dryness forms the foundation for a steadfast bond that withstands the test of time.
Mechanical Bonding:
- Mighty Metal Dowels or Pins: Drilled diligently into both marble pieces, these steadfast connectors provide an added layer of strength when coupled with adhesive.
- Sturdy Metal Brackets or Clamps: Secured firmly to the edges of marble components, these stalwart companions lend crucial support, particularly for horizontal surfaces.

Adhesives for Bonding Marble
Marble, a symbol of elegance and beauty, demands nothing less than a bond that can withstand the test of time. As an expert in the art of bonding marble, I am here to reveal the secrets behind achieving a flawless connection between these magnificent stones. Get ready to embark on a mesmerizing journey through the world of adhesives, where magic meets marble.
In the realm of marble bonding, not all adhesives are created equal. This captivating natural stone requires special adhesive properties to ensure a bond that is both strong and durable. Let’s dive into this enchanting world and uncover the perfect match for your marble bonding needs.
Enter epoxy resin, the reigning champion of marble bonding. Renowned for its exceptional strength and durability, epoxy resin is a two-component adhesive that combines a resin and a hardener before application. But hold on. Don’t rush to grab any old epoxy resin. Choose a high-quality product specifically designed for stone applications. These adhesives are formulated with the perfect viscosity and setting time to create a seamless bond between your prized marble pieces.
But that’s not all. We must also welcome polyurethane adhesive into our bonding arsenal. With its impressive bond strength and flexibility, polyurethane adhesives are ideal for marble, a material that may expand and contract with temperature changes. Available in one-part and two-part formulations, polyurethane adhesives offer versatility and ease of use. Just remember that one-part adhesives are ready to go straight from the container, while two-part formulations require mixing before application.
Now that we have identified the star players in our adhesive lineup, let’s explore the steps necessary to achieve a successful bond. Remember, dear reader, that the foundation of any great bond lies in meticulous preparation. Before applying any adhesive, take the time to thoroughly clean the surface of your marble. Rid it of dirt, dust, and other contaminants that may jeopardize the integrity of your bond.
Smooth things out, my friend. Ensure that the surfaces you plan to bond are flat and free from imperfections. If needed, a gentle sanding or polishing session may be in order. After all, perfection is not achieved by chance but through deliberate care and attention.
Epoxy Resin for Bonding Marble
Prepare to be captivated as we explore the extraordinary strength and durability of this adhesive wonder. Let’s embark on a journey that will unlock the secrets to creating unbreakable bonds between two pieces of marble.
First, let’s review the fundamentals. Epoxy resin is renowned for its exceptional bonding capabilities, making it the perfect choice for marble bonding. This remarkable adhesive consists of two components – a resin and a hardener – that, when combined in equal parts, initiate a chemical reaction resulting in an unbeatable bond.
Now, let’s dive into the process itself. Before applying the epoxy resin, proper preparation of the marble surfaces is vital. Cleanliness is paramount. Use a mild detergent and water solution to thoroughly cleanse the surfaces, ensuring they are free from any dirt, dust, or debris. Rinse them meticulously and make sure they are completely dry. We want those marble pieces to shine bright and be ready for their magnificent bonding adventure.
To enhance adhesion between the marble and epoxy resin, a touch of roughening is in order. Gently sanding the surfaces with sandpaper or using a diamond abrasive pad will create a texture that allows our adhesive hero to grip onto the marble with resolute strength, resulting in an even stronger bond.
Now, let’s move on to the exhilarating part – mixing the marvelous epoxy resin. Follow the manufacturer’s instructions diligently to achieve optimal bonding properties. Thoroughly combine both the resin and hardener – perfection lies in these precise details.
With brush or spatula in hand, apply a thin and even layer of epoxy resin to one of the marble surfaces. Remember, less is more in this magical realm of marble bonding. Avoid excessive buildup for an impeccable result.
Now comes the grand finale – uniting those marble pieces. Press them together firmly but gently, ensuring that the adhesive is evenly distributed between them. To keep everything in place during the curing process, employ clamps or weights. Brace yourself, as this bonding experience will be like no other.
Now, patience becomes your greatest virtue. Allow the epoxy resin the time it needs to work its enchantment. Adhere to the recommended curing time provided by the manufacturer, which can range from a few hours to 24 hours. Do not rush this step – true perfection takes time.
Polyester Resin for Bonding Marble
Prepare to be amazed as we delve into the captivating world of marble bonding with polyester resin. This versatile and durable adhesive offers a multitude of advantages when it comes to bonding marble pieces together. Let’s explore why polyester resin is the ultimate choice for bonding marble.
First and foremost, polyester resin is compatible with various types of marble, making it the perfect adhesive for bonding different marble pieces. Whether you’re working with natural or engineered marbles, rest assured that polyester resin will create a strong and seamless bond that can withstand the test of time. It’s a bond you can trust, regardless of the type of marble you’re working with.
But wait, there’s more. Polyester resin doesn’t just create any bond – it creates a bond that is incredibly strong. When properly applied, it forms a connection between two pieces of marble that can endure normal wear and tear. This is particularly important for marble applications that require structural integrity, such as countertops or flooring. With polyester resin, you can have peace of mind knowing that your marble installation is secure and long-lasting.
Now let’s talk about ease of application. Even if you’re not a professional, working with polyester resin is a breeze. It comes in two parts – the resin and the hardener – which need to be mixed together before application. Once mixed, the resin provides ample working time, allowing you to apply it meticulously and make any necessary adjustments before it sets. It’s like having your own magic potion for marble bonding – easy to use and highly effective.
But what about aesthetics? Polyester resin has got you covered in that department too. It’s available in different colors, allowing you to select a shade that perfectly matches the color of your marble. This means that the adhesive seamlessly blends in with the surrounding marble, creating a flawless and visually appealing bond. No more unsightly adhesive lines ruining the beauty of your marble masterpiece.
Polyester resin isn’t just a one-trick pony. It’s a versatile adhesive that can be used for more than just bonding marble pieces together. If you have cracks or voids in your marble surfaces, polyester resin can come to the rescue. It fills in those imperfections and provides additional support, helping to restore the appearance and functionality of damaged marble. With polyester resin, you can give your marble a little extra tender loving care.
Mechanical Methods for Bonding Marble
In our previous section, we marveled at the wonders of polyester resin as a magical adhesive. But now, it’s time to explore an alternative approach: mechanical methods for bonding marble. These physical mechanisms create unbreakable connections between marble pieces, offering a different way to join them together. So buckle up and get ready to embark on a thrilling journey through the various mechanical methods and their considerations.
First on our adventure is the use of dowels or pins. Imagine drilling holes into both pieces of marble and inserting dowels or pins to create a secure connection. These mighty dowels or pins, often made of stainless steel or brass, provide the strength and stability needed for a lasting bond. They fit together like two puzzle pieces, ensuring your marble pieces stay firmly united.

But that’s not all. Another exciting method involves clamps or brackets. Just picture it: these powerful clamps or brackets wrapped around the edges of your marble pieces, holding them together tightly. With a twist of a screw or fastener, your marble pieces are locked in place, creating a bond that even Hercules would envy. This method guarantees a strong connection, leaving you with peace of mind and a sense of awe.
Now, let’s venture into more unconventional territory: metal straps or plates. By attaching these sturdy straps or plates to the surface of your marble using screws or fasteners, you add an extra layer of support and stability. It’s like giving your marble pieces a superhero cape. This method is particularly useful for larger or heavier marble pieces that need some extra reinforcement.
Before you set off on your own marble bonding journey, remember to consider some key factors. These mechanical methods may require expert knowledge and specialized tools. Drilling holes in marble demands precision and finesse to avoid any unwanted damage. Attaching metal straps or plates requires a good understanding of proper fastening techniques. So don’t hesitate to seek guidance from the marble bonding wizards to ensure you’re on the right track.
Mechanical methods for bonding marble offer a fantastic alternative when adhesive bonding is not feasible or desired. However, like any adventure, it’s crucial to consider your project’s specific requirements. Each case may call for a different method, and consulting with the experts will help you choose the most suitable approach for your marble bonding needs.
Using Metal Dowels or Pins to Bond Marble
Today, we embark on a journey that combines precision, drilling prowess, and the magic of epoxy adhesive. Brace yourself as we delve into the secrets of using metal dowels or pins to create unbreakable connections between marble pieces. Let’s unlock the true potential of your marble creations.
Step 1: Marking the Sacred Grounds
Our first step in this marvelous bonding technique is to mark the territory where our metal dowels or pins will find their place. With unwavering precision, measure and mark the exact locations on both marble pieces. This meticulous attention to detail ensures a flawless fit.
Step 2: Drilling into Marble Mastery
Once our marks are set, it’s time to unleash the power of drilling. Equip yourself with a masonry drill bit specially designed to conquer stone or masonry. With controlled force, pierce through the tough exterior of the marble, creating holes that will serve as sanctuaries for our metal dowels or pins.
Step 3: Banishing Debris and Dust
No hero can triumph with obstacles in their path. In our bonding quest, we must cleanse our drilled holes from any debris or dust that may hinder our progress. Wield the powers of compressed air or a trusty vacuum cleaner to ensure smooth and unobstructed pathways.
Step 4: The Enigma of Epoxy Adhesive
Now, prepare to meet the star of our bonding show – epoxy adhesive. Select an epoxy adhesive specially formulated for stone materials, ensuring a bond that can withstand the test of time. Apply this mighty adhesive into our waiting holes, ready to embrace our metal dowels or pins.
Step 5: The Mighty Insertion
It’s time for the grand moment – the insertion of our metal dowels or pins. With steady hands and unwavering determination, firmly push the dowels or pins into their designated holes. But remember, we must tread carefully, ensuring a balance between force and gentleness to protect our precious marble.
Using Metal Brackets or Clamps to Bond Marble
Marble, renowned for its timeless beauty and elegance, has enchanted us for centuries. But when it comes to uniting two pieces of this exquisite material, we need a method that is as unyielding as the marble itself. Enter metal brackets and clamps – the unsung heroes of marble bonding. In this captivating article, we will unveil the steps to harness the power of these steadfast tools and achieve a bond that will endure the ages.
Step 1: Preparing the Battlefield
Before embarking on the realm of metal brackets and clamps, it is essential to ensure that your marble pieces are primed for battle. Wipe away any debris or dust that may have settled on their surfaces, employing a clean cloth dampened with water or a gentle detergent. A pristine battlefield lays the groundwork for unbreakable connections.
Step 2: Choosing Your Armor
Metal brackets and clamps come in an array of shapes and sizes, tailored to accommodate the weight and dimensions of your marble pieces. Select brackets or clamps that possess the fortitude necessary to withstand the task at hand, providing unwavering strength and pressure for a resolute bond.
Step 3: Positioning for Victory
Now is the moment to align your marble pieces with utmost precision. Place the brackets or clamps over the edges of the marble, ensuring their even distribution along the length of the bond. This strategic positioning sets the stage for an indomitable connection.
Step 4: The Final Tightening
With your marble pieces meticulously aligned, it is time to tighten the screws or bolts on the brackets or clamps. Employ a screwdriver or wrench to apply uniform pressure on both sides of the bond. Remember, equilibrium is paramount – avoid excessive tightening, as it could inadvertently mar your precious marble.
Step 5: Patience is a Virtue
Allow the adhesive or glue to cure as stipulated by the manufacturer’s instructions. This may necessitate leaving the brackets or clamps in place for a designated period, exercising the virtue of patience. A bond forged with time and care is one that will withstand the trials of eternity.
Preparing Surfaces Before Bonding Marble
Marble, the embodiment of elegance and timeless beauty, demands a bond that can withstand the test of time. To achieve this, the surfaces must be meticulously prepared before bonding. In this captivating blog post, we will delve into the art of surface preparation for marble bonding, exploring the necessary steps to ensure an unyielding and enduring connection.
Step 1: Cleaning – A Fresh Start:
Just like a masterpiece begins with a clean canvas, bonding marble requires pristine surfaces. Begin by removing any traces of dirt, dust, or debris with a gentle detergent and water solution. Harsh chemicals and abrasive cleaners are forbidden, as they pose a threat to the delicate marble. After cleansing, meticulous drying is paramount to eradicate any lingering moisture that could disrupt the bonding process.
Step 2: Roughening – Creating a Strong Grip:
To forge an unbreakable bond, roughening the marble surfaces is vital. This can be achieved through the art of sanding with fine-grit sandpaper or utilizing a mechanical sander armed with a diamond-grit pad. The objective is to engender a slightly coarse texture that amplifies the adhesion of the bonding agent. With this step, you lay the foundation for an indomitable bond.
Step 3: Priming – The Secret Ingredient:
A bonding agent’s greatest ally is a specially formulated primer designed exclusively for marble bonding. This magical elixir not only enhances adhesion but also guarantees a robust connection between the two marble pieces. Adhere strictly to the manufacturer’s instructions when applying the primer, including allowing ample drying time before proceeding with the bonding process. This secret ingredient holds the key to an everlasting bond that defies time itself.
Step 4: Alignment – Perfecting the Symphony:
Before embarking on the bonding process, take a moment to ensure that your marble pieces harmoniously align. Gently place them together and meticulously inspect for any gaps or misalignment. Fear not if adjustments are required; the aid of shims and leveling tools will bring forth a flawless fit. Remember, alignment is the final brushstroke that creates a seamless and visually captivating bond.
eEcaSrE2ZSA” >
Conclusion
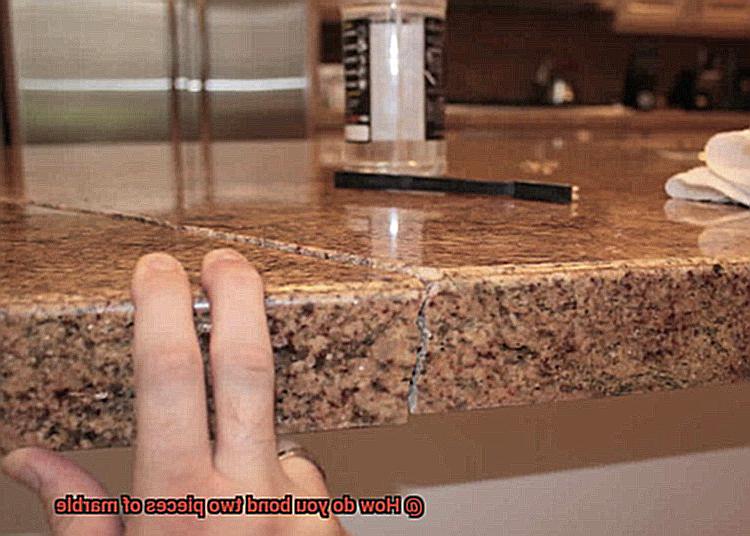
Bonding two pieces of marble requires precision, skill, and the right materials. To achieve a strong and durable bond, there are several methods you can use. One common technique is using an epoxy adhesive specifically designed for marble. This adhesive provides a strong bond that can withstand the test of time.
To begin the bonding process, ensure that both surfaces are clean and free from any dirt or debris. Next, apply the epoxy adhesive to one of the marble pieces using a small brush or applicator. Be sure to spread it evenly across the surface.
Once the adhesive is applied, carefully align the two pieces of marble together, ensuring a tight fit. Apply gentle pressure to ensure proper contact between the surfaces. Allow the adhesive to cure as per the manufacturer’s instructions.
Another method for bonding marble is using a polyester resin. This type of adhesive is commonly used in stone fabrication and provides excellent bonding strength. Similar to epoxy adhesives, it is important to clean and prepare the surfaces before applying the resin.
Apply a thin layer of resin onto one of the marble pieces, then press them firmly together. Use clamps or weights to hold them in place while the resin cures. It’s crucial to follow the recommended curing time provided by the manufacturer for optimal results.
In addition to adhesives, mechanical fasteners such as metal dowels or anchors can also be used to reinforce the bond between two pieces of marble. These fasteners provide additional strength and stability, especially for larger or heavier objects.
When bonding marble, it’s essential to consider factors such as temperature changes and moisture levels that may affect the longevity of your bond. Taking proper precautions during installation and maintenance will help ensure a secure and lasting bond between your marble pieces.
In conclusion, bonding two pieces of marble requires careful preparation, appropriate adhesives or fasteners, and attention to detail throughout the process.