Ever found yourself mesmerized by the sheer beauty and precision of a flawlessly paved walkway or patio? If you’ve ever wondered how the pros achieve such jaw-dropping results, prepare to be blown away. In this blog post, we’re diving headfirst into the captivating world of pavers, unraveling the secrets and techniques that professionals use to transform outdoor spaces into stunning works of art.
Imagine stepping into a realm where each stone has a purpose, every angle is meticulously measured, and each joint seamlessly blends with its surroundings. Welcome to the enchanting universe of professional paver installation, where skilled craftsmen turn ordinary materials into extraordinary wonders. Whether it’s a whimsical garden path, an impressive driveway, or an elegant courtyard, these experts possess the know-how to bring your vision to life.
Our adventure begins with meticulous planning and preparation. We’ll delve deep into the crucial steps taken before even laying a single paver – from scrutinizing the site to considering design elements and getting down and dirty with excavation. From there, we’ll uncover the vital role of a solid and level base – the rock-solid foundation that ensures your installation stands strong for years to come.
Once all groundwork is laid (pun intended), get ready for an inside look at the intricate process of paver laying. Discover firsthand the array of techniques professionals employ to achieve that flawless finish – from carefully selecting patterns to cutting and shaping methods that leave no room for error. Oh, and let’s not forget about their borderline obsession with attention to detail. We’ll also touch on why jointing sand and sealing are absolute musts for longevity and minimal maintenance.
Whether you’re itching to become a DIY paving enthusiast or simply appreciate the artistry behind an outdoor masterpiece, this blog post is your golden ticket to understanding how professionals work their magic. So buckle up and prepare for an eye-opening journey through the captivating world of paver installation.
Measuring and Marking the Layout
Contents
In the world of paver installation, precision reigns supreme. Before embarking on the journey of transforming a plain space into a stunning paved area, professionals understand the critical importance of accurately measuring and marking the layout. This meticulous process sets the stage for a successful project, ensuring not only accuracy and symmetry but also functionality and durability. Join us as we delve into the fascinating world of measuring and marking the layout for paver installation.
The Dance of Symmetry and Aesthetics:
At the heart of every pristine paver installation lies accurate measurements. These measurements are the key to unlocking a symmetrical masterpiece that fits together like a finely-crafted puzzle.
By precisely calculating the dimensions and quantity of pavers required, professionals eliminate unsightly gaps and uneven edges. Armed with stakes and string lines, they meticulously mark out the layout, maintaining straight lines and perfect right angles that are visually captivating.
The Art of Efficient Drainage:
A well-laid paver surface is not only visually appealing but also functional. Professionals understand the importance of planning ahead and considering factors such as drainage and slope during the measuring and marking process.
By carefully assessing the area, they ensure that water finds its proper path, preventing unwanted accumulation on the surface. This meticulous planning guarantees efficient runoff and protects against potential water damage.
Building on Solid Foundations:
The success of any paver installation lies in its foundation. Accurate measurements and markings serve as the cornerstones for a robust base layer. Professionals excavate the area to an appropriate depth, removing any unwanted soil or vegetation. They then meticulously prepare a stable foundation using crushed stone or gravel, ensuring even distribution and compaction. Precise measurements guarantee a solid base upon which every paver rests securely.
The Quest for Levelness:
Aesthetics aside, levelness is an essential aspect of any well-executed paver installation. A carefully measured layer of sand acts as a cushion, allowing for adjustments and creating a smooth, even surface. Professionals employ screeding techniques, using their keen eye and precise measurements to distribute the sand with exactness. Each paver finds its perfect height, resulting in a harmonious expanse that invites admiration and delight.
Excavating the Area
Embarking on the journey of turning a mundane space into a paver paradise is like conducting a symphony. Just as a maestro carefully measures and marks every note, professionals in the paver industry meticulously measure and mark the layout, ensuring each paver fits together flawlessly. But before this masterpiece can come to life, there’s a crucial step that demands our attention: excavation. In this captivating article, we will explore the significance of excavation before laying pavers and delve into the essential tools and equipment needed to conquer this task with finesse. So put on your hard hat and let’s dig deep.
The Foundation of Success: Excavation Sets the Stage
Excavation marks the beginning of our journey. By removing existing surface materials like grass, soil, or concrete, we create a level base for the paver installation. But why is this excavation so important? Well, by eliminating any organic material, we ensure a stable and long-lasting foundation that won’t settle or shift over time. It’s like clearing the canvas for our artistic vision to flourish.
The Arsenal of Excavation: Unleashing the Power Tools
To excavate like true masters, we must wield a vast array of tools and equipment. Imagine yourself gripping a trusty shovel, a wheelbarrow at your side ready to whisk away debris, and perhaps even an excavator or compactor for larger projects. These tools are more than mere instruments; they are the keys to efficiently and effectively removing existing materials, clearing the path for our paver masterpiece.
Marking Your Territory: Outlining Your Grand Design
Before we dive into the depths, we must first mark the area where our pavers will be laid. This involves using stakes and strings to outline the desired shape and size of the paved paradise. But accuracy is not a mere suggestion; it is an absolute necessity. By meticulously marking the boundaries, we ensure a precise installation, akin to an artist sketching the initial lines of their opus.
Preparing the Base Layer
In our last article, we delved into the intricacies of excavation, setting the stage for a flawless paver installation. Now, let’s take a deeper dive into the crucial next step: preparing the base layer. Think of it as the foundation of your paver paradise – strong, stable, and ready to support your artistic vision. So don your hard hat and let’s embark on this journey together.
Clear with Precision:
Before we can lay those gorgeous pavers, we must create a clean canvas. Bid adieu to unwanted vegetation, debris, and remnants of old pavement that might lurk in your project area. Trust me, this meticulous tidying-up extravaganza will pay off handsomely later.

Boundaries that Inspire:
Imagine a symphony of stakes and strings, gracefully choreographed across your project area. This is no ordinary performance; it’s a masterpiece in progress. By marking the boundaries with precision, you’ll have a clear visual of your layout, ensuring each paver finds its rightful place on this grand stage.
Dig Deep, Unleash Greatness:
Now it’s time to unearth greatness – quite literally. Excavate the soil to an appropriate depth, considering factors such as paver type, climate conditions, and intended use of the area. Aim for a depth of 6-8 inches to give your base layer sufficient room to work its magic.
Solidify with Conviction:
Once you’ve reached your desired depth, unleash the power of your trusty compactor or plate tamper upon that soil. We want our base layer to be as solid as a rock – no room for settling. By compacting the soil with conviction, you’re creating a stable surface that will anchor those pavers for years to come.

The Secret Ingredient: Crushed Stone:
Now, let’s unveil the secret ingredient to a successful base layer: crushed stone. Spread a layer, approximately 4-6 inches thick, over the compacted soil. This stone acts as a sub-base material, boasting excellent drainage capabilities and providing crucial support for your pavers. Remember to give it a resounding compaction with a vibratory plate compactor – snug and secure.
Spreading and Leveling Sand
Step into the world of paver installation mastery as we unveil the secrets behind the essential process of spreading and leveling sand. This intricate technique ensures a stable and even surface for your pavers, guaranteeing their longevity and functionality. Prepare to be captivated by the artistry involved in creating a perfect base for your paver paradise.
Preparing the Base: Establishing a Solid Foundation
Embark on your paver installation journey by meticulously preparing the base layer. Delve deep into the earth, excavating to the desired depth and removing any organic material that may undermine your masterpiece. With unwavering determination, compact the soil or aggregate base to create a rock-solid foundation that will withstand the test of time.
The Perfect Bedding Layer: A Cushion of Stability
As you lay the groundwork, it’s time to introduce the bedding sand, a vital component in this artistic endeavor. Referred to as “sharp sand” or “builder’s sand,” this coarse yet versatile material promotes optimal drainage and steadfastly prevents any future shifting. Carefully spread this majestic cushion evenly over your meticulously prepared base, aiming for an ideal thickness of approximately 1 inch.
Tools of the Trade: Equipping Yourself for Excellence
No artisan is complete without their meticulously chosen tools, and professional paver installers are no exception. Arm yourself with shovels, rakes, and screed boards as you embark on this creative journey. These trusted companions will aid you in distributing and leveling the sand flawlessly, ensuring a canvas worthy of your artistic vision.
Spreading Sand with Finesse: Creating a Blank Canvas
Unleash your inner maestro as you pick up your rake and delicately distribute the sand across your carefully prepared base. Let no corner go untouched as you ensure complete coverage, leaving no room for imperfections to mar your masterpiece. With every stroke, you inch closer to the perfect canvas for your paver installation.
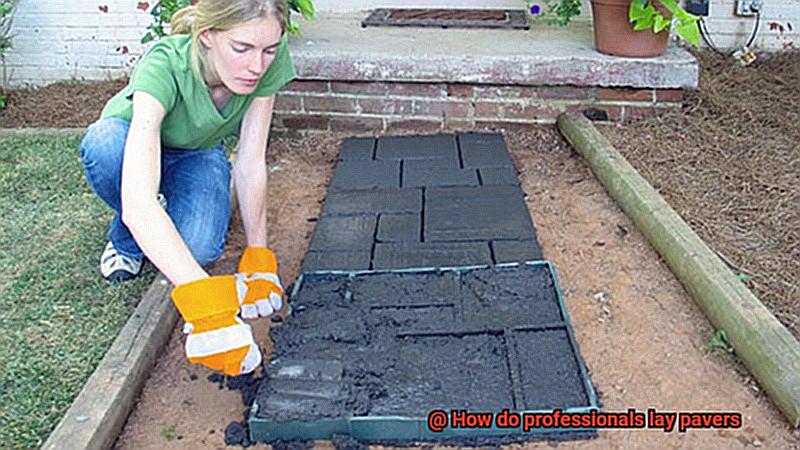
Laying the Pavers
In our previous discussion, we uncovered the secrets of preparing the base for our paver installation masterpiece. Today, we embark on the next chapter of our journey: laying the pavers themselves. So grab your trusty tools and let’s dive right in.
Planning and Preparation: Leveling the Playing Field
Before we get our hands dirty, let’s ensure our base is pristine. With shovels and rakes in hand, we remove any debris and level the ground, creating a flawless canvas for our pavers to shine.
The Foundation: Building on Stability
Now that our base is ready, it’s time to create a rock-solid foundation. We carefully lay down a layer of compacted gravel or crushed stone, providing stability and ensuring proper drainage. The thickness of this layer depends on our project’s requirements – attention to detail is paramount.
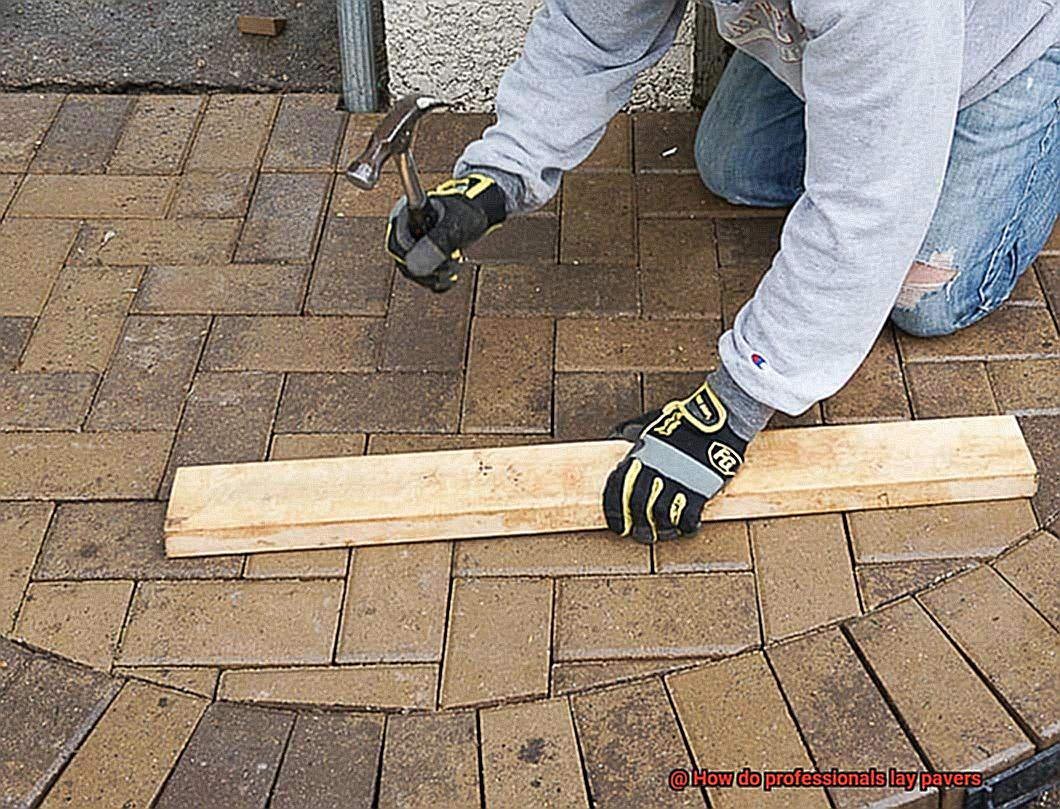
Getting Our Lines Straight: Guiding the Way
To avoid straying off course, we employ string lines and stakes – tried and true techniques. These trusty guides help us establish the desired layout and pattern for our pavers, ensuring a visually stunning result that will impress even the most discerning eye.
Sand as Our Canvas: Unleashing Our Inner Artist
With our foundation set, it’s time to unleash our creativity by spreading a layer of sand over the gravel base. This sand acts as a cushion, allowing for slight adjustments in height and leveling as we lay the pavers. Grab your screed boards – it’s time to create a smooth surface like no other.
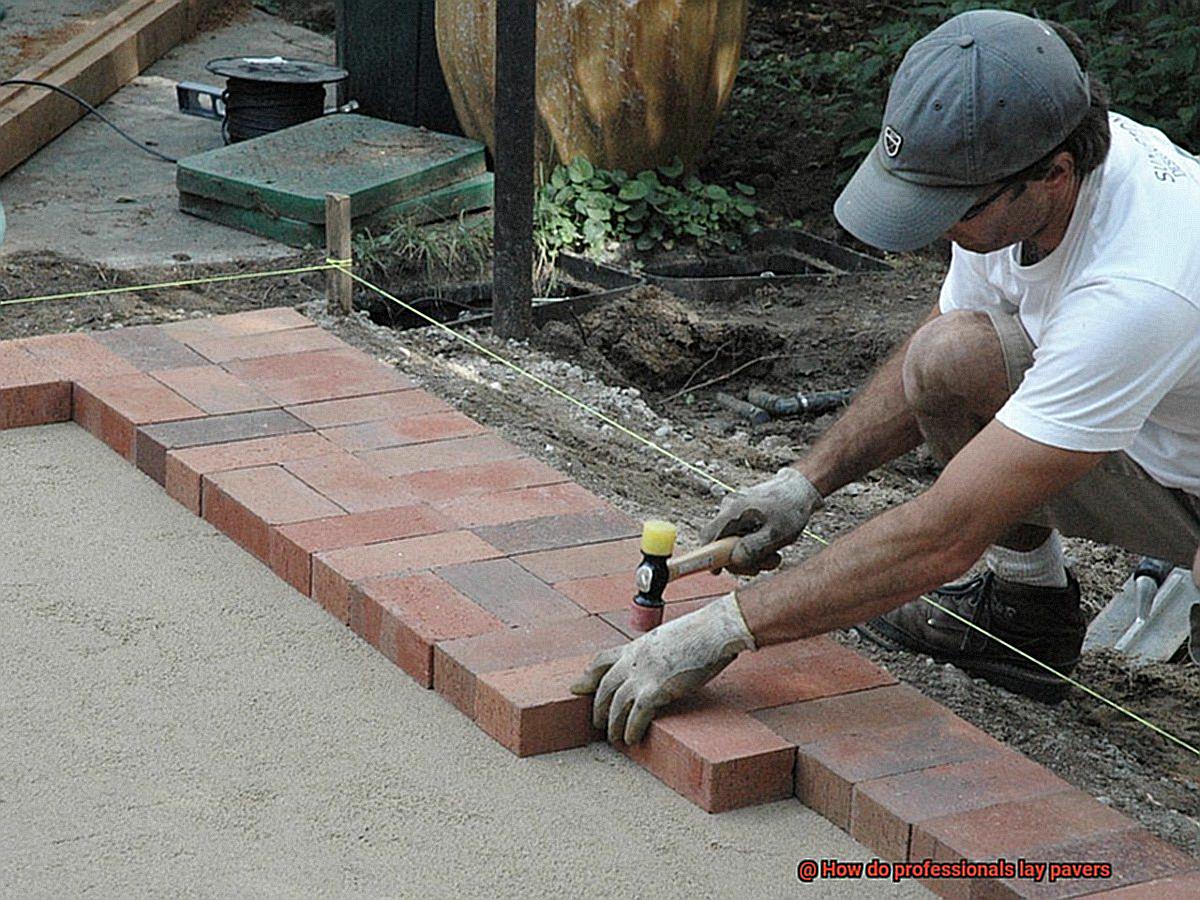
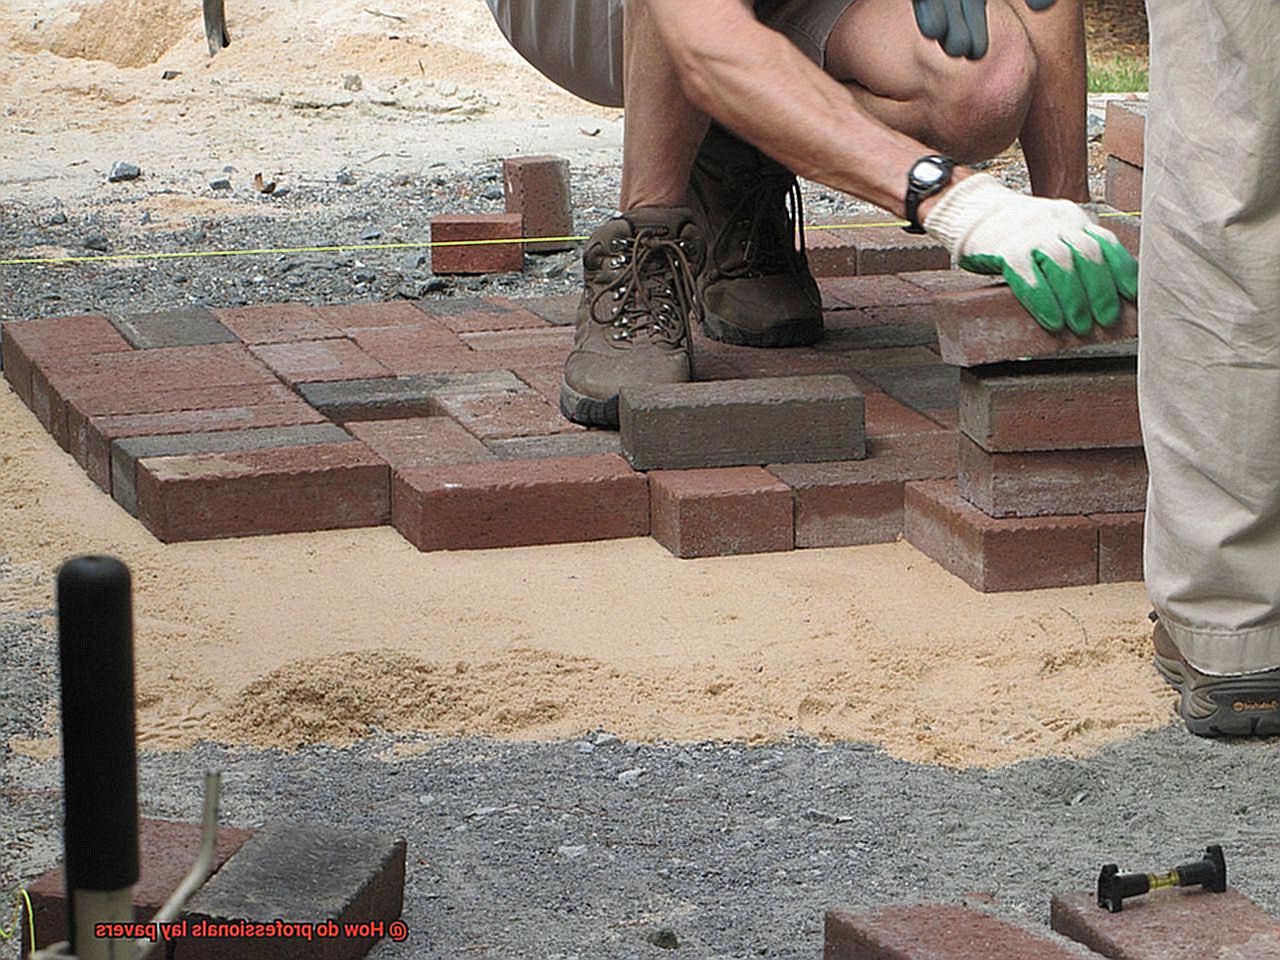
The Moment of Truth: Laying the Pavers
Now comes the exhilarating part – laying the pavers themselves. Starting from one corner or edge, we place each paver with precision, ensuring consistent spacing and alignment. It’s like solving a puzzle, each paver finding its perfect place in the grand design.
The Art of Precision: Crafting Perfection
Sometimes, our creative vision demands adjustments. This is where our specialized tools shine. Whether it’s the graceful glide of a wet saw or the rhythmic tap of a chisel and hammer, we ensure each paver fits seamlessly around curves, edges, or obstacles. Remember, precision is key to achieving that polished, professional finish.
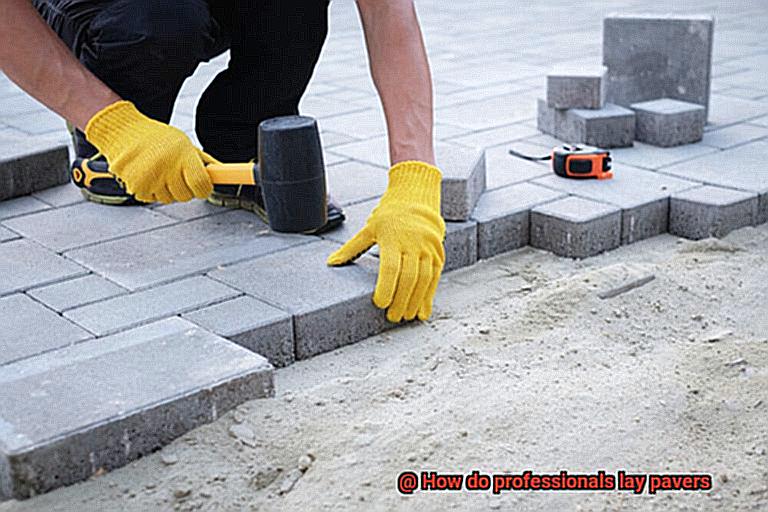
Securing the Pavers with a Rubber Mallet or Plate Compactor
Discover the secrets of securing pavers with finesse, using the versatile rubber mallet or the mighty plate compactor. Just like the final strokes on a masterpiece, this crucial step ensures a stunning and long-lasting landscape that will stand the test of time.
The Versatile Rubber Mallet:
The rubber mallet is the trusty companion of professionals in paver installation. Its ingenious design, made of rubber, provides the perfect balance between force and protection for your pavers. With each gentle tap, you ensure that every paver is firmly seated on the base material.
- Work systematically from one end to the other, paying attention to levelness and alignment.
- Protect the surface of your pavers while applying just enough force for secure placement.
The Mighty Plate Compactor:
For larger-scale projects, professionals turn to the mighty plate compactor. This powerful tool, with its heavy metal plate vibrating at lightning speed, helps you achieve optimal compaction and lock your pavers into place.
- Guide the plate compactor over the surface of the pavers with precision and care.
- Ensure even compaction to create a stable and uniform surface.
Attention to Detail:
Professionals never overlook any detail during this critical step. They understand that a flawless finish requires meticulous attention.
- Make minor adjustments as needed, tapping or compacting specific areas until perfection is achieved.
- Check for levelness and alignment to create a visually stunning paved area.
- Fill gaps between pavers with jointing sand or suitable material for stability and prevention of shifting.
The Final Flourish:
Now it’s time for the final flourish—a masterpiece that will leave you in awe. Professionals execute this last step with unwavering precision.
- Perform a final pass with the plate compactor to ensure a well-compacted and stable surface.
- Minimize future settling or movement of your pavers for a durable and long-lasting landscape.
- Step back and admire your creation—a perfectly secured and visually stunning paved area.
Filling Joints with Polymeric or Jointing Sand
As we embark on our quest for the perfect landscape, let’s explore the final frontier – filling those joints. Today, we’re about to uncover the secret to a breathtaking and enduring masterpiece: the magic of polymeric and jointing sand.
The Marvels of Polymeric Sand:
Prepare to be amazed by the unsung hero of the paver world – polymeric sand. This sand, mixed with silica and polymers, possesses extraordinary powers when activated by water. It not only stabilizes your paver surface but also banishes weed growth from your paradise.
Step 1: Laying the Foundation:
Before we dive into the enchantment of filling joints, let’s lay a solid foundation. Once your pavers are perfectly installed, it’s time to fill those gaps. Begin by applying a layer of regular sand, creating a strong base for the upcoming magic.
Step 2: Unleashing the Magic:
Now, get ready for the exhilarating part. Spread the polymeric or jointing sand across your pavers’ entire surface. Armed with a trusty broom or brush, ensure every crevice is filled evenly. Let the sand work its way into every joint, creating a seamless and captivating finish.
Step 3: Activating the Spell:
It’s time to awaken the sand’s binding powers. Gently spray water using a hose or mist the surface. But remember, my friends, moderation is key. Avoid flooding the area, as we want just enough water to unlock the sand’s magic without overwhelming it. A delicate touch is all it takes.
Step 4: The Waiting Game:
Patience becomes our greatest ally now. Allow the sand time to weave its wonders. As it hardens and forms a strong bond between the pavers, remember to resist the urge to walk on or disturb the surface. Let it fully cure, and your patience will be rewarded with a masterpiece that stands the test of time.
Step 5: The Final Flourish:
Once the polymeric or jointing sand has worked its magic, it’s time for the grand finale. Sweep away any excess sand using a broom or brush. Removing all loose sand ensures the stability of your pavers, leaving behind a flawless work of art.
Compacting the Entire Surface
Today, we embark on a journey to unlock the secrets of compacting the entire surface when laying pavers professionally. Get ready to witness the magic unfold as we delve into the key steps that ensure a masterpiece built to withstand the test of time. So grab your gear and let’s explore the fascinating world of compacting like a pro.
Preparing the Canvas:
Before we set our plans in motion, let’s prepare the canvas. Clear away any unwanted vegetation or debris, leaving behind a pristine surface that will serve as the backdrop for our paver masterpiece. It’s time to let our pavers shine, unencumbered by weeds or rocks.
Building a Solid Base:
With our canvas ready, it’s time to lay the foundation. Spread a layer of crushed stone or gravel evenly across the entire surface, creating a robust backbone for our project. This layer not only aids in drainage but also provides much-needed stability. Remember, the thickness of this layer will depend on your specific project requirements—typically around 4 to 6 inches for residential applications.
The Compaction Dance:
Now, let’s have some fun with compaction. Armed with your trusty plate compactor or vibrating roller, apply force to the surface in multiple passes. Move back and forth with purpose, evenly distributing your efforts across every inch. And don’t forget those edges and corners—they demand extra attention. For these tricky spots, rely on hand tampers or small handheld compactors to leave no stone unturned.
Level up:
As you twirl and whirl with your compactor, periodically check the level of your surface using a straight edge or level. This step ensures an even playing field for your pavers—a harmonious symphony of perfection. Let no uneven surprises mar our masterpiece.
A Splash of Water:
Now that the compaction is complete, let’s give our creation a refreshing drink. Gently sprinkle water over the surface, coaxing any lingering loose particles into place and promoting further compaction. Think of it as quenching the thirst of your hardworking base, ensuring its resilience for years to come.
xRSzAa3ygGE” >
Conclusion
In conclusion, professionals take great care and precision when laying pavers.
They begin by meticulously preparing the area, ensuring a solid foundation for the pavers to rest upon. With expert skill, they lay each paver in perfect alignment, creating a visually stunning pattern.
The professionals then carefully fill the gaps with sand or mortar, securing the pavers in place and preventing any shifting or movement. They finish off the project with meticulous attention to detail, ensuring that every edge is smooth and every joint is tight.
The result is a beautifully crafted surface that not only enhances the aesthetic appeal of a space but also withstands the test of time.