Well, you’re in for a treat because today we’re diving headfirst into the captivating world of fake eyelashes. Specifically, we’ll be unraveling the secrets of applying fake eyelashes with glue for beginners – so even if you’ve never dabbled in falsies before, fret not.
Picture yourself fluttering those luxuriously long lashes, effortlessly commanding attention from every corner of the room. With a little practice, dedication, and the right technique, you too can achieve this mesmerizing look and feel like a million bucks.
In this article, we’ll guide you through each step of the process for applying fake eyelashes with glue. We want to ensure that every time you take on this adventure, you achieve stunning and eye-catching results. From handpicking the perfect lashes that complement your unique eye shape to prepping your natural lashes for a seamless blend – consider us your personal lash gurus. And don’t worry; we’ll also delve into the dos and don’ts of lash application to steer clear of any sticky situations.
So whether you’re gearing up for a special occasion or simply want to add some pizzazz to your everyday look, keep reading to uncover the secrets behind mastering the art of fake eyelashes with glue. Get ready to elevate your lash game and turn heads with your irresistible eyes.
What You Need to Apply Fake Eyelashes with Glue
Contents
- 1 What You Need to Apply Fake Eyelashes with Glue
- 2 Preparing Your Natural Lashes
- 3 Measuring and Trimming the Fake Lashes
- 4 Applying the Glue to the Fake Lashes
- 5 Positioning and Securing the Fake Lashes
- 6 Blending Your Natural and Fake Lashes Together
- 7 Removing Your Fake Eyelashes at the End of the Day
- 8 Tips for Applying Fake Eyelashes with Glue for Beginners
- 9 Conclusion
Fake eyelashes with glue are the ultimate secret weapon for achieving captivating eyes. If you’re new to the world of falsies, fear not. This comprehensive guide will equip you with the essential tools and expert techniques you need for flawless application. Get ready to rock stunning lashes that will leave everyone in awe.
Find Your Perfect Match:
To start, choose false eyelashes that complement your eye shape and desired look. Whether you crave a natural flutter or a bold statement, there’s a lash style out there for you. You can find a vast selection at beauty supply stores, drugstores, or conveniently online.
Invest in Superior Adhesive:
Don’t settle for anything less than top-notch eyelash adhesive. Opt for a high-quality glue specifically designed for eye use and suitable for sensitive skin. Clear or black adhesive and latex-based or latex-free formulas are available to cater to your personal preferences.
Prep Those Lashes:
Before applying fake lashes, ensure your natural lashes are pristine. Cleanse your eyelids thoroughly, removing all traces of makeup or oils. This crucial step allows the glue to adhere better and extends the longevity of your lash application.
Must-Have Tools for Effortless Application:
- Precision Tweezers or Lash Applicators: These indispensable tools offer ultimate control and accuracy during application. Choose between tweezers with pointed ends or specialized lash applicators with curved tips. These tools make it a breeze to position the lashes as close to your natural lash line as possible.
- Get Up Close and Personal with a Handheld Mirror: Enhance your application process by using a handheld mirror or magnifying mirror. This enables you to achieve precise placement of the lashes, ensuring a seamless blend with your natural lashes.
Elevate Your Skills with Optional Pro Tools:
- Trim with Finesse: Have small scissors on hand to customize the length of the lashes to perfectly fit your eye shape. This step guarantees a comfortable fit and eliminates any poking or discomfort.
- Unite Natural and Faux: Blend your natural lashes effortlessly with the falsies by using an eyelash curler before application. This technique creates a cohesive and stunning final look.
Preparing Your Natural Lashes
Get ready to captivate everyone with stunning, flawless fake eyelashes. But before you dive into the world of glam, it’s crucial to properly prepare your natural lashes. In this comprehensive guide, we’ll walk you through the essential steps to ensure your natural lashes are primed and ready for a show-stopping look. Prepare for lash perfection.
Step 1: Wipe Away the Past
Before your lashes can shine, remove all traces of makeup. Gently sweep away any mascara, eyeliner, or eyeshadow using a reliable eye makeup remover. This crucial step creates a clean canvas for the glue to work its magic, ensuring your fake lashes stay put throughout the day.
Step 2: Cleanse and Dry – A Refreshing Start
Give your natural lashes a refreshing cleanse to remove any lingering dirt or oil. Use a mild cleanser or simply wash your face with water, paying special attention to your lash line. Pat them dry with a clean towel or let them air dry naturally.
Clean and dry lashes provide the perfect foundation for flawless application.
Step 3: Trim for the Perfect Fit
One size doesn’t fit all when it comes to fake lashes. To achieve that coveted natural look and comfortable fit, measure the length of the lash strip against your natural lashes. Using small scissors, delicately trim any excess from the outer corner. This meticulous step ensures your fake lashes blend seamlessly with your natural ones and sit comfortably on your lash line.
Step 4: Amplify with Drama
Ready to make heads turn? Give your natural lashes an extra boost of drama by gently curling them with an eyelash curler.
This simple yet effective step helps blend your real and fake lashes, creating a mesmerizingly seamless effect. Remember to handle the curler with care, avoiding any damage to your precious lashes.
Step 5: Build a Strong Foundation
To ensure your fake lashes stay put all day long, create a sturdy base by applying a thin coat of mascara to your natural lashes. This adds extra support and provides a solid surface for the glue to adhere to. Allow the mascara to dry completely before moving on to your next lash masterpiece.
Measuring and Trimming the Fake Lashes
Today, we embark on a journey to unlock the secrets of measuring and trimming fake lashes to achieve a mesmerizing, natural allure. Custom-fitting lashes can elevate your eye game to new heights, so grab your tools and let’s dive in.
Step 1: Precise Measurements
Begin by holding the fake lashes against your natural lash line, carefully assessing their length and width. This crucial step ensures a seamless blend and comfortable wear.
Step 2: Trim with Finesse
Should the lashes extend beyond your lash line, it’s time for some delicate trimming. Armed with small scissors or lash trimmers, gently remove the excess length from the outer edge. Remember, patience is key – trim bit by bit to avoid any mishaps.
Step 3: Embrace Length Variation
As you trim, bear in mind that lashes should gradually increase in length from the inner corner to the outer corner. This artful technique creates a natural, flattering effect that enhances your overall look.
Step 4: Find the Perfect Width
Comfort is paramount when donning fake lashes. If they feel too wide for your eye, they may cause discomfort or struggle to adhere properly. Fear not. Flexibility is just a gentle bending away. Carefully manipulate the lashes back and forth to adjust their width and ensure a snug fit.
Step 5: Symmetry Reigns Supreme
To achieve perfect harmony, measure and trim one lash first, then use it as a guide for its counterpart. This meticulous approach guarantees symmetrical lashes that exude balance and elegance. Your eyes will be the epitome of perfection.
Step 6: The Comfort Test
Before gluing those beauties on, take a moment to ensure they sit comfortably on your eyelid. No poking or discomfort should mar your lash adventure. If adjustments are needed, make them now to ensure a flawless fit.
Applying the Glue to the Fake Lashes
We’ve already delved into the secrets of measuring and trimming fake lashes, but now it’s time to take your lash game to the next level. In this guide, your trusted lash expert will walk you through the art of applying glue to fake lashes. Get ready to unleash your inner lash artist and achieve mesmerizing eyes.
Choosing the Perfect Glue:
Before we dive into the exciting world of glue application, let’s emphasize the importance of selecting the right adhesive for your fake lashes. With a plethora of options available – latex-based, clear-drying, and waterproof glues – it’s crucial to consider your preferences and needs. The perfect glue is the foundation for a flawless application.
Trimming for Perfection:
To ensure a comfortable fit and natural-looking result, let’s quickly review the trimming process. Hold your fake lashes against your natural lash line and trim any excess from the outer corner if needed. Symmetrical perfection is key.
The Art of Applying Glue:
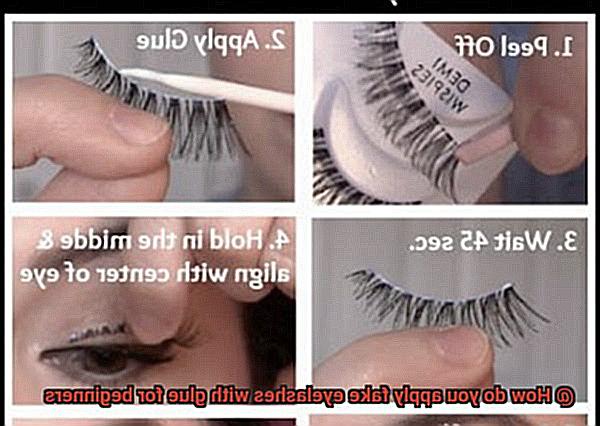
Now let’s focus on mastering the essential technique of applying glue to fake lashes. Follow these step-by-step instructions for impeccable results:
Start by squeezing a small amount of glue onto a clean surface or the back of your hand. Remember, less is more here. Too much glue can create a messy application and cause your lashes to slide around.
Gently pick up one fake lash from the tray using tweezers or a lash applicator. Beginning from the inner corner of your eye, dip the lash band into the glue. Ensure an even coating along the entire band, but don’t go overboard.
Patience pays off. Allow the glue to become tacky for approximately 30 seconds. This step is crucial for a secure and long-lasting bond between your natural and fake lashes. No slipping or sliding allowed.
Look down into a mirror and position the lash band as close to your natural lash line as possible. Starting from the inner corner, press it down gently along your lash line, working towards the outer corner.
Double-check your work. Once both lashes are applied, use your fingertips or a clean cotton swab to press them down firmly along your lash line. This final touch ensures the lashes are secure and seamlessly blend with your natural lashes.
Positioning and Securing the Fake Lashes
In our previous section, we delved into the secrets of applying glue to fake lashes and selecting the perfect adhesive. Now, get ready to unleash your inner lash artist as we dive into the next crucial step: positioning and securing those fabulous falsies. Let’s elevate your lash game and achieve a seamless blend with your natural lashes. Are you ready? Let’s begin.
Step 1: Trim for Symmetrical Perfection
Before we embark on the application process, let’s ensure your fake lashes fit your eye shape flawlessly. Grab a pair of sharp scissors and trim the lashes to match your natural lash line. Remove any excess from the outer corners for ultimate comfort and to prevent any annoying poking or lifting.
Step 2: Glue Application – The Foundation of Your Flawless Application
Now that you have perfectly trimmed lashes, it’s time to lay down the foundation for a secure hold. Apply a thin layer of lash glue along the band, using a high-quality adhesive designed for false eyelashes. This ensures a strong hold without damaging your precious natural lashes. Allow the glue to become tacky for about 30 seconds before moving on.
Step 3: The Art of Precision – Positioning Your Lashes
With precision and finesse, position those stunning fake lashes as close to your natural lash line as possible. Start by aligning the inner corner of the fake lashes with the inner corner of your eye, creating a seamless blend. Slowly press down along the rest of the lash line, ensuring each section adheres snugly to your eyelid.
Step 4: Seal the Deal – Secure Your Lashes in Place
To guarantee all-day (or night) slay, it’s time to secure those lashes in place. Gently press down on the fake lashes with your fingertips or a clean cotton swab. Pay special attention to the ends of the lashes, as they can be a little tricky. By firmly securing them, you’ll achieve a flawless finish that looks natural and stays put.
Blending Your Natural and Fake Lashes Together
If you’re craving that enviable, natural lash blend, you’ve arrived at the perfect destination. Blending your natural and fake lashes together is the secret recipe for achieving flawless and seamless lash application. In this guide, we’ll explore the essential steps and expert tips to help you become a master of the art of flawless fusion. Let’s embark on this transformative journey together.
Step 1: Choose the Perfect Lash Style
The foundation of a harmonious blend lies in selecting the right lash style. Seek out lashes that mirror your natural lashes in length, thickness, and curl pattern. This strategic choice will weave an invisible thread between your falsies and real lashes, creating a cohesive and captivating look.
Step 2: Trim with Precision
In the world of lashes, one size definitely does not fit all. Measure the lash strip against your eyelid and trim any excess from the outer edge if necessary. This meticulous trimming ensures a comfortable fit, allowing your fake lashes to seamlessly merge with your natural ones.
Step 3: Enhance with Mascara Magic
Before adorning your eyes with falsies, let’s show some love to your natural lashes. Begin by cradling them with an eyelash curler, coaxing them into a graceful upward arc. Then, apply a coat of mascara to create a sturdy foundation for your falsies to cling to while enhancing the blend.
Step 4: A Delicate Dance of Glue
Remember, when it comes to lash glue, restraint is key. Apply a thin, even layer along the lash band, focusing on the outer corners prone to lifting. Overdoing it can lead to clumps and hinder the seamless union between your fake and natural lashes.
Step 5: Precision Positioning
With tweezers or an applicator as your trusty tools, delicately position the fake lashes as close to your natural lash line as possible. Begin with the inner corner, ensuring a secure and snug fit. Then, gently press along the rest of the strip, creating a seamless bond that defies detection.
Removing Your Fake Eyelashes at the End of the Day
You’ve mastered the flawless fusion of fake lashes and achieved that enviable lash game. But now, it’s time to bid a graceful farewell to your fabulous falsies at the end of the day. With these simple steps, you will be able to remove them gently and properly, ensuring your natural lashes stay healthy and strong.
Step 1: Clean Hands, Happy Lashes
First things first – wash your hands thoroughly. Clean hands are essential in preventing unwanted bacteria or dirt from coming into contact with your delicate eye area.
Step 2: The Magic of Eye Makeup Remover
Equip yourself with a cotton pad or swab soaked in a gentle eye makeup remover. Opt for oil-free formulas specifically designed for eye makeup removal to avoid irritating the sensitive skin around your eyes.
Step 3: The Soak and Press Technique
Close your eyes and softly press the soaked cotton pad onto your eyelid, allowing it to rest there for a few glorious seconds. This simple move allows the eye makeup remover to work its magic, dissolving the glue and loosening your fake lashes.
Step 4: Slide and Glide
Once the adhesive has softened, it’s time for the grand finale. With grace and care, slide the cotton pad downwards towards the tip of your lashes. This smooth motion effortlessly removes both the glue and the fake lashes, leaving your natural ones unharmed. Repeat this process on the other eye if necessary.
Step 5: Cleanse and Refresh
Now that your falsies are history, it’s time to cleanse and refresh your face and eyes. Use a gentle facial cleanser or an eye makeup remover specifically formulated to remove residue from your eyelids and lashes. Rinse your face with lukewarm water, ensuring no traces of makeup or cleanser remain.
Step 6: Handle with Tender Love
After patting your face dry with a clean towel, exercise utmost caution around your lashes. Avoid rubbing or pulling on them, as they deserve gentle handling. Treat them like the delicate beauties they are.
Step 7: Nurture Your Natural Lashes
As the grand finale to your lash removal routine, indulge your natural lashes with a nourishing lash serum or conditioner. This final touch promotes growth and health while protecting them from any damage caused by wearing fake eyelashes.
Tips for Applying Fake Eyelashes with Glue for Beginners
Fake eyelashes can instantly transform your look, giving you those fluttery lashes you’ve always dreamed of. But for beginners, the process of applying fake eyelashes with glue can seem daunting. Fear not. In this guide, we’ll walk you through the step-by-step process, sharing expert tips and tricks to help you achieve flawless results.
Preparing Your Natural Lashes:
To ensure a seamless application, start with clean and oil-free natural lashes. Gently cleanse your lashes and eyelids using a makeup remover or micellar water. This step ensures that the glue adheres properly and prevents any makeup or oils from interfering with the application process.
Choosing the Perfect Lashes:
With countless lash styles available, opt for strip lashes as a beginner for ease of application. Consider your eye shape and desired look when selecting lashes. Remember, practice makes perfect, so don’t hesitate to experiment with different styles until you find the perfect fit for your eyes.
Trim for a Custom Fit:
One size doesn’t fit all when it comes to fake eyelashes. Measure the lash strip against your natural lash line and trim any excess from the outer edge for a comfortable fit. This ensures that your lashes feel snug and look natural, without any overhang or discomfort.
Applying Glue Like a Pro:
Achieving a seamless and long-lasting application requires applying a thin layer of glue. Squeeze a small amount of lash adhesive onto a clean surface or the back of your hand. Using a toothpick or small brush, apply a thin line of glue along the base of the lash strip. Remember, less is more when it comes to glue, preventing clumping or discomfort.
Perfect Placement:
Now that your lashes are prepped and the glue is tacky, it’s time to place them on your lash line. Use tweezers or a lash applicator to grasp the lashes by the outer corners and position them as close to your natural lash line as possible. Start from the center of your eye, pressing down on the inner and outer corners. This technique ensures a seamless blend and prevents any gaps between your natural and fake lashes.
Finishing Touches:
Allow your lashes to dry completely before applying additional makeup. Gently press your natural lashes together with the falsies using your fingers or a clean spoolie brush for a cohesive look. If you desire extra drama, apply a coat of mascara to blend your natural and fake lashes. Remember to use minimal mascara, so as not to weigh down the lashes or cause clumping.
jfuoio_Ahlk” >
Conclusion
Applying fake eyelashes with glue can be a daunting task for beginners. But fear not, because with a few simple steps, you’ll be able to achieve those fluttery lashes you’ve always dreamed of.
First, make sure your eyelids are clean and free of any oil or makeup residue. This will ensure that the glue adheres properly and lasts throughout the day. You can use a gentle cleanser or micellar water to cleanse your lids thoroughly.
Next, measure the length of the fake lashes against your natural lash line. If they’re too long, trim them carefully from the outer edge to fit your eye shape perfectly. Remember, it’s always better to start with shorter lashes and gradually increase the length if needed.
Now comes the fun part – applying the glue. Squeeze a small amount of lash adhesive onto a clean surface or the back of your hand. Using tweezers or a lash applicator, gently dip the base of the fake lashes into the glue. Make sure to apply an even layer along the entire band without using too much product.
Allow the glue to become slightly tacky for about 30 seconds. This step is crucial as it helps prevent any sliding or shifting of the lashes during application. It also ensures that they adhere seamlessly to your natural lashes.
Positioning is key when it comes to applying fake lashes. Starting from the center of your lash line, carefully place them as close to your natural lashes as possible. Use gentle pressure to press them down and hold for a few seconds until they’re secure.
Repeat this process for both eyes, adjusting and repositioning as necessary until you achieve symmetry and desired fullness. Once in place, you can use an eyelash curler to blend your natural and fake lashes together for a seamless look.
To finish off, apply mascara to further blend and enhance your lashes. This step also helps in holding everything together throughout the day.
Remember, practice makes perfect. Don’t get discouraged if your first attempt isn’t flawless. With time and patience, you’ll become a pro at applying fake eyelashes with glue.