Whether you want to turn heads with your everyday look or dazzle at a special event, mastering the art of falsies is a total game-changer. And guess what?
It’s way easier than you think. In this step-by-step tutorial, we’ll take you through everything from choosing the right lashes for your eye shape to prepping your natural ones and applying the adhesive.
Let’s dive right in.
What You Need to Apply False Eyelashes
Contents
To apply false eyelashes successfully, you will need a few essential tools and products. Here is a list of what you will need:
- False eyelashes: Choose the style and length that suits your desired look. There are various options available, from natural-looking lashes to dramatic and voluminous ones. It’s best to try different styles to find the one that enhances your eyes the most.
- Eyelash adhesive: This is a crucial component for keeping the false lashes in place. Look for a high-quality adhesive that is specifically designed for false eyelashes. Opt for a clear or transparent adhesive to avoid any visible residue on your eyelids.
- Tweezers: Tweezers are handy for precise application of false eyelashes. They allow you to hold and position the lashes accurately, ensuring they are aligned with your natural lash line.
- Small scissors: Sometimes false eyelashes may be too long for your eyes, so having small scissors on hand will allow you to trim them to the perfect length. Be cautious when cutting the lashes to avoid any accidents or damage.
- Eyelash curler: Using an eyelash curler before applying false lashes can help blend your natural lashes with the falsies and create a seamless look. Curling your lashes also adds extra lift and volume.
- Mascara: While not necessary, applying mascara to your natural lashes before putting on false eyelashes can help them blend together more seamlessly. This step is especially helpful if you have light-colored or sparse lashes.
- Cotton swabs and makeup remover: These are useful for cleaning any excess adhesive or makeup residue during and after the application process. They can also be used to make minor adjustments or fix any mistakes.
Having these tools and products ready before you start applying false eyelashes will make the process smoother and more efficient. It’s important to ensure that all the items are clean and in good condition to achieve the best results.
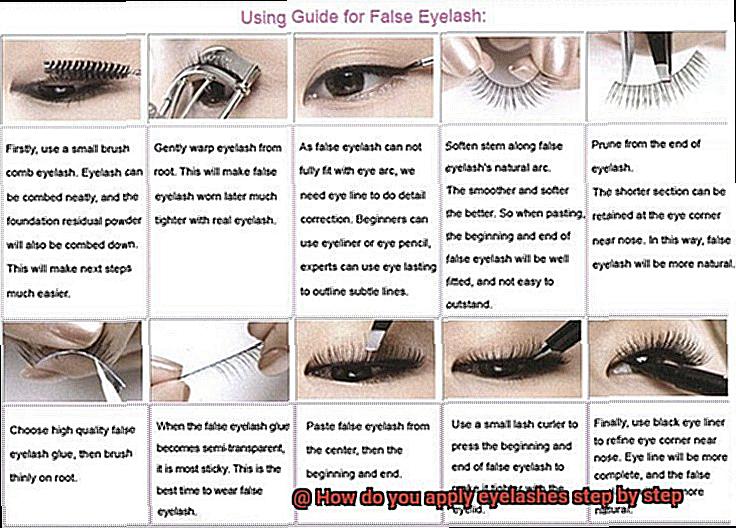
Applying false eyelashes can be a bit tricky, but with the right tools and products, it can be done successfully. Here’s a step-by-step guide on how to apply false eyelashes:
First, gather the necessary tools and products. You will need false eyelashes, lash adhesive, tweezers, small scissors, an eyelash curler, mascara, cotton swabs, and makeup remover. These items will ensure that you have everything you need for a flawless application.
Next, prepare your natural lashes. Ensure that they are clean and free of any mascara or oil-based products. This will help the false lashes adhere better to your lash line. If needed, curl your natural lashes using an eyelash curler to blend them with the falsies.
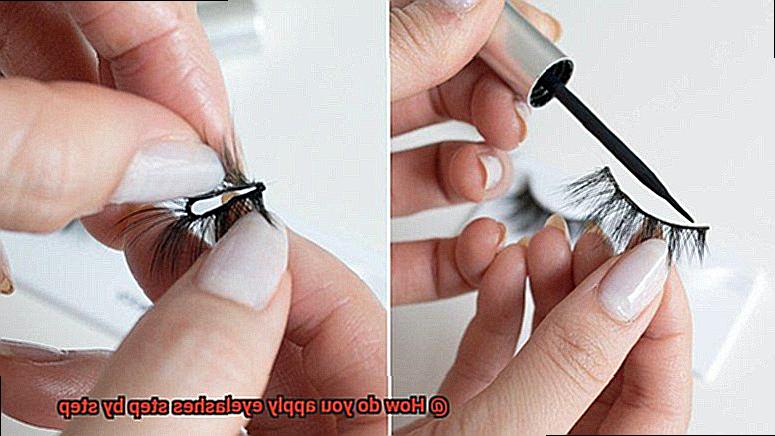
Now it’s time to choose the right pair of false eyelashes. Select a pair that fits your eye shape and desired look. There are different styles available, ranging from natural-looking lashes to dramatic ones. Trim the lashes from the outer edge if they are too long for your eyes.
Apply lash adhesive by squeezing a small amount onto a clean surface. Use a toothpick or a small brush to apply a thin layer of glue along the lash band. Be sure to cover both ends of the band as they tend to lift first.
Wait for the adhesive to become tacky. Let it set for about 30 seconds or until it becomes tacky. This is important because applying lashes with wet glue can lead to slipping and uneven placement.
Now it’s time to position the lashes. Starting from the center of your eye, carefully position the lash strip along your natural lash line. Gently press down on the lash band with tweezers or your fingertips, working your way towards the inner and outer corners.
To achieve a seamless look, blend the lashes together using tweezers or a lash applicator. Gently press your natural lashes and the false lashes together. You can also use a clean mascara wand to comb through the lashes and blend them with your natural ones.
Preparing Your Natural Lashes
Preparing your natural lashes before applying false eyelashes is crucial to achieving a flawless and long-lasting look. Here’s a comprehensive guide on how to properly prepare your natural lashes:
- Cleanse: Start by thoroughly cleansing your lashes and the surrounding area to remove any traces of makeup or oils. Use a gentle eye makeup remover or micellar water to ensure a clean canvas for the false lashes. This step not only helps the lashes adhere better but also prevents potential irritation or infections.
- Trim: Measure the false lashes against your natural lash line and carefully trim any excess from the outer corner. This ensures a comfortable fit and a natural appearance on your eyes.
- Curl: If your natural lashes are straight or point downward, use an eyelash curler to give them a lift. Gently clamp the curler at the base of your lashes, hold for a few seconds, and release. This subtle curl will seamlessly blend with the false lashes.
- Mascara (optional): Applying a thin coat of mascara to your natural lashes can enhance their blend with the false lashes and create a cohesive look. However, wait for the mascara to dry completely before applying the false lashes to avoid clumping or smudging.
- Reduce oiliness: If you have oily eyelids, lightly dust some translucent powder over your eyelids before applying the false lashes. This absorbs excess oil and provides a better surface for the adhesive to stick to.
Applying the Glue
Applying the glue is a crucial step in the process of achieving flawless false eyelashes. Without proper application, your lashes may not stay put throughout the day, ruining your desired look. To ensure a successful application, follow these steps:
- Preparation: Before applying the glue, make sure your natural lashes are clean and free from any previous adhesive residue. Gently remove any excess glue using tweezers or your fingers. This will provide a clean surface for the new adhesive to adhere to.
- Choose the right glue: There are different types of lash glues available, so select one that suits your needs. Consider factors like color and sensitivity. Clear glue is suitable for lighter-colored lashes, while black glue blends seamlessly with eyeliner. If you have sensitive eyes or latex allergies, opt for a latex-free adhesive to avoid any irritation.
- Application: Squeeze a small amount of glue onto a clean surface, like a piece of foil or the back of your hand. Less is more when it comes to lash glue, so use a toothpick or small brush to pick up a tiny amount of adhesive from the surface. Carefully run the lash band through the glue, ensuring it’s evenly coated but not dripping.
- Tacky time: Wait for a few seconds to let the glue become tacky. This step is crucial as applying lashes when the adhesive is too wet can cause them to slip and slide around. Patience is key here.
- Positioning: Starting from the inner corner of your eye, carefully place the false lashes as close to your natural lash line as possible. Use tweezers or your fingertips to secure them in place. If you find it challenging to position the lashes correctly, use a mirror and tilt your head back slightly for better visibility.
- Set and dry: Hold the lashes for a few seconds to allow the glue to dry and set. This will ensure that they stay put throughout the day. Be patient and resist the urge to touch or adjust them too soon.
- Finishing touches: Once the glue has fully dried, you can apply mascara or any other eye makeup if desired. Just be careful not to disrupt the lashes or create clumps. Gently comb through your natural lashes and false lashes with a clean spoolie brush to blend them together seamlessly.
Positioning the Lash Strip
Positioning the lash strip correctly is a crucial step in applying false eyelashes. It determines the overall look and comfort of the lashes, so it’s important to get it right. Here are the steps to position the lash strip correctly:
- Measure and trim the lash strip: Before applying the lash strip, take the time to measure and trim it to fit your eye shape perfectly. Hold the lash strip against your natural lash line and check if any excess needs to be trimmed. Use small scissors to carefully trim the outer edge of the lash strip if necessary. Be cautious not to cut off too much as it may affect the symmetry of the lashes.
- Apply glue: Squeeze a small amount of lash adhesive onto a clean surface, like a makeup palette or the back of your hand. Use a thin applicator or a clean cotton swab to evenly spread a thin layer of glue along the band of the lash strip. Make sure that the glue is applied from end to end, with a little extra at each corner for extra hold.
- Wait for the glue to become tacky: Patience is key here. Wait for about 30 seconds to a minute for the glue to become tacky. This step is crucial as it allows the adhesive to stick more securely to your natural lashes. Avoid applying the lashes immediately after applying glue as they may slide around or not adhere properly.
- Position the lash strip: Now comes the fun part – positioning the lash strip onto your natural lash line. Using tweezers or a lash applicator, gently pick up the lash strip from the middle, ensuring that you have a good grip on both ends. Look down into a mirror and position the lash strip as close to your natural lash line as possible. Start by aligning the middle part of the lash strip with the center of your eye, then carefully press down both ends towards the inner and outer corners of your eyes. Use gentle pressure to ensure that the lash strip is secure and properly adhered.
- Blend your natural lashes: To create a seamless look, use a clean spoolie brush or a mascara wand to blend your natural lashes with the false lashes. Gently comb through your lashes from root to tip, ensuring that they are well blended.
- Allow the glue to dry: Give the glue a few minutes to dry completely before applying any makeup or touching your eyes. This will ensure that the lashes stay in place throughout the day without any risk of lifting or shifting.
Pressing the Lash Strip in Place
Pressing the lash strip in place is an essential step in achieving a flawless and long-lasting false eyelash application. This final step ensures that the lashes adhere properly and stay in place throughout the day or night. To help you master this technique, here is a step-by-step guide:
- Wait for the glue to become tacky: Before pressing the lash strip, it is important to wait for the glue to become tacky. This usually takes around 30 seconds to a minute, depending on the type of eyelash glue being used. Tacky glue will stick better and provide a stronger hold.
- Use tweezers or a lash applicator: To hold the lashes in place, it is recommended to use a pair of tweezers or a lash applicator. These tools allow for better control and precision during the application process.
- Start from the inner corner: Begin by placing the lash strip as close to your natural lash line as possible, starting from the inner corner of your eye and moving towards the outer corner. Positioning the strip correctly is crucial for a seamless and natural look.
- Gently press down: Using your tweezers or lash applicator, gently press down on the lash strip starting from the inner corner and working your way towards the outer corner. Apply enough pressure to secure the lashes, but be careful not to apply too much force as it may cause discomfort or damage to your natural lashes.
- Securely attach and adjust: Once the lash strip is in place, use your fingers or the applicator to gently press along the entire length of the strip to ensure that it is securely attached. If needed, you can use a clean cotton swab or your fingertip to adjust and position the lashes for a more natural look.
- Allow the glue to dry: After pressing the lash strip in place, allow the glue to fully dry and set before applying any mascara or other eye makeup. This will ensure that the lashes stay in place and won’t smudge or shift.
Blending Your Natural and False Lashes Together
Blending your natural and false lashes together is the key to achieving a flawless and natural-looking lash application. It’s all about creating a seamless transition between your real lashes and the falsies for a cohesive and beautiful result. Here are some expert tips and techniques to help you master the art of blending:
- Curl your natural lashes: Start by curling your natural lashes with an eyelash curler. This step is crucial as it creates a uniform base for your false lashes to sit on, ensuring they blend seamlessly.
- Apply mascara: Apply a thin layer of mascara to your natural lashes before applying the falsies. Mascara helps blend your natural lashes with the false ones, giving them a cohesive look. Coat both the upper and lower lashes for a balanced effect.
- Trim if necessary: Measure the false lashes against your natural lash line and trim any excess if needed. This ensures that the falsies fit comfortably on your eyes without looking too long or overwhelming.
- Apply lash adhesive: Apply a thin line of lash adhesive along the band of the false lashes. Wait for a few seconds until the glue becomes tacky before placing them on your lash line. This helps the adhesive adhere better and keeps the falsies securely in place.
- Precise placement: Using tweezers or your fingers, carefully place the false lashes as close to your natural lash line as possible, starting from the inner corner of your eye and gently pressing down to secure them. The closer they are to your natural lashes, the more seamless the blend will be.
- Press together: Once the false lashes are applied, gently press them together with your natural lashes using your fingers or a clean spoolie brush. This step helps blend them together even further, creating a flawless, unified look.
- Optional mascara touch-up: If necessary, apply another coat of mascara to further blend your natural and false lashes together. Be careful not to apply too much, as it can clump and weigh down the lashes.
- Curl again: To ensure uniformity, use an eyelash curler once more to curl both your natural and false lashes together. This final step helps create a seamless curl and enhances the blending effect.
- Maintain throughout the day: To keep your blended lashes looking their best, avoid rubbing or pulling on them. Instead, gently pat or stroke them if needed. Additionally, steer clear of oil-based makeup removers or cleansers near your lashes, as they can break down the adhesive and compromise the blend.
Allowing the Glue to Dry Completely
Allowing the glue to dry completely is crucial when applying eyelashes for a flawless and long-lasting look. It ensures that the lashes stay in place throughout the day, preventing them from coming off or shifting. To achieve proper drying, follow these simple steps.
Firstly, after applying the lashes, gently press them onto your natural lash line using a clean cotton swab or your fingertips. This secures the lashes in place and ensures they adhere well to your natural lashes. Avoid touching or manipulating them for at least a minute or two, keeping your eyes closed to prevent any accidental movement or rubbing.
Different glues have varying drying times, so refer to the instructions provided with your specific glue. Some dry within seconds, while others may take a few minutes. Patience is key during this stage to avoid subpar results.
To ensure even drying, keep your eyes closed for a few minutes after applying the lashes. This prevents air from reaching the glue and interfering with its drying process. Use this time to relax and let it set properly.
Avoid applying mascara or other eye makeup until the glue has completely dried. Applying mascara too soon can weigh down the lashes and disrupt their adherence to your natural lashes.
Enhancing the Look with Eyeliner
Eyeliner is a crucial step in enhancing the overall look when applying eyelashes. It helps define the eyes, making them appear more prominent and alluring. There are various types of eyeliner available in the market, including pencil, liquid, gel, and pen liners. Each type has its own advantages and techniques for application.
To begin, gently hold your eyelid taut with one hand to create a smooth canvas for applying the eyeliner. With the other hand, start at the inner corner of your eye and draw a thin line as close to the lash line as possible. Use short strokes to create small dots or dashes along the lash line if you find it challenging to draw a continuous line. Gradually thicken the line as you move towards the outer corner for a more intense look. For those who prefer a softer look, smudging the eyeliner can create a smoky effect.
Different eyeliner formulas require different techniques. Pencil eyeliners are easy to control and ideal for beginners. They can be applied directly to the lash line and easily smudged for a softer look. Liquid eyeliners offer precise application but require a steady hand and practice to master. Gel eyeliners provide a smooth and intense line, while pen liners are convenient for creating precise lines and wings.
Ensure that the eyeliner is dry before proceeding with applying false lashes, as wet liner can smudge or transfer onto the lashes. Once the liner is completely dry, carefully apply the false lashes as close to the lash line as possible. The eyeliner acts as a guide and helps blend the natural lashes with the falsies seamlessly.
To complete the look, apply mascara to both your natural lashes and the false lashes. This helps blend them together, creating a cohesive and polished appearance. Using an eyelash curler before applying mascara can further enhance the overall look by lifting and curling both the natural and false lashes.
jfuoio_Ahlk” >
Conclusion
Applying eyelashes step by step can seem daunting at first, but with a little practice and the right technique, you’ll be able to achieve beautiful, fluttery lashes in no time. So, let’s break it down into easy-to-follow steps.
Firstly, make sure your natural lashes are clean and mascara-free. This will provide a smooth base for the false lashes to adhere to. Gently curl your lashes with an eyelash curler for added lift.
Next, carefully remove the false lashes from their packaging using tweezers or your fingers. Be gentle to avoid damaging the delicate hairs.
Measure the length of the false lashes against your natural lash line. If they are too long, trim them accordingly using small scissors. Remember to always trim from the outer edge of the lash strip for a more natural look.
Now comes the crucial step: applying adhesive to the lash band. Use a high-quality lash glue and apply a thin strip along the entire length of the lash band. Wait for about 30 seconds until the glue becomes tacky.
Using either your fingers or tweezers, position the false lashes as close to your natural lash line as possible. Start from the center of your eye and gently press down on both ends to secure them in place.
Once you’ve applied both lashes, give them a few moments to fully dry and set. Avoid touching or rubbing your eyes during this time.
To seamlessly blend your natural lashes with the falsies, apply a coat of mascara and use an eyelash curler again if desired. This will help create a unified and polished look.
Lastly, don’t forget to take care of your false lashes for future use. Remove any excess glue by gently peeling it off with tweezers or your fingers. Store them back in their original packaging or a clean container to maintain their shape and prevent any damage.
You now have stunning eyelashes that will enhance your eyes and elevate your overall makeup look. With practice, applying false lashes will become second nature to you, allowing you to effortlessly achieve that glamorous flutter every time.