Ready to revamp your living space with a dash of style and a sprinkle of comfort? Look no further than the versatile wonder that is vinyl flooring. Not only does it add elegance to any room, but it also boasts durability and low maintenance. If you want your vinyl flooring to stay put for years to come, gluing it down is the way forward.
But hold on just a sec. Before you dive headfirst into your vinyl flooring project, there are a few key ingredients you’ll need to ensure a seamless installation. In this blog post, we’ll delve deep into the world of gluing down vinyl flooring, uncovering the essentials required for a flawless finish.
Hook:
Imagine stepping into your newly transformed sanctuary, the softness beneath your feet tantalizing your senses. Now, let’s embark on this journey together and unlock the secrets behind achieving this flooring utopia.
Main Points:
- Quality Vinyl Adhesive: The backbone of your glue-down vinyl flooring project lies in choosing top-notch adhesive. This specialized glue creates a robust bond between the subfloor and your vinyl, guaranteeing stability and resistance against wear and tear.
- The Right Tools: Every DIY enthusiast knows that using the right tools is crucial for success. When it comes to gluing down vinyl flooring, indispensable tools like a notched trowel, roller, utility knife, and measuring tape will make installation a breeze.
- Subfloor Preparation: Adequate preparation of the subfloor is vital for ensuring a smooth and long-lasting vinyl flooring installation. From thorough cleaning and leveling to addressing any imperfections, this step lays the foundation for an impeccable final result.
- Expertise and Patience: While gluing down vinyl flooring may seem like a walk in the park, attention to detail is paramount. Take your time, follow instructions meticulously, and don’t hesitate to seek professional advice if needed.
Now that the secrets of gluing down vinyl flooring have been unveiled, you’re armed with the knowledge and tools to embark on your flooring journey. Remember, take your time, invest in high-quality adhesive, and don’t shy away from seeking professional guidance.
Before you know it, you’ll be reveling in the beauty and comfort of your newly installed vinyl flooring, adding a touch of luxury to your beloved space. Let’s get gluing.
Types of Adhesives Used for Vinyl Flooring
Contents
- 1 Types of Adhesives Used for Vinyl Flooring
- 2 Choosing the Right Adhesive
- 3 Tools and Materials Needed to Glue Down Vinyl Flooring
- 4 Preparing the Subfloor for Installation
- 5 Applying the Adhesive Evenly
- 6 Waiting for the Adhesive to Become Tacky
- 7 Laying Down the Vinyl Flooring
- 8 Applying Pressure to Secure a Strong Bond
- 9 Conclusion
One crucial aspect of a successful installation is selecting the right adhesive. With a plethora of options available, it can be overwhelming to determine which one is best suited for your specific needs. In this comprehensive guide, we will delve into the different types of adhesives used for vinyl flooring and provide valuable insights to empower you in making an informed decision.
Pressure-Sensitive Adhesive:
One of the most popular adhesive options for vinyl flooring is pressure-sensitive adhesive. These adhesives come in both water-based and solvent-based formulas, offering a robust bond between the vinyl flooring and the subfloor. What sets pressure-sensitive adhesives apart is their unique tackiness even after drying, allowing for easy positioning and adjustment during installation. While water-based adhesives are environmentally friendly and a breeze to clean up, solvent-based adhesives provide additional fortitude, making them ideal for high-traffic areas.
Acrylic Adhesive:
If you’re seeking an adhesive that excels in moisture resistance and temperature changes, look no further than acrylic adhesive. These adhesives boast exceptional durability, making them well-suited for commercial spaces and high-traffic areas. With remarkable bonding strength and flexibility, acrylic adhesives guarantee a long-lasting installation that can withstand the rigors of daily life.
Epoxy Adhesive:
When it comes to industrial or heavy-duty applications, epoxy adhesives reign supreme. Renowned for their exceptional bonding strength, these adhesives create an unyielding chemical bond between the vinyl flooring and the subfloor. Although they require meticulous mixing prior to application, their unparalleled durability and maximum strength make them worth every extra effort.
Urethane Adhesive:
Are you in search of an adhesive that strikes the perfect balance between strength and flexibility? Look no further than urethane adhesives. These adhesives offer a formidable bond while still allowing for some movement in the flooring system. With their resistance to moisture and ability to withstand high temperatures, urethane adhesives are well-suited for various environments. They are an excellent choice for both residential and commercial settings with moderate foot traffic.
Modified-Silane Adhesive:
A newcomer to the adhesive market, modified-silane adhesives combine the best qualities of urethane and silicone adhesives. With exceptional bonding strength, flexibility, and moisture resistance, they are incredibly versatile, making them suitable for luxury vinyl tiles and planks. The rising popularity of modified-silane adhesives can be attributed to their superior performance and ability to meet the demands of modern flooring installations.
When it comes to selecting the perfect adhesive for your vinyl flooring, it is crucial to consider factors such as the type of vinyl flooring, the subfloor material, and the environmental conditions.
Choosing the Right Adhesive
Choosing the right adhesive for your vinyl flooring installation is a decision that can make or break the long-term success and durability of your floor. With a multitude of options available, navigating the adhesive landscape may seem daunting. But fear not. I am here to be your guide, helping you make an informed decision and laying the foundation for a flawless and beautiful floor.
First and foremost, selecting the appropriate adhesive is crucial because it establishes a secure bond between your vinyl flooring and the subfloor. This bond ensures that your flooring remains in place, even in high-traffic areas or environments with fluctuating moisture and temperature levels. As a result, you can say goodbye to unsightly lifting or curling of the vinyl, embracing a smooth and seamless look.
When considering which adhesive to choose, several factors come into play. The type of subfloor you possess takes center stage. Adhesives are designed for specific subfloors, ranging from concrete to plywood to existing vinyl. Picking an adhesive compatible with your specific subfloor is paramount in achieving a strong and enduring bond.
Another critical consideration is the environment or location where the flooring will be installed. Are you placing vinyl in a bathroom or kitchen, where moisture is prevalent? If so, opting for a waterproof or moisture-resistant adhesive is essential. Similarly, if you plan to install vinyl in an area with extreme temperature changes, like a conservatory or sunroom, you must select an adhesive that can withstand these fluctuations.
The type of vinyl flooring also influences adhesive selection. Sheet vinyl requires a different adhesive than luxury vinyl tiles or planks. To ensure compatibility and optimal performance, it is imperative to choose an adhesive recommended specifically by the manufacturer for your particular vinyl product.
Of course, proper surface preparation is a crucial step in achieving a successful adhesive bond. Before applying the adhesive, meticulously clean and level the subfloor. Any lingering dirt, dust, or unevenness can compromise the bond and lead to future issues. Following the manufacturer’s instructions for surface preparation is of utmost importance.
When working with adhesives, health and safety should never be overlooked. Some adhesives may require specific ventilation requirements, so it is vital to work in a well-ventilated area or utilize appropriate protective equipment as needed. Furthermore, always handle adhesives according to the manufacturer’s instructions to minimize potential risks.
Tools and Materials Needed to Glue Down Vinyl Flooring
Get ready to embark on an adventure in vinyl flooring installation, armed with the essential tools and materials needed to glue down your floors flawlessly. Let’s dive into the world of trowels, knives, tapes, rollers, and adhesives to ensure a professional-grade installation that will make your floors the envy of the neighborhood.
First and foremost, we have the mighty notched trowel. This versatile tool is your secret weapon for spreading adhesive evenly across the subfloor. The size of the notches on the trowel depends on the type and thickness of your vinyl flooring. Choose wisely to achieve a bond that stands strong against the test of time.
Now, let’s talk about precision cutting. Enter the utility knife or vinyl cutter. These sharp wonders are your ticket to clean and precise cuts around corners, edges, and any pesky obstacles in your room. Channel your inner artist as you sculpt your vinyl flooring with finesse.
Of course, no project is complete without accurate measurements. The measuring tape becomes your trusty sidekick, helping you determine the dimensions of your room and vinyl flooring. With its guidance, you’ll know exactly how much material you need and where to make those crucial cuts.
When dealing with large sheets of vinyl flooring, a chalk line can be a superhero in disguise. Marking straight lines on the subfloor ensures flawless alignment, leaving no room for wonky patterns to spoil your masterpiece.
Once your vinyl is in place, it’s time for the roller or hand roller to take center stage. These essential tools press the flooring into the adhesive, eliminating air bubbles and wrinkles like magic. Embrace the satisfying feeling as your floors transform into a smooth and flawless surface.
If you’re using a two-part adhesive that requires mixing, don’t forget your trusty bucket and mixing paddle. These dynamic duo partners help you achieve the perfect consistency for your adhesive mixture. Follow the manufacturer’s instructions, and your adhesive will be mixed to perfection, ready to bond your vinyl flooring securely.
Now, let’s address moisture-prone areas. For bathrooms or any damp spaces, a moisture barrier can save the day. This protective layer prevents moisture from seeping through the subfloor and wreaking havoc on your beloved vinyl flooring. Think of it as a superhero cape, shielding your floors from potential harm.
Preparing the Subfloor for Installation
Get your tools ready as we delve into the art of preparing the subfloor, a crucial step to ensure a long-lasting and stunning vinyl floor.
Step 1: Clear the Path – Bid Farewell to the Past:
Say goodbye to old flooring materials that have seen better days. Whether it’s worn-out carpet, tired tiles, or faded hardwood, it’s time to remove them from the scene. Arm yourself with a scraper or adhesive remover to eliminate any lingering residue. Smoothness is key, so let’s create a clean slate.
Step 2: Dust Off and Shine On – The Cleaning Ritual:
Prepare your broom or vacuum cleaner as we embark on a thorough cleaning adventure. Sweep away dust and loose particles, leaving no trace behind. For stubborn stains, mix warm water with a gentle detergent and scrub away. Remember, harsh chemicals are not invited to this party; we want a pristine subfloor free from unwanted residues.
Step 3: Inspect and Repair – Where Perfection Meets Imperfections:
Time to put on your detective hat and inspect every nook and cranny of your subfloor. Look out for cracks, holes, or gaps that might sabotage your flooring dreams. Fear not. Small cracks and gaps can be filled with a suitable floor patching compound and leveled out with finesse using a trusty trowel. For larger damages or uneven surfaces, it’s wise to entrust the task to professionals who will ensure a smooth and stable foundation.
Step 4: Moisture Check – Keeping Your Floors Dry:
Moisture is the nemesis of vinyl floors, so let’s keep it at bay. Equip yourself with a trusty moisture meter to measure the moisture content of your subfloor. Concrete subfloors should have a moisture content below 4%, while wooden subfloors should remain below 12%. If the levels exceed these thresholds, fear not. Install a moisture barrier or implement a reliable moisture control system to protect your floors from future woes.
Applying the Adhesive Evenly
In our quest for a flawless vinyl flooring installation, we’ve conquered the art of prepping the subfloor. Now, let’s dive into the next crucial step: applying the adhesive evenly. Get ready to unleash your inner artist as we explore expert tips and techniques that will ensure your vinyl flooring stays securely in place for years to come. So grab your notched trowel and let’s embark on this adhesive adventure.
Step 1: Prepping the Subfloor with Care:
Before we can begin our adhesive masterpiece, it’s essential to prepare the subfloor meticulously. Bid farewell to dust, debris, and any lingering grease or grime that might hinder the perfect bond. Remember, a clean canvas is the foundation for a flawless finish.
Step 2: Choosing Your Adhesive Wisely:
Like a maestro selecting their instrument, choosing the right adhesive is crucial for a harmonious bond between your vinyl flooring and subfloor. The specific type of vinyl flooring you’re installing will dictate the adhesive you need. Don’t leave anything to chance – always follow the manufacturer’s instructions for compatibility and optimal performance.
Step 3: Unleashing the Notched Trowel Magic:
In our quest for adhesive excellence, the notched trowel emerges as our secret weapon. With varying notch sizes and shapes depending on your adhesive and vinyl thickness, this tool creates purposeful ridges that ensure impeccable adhesion and banish any lurking air pockets.
Step 4: Spreading Gracefully like a Pro:
Time to channel your inner chef as we approach the art of spreading adhesive with finesse. Begin by pouring a small amount of adhesive onto your pristine subfloor. Take hold of the flat side of your notched trowel and glide it across the surface, spreading the adhesive like a master chef delicately buttering toast. A smooth, even layer is the foundation for a flawless vinyl flooring installation.
Step 5: Combing Brilliance for Perfection:
Now it’s time for the pièce de résistance – the combing technique that will elevate your adhesive application to new heights of perfection. With the notched side of your trowel, gently and purposefully comb through the adhesive in one direction. This meticulous process ensures a consistent and even distribution of adhesive, leaving no room for unsightly surprises.
Waiting for the Adhesive to Become Tacky
In our previous sections, we’ve covered everything from subfloor preparation to choosing the perfect adhesive. Now, let’s embark on a captivating journey into the world of waiting for the adhesive to become tacky. Imagine yourself as a patient artist, awaiting that precise moment to apply the brushstroke of adhesive that will transform your space into a masterpiece. So, grab your notched trowel and prepare to discover why patience truly is a virtue.
The Science Behind Tacky Adhesive
Let’s begin by understanding the magic behind tacky adhesive. It’s that remarkable state where it possesses just the right amount of stickiness to hold your vinyl flooring securely in place. Yet, it avoids being too wet, preventing seepage through seams and eliminating risk of slipping. It’s like finding the perfect harmony between adhesive strength and flexibility.
Timing is Everything
Just like a symphony conductor, timing plays a crucial role here. The waiting period for adhesive to reach tackiness can vary depending on the specific product used. Embrace patience and follow the manufacturer’s instructions diligently. Generally, anticipate waiting anywhere from 10 to 30 minutes for that ideal level of tackiness to manifest.
The Significance of Proper Adhesion
Now, let’s delve into the heart of the matter. Why is waiting for adhesive to become tacky so pivotal? Well, dear readers, it all boils down to adhesion. If you hastily lay your vinyl flooring before the adhesive has reached optimal tackiness, you risk poor bonding with the subfloor. This could lead to dreaded issues such as peeling or lifting over time. Conversely, waiting too long and ending up with a dry adhesive won’t result in an effective bond at all. It’s a delicate balance, but one that rewards those who wait.
The Tacky Touch Test
Now, how can you determine if the adhesive has achieved its tacky state? Gently touch the adhesive with your fingertip and assess its stickiness. If it feels slightly sticky and leaves a faint residue on your finger, it’s a sign that it’s ready for installation.
Laying Down the Vinyl Flooring
Before we begin laying down the vinyl, let’s prepare our subfloor like seasoned artists. Clean, dry, and level, the subfloor sets the foundation for our masterpiece. Fill cracks, sand down protrusions – smoothness is paramount.
Now, let’s measure our room and calculate the vinyl needed for our creation. Remember, a little extra ensures we’re prepared for mishaps or future repairs. Think of it as having spare paint for touch-ups on your canvas.
As any artist knows, patience is key. Allow the vinyl to acclimate to the room temperature by resting it there for 24 hours before we start. This anticipation adds a touch of excitement to our creative process.
With our flooring ready, it’s time to apply the adhesive – our artistic glue. Grab your notched trowel and spread it evenly over the subfloor, stroke by stroke. Work in small sections to keep the adhesive from drying out before we can lay down the vinyl. Each stroke is like a brushstroke on our canvas – precise and calculated.
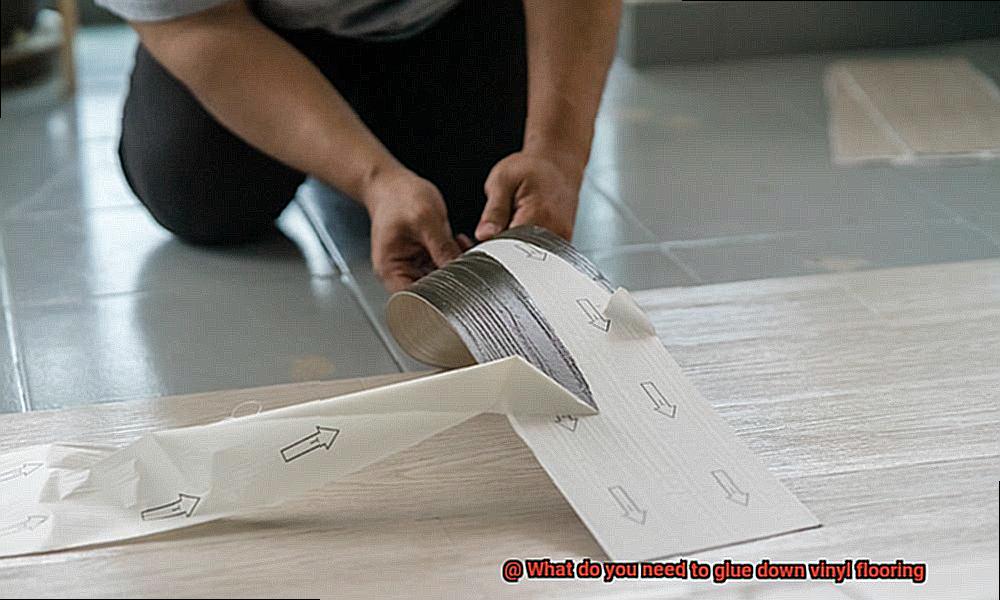
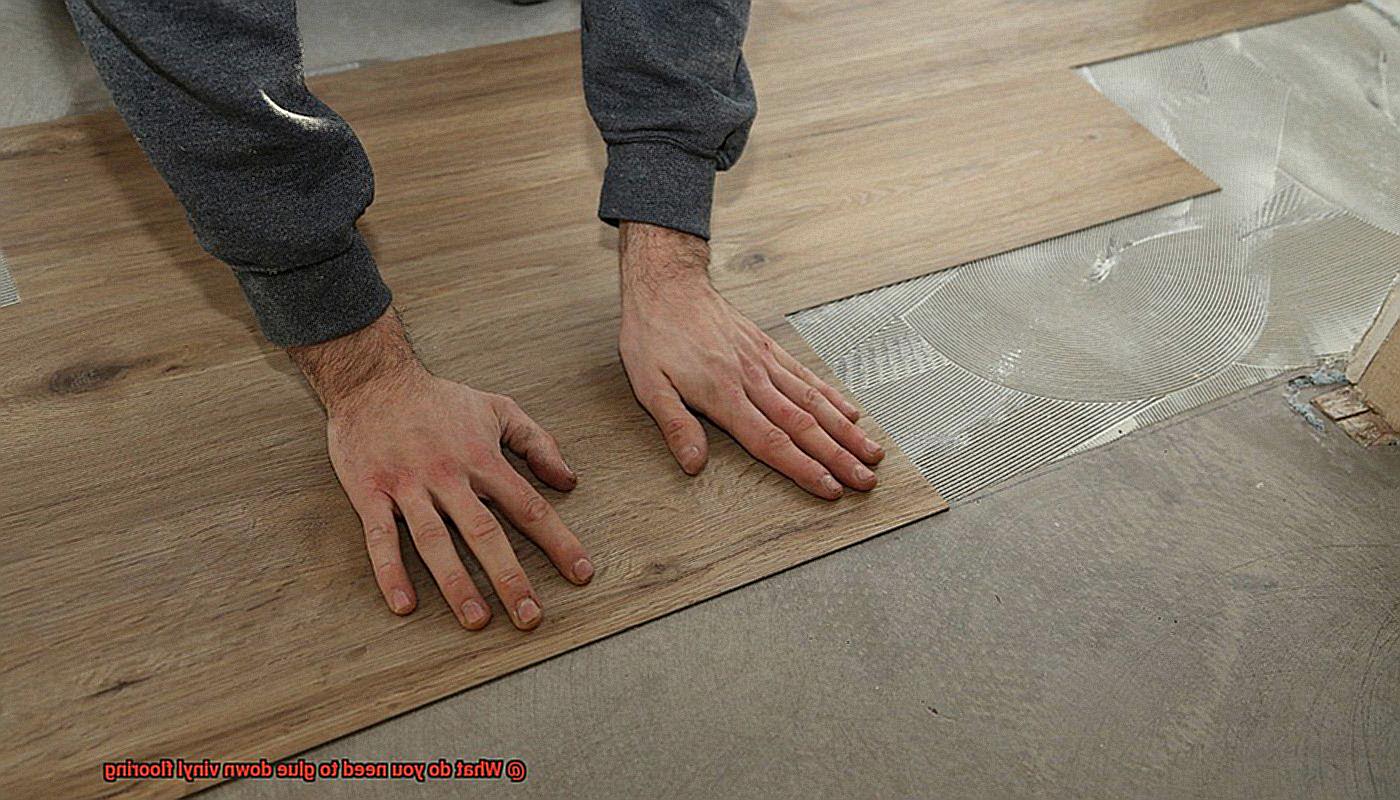
Now comes the exhilarating part – laying down the vinyl flooring. Starting from one end of the room, carefully place each piece onto the adhesive, working towards the other end. Use a roller to press down on the vinyl, ensuring a secure bond with the adhesive. This is where our artistic vision truly comes to life.
Attention to detail is paramount in any masterpiece. Trim any excess vinyl with precision using a utility knife or vinyl cutter – each cut intentional, avoiding damage to the subfloor beneath. The perfect fit is essential for a professional finish.
Continuing our creative journey, we lay down each section of vinyl flooring until our entire canvas is covered. Aligning edges perfectly creates a seamless look – a true mark of mastery.
Just like waiting for paint to dry, patience is needed as we allow the adhesive to dry completely. Consult the manufacturer’s instructions for drying time before walking on or placing furniture on our newly installed vinyl flooring.
It’s important to note that some vinyl flooring requires no adhesive at all. Self-adhesive vinyl tiles make installation a breeze, no additional glue necessary. Embrace the simplicity of peel and stick, and let your artistic vision shine.
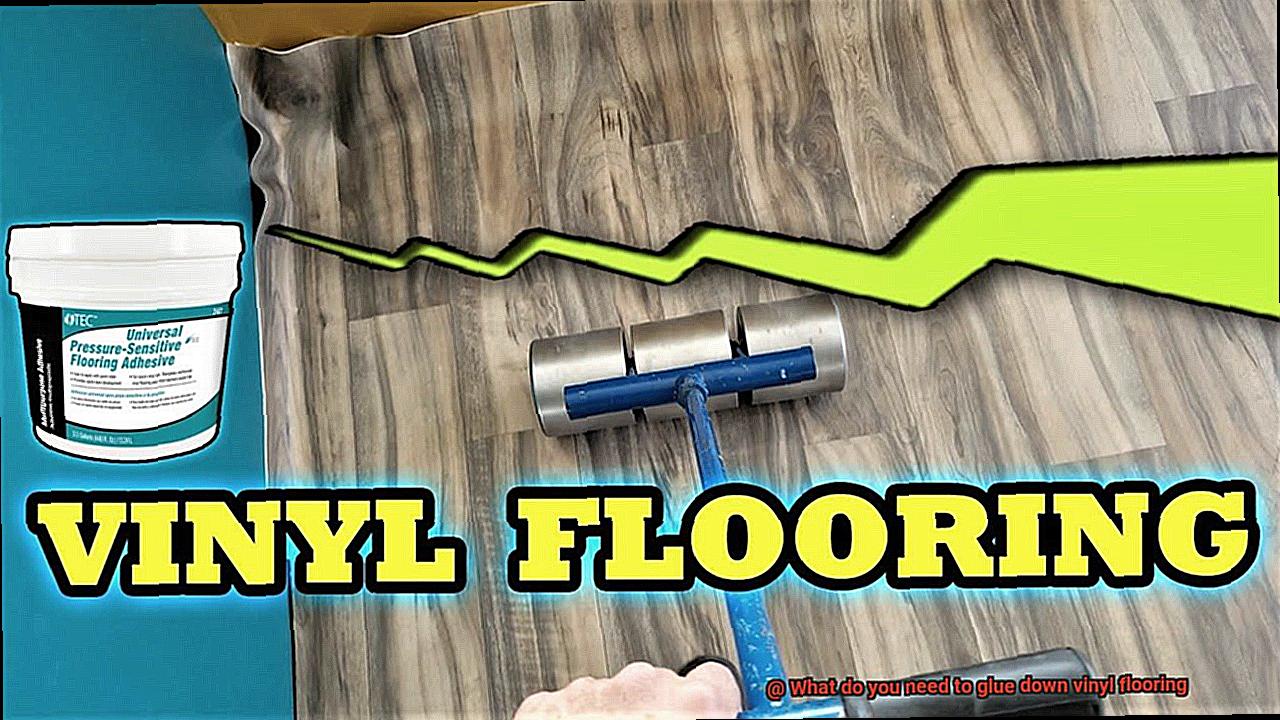
Applying Pressure to Secure a Strong Bond
Imagine the satisfaction of stepping onto your flawlessly installed vinyl flooring, knowing that every inch is securely bonded to the subfloor. Applying pressure is the secret ingredient that ensures this strong bond. In this captivating article, we will explore the art of applying pressure during vinyl flooring installation and provide you with an array of techniques to achieve a seamless and long-lasting result.
The Importance of Applying Pressure:
Applying pressure plays a pivotal role in vinyl flooring installation for several reasons. Firstly, it allows the adhesive to spread evenly, creating a robust connection between the flooring and subfloor. This even distribution eliminates weak areas and prevents the dreaded consequences of loose or peeling vinyl over time. It’s the difference between a floor that stands the test of time and one that falls apart at the seams.
Utilizing the Power of a Roller:
Enter the flooring roller, a superhero in your installation toolkit. Designed specifically for this purpose, its weight and structure become a force to reckon with. As you glide it across the vinyl flooring, it evenly distributes pressure, ensuring every nook and cranny is firmly bonded. Starting from the center and working towards the edges helps expel trapped air and excess adhesive, banishing any possibility of bubbles or lumps from disrupting your flawless masterpiece.
Alternative Techniques for Pressure Application:
When the trusty roller isn’t readily available, fear not. There are other ingenious methods to apply pressure and secure that bond. Harnessing the power of heavy objects can be your salvation. Strategically placing books or boxes filled with weights on your newly installed flooring creates targeted pressure points, guaranteeing proper bonding. Just make sure these objects are clean and won’t leave any marks on your pristine vinyl canvas.
Unleashing Your Body Weight:
Who said installing vinyl flooring couldn’t be a full-body workout? By walking across your installed flooring in a controlled manner, you can transfer your body weight onto the surface, unleashing the ultimate pressure application technique. It’s like giving your floor a personalized stamp of approval. Remember to don clean shoes or use shoe covers to preserve the integrity of your masterpiece and prevent any unwanted dirt or debris from tarnishing its beauty.
pkOMxSPcTtE” >
Conclusion
To properly adhere vinyl flooring, you will need a few essential tools and materials. Firstly, you’ll need a high-quality adhesive specifically designed for vinyl flooring installation. This adhesive should be moisture-resistant to prevent any damage caused by water or humidity. Additionally, ensure that the adhesive is suitable for the type of vinyl flooring you are using, as different adhesives work better with certain types of vinyl.
Next, make sure you have a trowel or notched spreader to apply the adhesive evenly and efficiently. This tool will help you achieve proper coverage and minimize any lumps or unevenness in the glue application.
Before starting the installation process, it’s crucial to prepare the subfloor properly. Ensure that it is clean, dry, and free from any debris or imperfections that could affect the adhesion of the vinyl flooring. You may also need a primer if your subfloor requires additional preparation before gluing down the vinyl.
When gluing down vinyl flooring, it’s essential to have a roller on hand. This tool will help firmly press the flooring into the adhesive, ensuring maximum contact and optimal bonding between the two surfaces.
Lastly, don’t forget about safety equipment. It’s always wise to wear gloves and eye protection when working with adhesive to protect yourself from any potential harm.
In conclusion, to glue down vinyl flooring successfully, gather your supplies: high-quality adhesive suitable for vinyl flooring, a trowel or notched spreader for even application, a roller for firm bonding, and safety equipment such as gloves and eye protection.