Are you searching for the secret ingredient that can securely hold a mirror in place, adding elegance and functionality to any room? Look no further. I’m here to reveal the mysteries of mirror adhesion. Whether you’re hanging a small decorative mirror or installing a larger one in your bathroom, choosing the right adhesive is key for a long-lasting bond. From classic methods to modern marvels, let’s explore some tried-and-true options that will help you achieve mirror-mounting perfection.
First up is the beloved construction adhesive. Known for its strength and durability, construction adhesive like Liquid Nails or E6000 is a popular choice among DIY enthusiasts and professionals alike. With its zigzag pattern application directly on the wall, this powerful glue provides a sturdy hold that can withstand the test of time.
If you prefer a cleaner, more streamlined look, consider using mirror mastic. This specially formulated adhesive is designed specifically for mirrors and comes in a caulk tube or can be applied with a trowel. It creates a strong bond while allowing for a seamless finish, making your mirror appear to effortlessly float on the wall.
For those seeking quick and simple solutions, double-sided adhesive tape may be just what you need. This versatile tape eliminates messy glue application and works well for lightweight mirrors or temporary installations. Just make sure to choose high-quality tape specifically designed for mirrors to ensure a secure attachment.
If you’re into unconventional techniques, mirror clips might catch your attention. These small metal brackets are often used with frameless mirrors and can be attached to the wall using screws or adhesive pads. They provide stability along with a unique aesthetic appeal.
Lastly, glass suction cups can be your best friend when it comes to temporary mirror installations. These handy gadgets create powerful vacuum seals, allowing you to easily mount and remove mirrors without leaving any residue or damage behind.
Armed with this wealth of knowledge about mirror adhesion, you can confidently transform any space with style and panache. Just remember to choose the adhesive that suits your needs best and always follow the manufacturer’s instructions for optimal results. Happy mirror mounting.
What is Glue?
Contents
Glue is a versatile substance that bonds materials together in various applications. Whether you’re a DIY enthusiast or a professional craftsman, understanding the different types of glue can help you choose the right adhesive for your project.
In this article, we’ll explore the world of glue, including its properties, uses, and advantages or disadvantages. We’ll also provide essential tips for gluing mirrors, ensuring a strong and durable bond that will stand the test of time.
Types of Glue:
Glue comes in many forms, each with its own unique properties and uses. Let’s take a look at some of the most common types:
- PVA Glue: Known for its versatility, PVA glue is water-based and can bond materials like wood, paper, fabric, and certain plastics. It dries clear and is easy to use.
- Epoxy Glue: This two-part adhesive creates a strong bond and is resistant to heat, chemicals, and moisture. It’s perfect for various applications.
- Super Glue: Forming an instant bond upon contact with moisture, super glue is ideal for materials like metal, plastic, rubber, and ceramics.
- Construction Adhesive: Designed for heavy-duty projects, this adhesive bonds materials such as wood, drywall, concrete, and metals.
- Silicone Adhesive: Flexible and waterproof, silicone adhesive is great for sealing and bonding materials exposed to extreme temperatures or moisture.
Tips for Gluing Mirrors:
When it comes to gluing mirrors, here are some helpful tips to ensure success:
- Choose the Right Adhesive: Opt for a strong adhesive specifically designed for glass surfaces, such as silicone-based adhesives or epoxy resins.
- Prepare the Surface: Thoroughly clean and dry both the mirror and the surface to remove any dust or debris.
- Use a Primer: Apply a primer or bonding agent on both the mirror and the surface for enhanced adhesion and bond strength.
- Follow Manufacturer’s Instructions: Carefully adhere to the adhesive manufacturer’s instructions for application, drying time, and curing.
- Apply Evenly: Spread the adhesive evenly on both the mirror and the surface using a notched trowel or putty knife, ensuring complete coverage.
- Support During Curing: Prevent the mirror from sliding or falling by providing support while the adhesive cures.
- Allow Sufficient Curing Time: Different adhesives have varying curing times, so refer to the manufacturer’s recommendations. Avoid subjecting the bond to stress or load until fully cured.
Types of Adhesives for Gluing Mirrors
Choosing the right adhesive for gluing mirrors is crucial for a secure and long-lasting bond. With a variety of options available, it can be overwhelming to know which one to use. In this guide, we will explore different types of adhesives, their advantages, and disadvantages, helping you make an informed decision for your mirror installation project.
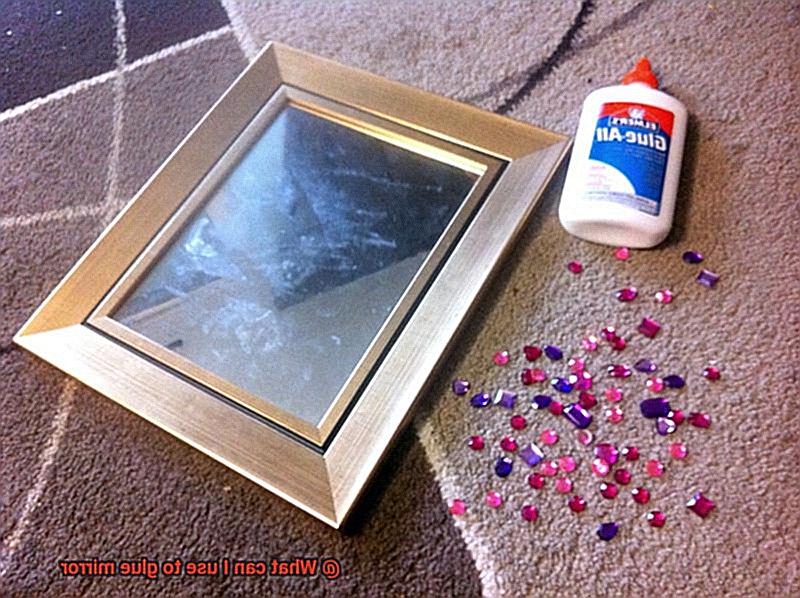
Mirror Mastic: Strong and Easy to Use
Mirror mastic is a popular choice due to its strong bonding capabilities and user-friendly application. It is a moisture-curing silicone-based compound that adheres well to both the mirror and the surface.
Its thick consistency fills gaps between the mirror and the surface, ensuring a secure bond. Mirror mastic also offers good resistance to moisture, making it ideal for bathroom installations. However, it may take longer to dry compared to other adhesives.
Construction Adhesive: Versatile and Durable
Construction adhesive, also known as construction glue, is another option for gluing mirrors. It bonds various materials, including glass and mirrors. This adhesive provides a strong bond and excellent durability, making it suitable for both indoor and outdoor mirror installations.
However, ensure that you choose a construction adhesive specifically formulated for mirrors.
Epoxy Adhesive: Exceptionally Strong but Requires Careful Application
Epoxy adhesives are renowned for their exceptional strength and durability. They consist of two components – resin and hardener – that need to be mixed before application. Epoxy adhesives create a strong bond between the mirror and the surface; however, they require precise application and careful mixing. Additionally, they may have a longer curing time than other adhesives.
Double-sided Mounting Tape: Convenient but Less Durable
Double-sided mounting tape is a convenient option for lightweight or temporary mirror installations. It adheres to both the mirror and the surface, providing a quick and easy way to mount mirrors without additional tools or curing time. However, it may not be as durable as other adhesive options and may not be suitable for heavy or large mirrors.
Liquid Nails: Strong and Versatile
Liquid Nails is a brand that offers a range of adhesives suitable for mirror installation. These adhesives are known for their strong bonding capabilities and versatility in bonding different materials. They are available in tubes or cartridges and can be applied using a caulking gun or adhesive dispenser. However, ensure that you choose an adhesive specifically designed for mirror installation.
Preparing the Surface Before Applying Adhesive
Achieving a strong and durable bond when gluing a mirror requires careful preparation of the surface. By following a few essential steps, you can ensure that your mirror installation is a success.
- Clean the surface: Begin by thoroughly cleaning the surface. Use a mild detergent or glass cleaner to remove any dust, dirt, or grease. Pay close attention to the edges of the mirror, as these areas are more prone to adhesive failure if not properly cleaned.
- Dry the surface: After cleaning, it is crucial to dry the surface completely. Use a lint-free cloth or paper towel to remove any moisture that could interfere with the adhesive bond. We want our adhesive to have a clean and dry canvas to work with.
- Inspect and repair: Take a close look at the surface for any cracks, chips, or imperfections. These blemishes can compromise the integrity of the bond, so it’s best to address them before applying adhesive. Fill cracks with an appropriate filler and smooth them out. Chips may require some extra care, such as replacing the affected area.
- Enhance adhesion: To enhance adhesion, slightly roughen the surface. This provides something for the adhesive to grip onto. You can achieve this by lightly sanding the surface with fine-grit sandpaper or using a specialized primer designed for mirror adhesion. However, be cautious not to overdo it, as excessive roughening can damage the mirror or weaken its structure.
- Apply the adhesive: Finally, it’s time to apply the adhesive. However, before you dive in, be sure to read and follow the manufacturer’s instructions carefully. Different adhesives have different application methods and curing times. It’s important to adhere to these guidelines for optimal results.
Applying the Adhesive
If you’re looking to add a touch of elegance to your home with a beautiful mirror, gluing it is a great way to achieve a seamless and sleek look. However, applying the adhesive correctly is crucial for a strong and secure bond. In this guide, we’ll walk you through the step-by-step process of applying adhesive to glue a mirror.
- Prepare the surface: Start by cleaning the area where the mirror will be attached. Use a mild detergent and water solution to remove dirt, grease, and dust. A clean surface is essential for a strong bond. Make sure to dry the surface thoroughly before moving on.
- Choose the right adhesive: Mirror mastic is a popular choice due to its ability to bond mirrors to various surfaces securely. Follow the manufacturer’s instructions for optimal results.
- Protect the edges: Before applying the adhesive, use masking tape to protect the edges of the mirror. This prevents accidental damage or smudging during application.
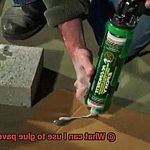
- Apply the adhesive: Squeeze a small amount of adhesive onto the back of the mirror in a zigzag pattern or dots. Spread it evenly using a putty knife or similar tool. Avoid excessive amounts that may create a messy appearance.
- Position and press firmly: Carefully place the mirror on the prepared surface, ensuring correct positioning before releasing it. Press it firmly against the wall or support material to promote good contact between the mirror and adhesive.
- Apply gentle pressure: Use a clean cloth or roller to apply gentle pressure all over the mirror’s surface. This helps it adhere well to the surface and creates a strong bond.
- Allow drying time: Follow the manufacturer’s recommended drying time for the adhesive. Avoid putting stress or weight on the mirror during this period.
- Remove masking tape and inspect: Once dried, remove the masking tape from the edges of the mirror. Inspect it to ensure a secure bond without visible gaps or spaces.
- Clean excess adhesive: Use a damp cloth or scraper to carefully remove any excess adhesive that may have squeezed out during application. Be cautious not to scratch or damage the mirror’s surface.
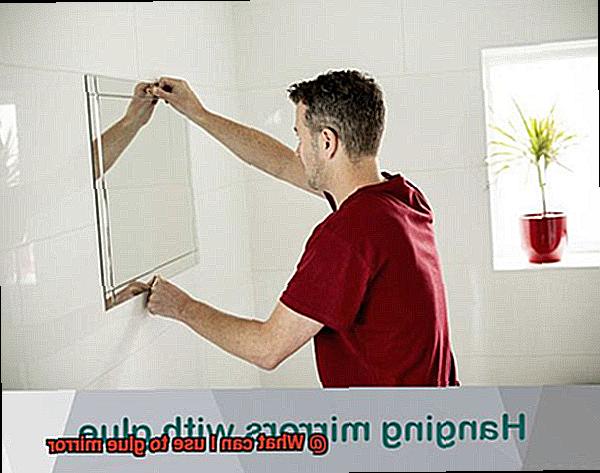
Placing the Mirror on the Desired Surface
Placing a mirror on your desired surface is just the ticket. Not only do mirrors add elegance to any room, but they also create an illusion of space and light. But before you dive into the project, let’s walk through the steps to ensure a secure and stunning installation.
First things first, cleanliness is key. Ensure that the surface you’re attaching the mirror to is free from dust and debris. Grab your trusty cleaning supplies and give it a good wipe down.
Next, measure and mark the desired position of the mirror on the surface. We all want our mirrors to hang straight and true, don’t we?
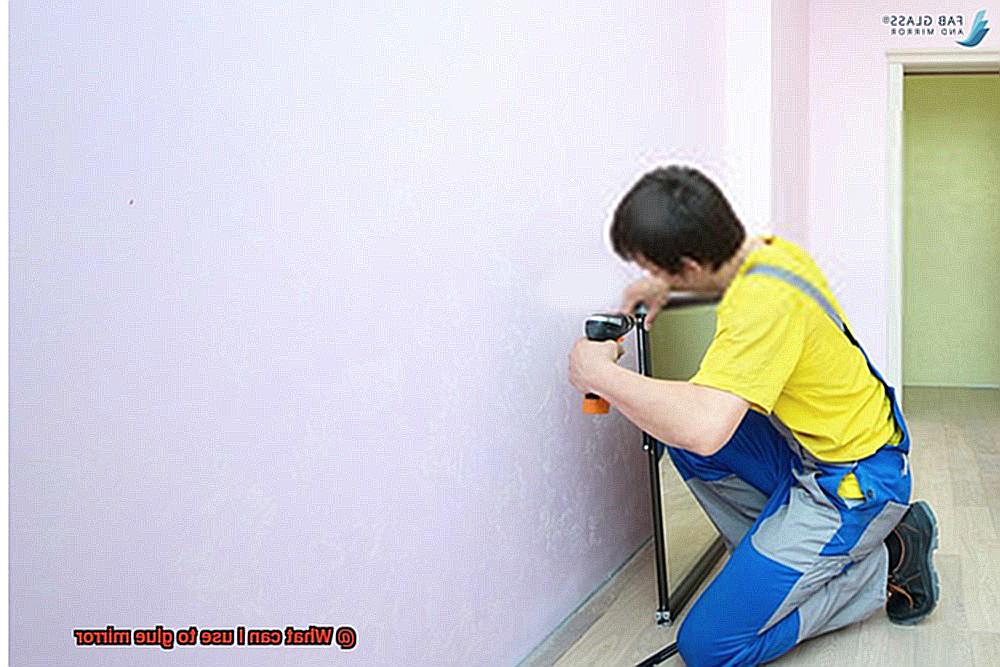
Depending on the size and weight of your mirror, additional support may be needed. Consider using brackets or clips for larger mirrors or those in high-traffic areas. Safety first, folks.
Now let’s talk adhesive. Mirror mastic is your go-to. Designed for bonding mirrors to various surfaces like wood, drywall, and tile, it’s strong, durable, and flexible. Follow the manufacturer’s instructions carefully.
Apply the mirror mastic in a zigzag pattern on the back of the mirror, leaving space around the edges for expansion. Press the mirror firmly onto the desired surface, ensuring good contact with the adhesive.
For lightweight or temporary installations, double-sided adhesive tape is an option. Apply it along the edges of the back of the mirror for full coverage. Keep in mind that additional support may still be necessary.
Once in place, make sure the mirror is level and straight using a level or measuring tools.
Lastly, give the adhesive time to cure and set. Check the manufacturer’s instructions for guidance.
And there you have it. A successfully placed mirror on your desired surface. Step back, admire your handiwork, and bask in the beauty of your newly enhanced space.
Curing Time for Adhesive
Before diving into the world of mirror installation, understanding the crucial element of adhesive curing time is essential. This factor plays a significant role in ensuring a secure bond that will stand the test of time. Let’s explore the different types of adhesives and their respective curing times, so you can confidently embark on your mirror installation journey.
Silicone-based Adhesives:
Flexible and resistant to moisture, silicone-based adhesives are your best friend when it comes to mirror installations. Perfect for high-humidity areas like bathrooms, these adhesives require some patience due to their curing time ranging from 24 to 72 hours. Remember, factors like temperature and humidity can influence drying time, so follow the manufacturer’s guidelines closely.
Epoxy Adhesives:
For those who prefer a quicker curing time, epoxy adhesives are a fantastic option. Depending on the specific product, these adhesives can dry and reach maximum strength within just a few hours. However, keep in mind that epoxy adhesives often require mixing two components before application. Take your time, follow instructions meticulously, and enjoy the shorter waiting period.
Mirror Mastic:
When it comes to professional mirror installations, mirror mastic steals the show. Specially designed for bonding mirrors, this thick paste provides a strong and secure hold. With a relatively speedy curing time of around 24 hours, mirror mastic ensures you won’t be waiting too long to fully enjoy your beautiful mirror.
The Waiting Game:
Although it may be tempting to test out your mirror installation right away, patience is key. Experts recommend waiting at least 48 hours before subjecting the mirror to any stress or movement. This waiting period allows for complete curing and ensures your mirror remains securely in place for years to come.
Different Drying Times and Cure Strengths
Before you dive into the world of adhesives, it’s important to understand the secret ingredient that holds everything together – the curing time. This is the glue that ensures a bond that can withstand the test of time. So let’s explore the different drying times and cure strengths of glues commonly used for mirror adhesion.
First up, we have silicone-based adhesives. These trusty sidekicks are flexible and resistant to moisture, making them perfect for high-humidity areas like bathrooms. However, their curing time ranges from 24 to 72 hours, so patience is key. Remember, factors like temperature and humidity can influence drying time, so follow the manufacturer’s guidelines closely.
If you’re someone who prefers a quicker turnaround time, epoxy adhesives come to the rescue. Depending on the specific product chosen, these adhesives can dry and reach maximum strength within just a few hours. Just keep in mind that epoxy adhesives often require mixing two components before application – take your time with this process and follow instructions meticulously to enjoy the shorter waiting period.
Now, let’s talk about mirror mastic – the superstar of professional mirror installations. This thick paste is specially designed for bonding mirrors and provides a strong and secure hold. With a relatively speedy curing time of around 24 hours, mirror mastic ensures you won’t be anxiously waiting too long before fully enjoying your beautiful mirror. But remember – patience is still essential. Even though it may be tempting to test out your newly installed mirror right away, experts recommend waiting at least 48 hours before subjecting it to any stress or movement.
Removing a Mirror Bonded with Adhesive
Removing a mirror that has been bonded with adhesive requires caution and the right tools to avoid damaging the mirror or the surface it is attached to. Safety should always be a priority, so make sure to protect yourself by wearing gloves and safety goggles.
First, assess the type of adhesive used to bond the mirror. The most common adhesives for mirrors are silicone adhesive, construction adhesive, and mirror mastic. Knowing which one you’re dealing with will help you choose the best removal method.
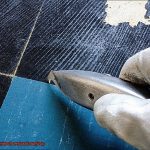
If the mirror is bonded with silicone-based adhesive, carefully cut through the adhesive around the edges of the mirror using a utility knife or razor blade. It’s important to apply gentle pressure to avoid cracking or shattering the mirror.
For mirrors bonded with construction adhesive or mirror mastic, heat is needed to soften the adhesive. Use a hairdryer or heat gun to gently warm up the adhesive, keeping the heat source at a safe distance from the mirror to prevent damage.
Once the adhesive is soft, use a putty knife or scraper to pry the mirror away from the surface. Start at one corner and gradually work your way across, applying gentle pressure as you go.
If there are stubborn spots where the adhesive won’t let go, consider using a solvent specifically designed for removing construction adhesives. Follow the manufacturer’s instructions and allow the solvent to penetrate and loosen the adhesive before attempting to remove the mirror again.
It’s important to note that removing a mirror bonded with adhesive can be delicate, especially if it’s large or heavy. If you’re unsure about how to proceed or if you have a valuable or antique mirror, it’s best to seek professional assistance.
After successfully removing the mirror, clean any remaining adhesive residue from both the mirror and the surface using an appropriate solvent or adhesive remover. Follow the manufacturer’s instructions for safe and effective removal.
Lastly, dispose of any broken glass or adhesive waste according to local regulations. Place broken glass in a sturdy bag or container to prevent injuries, and if possible, recycle it in a designated glass recycling bin.
Also Read: How To Glue Mirror On Wall Without Nails?
Conclusion
When it comes to gluing mirrors, there are several options available that can provide a strong and durable bond.
One commonly used adhesive is silicone-based glue, which is known for its flexibility and resistance to moisture. Another popular choice is mirror adhesive, specifically designed for bonding mirrors to various surfaces.
Additionally, construction adhesives such as epoxy or polyurethane can also be effective in securing mirrors in place. It’s important to ensure that the surface is clean, dry, and free from any debris before applying the adhesive.
Ultimately, choosing the right adhesive depends on factors such as the size and weight of the mirror, as well as the surface it will be attached to.