Wooden furniture and structures are a timeless addition to any space. But even the most well-crafted pieces can suffer from cracks, dents, or gaps that can compromise their beauty and functionality. That’s where wood fillers come in handy. They’re easy to use, filling in gaps and restoring the structural integrity of the wooden piece in no time.
But here’s the million-dollar question: can you stain over wood fillers? The answer is not as straightforward as you might think. Depending on the type of wood filler you use, staining may or may not be an option. And that’s where things get interesting.
In this blog post, we’ll delve into the nitty-gritty of wood fillers and stains. We’ll explore which types of wood fillers work best for staining and which ones don’t. Plus, we’ll provide some tips on how to choose the right wood filler for your needs and how to achieve a smooth finish when staining over it.
So if you’re wondering whether you can stain over wood fillers or not, sit back, relax with a cup of coffee (or tea), and keep reading to find out everything you need to know about this fascinating topic.
What is a Wood Filler?
Contents
- 1 What is a Wood Filler?
- 2 Types of Wood Fillers
- 3 Can All Wood Fillers be Stained Over?
- 4 Why Epoxy-Based Fillers are Best for Staining Over
- 5 Preparing the Surface Before Applying Filler
- 6 How to Apply Epoxy-Based Filler
- 7 Finishing the Filler with Stain
- 8 Tips for Successful Staining Over Wood Fillers
- 9 Conclusion
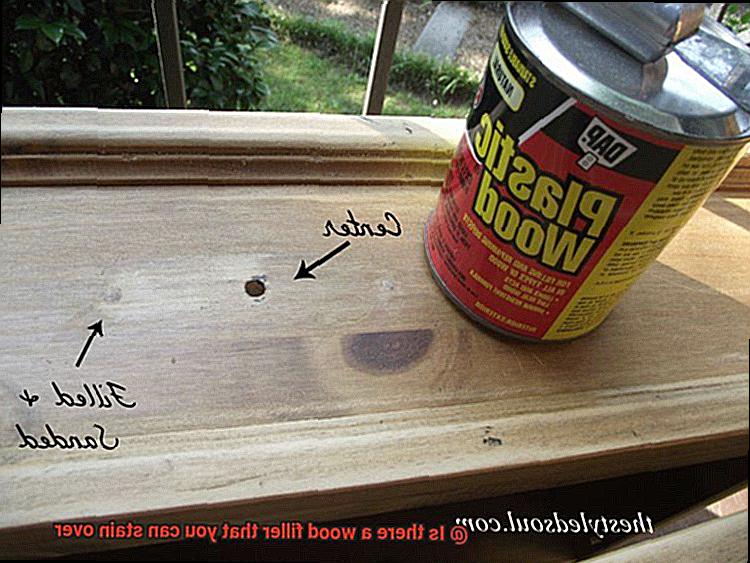
Wood filler is a vital material in woodworking and furniture making. Its primary purpose is to fill in gaps, cracks, holes, and other imperfections in wood surfaces, ensuring a smooth and seamless finish. Wood fillers are available in different types, including epoxy, vinyl, cellulose, and sawdust mixed with glue.
The color of the wood filler is an essential factor to consider when selecting the right one for your project. Wood fillers come in various colors and shades, making it easier to match the color of the wood being repaired. Additionally, some wood fillers are stainable, allowing them to blend in seamlessly with the surrounding wood.
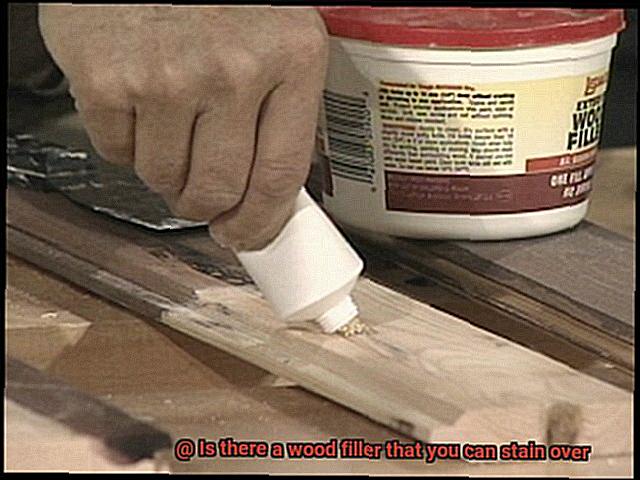
To achieve the best results with wood filler, it’s crucial to follow the manufacturer’s instructions carefully. Some types of wood filler require sanding after application while others can be smoothed with a putty knife or wet cloth.
Proper preparation of the surface before applying wood filler is crucial. Cleaning the surface thoroughly and sanding it down to remove debris or rough spots ensures that the filler adheres correctly and provides a smooth finish that can be stained over with ease.
When choosing a wood filler, it’s essential to consider its color, texture, and compatibility with the surrounding wood. Here are some of the different types of wood fillers available:
- Water-based fillers: These contain binders that prevent them from absorbing stain properly, resulting in an uneven finish.
- Solvent-based fillers: Like water-based fillers, these also contain binders that can cause problems when staining.
- Epoxy-based fillers: These bond with the surrounding wood and accept stain uniformly.
Types of Wood Fillers
Wood fillers are an essential product for repairing and restoring damaged wood surfaces. They come in different types, each with its unique properties and uses. In this section, we will explore the five main types of wood fillers and how they can be used for staining.
Water-Based Fillers: Easy to Apply and Quick Drying
Water-based fillers are made using water as the base ingredient and are perfect for use on unfinished wood surfaces. They are easy to apply, dry quickly, and can be sanded and painted over once they have dried. Water-based fillers also accept stains well, making them a popular choice for staining wood.
Solvent-Based Fillers: Suitable for Finished and Unfinished Wood
Solvent-based fillers use solvents such as acetone or mineral spirits as the base ingredient. They are suitable for use on both finished and unfinished wood surfaces but take longer to dry than water-based fillers. Solvent-based fillers have a strong odor and do not accept stains well, making them less popular for staining wood.

Epoxy Fillers: Strong and Durable
Epoxy fillers consist of a resin and a hardener, making them incredibly strong and durable. They are perfect for use on high-traffic areas such as floors and stairs where heavy-duty repairs are needed. Epoxy fillers take longer to dry than other types of fillers but provide long-lasting results. When it comes to staining over epoxy fillers, specific steps must be taken to ensure an even finish.
Vinyl Fillers: Easy to Use but may Shrink Over Time
Vinyl fillers are made using a combination of PVC particles and resin. They are easy to use, quick-drying, and accept stains well. However, they may shrink over time, requiring sanding or painting over for long-lasting results.
Wax Fillers: Ideal for Small Cracks
Wax fillers consist of a mixture of wax and wood fibers, making them perfect for filling in small cracks and holes. They are easy to apply and can be matched to the color of the surrounding wood using a wax stick or crayon. However, wax fillers are not suitable for use on larger areas and cannot be stained over.
When it comes to staining over wood filler, the type of filler you choose will play a significant role in the outcome of your project. Water-based fillers can be easily stained over with most types of wood stains, while solvent-based fillers can sometimes cause the stain to become splotchy or uneven. Epoxy fillers can be stained over but require specific steps to ensure an even finish. Wax fillers cannot be stained over, but they can be matched to the color of the surrounding wood.
Can All Wood Fillers be Stained Over?
Well, the answer is not as straightforward as you might think. Different types of wood fillers react differently to staining, and choosing the right one for your project can make all the difference in achieving a flawless finish.
Firstly, let’s take a closer look at water-based fillers. While these fillers are perfect for painting over, they tend to absorb stain unevenly and can cause blotchy or discolored spots when stained. So, if you’re planning to stain your wooden surface after using a water-based filler, be prepared for some disappointment. However, if you’re only planning to paint over it, a water-based filler could still be a great option.
On the other hand, solvent-based fillers are better suited for staining and produce a more even finish. They don’t absorb the stain as much as water-based fillers do, making them ideal for achieving an even stain color. However, keep in mind that solvent-based fillers require longer drying times and produce strong fumes that may require proper ventilation.
When choosing a wood filler, it’s also crucial to color-match it as closely as possible to the wooden surface you’re repairing. This will minimize the need for staining and ensure that the finished product looks seamless. Remember, different types of wood have unique colors and grain patterns; therefore, matching the filler’s color is key to achieving that flawless finish.
If you do need to stain the wood after applying the filler, always test it on a small area first to see how it reacts. If the filler absorbs too much stain or causes discoloration, consider using a different type of filler or adjusting your staining technique.
Why Epoxy-Based Fillers are Best for Staining Over
When it comes to woodworking projects, finding the right wood filler can make or break your finished product. Fortunately, epoxy-based fillers stand out as the best option for staining over. Here’s why:
- Sandable and Stainable: Epoxy-based fillers are a two-part system made up of a resin and hardener that work together to create a strong and durable filler that can be sanded and stained just like natural wood. This means that you can achieve a seamless finish across your wood surface, regardless of any gaps or holes.
- Uniform Color: One of the standout features of epoxy-based fillers is their ability to take on stain colors without changing their own color. This allows you to achieve a uniform color across your wood surface, unlike other types of fillers that may darken or change color when stained.
- Water-Resistant: Epoxy-based fillers bond well to wood and are water-resistant, making them an ideal choice for areas exposed to moisture, such as bathrooms or kitchens. They help prevent moisture from penetrating the surface of your wood and causing damage over time.
Additionally, epoxy-based fillers offer several advantages over other types of fillers. Compared to water-based fillers, which can result in blotchy or discolored spots when stained, epoxy-based fillers provide a reliable solution for filling large gaps or holes in wood. And compared to solvent-based fillers, which require longer drying times and proper ventilation due to strong fumes, epoxy-based fillers offer a more convenient and safe option.
Preparing the Surface Before Applying Filler
Before even thinking about applying filler, it’s crucial to prepare the surface correctly. This essential step ensures that your wood filler adheres correctly and that your stain adheres evenly to the surface.
To begin, remove any loose debris from the surface using a damp cloth. This will ensure that the surface is free of dirt, grease, or grime that could hinder the filler’s adhesion. Next up, sandpaper becomes your best friend. Start with a coarse grit sandpaper like 80 grit and work your way up to a finer grit like 220 grit. Sanding down the surface is crucial as it creates a smooth and even surface that the filler can adhere to correctly.
After sanding, use a vacuum or tack cloth to remove any remaining dust particles from the surface. It’s essential to remove these pesky dust particles as they can mix with your filler and create an uneven finish. If you’re working with bare wood, apply a sealer before applying the filler. This step prevents moisture absorption from the filler and ensures that the stain adheres evenly to the surface.
When prepping for filler application, here are some steps to keep in mind:
- Remove loose debris from the surface with a damp cloth
- Sand down the surface with coarse grit sandpaper, working your way up to finer grits
- Use a vacuum or tack cloth to remove any remaining dust particles from the surface
- Apply a sealer before applying filler if you’re working with bare wood
How to Apply Epoxy-Based Filler
Epoxy-based fillers are an excellent option for repairing wooden surfaces that have cracks or holes. They can also be stained over, making them a popular choice for those who want to restore the surface’s beauty.
However, applying epoxy-based filler requires proper preparation and application to ensure a successful staining result. Here are five subtopics that explain how to apply epoxy-based filler for a beautiful staining result:
Choose the right type of epoxy-based filler
Choosing the right type of epoxy-based filler is crucial when it comes to staining over it. Not all fillers are created equal, and some may not take stain evenly or may alter the color of the stain. Therefore, it is essential to test a small area before applying the filler to the entire surface.
Prepare the surface properly
Properly preparing the surface is vital to ensure that the epoxy-based filler adheres well and does not crack or shrink over time. Before applying the filler, clean the area thoroughly and remove any loose or damaged wood fibers. Sanding the surface will help create a rough texture that will allow the filler to adhere better.
Mix and apply the filler
Mixing and applying the epoxy-based filler requires following the manufacturer’s instructions carefully. Use a putty knife or plastic spreader to apply it to the damaged area, making sure to fill all the cracks and voids completely. Working quickly is crucial since epoxy-based fillers tend to harden quickly.
Smooth out and sand down excess material
After applying the filler, smooth out the surface and remove any excess material using a putty knife or sanding block. Carefully sand down once it has cured completely until it is flush with the surrounding wood surface, taking care not to sand too much as this may damage the filler and expose the underlying wood.
Stain and protect the surface
When staining over epoxy-based fillers, use a high-quality stain that is compatible with your filler. Apply the stain according to the manufacturer’s instructions, and use a rag or brush to ensure even coverage. Follow up with a sealer or topcoat to protect the surface from moisture and wear.
Finishing the Filler with Stain
You’ve invested time and effort into filling those unsightly holes and cracks in your wooden surface with a reliable epoxy-based filler. Now it’s time to take things up a notch with a stunning stain finish. However, before you begin, it’s crucial to follow a few essential steps to ensure that your finished product is not only gorgeous but also long-lasting.
One of the most crucial steps to achieving a beautiful stain finish is selecting the right wood filler. Not all fillers are created equal, and some may not interact well with stains. Therefore, it’s vital to choose a product specifically designed to be stained over.
After filling in the cracks and holes with the appropriate wood filler, allow it plenty of time to dry entirely. The drying time will vary depending on the size of the area you’re filling and the product used. To ensure that your stain adheres correctly, it’s best to wait at least 24 hours before proceeding.
When it comes to staining the wood filler, selecting a high-quality stain designed for use on wood is essential. Oil-based stains tend to work best as they penetrate deeper into the surface of the wood, resulting in a more even and consistent finish. As you apply the stain, ensure that it’s done evenly and in thin coats, allowing each coat sufficient time to dry before adding another.
To protect your newly-stained surface from scratches, moisture, and other types of damage, consider applying a clear topcoat. A water-based polyurethane or varnish can work as an excellent topcoat option. However, it’s essential to check its compatibility with the type of stain used.
Tips for Successful Staining Over Wood Fillers
Achieving a successful stain over wood fillers requires careful consideration and attention to detail. Below are five tips and tricks to help you achieve a beautiful and even finish when staining over wood fillers.
Choose the Right Wood Filler
Not all wood fillers are created equal, and some may not take stain well or may not match the color of your wood. It’s important to choose a filler that is designed specifically for staining, as some fillers may not absorb stain evenly or may have a different texture than the surrounding wood. Consider the compatibility of the filler with the type of stain you plan to use, as some fillers may be more compatible with oil-based stains, while others may work better with water-based stains.
Properly Prepare the Surface
Preparing the surface properly before applying any filler is essential. This involves cleaning it thoroughly and sanding it down to remove any debris or rough spots. This will ensure that the filler adheres correctly and provides a smooth finish that can be stained over with ease. Consider using a pre-stain conditioner or sealer to help prevent blotching or uneven absorption of the stain.
Select the Right Type of Stain
Choosing the right type of stain for your project is crucial. Some stains are specifically designed for use on wood fillers, while others may not work as well. It’s also important to choose a color that complements the surrounding wood and any other finishes that may be present. Consider using a test piece of wood to experiment with different types and colors of stain before committing to your final choice.
Apply the Stain Evenly
When it comes to applying the stain, it’s best to use a brush or rag rather than a spray can. This allows for better control over the application and can help ensure that the stain is applied evenly. It’s also important to apply the stain in thin layers, allowing each layer to dry completely before applying another. Consider using a foam brush or cloth to remove any excess stain and ensure an even application.
Allow Ample Drying Time
Finally, it’s important to allow ample drying time before applying any additional coats or finishes. This may involve applying multiple coats of stain to achieve the desired color and depth, as well as allowing each coat to dry completely before moving on to the next step. Consider using a fan or open windows to help speed up the drying process.
amXyo5nsEd0″ >
Conclusion
In conclusion, the answer to whether there is a wood filler that you can stain over is a resounding yes.
With the right type of wood filler and proper preparation, you can easily achieve a seamless finish that looks just like natural wood. It’s important to choose a high-quality wood filler that is specifically designed for staining and ensure that it matches the color of your project.
By following these simple steps, you can achieve professional-looking results and enhance the overall look of your woodworking projects.


