Welcome to our blog post where we delve into the enchanting realm of resin art and uncover the secrets to sticking resin pieces together.
Whether you’re a seasoned resin aficionado or just dipping your toes into this captivating craft, one crucial skill you’ll need in your arsenal is the ability to securely adhere your resin creations. Fear not, for in this article, we’ll share with you a treasure trove of detailed insights and professional advice on the various techniques and materials that will enable you to achieve a steadfast bond between your beloved resin pieces.
So gather your tools and prepare to embark on an exhilarating journey towards elevating your resin artistry to dazzling new heights.
Different Types of Adhesives for Sticking Resin Pieces Together
Contents
- 1 Different Types of Adhesives for Sticking Resin Pieces Together
- 1.1 Epoxy Resin:
- 1.2 Advantages: The strong and durable bond ensures longevity in resin projects. Resistant to water, heat, and chemicals, epoxy is suitable for various conditions. The extended working time allows for meticulous adjustments and positioning.
- 1.3 Cyanoacrylate Glue (Super Glue):
- 1.4 Advantages: Super glue offers quick and strong bond formation. Its fast-drying nature allows for efficient project completion.
- 1.5 Silicone Adhesive:
- 1.6 Advantages: The flexible and durable bond ensures resilience in resin pieces subjected to movement or stress. Resistance to high temperatures and chemicals enhances the adhesive’s versatility.
- 1.7 UV Resin:
- 2 Epoxy Resin: A Strong and Durable Adhesive
- 3 Cyanoacrylate Glue (Super Glue): Fast-Acting and Secure Bonding
- 4 Two-Part Polyurethane Adhesive: Flexible Bonding with Longer Curing Time
- 5 Hot Glue: Convenient and Easy to Use
- 6 UV Resin: Transparent Bonding with Exposure to UV Light
- 7 Preparing the Surfaces for Strong Bonding
- 8 Choosing the Right Adhesive for Your Project
- 9 Conclusion
Resin crafts have become increasingly popular in recent years, with artists and hobbyists alike creating stunning jewelry, artwork, and decorative pieces. One of the key aspects of successful resin projects is choosing the right adhesive to stick resin pieces together. In this article, we will explore different types of adhesives for sticking resin pieces together and discuss the advantages and disadvantages of each option. By understanding the unique properties of each adhesive, you can ensure a strong and durable bond that will withstand the test of time.
Epoxy Resin:
Epoxy resin is a go-to adhesive for bonding resin pieces due to its exceptional strength and durability. Composed of a resin and a hardener, this two-part adhesive creates a chemical reaction when mixed together, resulting in a strong bond. Epoxy offers excellent resistance to water, heat, and chemicals, making it ideal for various applications. Additionally, epoxy provides a long working time, allowing for precise positioning before it sets.
-
Advantages: The strong and durable bond ensures longevity in resin projects. Resistant to water, heat, and chemicals, epoxy is suitable for various conditions. The extended working time allows for meticulous adjustments and positioning.
- Disadvantages: Epoxy can be messy to work with due to the mixing process required. It also has a longer curing time compared to other adhesives.
Cyanoacrylate Glue (Super Glue):
Cyanoacrylate glue, commonly known as super glue, is another popular adhesive choice for sticking resin pieces together. This fast-drying adhesive forms an instant and strong bond when it comes into contact with moisture. However, it’s important to note that not all types of resin are compatible with cyanoacrylate glue, so testing it on a small area is advisable.
-
Advantages: Super glue offers quick and strong bond formation. Its fast-drying nature allows for efficient project completion.
- Disadvantages: Some types of resin may not adhere well to cyanoacrylate glue. It can leave a white residue on the resin surface, affecting the final aesthetic.
Silicone Adhesive:
Silicone adhesive is a versatile option for bonding different materials, including resin. This flexible and durable adhesive comes in a tube and can be applied using a caulking gun or similar tool. Silicone adhesive provides excellent resistance to high temperatures and chemicals, making it suitable for various resin projects.
-
Advantages: The flexible and durable bond ensures resilience in resin pieces subjected to movement or stress. Resistance to high temperatures and chemicals enhances the adhesive’s versatility.
- Disadvantages: Silicone adhesive can be messy to work with due to its sticky nature. It may require additional support or clamping during the curing process.
UV Resin:
UV resin is a specialized adhesive that cures when exposed to ultraviolet light.
Epoxy Resin: A Strong and Durable Adhesive
When it comes to sticking resin pieces together, there’s one adhesive that stands out above the rest – epoxy resin. Crafters, artists, and DIY enthusiasts all know that when it comes to strength and durability, epoxy resin is the go-to choice.
What sets epoxy resin apart from other adhesives? It’s all in the chemical reaction. When the resin and hardener components are mixed together, something magical happens. They bond together, creating a connection that can withstand the test of time and various stresses and strains.
But that’s not all – epoxy resin is incredibly versatile. It can bond not only resin pieces but also plastic, metal, wood, and even glass. This means you can use it for a wide range of projects, from jewelry making to furniture repairs.
Now, let’s talk about how to achieve the best results with epoxy resin. First things first, make sure to clean the surfaces thoroughly. Dust and debris can get in the way of a strong bond, so give those pieces a good scrub before applying the adhesive.
Next, apply a thin layer of epoxy resin onto one of the pieces. Spread it evenly to ensure maximum contact between the surfaces. Then, join the two pieces together and apply gentle pressure. Hold them in place for a few minutes until the initial bond forms.
Once that’s done, it’s time to let the epoxy resin cure. Follow the manufacturer’s instructions for curing time and any additional steps that may be needed. This could involve leaving your project undisturbed for a specified period of time or applying heat to speed up the process. Either way, once cured, you’ll have a bond that can withstand moisture, chemicals, and temperature changes.
Of course, safety should always be a priority when working with epoxy resin. Make sure to work in a well-ventilated area or wear a respirator mask to avoid inhaling any fumes. And don’t forget your gloves and protective eyewear to keep your skin and eyes safe.
Cyanoacrylate Glue (Super Glue): Fast-Acting and Secure Bonding
Cyanoacrylate glue, also known as super glue, is a game-changer in the world of adhesives. Its fast-acting and secure bonding properties make it the ideal choice for sticking resin pieces together. Whether you’re a resin enthusiast or a crafty individual, super glue is the go-to adhesive for creating sturdy and long-lasting bonds.
What sets super glue apart from other adhesives is its ability to form an incredibly strong bond when it comes into contact with moisture. The humidity in the air or the moisture present on the surface of the resin pieces activates the adhesive, allowing it to create a tight and secure bond. Once you stick those resin pieces together with super glue, they’re not going anywhere.
But that’s not all. Super glue also boasts a quick-drying nature that sets it apart from its counterparts. While other adhesives may take hours to set, super glue bonds within seconds. This rapid bonding time saves you precious hours and lets you complete your projects in no time.
To ensure a successful bond, proper preparation is key. Cleanliness is crucial – wipe the resin pieces with a clean cloth to remove any dust or debris. For a thorough cleaning, use a mild detergent solution if necessary. Remember, a clean surface provides better adhesion for your super glue.
When applying super glue, remember that less is more. Only use a small amount as a little goes a long way. Applying too much glue can result in excess oozing out and potentially marring the appearance of your resin piece.
After applying the adhesive, hold the resin pieces firmly together for a few seconds. Applying pressure helps ensure that the adhesive spreads evenly across the surfaces, creating a stronger and more reliable bond.
Super glue’s excellent bonding strength is well-known, but it’s essential to check its compatibility with your specific type of resin. Some resins may require different types of adhesives or techniques for optimal bonding. Always read the manufacturer’s instructions and recommendations to ensure the best results.
It’s worth noting that super glue creates a permanent bond between resin pieces. Once they’re stuck together, it’s challenging to separate them. Therefore, be careful when aligning and positioning the pieces before applying the adhesive to avoid any mistakes or misalignments.
While super glue is fantastic for most projects, it’s not suitable for resin pieces that will be exposed to extreme temperatures or direct sunlight. Over time, these conditions may weaken or break down the bond.
Two-Part Polyurethane Adhesive: Flexible Bonding with Longer Curing Time
Two-part polyurethane adhesive is the ultimate adhesive superhero for flexible bonding with a longer curing time. Its incredible powers make it a game-changer for bonding resin pieces together. Let’s dive into the advantages of this adhesive and explore its magical properties.
First off, let’s talk about flexibility. Resin pieces can be quite finicky when it comes to movement and expansion. But fear not. Two-part polyurethane adhesive has got you covered. With its flexible nature, it can accommodate those resin piece shenanigans without compromising the bond. Temperature changes or external factors causing your resin pieces to move and groove? No problem. This adhesive will hold strong, ensuring that your masterpiece stays intact.
But wait, there’s more. The longer curing time of this adhesive is where the real magic happens. Unlike its quick-drying counterparts, two-part polyurethane adhesive gives you ample working time to get everything just right. Think intricate or complex resin pieces that require precise alignment. With this adhesive, you can make those adjustments without breaking a sweat. Take your time, my friend, because perfection awaits.
Now, let’s delve into technique. Mixing equal parts of the resin and hardener is the name of the game here. Thoroughly blend them until you have a smooth and homogenous mixture, like a potion brewed by a master alchemist. Apply this magical concoction to the surfaces that need bonding and press them together firmly. Pro tip: use clamps or other pressure-applying methods for an extra-strong bond. We’re not messing around here.
Now comes the waiting game. The curing time may vary depending on factors like temperature and humidity. It’s crucial to give your adhesive enough time to work its magic and fully cure before subjecting those bonded resin pieces to any stress or strain. Patience pays off in the form of maximum strength and durability.
Hot Glue: Convenient and Easy to Use
When it comes to sticking resin pieces together, hot glue emerges as the ultimate superhero adhesive, saving the day with its unrivaled convenience and ease of use. Crafters and DIY enthusiasts have made hot glue their go-to option for bonding resin pieces due to its versatility, quick drying time, and effortless application. In this article, we will delve into the power of hot glue, discussing the right tools, application techniques, fast drying time, flexibility and durability, and easy removal, all highlighting why hot glue is the ultimate choice for convenient and easy bonding.
The Power of Hot Glue:
Hot glue’s secret lies in its composition of thermoplastic polymers that instantly melt when heated. This unique feature makes hot glue effortlessly applicable to various surfaces, ensuring a strong bond every time. Its adaptability and quick drying time make it ideal for a wide range of resin applications.
The Right Tools:
To wield the power of hot glue effectively, you will need a trusty sidekick – a hot glue gun – and hot glue sticks. Choosing the right hot glue gun is crucial as there are different sizes and types available on the market. Remember to clean the surfaces of the resin pieces before applying hot glue to ensure an unbreakable bond.
Application Technique:
With your trusty sidekick at your side, insert a hot glue stick into the hot glue gun and let it heat up. Once melted, activate the power by gently squeezing the trigger to dispense the adhesive onto one of the resin pieces. Quickly align the other piece with precision and press them together firmly. Hold them in place for a few seconds until the hot glue sets, creating an impenetrable bond.
Fast Drying Time:
Hot glue’s superpower lies in its rapid drying time. Unlike other adhesives that may leave you waiting for hours or even days, hot glue solidifies within minutes. This incredible ability allows you to continue working on your project without any unnecessary delays.
Flexibility and Durability:
Hot glue exhibits remarkable flexibility and durability, making it suitable for a multitude of resin applications. It can handle moderate stress and movement, ensuring your resin pieces remain securely bonded over time. However, for heavy-duty or load-bearing applications, it’s advisable to consider using a stronger adhesive.
Easy Removal:
In the world of bonding, sometimes disassembly or repositioning becomes necessary. Fear not, for hot glue can be easily removed. By simply applying heat to the bonded area using a hairdryer or heat gun, the hot glue softens and becomes pliable once more, allowing you to make adjustments as desired.
UV Resin: Transparent Bonding with Exposure to UV Light
In this blog post, we will explore the captivating world of UV resin, delving into its unique properties, application process, and remarkable benefits. So grab your UV lamp and get ready for a dive into the magic of UV resin.
UV Resin: Unveiling the Basics:
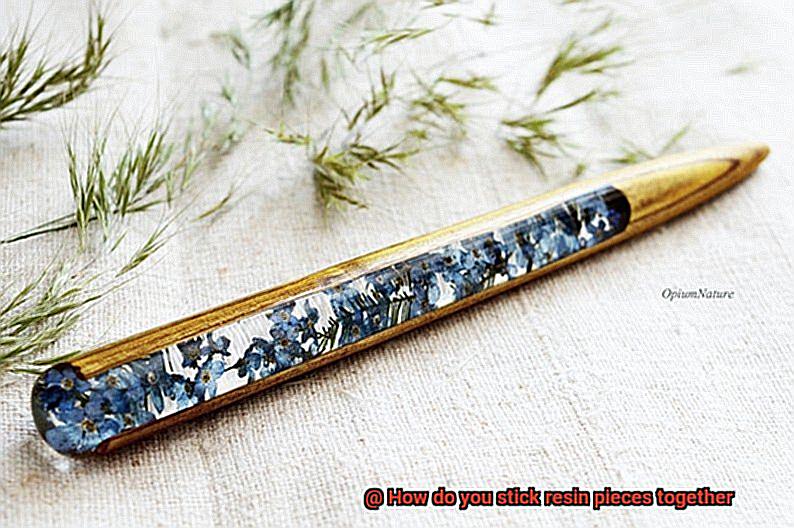
UV resin derives its name from its remarkable ability to cure or harden when exposed to ultraviolet (UV) light. This transparent adhesive is a game-changer when it comes to bonding resin pieces, thanks to its unmatched strength and durability. Say goodbye to unsightly marks or residue – with UV resin, your crafts will remain flawlessly transparent.
The Artistry of Application:
Using UV resin is an absolute breeze. First, ensure that the surfaces you intend to bond are pristine and dry. Next, apply a small amount of UV resin to one surface, carefully aligning the other resin piece on top for a perfect fit. Now comes the enchantment – expose the adhesive to UV light using a lamp or sunlight exposure box. Within mere minutes, witness the mesmerizing transformation as the resin cures and hardens, forging an unbreakable bond between the two pieces.
Benefits that Shine Brightly:
- Transparency Unleashed: Unlike conventional glues, UV resin bonds remain virtually invisible, preserving the aesthetic allure of your resin projects.
- Strength that Endures: Rest assured that your creations will stand the test of time, as UV resin boasts robust bonding capabilities.
- Rapid Curing Time: With its swift curing process, UV resin allows you to work efficiently without sacrificing quality or waiting hours for your project to set.
- Limitless Versatility: From jewelry making to art projects and even repairing small resin items, UV resin proves its worth across various applications.
Preparing the Surfaces for Strong Bonding
Preparing the Surfaces for Strong Bonding
Achieving a strong and durable bond between resin pieces requires meticulous surface preparation. This crucial process ensures that the adhesive or glue adheres effectively, preventing potential breakage or detachment. Let’s dive into the nitty-gritty details of preparing the surfaces for a bond that’s as solid as a rock.
First and foremost, cleanliness is key to successful bonding. Imagine trying to stick two pieces together when they’re covered in dirt, dust, or oils – it’s like trying to grip a greased-up eel. To avoid this slippery situation, grab a mild detergent or soap and mix it with water. Armed with a soft brush or cloth, gently scrub away any lurking grime. Rinse the surfaces thoroughly with clean water and ensure they’re bone dry before moving on.
Now, let’s tackle texture. Resin pieces may be smooth and glossy, which may be great for looks but not so great for bonding. We need to roughen those surfaces a bit to give the adhesive something to cling onto. Don’t worry, we’re not talking about major sanding here – just a light touch with fine-grit sandpaper or a scoring tool will do the trick. Remember, more surface area means more magic for that adhesive.
But wait, there’s more. Some resin pieces come with a protective coating that acts like a barrier for adhesives. We need to break down that barrier for a strong bond. Grab a solvent or adhesive remover specifically designed for resin materials and follow the instructions carefully. Gently wipe away any residue with a clean cloth, and voila – those surfaces are ready for some serious bonding action.
Last but certainly not least, moisture is the enemy of strong bonding. Picture trying to stick two wet surfaces together – it’s like trying to glue water. To combat this issue, ensure those surfaces are completely dry before starting the bonding process. A gentle pat with a clean, dry cloth should do the trick. But if you’re in a rush, a low heat setting on your trusty hairdryer can speed up the drying process (just be cautious not to melt those precious resin pieces.).
Choosing the Right Adhesive for Your Project
Choosing the Right Adhesive for Your Project
When it comes to selecting the right adhesive for your project, making the right choice is crucial for a successful and durable bond. With so many options available, it can be overwhelming to determine which adhesive will best suit your needs. Here are some factors to consider and types of adhesives to help you make an informed decision:
- Epoxy Resin: Epoxy is a versatile adhesive that can bond a wide range of materials, including resin, glass, metal, and plastic. Its excellent adhesion strength and durability make it suitable for both indoor and outdoor projects. Epoxy resin is available in various formulas, including fast-setting and clear options.
- Cyanoacrylate Glue: Also known as super glue or instant glue, cyanoacrylate glue is famous for its fast bonding time and strong bond. It’s an excellent choice for quickly and securely sticking resin pieces together. However, it’s crucial to check the manufacturer’s recommendations before using cyanoacrylate glue, as it may not be suitable for all types of resin and surfaces.
- Clear Silicone Adhesive: If you require flexibility or a clear bond line, a clear silicone adhesive may be the best option. Silicone adhesives offer flexibility and transparency, making them ideal for applications where movement or visibility is important. They are commonly used in jewelry-making or crafts involving transparent resin pieces.
- Polyurethane Glue: For projects involving bonding resin pieces to porous surfaces like wood or fabric, a strong adhesive like polyurethane glue might be recommended. Polyurethane glues have excellent bonding strength and can create a durable bond even on porous surfaces. However, they may require longer curing times and may expand as they dry, so careful application is necessary.
Consider these factors when selecting an adhesive:
- Type of Resin: Different adhesives may work better with certain types of resin, so it’s important to consider compatibility before making a choice.
- Surface Materials: The materials being bonded should also be taken into account. Some adhesives may not work well on certain surfaces, so it’s crucial to check the manufacturer’s recommendations.
- Intended Use: Think about the purpose of your project and where it will be used. If it will be exposed to extreme temperatures or outdoor conditions, you’ll need an adhesive that can withstand these conditions.
- Applicator/Dispenser: Consider the applicator or dispenser that comes with the adhesive. Some adhesives have convenient squeeze bottles or applicators that make it easier to control the amount and placement of the adhesive.
Always follow the manufacturer’s instructions when using any adhesive. Proper surface preparation, application techniques, and curing times are crucial for a successful bond. It’s also recommended to test the adhesive on a small, inconspicuous area first to ensure compatibility and desired bond strength.
Mlt8O6YurWU” >
Conclusion
In the realm of resin crafting, the question of how to stick resin pieces together is a common one. Fortunately, there are several effective methods to achieve a strong bond between these delicate creations.
One popular option is using epoxy resin adhesive. This powerful adhesive not only securely joins resin pieces but also provides a clear and durable bond. Simply apply a small amount of the adhesive to the surfaces you wish to connect, press them together firmly, and allow the epoxy to cure according to the manufacturer’s instructions. The result? A seamless connection that will withstand the test of time.
Another method worth considering is using UV resin. This type of resin requires exposure to ultraviolet light for curing, which can be achieved with a UV lamp or sunlight. By applying a thin layer of UV resin onto the surfaces you want to stick together and then exposing it to UV light, you can create a firm and transparent bond that will leave your resin pieces looking flawless.
For those seeking an alternative approach, super glue can also be used to stick resin pieces together. This quick-drying adhesive forms an instant bond when applied to clean and dry surfaces. However, it’s important to note that not all super glues are suitable for use on resin. Look for a cyanoacrylate-based glue specifically designed for bonding plastics, as it will provide optimal adhesion without damaging your precious creations.
Regardless of the method you choose, it’s crucial to ensure that both surfaces are clean and free from any dust or debris before attempting to stick them together. Additionally, take care not to use excessive amounts of adhesive as this may result in unsightly residue or overflow.
In conclusion, sticking resin pieces together requires careful consideration and the use of appropriate adhesives such as epoxy resin adhesive, UV resin, or specialized super glue. By following proper application techniques and allowing sufficient curing time, you can achieve strong and visually pleasing bonds that will elevate your resin creations to new heights.