Ready to dive into the fabulous world of false eyelashes? Whether you’re getting dolled up for a special event or just want to add some extra oomph to your everyday look, gluing on lashes is the way to go.
Now, I know what you’re thinking: “But isn’t it tricky?” Don’t worry, my friend, I’ve got your back.
In this blog post, we’ll take you by the hand and guide you through every step of the process. From prepping your natural lashes to nailing that perfect application, we’ll make sure you’re armed with all the knowledge you need.
So get comfy and let’s get those lashes on fleek together.
Types of Eyelash Glue
Contents
- 1 Types of Eyelash Glue
- 2 Choosing High-Quality Eyelash Glue
- 3 Step-by-Step Guide to Applying Eyelash Glue for Beginners
- 4 Common Mistakes When Applying Eyelash Glue
- 5 Removing False Lashes Without Damage
- 6 Recommended Brands of Eyelash Glue for Beginners
- 7 Practicing and Patience with Applying Eyelash Glue
- 8 Tips and Tricks for Applying Eyelash Glue
- 9 Conclusion
There are several types of eyelash glue available on the market, each with its own unique properties and benefits. It’s important for beginners to understand these different types in order to choose the right one for their needs.
One of the most common types of eyelash glue is the traditional white adhesive. This glue dries clear and is suitable for both strip lashes and individual lashes. It provides a strong hold and is often considered long-lasting. However, it can be a bit tricky to apply for beginners as it requires precise placement and can sometimes leave a visible residue if not applied correctly.
Another popular option is the clear adhesive. This type of glue also dries clear, but it is formulated to be more flexible and comfortable on the eyelids. It is often recommended for those with sensitive skin or those who find the traditional white adhesive too harsh. Clear adhesive is generally easier to work with as it allows for easier adjustments during application.
For those looking for a quicker and more convenient option, there are also eyelash glues available in the form of adhesive pens or tubes. These glues come with a built-in brush applicator, making them easy to use even for beginners. They usually dry clear and provide a secure hold, but may not offer the same level of longevity as traditional or clear adhesives.
In recent years, magnetic eyelash glue has also gained popularity. This type of glue utilizes tiny magnets attached to the lash band and eyelid, allowing the lashes to adhere without any adhesive. Magnetic eyelash glues are easy to use and eliminate the mess and potential irritation associated with traditional adhesives. However, they may not provide as strong of a hold as other types of glue, especially for those with oily eyelids.
Lastly, there are latex-free eyelash glues available for those with latex allergies or sensitivities. These glues are formulated without latex, which can cause irritation or allergic reactions in some individuals. Latex-free glues can come in various forms, such as traditional white adhesive or clear adhesive, and provide a secure hold without the risk of irritation.
It’s important for beginners to consider their personal preferences, skin type, and specific needs when choosing an eyelash glue. Some may prioritize longevity and a strong hold, while others may prioritize comfort and ease of use. Trying out different types of glue can help beginners determine which one works best for them.
Choosing High-Quality Eyelash Glue
Choosing high-quality eyelash glue is essential for achieving a flawless and long-lasting lash application. With several key considerations in mind, you can find a glue that meets your needs and ensures a comfortable and secure hold.
Firstly, it is important to choose an eyelash glue specifically formulated for use with false lashes. These glues are designed to provide a strong bond while being gentle on the delicate eye area. Opt for latex-free glues if you have sensitive skin or latex allergies to avoid any adverse reactions or irritation.
Consider the drying time of the glue. Some glues dry quickly, allowing for faster application, while others may take longer to set. Choose a glue with a drying time that suits your skill level and preferences.
Durability is another important factor to consider. Look for glues that offer all-day hold, ensuring your lashes stay put even in humid conditions or during physical activities. Pay attention to the ingredients in the glue as well. Avoid harsh chemicals or irritants and opt for glues formulated with nourishing ingredients like vitamins or natural extracts to promote lash health.
The applicator style is worth considering too. Some glues come with a brush applicator, while others have a squeeze tube or pen-like design. Choose an applicator style that you find comfortable and easy to use.
Reading reviews and seeking recommendations from other lash enthusiasts can provide valuable insights into the performance and reliability of different glues.
Finally, consider your budget when choosing an eyelash glue. While it’s important to invest in a good quality product, there are also affordable options available that offer excellent performance.
Step-by-Step Guide to Applying Eyelash Glue for Beginners
To achieve a flawless and long-lasting eyelash application, follow this step-by-step guide:
- Choose the right eyelash glue: Select a high-quality eyelash glue that suits your needs. Consider factors such as the color of the glue (clear or black), sensitivity of your eyes (latex-free), and desired longevity (waterproof).
- Prepare your natural lashes: Cleanse your natural lashes to remove any makeup or oils. Use a gentle cleanser or micellar water for thorough cleaning. Trim the false lashes to fit the length of your own lashes and curve them slightly to match the shape of your eyes.
- Apply a thin layer of glue: Squeeze a small amount of eyelash glue onto a clean surface, like a disposable makeup palette or the back of your hand. Use a precise applicator, such as a toothpick or small brush, to dip into the glue. Apply a thin layer along the band of the false lashes, ensuring an even distribution. Avoid applying too much glue, as it can create a messy application and discomfort.
- Allow the glue to become tacky: After applying the glue, wait for a few seconds to let it become tacky. This step is crucial as it allows the glue to adhere better to your natural lashes. Gently blow on the lash strip or fan it with your fingers to speed up the drying process.
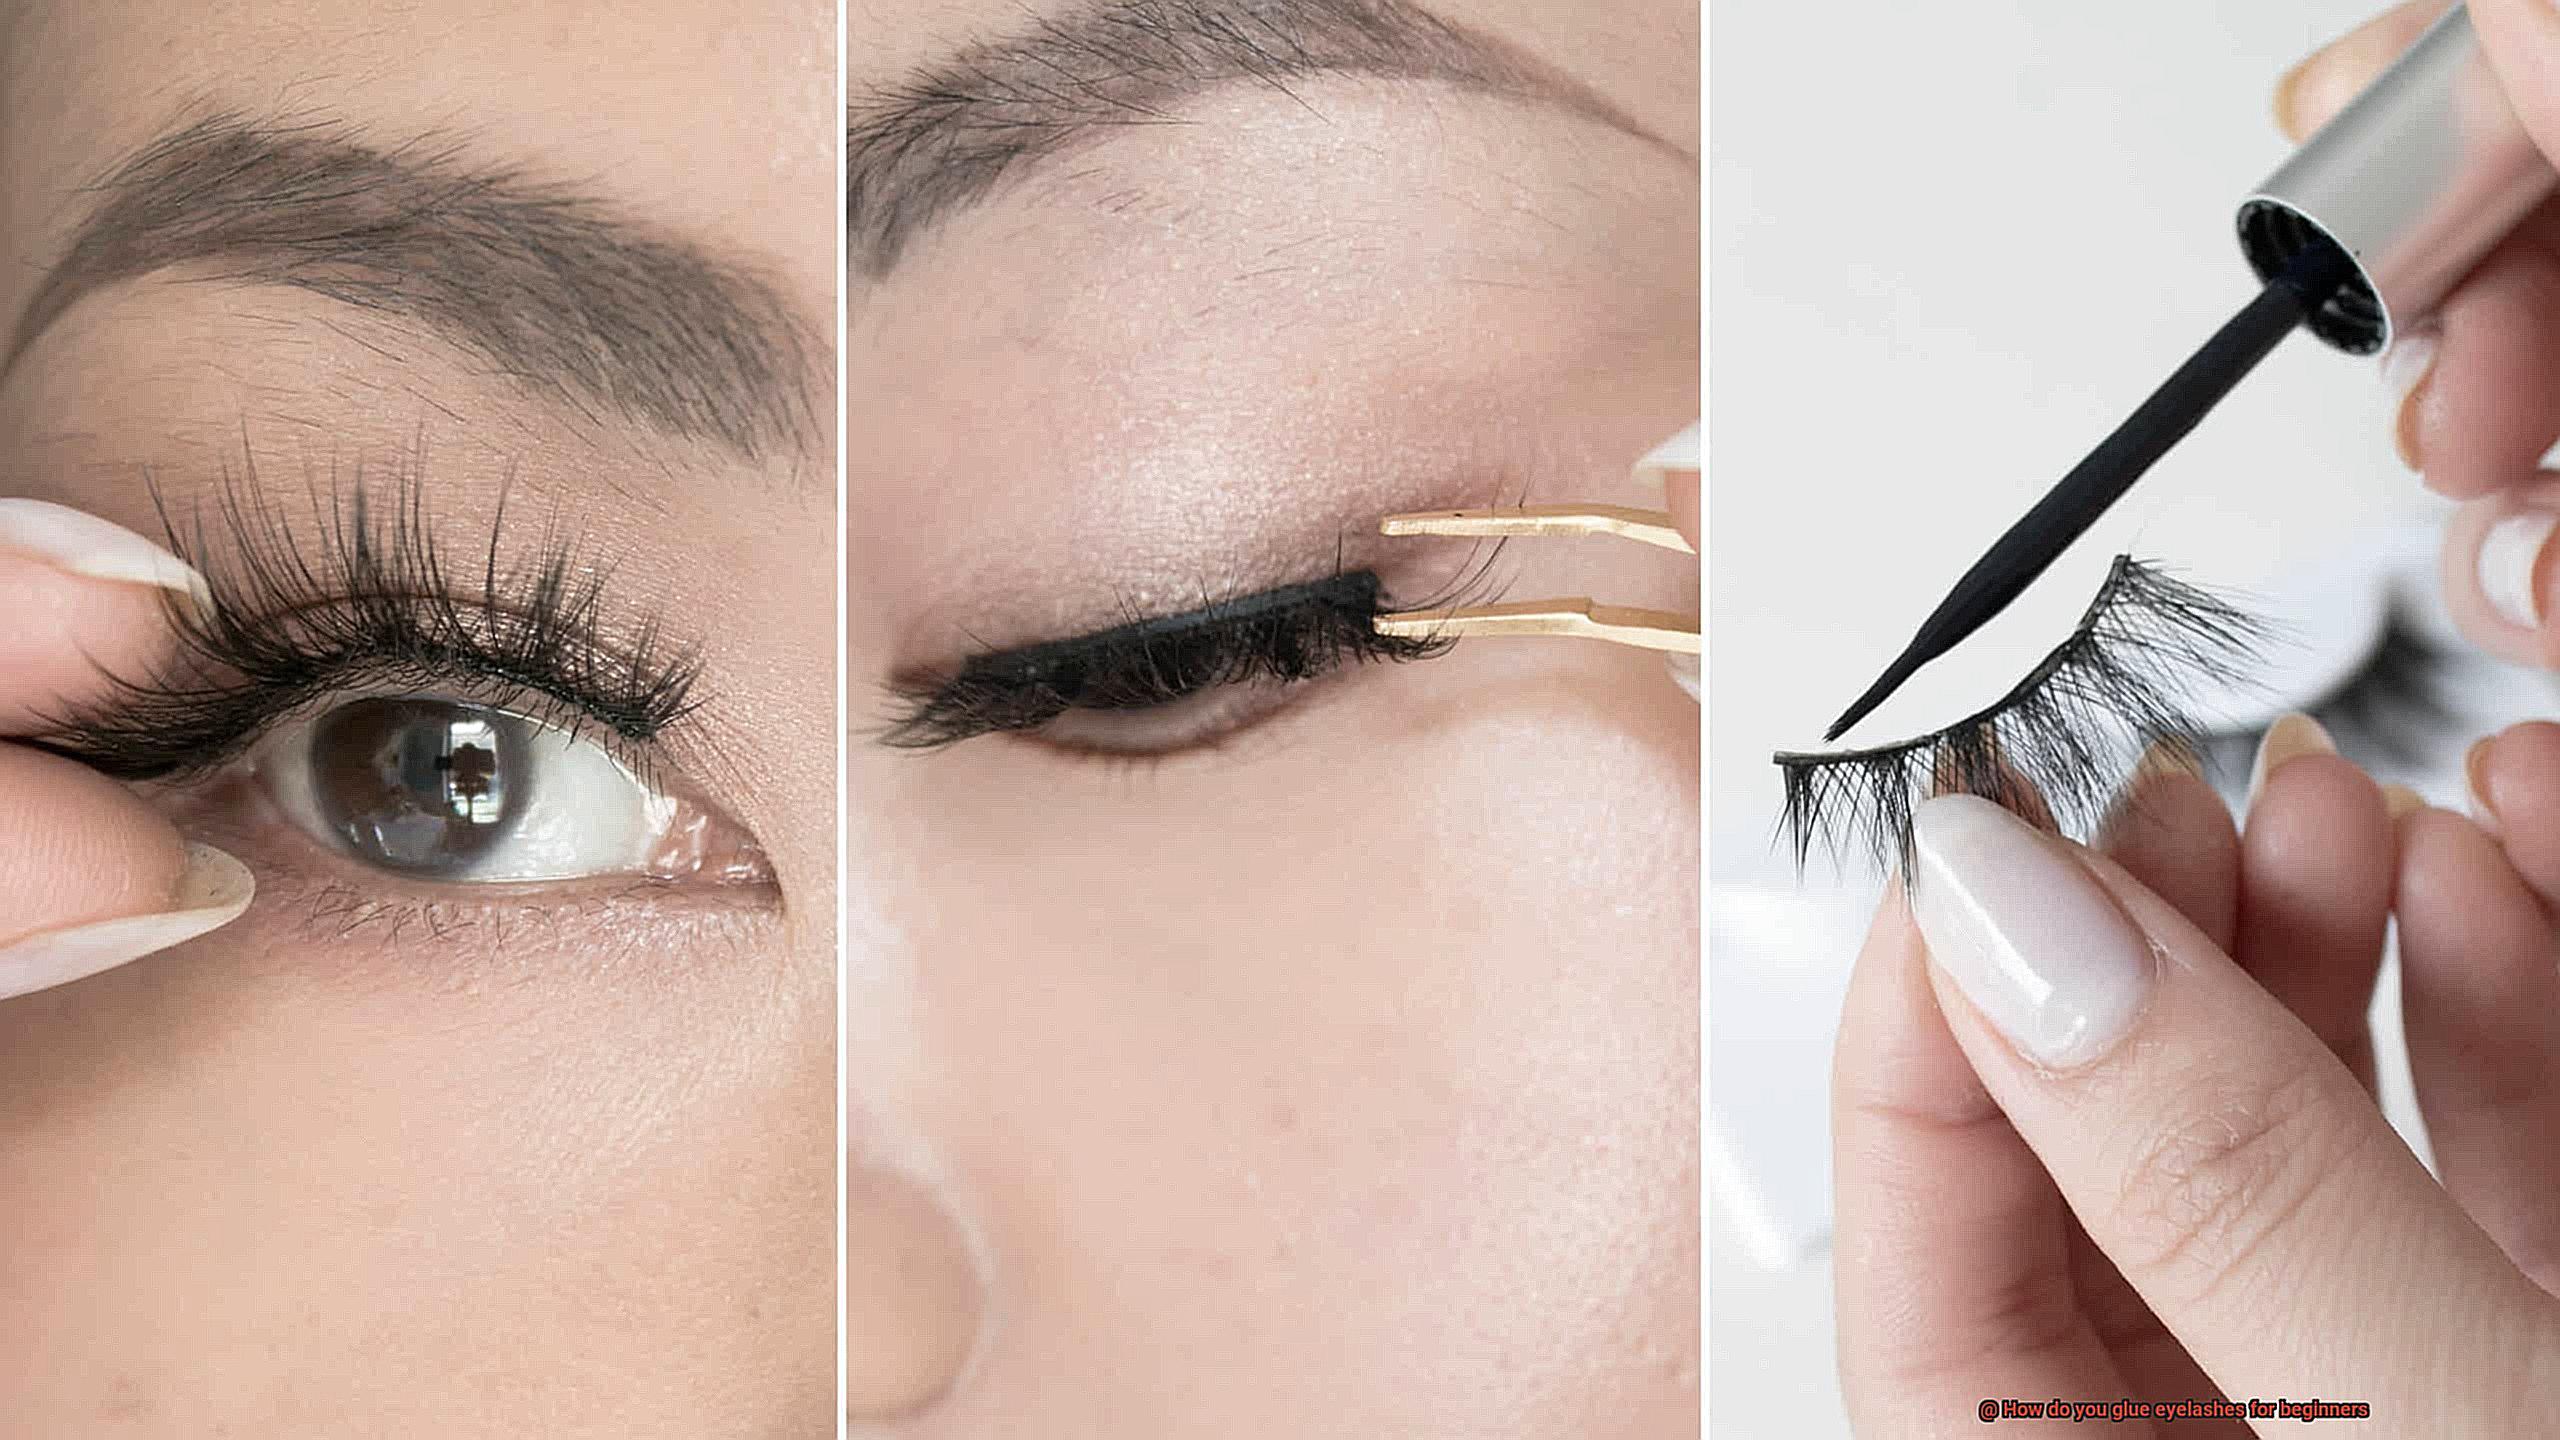
- Placement and adjustment of false lashes: Starting from the inner corner, carefully place the false lashes on top of your natural lashes. Gradually work towards the outer corner, ensuring proper alignment with your lash line. Use your fingertips or tweezers to adjust the position of the lashes and press them gently onto your natural lashes for a secure bond. Remember to keep the false lashes close to the lash line for a natural look.
- Set and finish: Give the false lashes a few minutes to fully dry and set in place. Once the glue has completely dried, use an eyelash curler to blend the false lashes with your natural lashes and create a more cohesive look. Apply a coat of mascara to further blend the lashes and add extra volume if desired.
Common Mistakes When Applying Eyelash Glue
Applying false lashes can transform your makeup look, but beginners often make mistakes when it comes to applying eyelash glue. By knowing what these mistakes are and how to avoid them, you can achieve stunning and long-lasting results with your false lashes.
Using too much eyelash glue is a common mistake. Many believe that more glue means better adhesion, but this actually leads to clumping and discomfort. To avoid this, apply a thin, even layer of adhesive along the lash band. This ensures proper adhesion without excess glue seeping out.
Not waiting for the glue to become tacky before applying the lashes is another mistake. Beginners may be eager to attach their false lashes immediately after applying the adhesive, but this can cause the lashes to slip or not adhere properly. It’s crucial to wait for about 30 seconds to a minute for the glue to become slightly sticky before placing the lashes onto the eyelid. This allows for better adhesion and prevents mishaps.
Improperly aligning the lashes is a common mistake as well. Beginners may struggle with positioning the false lashes correctly along their natural lash line, resulting in an unnatural or uncomfortable appearance. To avoid this, measure and trim the lashes according to your eye shape and carefully place them as close to your natural lash line as possible. This creates a seamless and natural look.
Pulling or tugging on the lashes during application or removal is another mistake beginners make. This can damage both the false and natural lashes. To avoid this, be gentle when handling the lashes and use a designated lash applicator or tweezers for better control during application and removal.
Neglecting to clean the lashes properly after use is a mistake that affects their longevity. Removing residual glue or makeup helps maintain their shape and allows for multiple uses. To clean the lashes, use a gentle oil-free makeup remover or micellar water on a cotton pad and wipe from root to tip.
Lastly, not storing the false lashes properly can lead to damage or loss. Leaving them lying around or storing them in unsuitable conditions causes them to lose shape or gather dust. To avoid this, store the lashes in their original packaging or a clean, dry container to protect them from dirt, moisture, or potential damage.
Removing False Lashes Without Damage
Removing false lashes without causing damage is essential for maintaining the health and strength of your natural lashes. Improper removal can lead to pulling out your own lashes or irritating the delicate skin around your eyes. To ensure a safe and effective removal process, follow these steps:
- Be gentle and patient: Rushing the process can result in damage. Take your time and be gentle when removing the lashes.
- Use an oil-based makeup remover: An oil-based makeup remover is effective in breaking down the adhesive used to attach false lashes. Soak a cotton pad or swab with the remover.
- Apply the remover: Close your eyes and gently press the soaked cotton pad onto your eyelid, covering the entire lash line. Allow the remover to work its magic for a few minutes.
- Swipe and loosen: After a few minutes, gently swipe the cotton pad along your lash line, from the inner corner to the outer corner. This action helps loosen the adhesive and facilitates easier removal.
- Be patient with resistance: If you encounter any resistance, avoid pulling or tugging on the false lashes. Instead, add more makeup remover and give it some time to further break down the adhesive.
- Peel off carefully: Once the false lashes start to loosen, carefully peel them off from one end to the other. Start from either the inner corner or outer corner, according to your comfort.
- Remove adhesive residue: If there is still adhesive residue on your natural lashes, use a clean cotton swab dipped in makeup remover to gently remove it. Avoid getting any remover into your eyes.
- Cleanse thoroughly: After removing the false lashes and adhesive residue, cleanse your eyelids and lashes thoroughly. Use a gentle eye cleanser or mild facial cleanser with warm water. Massage the cleanser onto your eyelids and rinse until all product is removed.
- Pat dry: Gently pat your eyelids dry with a clean towel or allow them to air dry. Refrain from rubbing or pulling on your lashes, as this can cause damage.
- 10. Give your natural lashes a break: It is advisable to give your natural lashes a break from wearing false lashes occasionally. This allows them to regenerate and stay healthy in the long run.
Recommended Brands of Eyelash Glue for Beginners
Choosing the right eyelash glue is essential for beginners to ensure a successful and comfortable application. Using a high-quality glue not only helps the lashes stay in place but also prevents any discomfort or irritation. With so many options available in the market, it can be overwhelming to find the perfect glue for your needs. Here are some highly recommended brands of eyelash glue for beginners.
- Duo Eyelash Adhesive: Duo is a popular choice among beginners and professionals alike. It offers a strong hold, easy application, and dries clear. The latex-free formula makes it suitable for those with sensitive eyes.
- Ardell LashGrip Eyelash Adhesive: Ardell is known for its reliable lash products, and their LashGrip adhesive is no exception. It provides a secure hold, dries quickly, and is long-lasting. The brush applicator allows for precise and mess-free application.
- House of Lashes Eyelash Adhesive: This adhesive is loved by many for its strong hold and latex-free formula. It comes in a dark tone, making it perfect for blending with black eyeliner or mascara.
- Revlon Precision Lash Adhesive: Revlon’s lash adhesive is easy to use and offers a secure bond that lasts all day. It comes with a precision brush tip for precise application, ensuring that you can apply just the right amount of glue.
- Tarte Tarteist PRO Lash Adhesive: Tarte’s lash adhesive is perfect for beginners as it is latex-free and gentle on sensitive eyes. It provides a strong hold and dries quickly, making it ideal for both strip lashes and individual lashes.
Practicing and Patience with Applying Eyelash Glue
Practicing and having patience are not just helpful, but essential for beginners when it comes to applying eyelash glue. Applying false lashes can be an intimidating task, especially for those who are new to the process. However, with practice and patience, anyone can master this skill and achieve beautiful, long-lasting results.
Here are several reasons why practicing and having patience are crucial for beginners:
- Developing Technique: Applying eyelash glue requires precision and finesse. It may take a few tries before you get the hang of it and understand how much glue to use, where to place the lashes, and how to ensure they stay in place. By practicing regularly, you can develop your technique and become more confident in your ability to apply false lashes flawlessly.
- Customizing Application: Each person’s eyes are unique, so what works for one person may not work for another. Through practice, you can experiment with different techniques and find what suits you best. You can try different angles, placement methods, and amounts of glue until you achieve the desired result that enhances your natural features.
- Importance of Drying Time: After applying the glue, it is crucial to wait for it to become tacky before placing the false lashes. Rushing this step can lead to a weak bond or the lashes not sticking properly, resulting in discomfort or even falling off during the day. Having patience and allowing the glue to dry properly will ensure a secure and long-lasting hold between your natural lashes and the false ones.
- Correcting Mistakes: Mistakes happen, especially when you are just starting out. If you make a mistake or need to reposition the lashes, don’t panic. Having patience allows you to calmly remove the lashes, dissolve the glue with makeup remover if necessary, and try again without damaging your natural lashes or causing unnecessary frustration.
Tips and Tricks for Applying Eyelash Glue
Eyelash glue is an essential tool for achieving longer and fuller lashes. If you’re a beginner, don’t worry. With these tips and tricks, you’ll be able to apply eyelash glue like a pro in no time.
Choose the Right Glue
Start by choosing the right eyelash glue for beginners. Look for a glue that is specifically formulated for beginners, as it will typically have a slower drying time and a stronger hold. Clear or white adhesive is recommended for beginners as it is easier to see where the glue is being applied.
Clean Your Lashes
Before applying eyelash glue, make sure your lashes are clean and free of any mascara or makeup residue. This will ensure that the glue adheres properly to your natural lashes.
Apply a Thin Strip of Glue
Apply a thin strip of glue to the band of the false eyelashes. Use a small brush or a toothpick to apply the glue evenly along the entire length of the band. Be careful not to apply too much glue, as this can cause the lashes to look clumpy and unnatural.
Wait for the Glue to Become Tacky
Wait for the glue to become tacky before applying the false lashes. This usually takes about 30 seconds to a minute. Tacky glue will adhere better and prevent the lashes from sliding around during application.
Use Tweezers or an Applicator Tool
Use tweezers or a lash applicator tool to apply the false lashes. Gently place the lashes as close to your natural lash line as possible, starting from the inner corner and working your way outwards. Press down on the lashes gently to secure them in place.
Blend and Secure
Once the lashes are in place, give them a gentle squeeze with your fingers to help them blend in with your natural lashes. This will create a seamless look and ensure that they stay in place all day.
Conclusion
Gluing eyelashes may feel intimidating for beginners, but fear not. Achieving those mesmerizing lashes is simpler than you think.
Start by gathering your tools: false eyelashes, lash glue, tweezers, and a mirror – everything you need at arm’s reach. Carefully unbox your lashes and compare them to your natural lash line; trim any excess length if necessary. Now comes the trickiest part – applying the glue. Squeeze out a small amount onto your hand or another clean surface and patiently wait for it to reach that perfect tackiness level we’re aiming for.
With your trusty tweezers in hand, delicately grasp the lashes by their band and apply an even layer of glue along its length – pay extra attention to the ends, as they tend to lift.
Once the glue is applied, let it sit for about 30 seconds until it becomes slightly sticky. Now, place the lashes as close to your natural lash line as possible and gently press down to secure them in place.