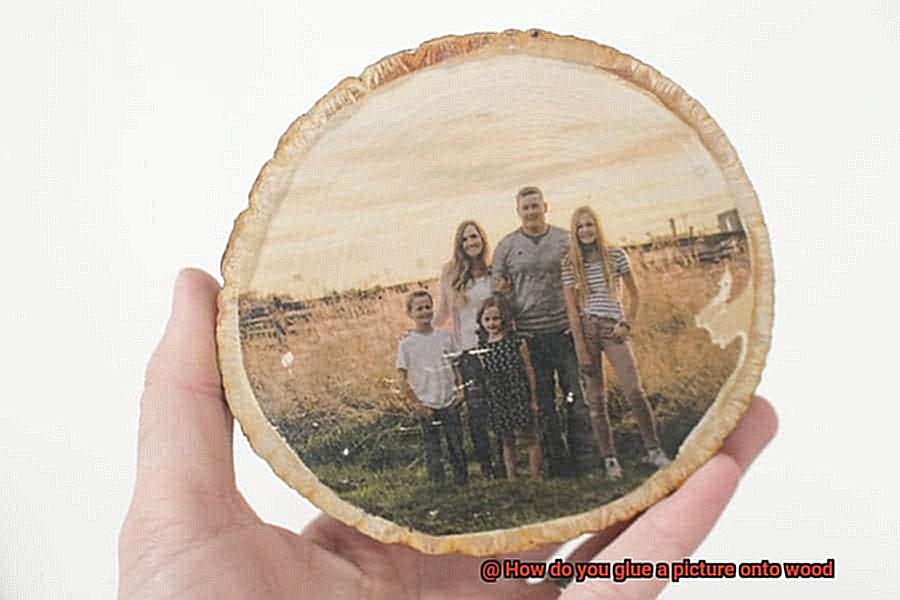
Picture this: a breathtaking photograph, frozen in time, now adorning a rustic slab of wood. The fusion of nature’s canvas and cherished memories creates an awe-inspiring centerpiece that demands attention. It’s enough to make you wonder: How is this enchanting transformation achieved?
Welcome to the captivating realm of gluing pictures onto wood, where traditional craftsmanship meets personal ingenuity. Whether you’re a DIY enthusiast or a seasoned artist, mastering this art form promises to infuse your home decor with an extra dose of charm or deliver the perfect personalized gift for someone dear.
In this blog post, we’ll delve into various techniques and insider tips for successfully bonding pictures to wood. From selecting the ideal adhesive to prepping the wooden surface, we’ve got you covered at every step.
But before we dive headfirst into this crafty adventure, let’s take a moment to appreciate the versatility and uniqueness it offers. From vintage black-and-white portraits to vibrant snapshots from family vacations, the possibilities are truly boundless. The seamless marriage between organic wood textures and vivid imagery creates an alluring contrast that will undoubtedly captivate anyone who lays eyes on it.
Throughout this article, we’ll explore the importance of picking the right adhesive for your desired outcome and share insights into optimal surface preparation techniques. We’ll also provide troubleshooting tips to ensure a flawless bond between photo and wood, empowering you with confidence as you embark on your gluing journey.
Get ready as we unveil the secrets behind transforming ordinary wood and photographs into extraordinary works of art.
Benefits of Gluing a Picture onto Wood
Contents
- 1 Benefits of Gluing a Picture onto Wood
- 2 Choosing the Right Type of Adhesive for the Job
- 3 Preparing the Wood and Picture Surface
- 4 Applying Glue to the Wood Surface
- 5 Positioning the Picture on the Wood
- 6 Securing a Strong Bond Between Picture and Wood
- 7 Drying and Setting Time
- 8 Adding an Extra Layer of Protection
- 9 Conclusion
This innovative method not only offers enhanced durability and customization options but also adds a touch of natural beauty to any space. In this article, we will delve into the numerous benefits of this technique, from its aesthetic appeal to its eco-friendly nature.
Unyielding Durability:
Traditional frames often leave us worrying about their fragility and susceptibility to breakage. However, when pictures are glued onto wood, they become remarkably sturdy and long-lasting. The wood acts as an impenetrable shield, safeguarding the image from scratches and damage.
Aesthetically Captivating:
Glued pictures on wood possess an enchanting organic charm that elevates their visual impact. The texture and grain of the wood effortlessly enhance the beauty of the image, infusing it with a rustic or vintage allure. This style of decor is particularly appealing to those seeking an earthy and authentic ambiance in their homes.
Limitless Customization:
The ability to customize is where gluing pictures onto wood truly shines. Unlike conventional frames that restrict us with their limited sizes and designs, wood can be effortlessly cut or shaped to match any desired dimensions. This flexibility empowers individuals to create personalized displays that perfectly embody their unique preferences and style.
Banishing Glare and Reflections:
Conventional frames often suffer from annoying glare or reflections that obstruct our view of the image. By gluing pictures onto wood, we eliminate the need for glass or plastic coverings commonly found in frames. This not only enhances the clarity of the image but also eradicates the tedious task of cleaning smudges or fingerprints off a glass surface.
Effortless Display:
Say goodbye to the hassle of hooks or stands. Glued pictures on wood can be effortlessly hung on walls or displayed on shelves, making them a convenient and versatile option for showcasing artwork or photographs in any area of the home.
Choosing the Right Type of Adhesive for the Job
Today, we embark on a thrilling journey into the realm of adhesive selection for gluing pictures onto wood. As we all know, a picture holds memories beyond measure, but it’s the adhesive that wields the power to preserve those cherished moments on their wooden canvas.
So, gather your tools and join me on this adhesive adventure as we explore the essential factors to consider when selecting the perfect glue for your artistic masterpiece.
Types of Adhesive:
Let’s begin with the building blocks of our adhesive arsenal. The market offers a delightful array of glues, each boasting its own unique attributes and recommended applications.
From the reliable white glue to the steadfast wood glue, the versatile epoxy to the super-powered cyanoacrylate (super glue), and even the handy spray adhesives – there’s a glue for every need. Keep in mind that each type possesses distinct bonding strengths, drying times, and durability. So, choose wisely to ensure your creation stands strong.
Consider the Surface:
Just as a painter selects their canvas, we must carefully evaluate both our picture and wood surfaces. Does your picture possess a glossy finish or is it printed on specialized paper? If so, it may require an adhesive tailored to these unique qualities. On the other hand, if your wood boasts a porous or rugged surface, you’ll need an adhesive that can penetrate and bond effectively. By matching your adhesive to your surfaces, you guarantee a bond that withstands the test of time.
Bonding Strength:
Picture size matters – at least when it comes to selecting the right adhesive. The strength of your bond depends on the weight and dimensions of your picture. For petite and lightweight photos, regular craft glue or wood glue will suffice. However, when working with larger or weightier images, it’s wise to fortify your bond with stronger adhesives such as epoxy or construction adhesive. Remember, a sturdy bond ensures your memories stay securely in place.
Drying Time:
Ah, the virtue of patience. It becomes paramount when gluing pictures onto wood. Each adhesive boasts its own timetable for drying and curing. Some dry in mere minutes, while others require hours or even days to reach their full potential. Before unveiling your masterpiece to the world, ensure you allow ample time for the adhesive to dry completely. Rushing this process risks compromising the quality of your creation.
Preparing the Wood and Picture Surface
In our quest to create stunning picture masterpieces on wood, we’ve already explored the world of glues and bonding techniques. Now, it’s time to dive into the crucial first step – preparing the wood and picture surface. Buckle up, because we’re about to embark on a journey filled with smooth surfaces, perfect alignments, and flawless finishes.
Step 1: Cleanliness is Key
Before we even think about gluing, cleanliness reigns supreme. Give both the wood and picture surface a thorough cleaning, banishing any dust, dirt, or debris. Wipe them down gently with a soft cloth or use a mild cleaning solution. Let’s keep those unwanted specks at bay.
Step 2: Smooth as Silk
Smooth surfaces are the secret behind a professional-looking glued picture. Embrace the art of sanding with finesse. Take your fine-grit sandpaper and delicately caress the wood surface until it feels as smooth as a baby’s bottom. And remember, wipe off any lingering sanding residue – we only want perfection here.
Step 3: Picture Perfect
Now that our wood is ready, let’s focus on the picture surface. If you’re using a printed photograph or artwork, choose high-quality material that’s glue-friendly. Size matters too. Ensure your picture fits snugly on the wood surface, allowing for any desired margins or borders. It’s all about finding that ideal balance.
Step 4: Canvas Confidence
For those working with canvas or other materials, confidence is key. Tighten that canvas like a trampoline before proceeding. Loose or sagging fabric will only lead to uneven gluing and a less-than-stellar final result. So stretch it tight and let’s get this show on the road.
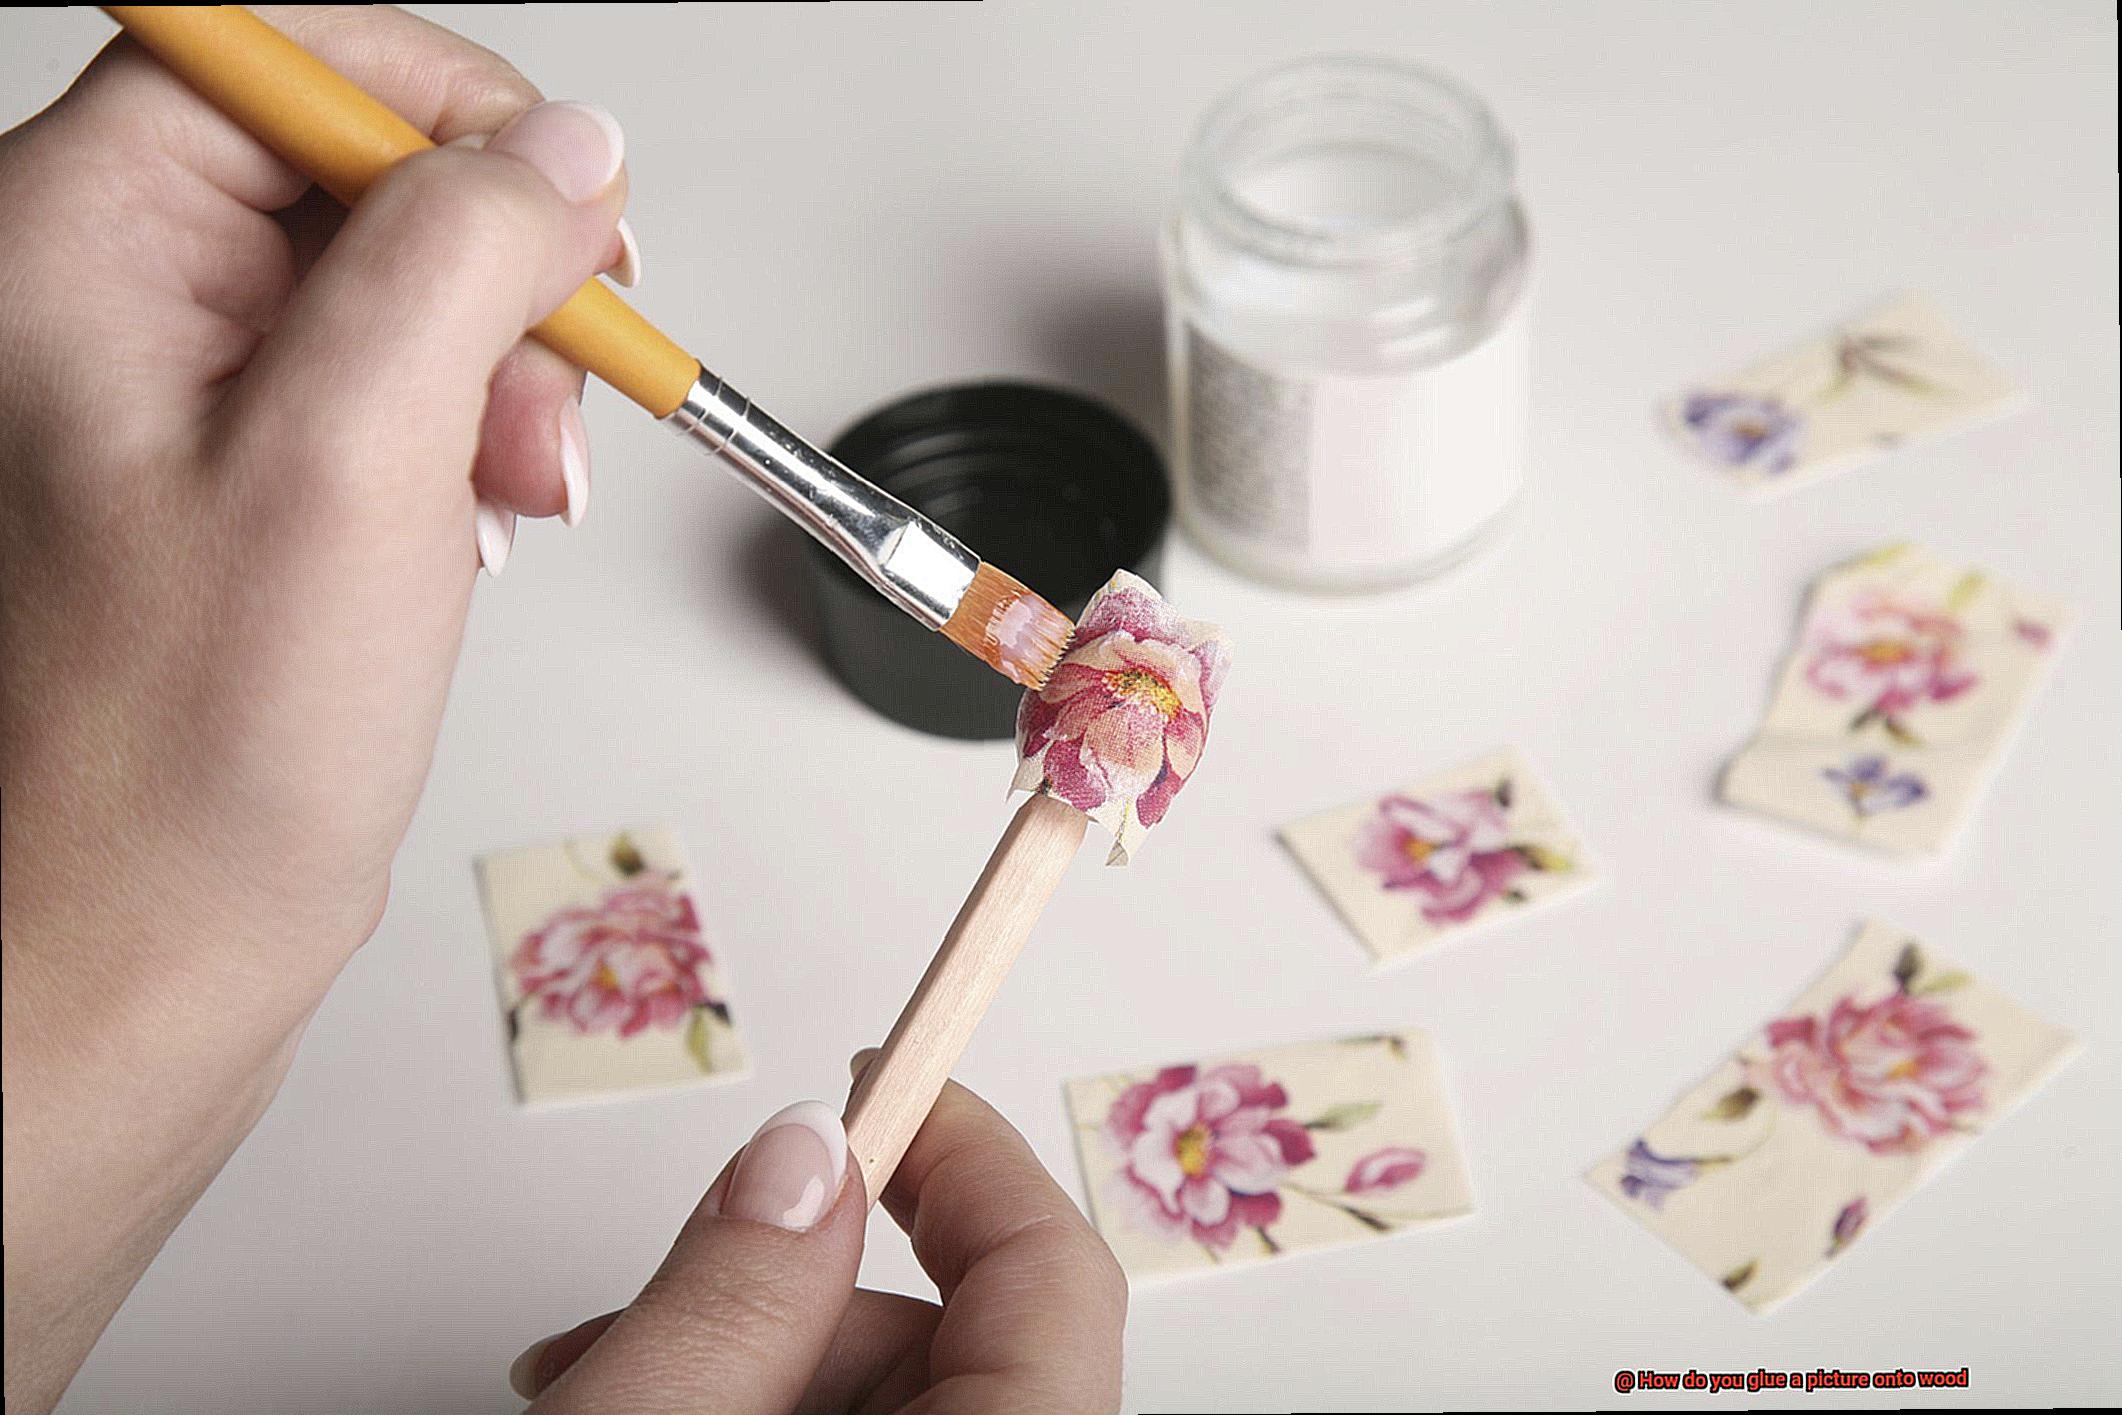
Step 5: The Glue Factor
Ah, the glue – the unsung hero of our masterpiece. Choose wisely from the array of options available, such as wood glue, epoxy resin, or specialized photo-mounting adhesives. Opt for a glue specifically designed for gluing pictures onto wood. We want a bond that’s strong and long-lasting, ensuring our artwork stands the test of time.
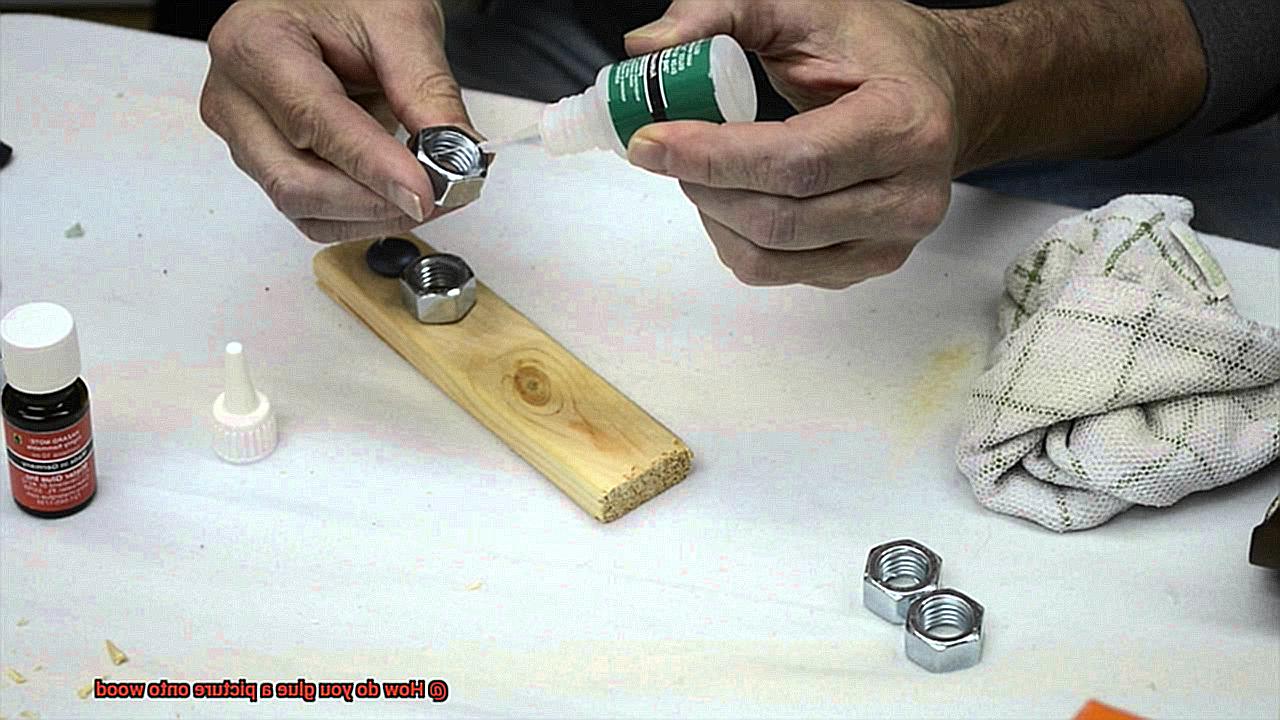
Applying Glue to the Wood Surface
In this guide, we’ll explore the secrets to achieving flawless results as we take you through the process of applying glue to a wood surface. So grab your brushes, roll up your sleeves, and let’s embark on this exhilarating journey together.
Choosing the Right Glue:
First and foremost, it’s essential to select the right glue for your masterpiece. Wood glue, epoxy glue, or adhesive sprays – the options are endless. Each type of glue has its own unique properties and uses. So take a moment to consider your project’s requirements and choose the glue that will deliver the strongest bond and lasting endurance.
Preparing the Wood Surface:
Before we dive headfirst into the gluing process, let’s pause for a moment of cleanliness. Your wood surface should be pristine, free from any dirt or debris that could dare to interfere with the sacred bonding ritual. Grab a clean cloth and wipe away any impurities.
If necessary, a mild detergent solution can be summoned to cleanse away stubborn stains. Remember, a clean surface guarantees better adhesion and ensures a flawless finish for your artistic masterpiece.
Creating the Perfect Texture:
Ah, the tactile pleasure of sanding. To enhance the bond between the wood and the glue, we must grant our surface a gentle caress with fine-grit sandpaper. Let us create a slightly rough texture on the wood – a subtle invitation for the glue to grip with all its might. Caress the wood in harmony with its grain, ensuring its natural beauty remains unblemished.
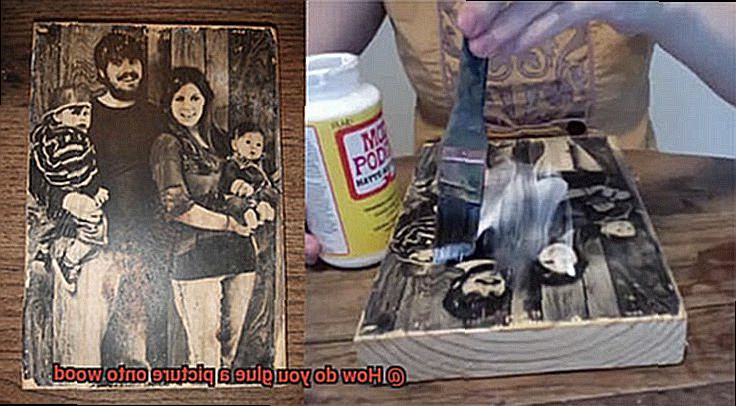
Applying the Glue:
The time has come to unleash our chosen glue upon the waiting wood canvas. With brush or spatula in hand, spread an even layer of this magical adhesive onto the surface. Begin with a delicate touch, applying a thin coat that kisses every inch of the wood. Should the moment call for it, add more glue with a steady hand, ensuring a consistent layer envelops the entire surface. Remember, gentle strokes are our allies in this quest for even distribution.
Positioning the Picture on the Wood
In our journey towards creating artistic masterpieces, we have delved into the secrets of choosing the perfect glue, preparing the wood surface, and creating texture. Now, it’s time to uncover the sacred art of positioning pictures onto wood. Get ready to unleash your inner artist as we explore the secrets to achieving flawless results.
Consider the Design and Composition:
Before diving into the gluing process, take a moment to envision the overall design and composition of your piece. Visualize where you want the picture to be placed and how it will interact with the surrounding elements. This crucial step sets the foundation for a visually captivating result.
Cleanliness is Key:
A pristine canvas yields impeccable results. Ensure both the wood surface and the back of the picture are free from any dust or debris. This attention to detail creates a stronger bond and prevents unsightly imperfections from making an appearance. Remember, cleanliness is key to artistic success.
Measure Twice, Glue Once:
Achieve precision by using a ruler or measuring tape to mark the desired placement on the wood surface. This simple step ensures even alignment and helps you avoid crooked angles that can throw off the entire composition. Remember, precision is the backbone of perfection.
Apply Adhesive with Care:
Summon your adhesive magic. With a brush or sponge applicator, apply a thin layer of adhesive onto the wood surface. Opt for an adhesive specifically designed for bonding wood and paper materials – this ensures a strong and durable bond that will stand the test of time.
Press Down and Smooth Out:
Gently place your picture onto the adhesive, starting from one edge and slowly pressing it down. This technique prevents air bubbles or wrinkles from tarnishing your masterpiece. Should any imperfections appear, fear not. Utilize a clean cloth or roller to smoothly restore perfection.
Repositioning, the Right Way:
If adjustments are necessary, act swiftly before the adhesive dries completely. Once dry, repositioning becomes a challenge that risks damaging your picture or wood surface. So seize the moment, fellow artists.
Patience is a Virtue:
Allow sufficient drying time as per the instructions provided with your chosen adhesive. This step ensures a secure bond between the picture and the wood surface. Remember, great art comes to those who wait.
Securing a Strong Bond Between Picture and Wood
In our previous section, we explored the intricacies of positioning pictures onto wood and creating a pristine canvas. Now, we unveil the final step – securing a bond that will withstand the test of time. Prepare to embark on a journey of flawless craftsmanship that will leave admirers in awe.
The Glue That Transforms:
In the realm of bonding pictures to wood, selecting the perfect adhesive is paramount. Enter strong craft glue or adhesive, meticulously designed for porous surfaces like wood. Remember, compatibility is key – ensure your adhesive harmonizes with both the picture material and wood surface.
A Canvas Prepared for Perfection:
Before diving into adhesive application, your wood surface requires proper preparation. A pristine canvas is non-negotiable – rid it of any dust or debris. For an optimal bond, lightly sand the surface, imparting a delicately roughened texture that beckons the adhesive to grip with unwavering tenacity.
Precision in Application:
In this artful process, less is more. With a brush or applicator in hand, apply a thin and even layer of adhesive onto the wood surface. Exercise caution, for excess glue seeping from picture’s edges can mar its magnificence. Our goal? Flawless execution worthy of admiration.
The Dance of Alignment:
With grace and precision, place your picture upon the glued wood surface, ensuring its alignment is impeccable. Embrace perfectionism as you exert gentle pressure across the entire expanse, forging an unbreakable connection between adhesive and materials.
Tender Love and Care for Unyielding Bonds:
To fortify this union further, consider employing additional techniques such as clamping or weighting down the picture while the adhesive cures. These acts of devotion prevent any shifting or movement during the drying process, birthing a bond that defies all odds.
The Virtue of Patience:
In this realm of artistry, patience is an esteemed virtue. Allow sufficient time for the adhesive to dry completely, adhering steadfastly to the manufacturer’s instructions. Resist the urge to disturb or handle the picture prematurely, lest the bond be weakened or damaged.
Drying and Setting Time
Today, we embark on a journey into the fascinating world of drying and setting time when gluing pictures onto wood. Just like an artist unveiling their masterpiece after patiently waiting for it to dry, we must exercise the same virtue when securing our cherished pictures onto wood. So, grab your tools and let’s explore why allowing sufficient drying and setting time is crucial for creating a bond that stands the test of time.
Choosing the Right Adhesive: A Race Against Time
When it comes to gluing pictures onto wood, not all adhesives are created equal in terms of their drying and setting time. Let’s explore some commonly used options:
Wood Glue: The Reliable Classic
Wood glue, a go-to choice for its strong bond and ease of use, demands our attention. In just 30 minutes to an hour, this adhesive can dry completely. But remember, patience is the secret ingredient. For a secure bond that withstands the test of time, leave your glued picture undisturbed for at least 24 hours.
Epoxy Glue: Strength and Durability Combined
For those seeking exceptional strength and durability, epoxy glue emerges as a formidable contender. However, this adhesive takes its time to dry, typically requiring 24 to 48 hours. Don’t rush this process; your masterpiece deserves the utmost care. Follow the instructions provided by the manufacturer to ensure optimal results.
Craft Glue: Quick and Convenient
Craft glue, including PVA or white glue, offers a faster drying time compared to wood glue or epoxy glue. Usually within 15 to 30 minutes, it provides a convenient option for those with a tight schedule. Remember to consult the product packaging for precise drying and setting times.
The Importance of Patience:
Now, let’s address the elephant in the room – why is allowing sufficient drying and setting time so crucial? Rushing this process can lead to disastrous consequences. A weak bond is the last thing you want after investing your time and effort into creating a masterpiece.
Handling or moving the glued picture prematurely can result in damage to both the picture and the wood surface. Take a deep breath, exercise patience, and let your creation flourish.
Adding an Extra Layer of Protection
Now, let’s discuss how we can take it to the next level and ensure its longevity and durability. By adding an extra layer of protection, we create a barrier against moisture, UV rays, and physical damage.
In this comprehensive guide, we’ll explore two options for safeguarding your artwork: the clear varnish method and the adhesive film alternative. Prepare to unleash your art’s full potential and keep it looking flawless for years to come.
Step 1: Preparing for Perfection
Before diving into protection, let’s set the stage for success. Take a moment to inspect both the picture and wood surface, removing any dust or debris with a gentle touch of a soft brush or cloth. This meticulous step guarantees a flawless canvas and prevents any imperfections from hindering the protective layer’s effectiveness.
Step 2: The Clear Varnish Method
For art that radiates beauty while standing strong against the elements, clear varnish is an excellent choice. Select a varnish specifically formulated for wood surfaces to achieve optimal results. Armed with a clean brush or foam applicator, embark on your varnishing journey. Begin by applying a thin and even coat over the entire picture and wood surface, ensuring not to exert too much pressure that may cause distortion. Allow each coat to dry completely before moving on to subsequent layers.
Step 3: Building Layers of Resilience
To maximize protection, consider adding multiple coats of varnish. Each coat should follow the same technique as before – apply thinly and evenly, with ample drying time between layers. Experts recommend at least two to three coats for optimal results. Once all coats have dried, conduct a thorough inspection of the surface. Should imperfections or rough areas be detected, gently sand them with fine sandpaper before applying an additional coat to achieve a smooth finish.
sNUjHB2AYQw” >
Conclusion
Gluing a picture onto wood may seem like a daunting task, but with the right materials and techniques, it can be a simple and satisfying DIY project. To achieve a strong and long-lasting bond, follow these steps:
- Prepare the surface: Start by ensuring that both the wood and the picture are clean and free from any dust or debris. Use a damp cloth to wipe away any dirt or grime, and let them dry completely before proceeding.
- Choose the right adhesive: Selecting the appropriate adhesive is crucial for successful bonding. A strong adhesive such as wood glue or epoxy resin works best for attaching pictures to wood. These adhesives provide a secure hold while also being resistant to moisture and temperature changes.
- Apply the adhesive: Apply a thin layer of adhesive onto the back of your picture using a brush or spatula. Make sure to spread it evenly across the entire surface, paying extra attention to the edges.
- Position the picture: Carefully place your picture onto the wood surface, aligning it exactly where you want it to be positioned. Press down firmly but gently, ensuring that there are no air bubbles trapped underneath.
- Allow it to dry: Give ample time for the adhesive to dry according to the manufacturer’s instructions. Avoid moving or disturbing the picture during this period to ensure a strong bond.
- Seal and protect: Once fully dried, consider applying a protective sealant over your picture to safeguard it against moisture, UV rays, and general wear and tear. A clear varnish or lacquer can help enhance its longevity and preserve its vibrant colors.
Remember, practice makes perfect. If you’re new to gluing pictures onto wood, start with smaller projects before tackling larger ones. With patience and attention to detail, you’ll soon master this technique and create stunning wooden displays adorned with your favorite images.