Are you a DIY enthusiast ready to take on plumbing projects in your home?
If so, it’s crucial to know how to connect PEX pipes. PEX (cross-linked polyethylene) pipes have become popular for their toughness and easy installation.
But how do you attach PEX to PEX? Don’t worry – it’s simple and only requires a few basic tools.
In this blog post, we’ll walk you through the steps of connecting PEX pipes for a secure, leak-free connection. Whether you’re replacing old pipes or adding new ones, this information will be your go-to guide for your next plumbing adventure.
So grab your wrenches and let’s dive in.
Necessary Tools and Materials
Contents
When it comes to plumbing projects, using PEX tubing has become increasingly popular due to its flexibility, durability, and ease of installation. Whether you’re a seasoned DIYer or a professional plumber, knowing the necessary tools and materials for attaching PEX to PEX is essential. In this article, we will explore the key tools and materials required for a successful PEX connection.
PEX Tubing:
To ensure a secure connection, it’s crucial to use high-quality PEX tubing. There are three common types available – PEX-A, PEX-B, and PEX-C – each with its own advantages and disadvantages.
PEX-A offers superior flexibility and durability, making it ideal for curved or complex installations. PEX-B is more affordable while still maintaining excellent performance. PEX-C is known for its resistance to chlorine and other chemicals. Select the appropriate size of PEX tubing based on your project requirements and its compatibility with fittings.
PEX Fittings:
PEX fittings are specifically designed to connect PEX tubing together securely. Different types of fittings include crimp fittings, push-to-connect fittings, expansion fittings, and compression fittings.
Crimp fittings are widely used and require a crimping tool to compress a stainless steel ring around the PEX tubing and fitting, creating a tight seal. Push-to-connect fittings offer quick and easy installation without the need for any additional tools. Expansion fittings utilize an expansion tool to expand the PEX tubing to create a leak-free connection. Compression fittings provide a reliable connection by tightening a compression nut over the tubing and fitting.
Crimping Tool:
For crimp fittings, a reliable crimping tool is essential. This tool compresses a stainless steel ring around the PEX tubing and fitting, creating a tight seal. There are various types of crimping tools available, such as manual and battery-powered options. Choose one that suits your project needs and ensure it is compatible with the size of PEX tubing and fittings being used.
Expansion Tool:
If you opt for expansion fittings, an expansion tool is necessary. These tools expand the PEX tubing to create a leak-free connection between the fitting and tubing. There are manual and battery-powered expansion tools available, each offering different levels of convenience and ease of use. Ensure compatibility between your chosen expansion tool and the specific PEX tubing being used.
Deburring Tool:
Before attaching fittings, it’s crucial to remove any rough edges or burrs from the cut ends of the PEX tubing. A deburring tool serves this purpose by ensuring proper sealing and preventing leaks. Choose a deburring tool suitable for your project needs, such as a handheld rotary deburring tool or a multi-purpose tool with interchangeable blades.
Preparing the PEX Tubing
PEX tubing has revolutionized the plumbing industry with its exceptional flexibility, durability, and ease of installation. To ensure a secure and leak-free connection, it is vital to properly prepare the PEX tubing before attaching it to other components. This comprehensive guide will walk you through the steps of preparing PEX tubing, from precise measuring and clean cutting to thorough cleaning and meticulous inspection. By following these steps, you can guarantee that your plumbing system functions flawlessly.
Measure and Cut:
Begin by using a PEX cutter or a sharp utility knife to measure and cut the PEX tubing according to your desired length. Make clean and precise cuts, ensuring a perfect fit for the connection.
Remove Burrs:
After cutting, eliminate any burrs or rough edges using a specialized deburring tool designed specifically for PEX tubing. This meticulous step prevents potential damage to fittings and guarantees a smooth connection.
Clean the Ends:
Thoroughly clean the ends of the PEX tubing using a clean cloth or rag to remove any dirt, debris, or moisture. The cleanliness of the ends contributes to better sealing between the tubing and fittings, enhancing the overall performance of your plumbing system.
Inspect for Kinks and Bends:
Carefully inspect the PEX tubing for any kinks or bends that may compromise its functionality. Straighten out any irregularities to maintain an uninterrupted flow of water through the system, preventing potential issues in the future.
Check Compatibility:
Before proceeding with attachment, ensure that your chosen PEX tubing and fittings are compatible. Different types of PEX tubing may require specific fittings that match their characteristics. Confirm compatibility to avoid any mismatches that could lead to leaks or failures in the connection.
Consider Expansion and Contraction:
PEX tubing possesses inherent flexibility to accommodate thermal expansion and contraction. When installing the tubing, leave some slack to allow for these movements. By providing the necessary space, you can prevent stress on the tubing and maintain its integrity over time.
Inserting the PEX Tubing into Fittings
Prepare yourself for an adventure filled with finesse and precision as we guide you through the art of inserting PEX tubing into fittings. So, buckle up and let’s dive in.
Step 1: Cleanliness is Key
Before you even think about connecting your PEX tubing to a fitting, cleanliness is paramount. Ensure that both the tubing and fittings are squeaky clean, free from any debris or dirt. Give them a wipe down with a clean cloth or use a pipe cleaning solution. Trust me, cleanliness is the foundation for a successful connection.
Step 2: Measure and Mark
To achieve a perfect fit, measure and mark the desired length of tubing that needs to be inserted into the fitting. This will help you align everything correctly and prevent any unnecessary mishaps along the way.
Step 3: Crimp it Real Good
Now it’s time to bring in the big guns – the PEX crimping tool. This magical tool will create a secure crimp on the end of your PEX tubing. The crimp will hold the tubing securely in place within the fitting, so make sure it’s nice and tight. A strong crimp ensures a reliable connection.
Step 4: The Art of Insertion
With confidence and finesse, apply gentle but firm force while pushing the PEX tubing into the fitting. You want to ensure that it’s fully seated within the fitting, creating a tight seal. However, avoid going overboard with the force as too much pressure can damage both the tubing and fitting. Remember, gentle but firm is the name of the game here.
Step 5: Inspect and Adjust
Once your PEX tubing is fully inserted into the fitting, take a moment to visually inspect the connection. Look for any gaps or misalignments that may indicate a faulty connection. If you spot anything off, address it before proceeding with any further installation. Attention to detail is key in achieving a flawless connection.
Step 6: Compatibility Matters
It’s important to note that not all fittings are created equal. When inserting PEX tubing into fittings, ensure that you’re using fittings specifically designed for PEX tubing. Using incompatible fittings can lead to leaks or other issues down the line, and nobody wants that. Stay compatible for a hassle-free experience.
Step 7: The Ultimate Test
After all your hard work, it’s time to put your connection to the test. Run water through the system and keep a keen eye out for any leaks. If you do spot a leak, don’t panic. Simply reexamine the connection and make any necessary adjustments. It’s all about trial and error to achieve perfection.
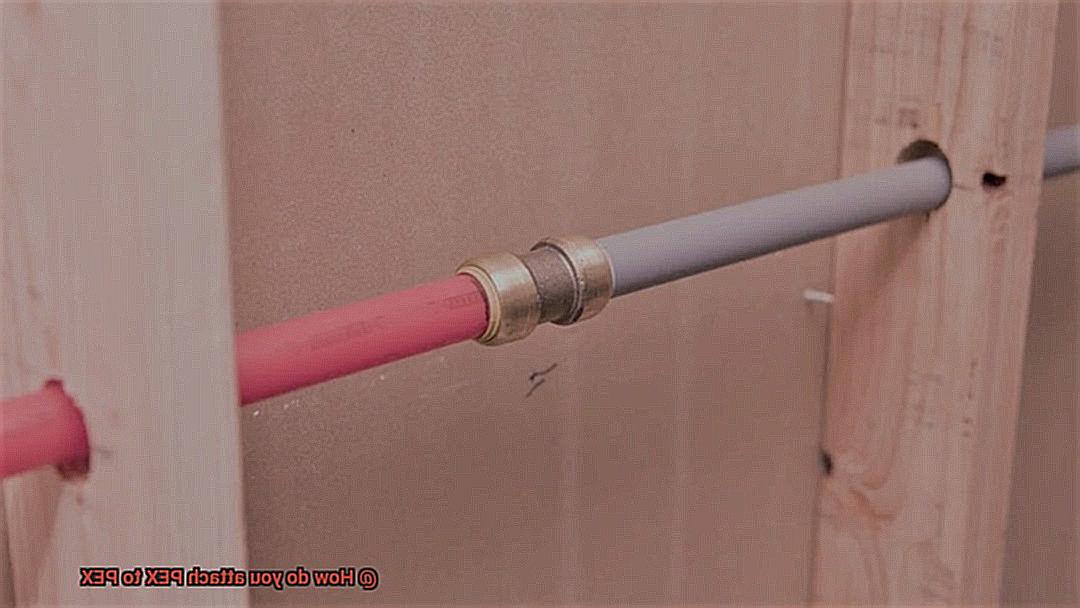
Crimping the Ring onto the Tubing
Crimping the ring onto the tubing is a fundamental step in attaching PEX to PEX, ensuring a secure and leak-free connection. By following a series of precise steps and using the right tools, you can confidently crimp the ring onto the tubing and achieve a reliable plumbing system.
Step 1: Cut the Tubing
To begin, use a reliable PEX pipe cutter to measure and mark the desired length of tubing. It is crucial to cut the tubing cleanly and straightly to ensure a proper connection. Precision is key here, as any rough or angled cuts can compromise the integrity of the connection.
Step 2: Insert the Tubing into the Fitting
Once you have your perfectly cut tubing, it’s time to insert it into the fitting. Push the tubing all the way until it reaches the shoulder of the fitting. This ensures a snug fit and minimizes the potential for leaks. Remember, a secure connection starts with proper alignment between the tubing and fitting.
Step 3: Slide on the Crimp Ring
Now, grab your crimp ring, also known as a cinch ring, and slide it over the end of the tubing. Position it close to the fitting, ensuring that it is snug against it. Take note of the raised stop on the crimp ring – this should be facing towards you during installation. This stop serves as a guide to ensure proper positioning of the ring on the tubing.
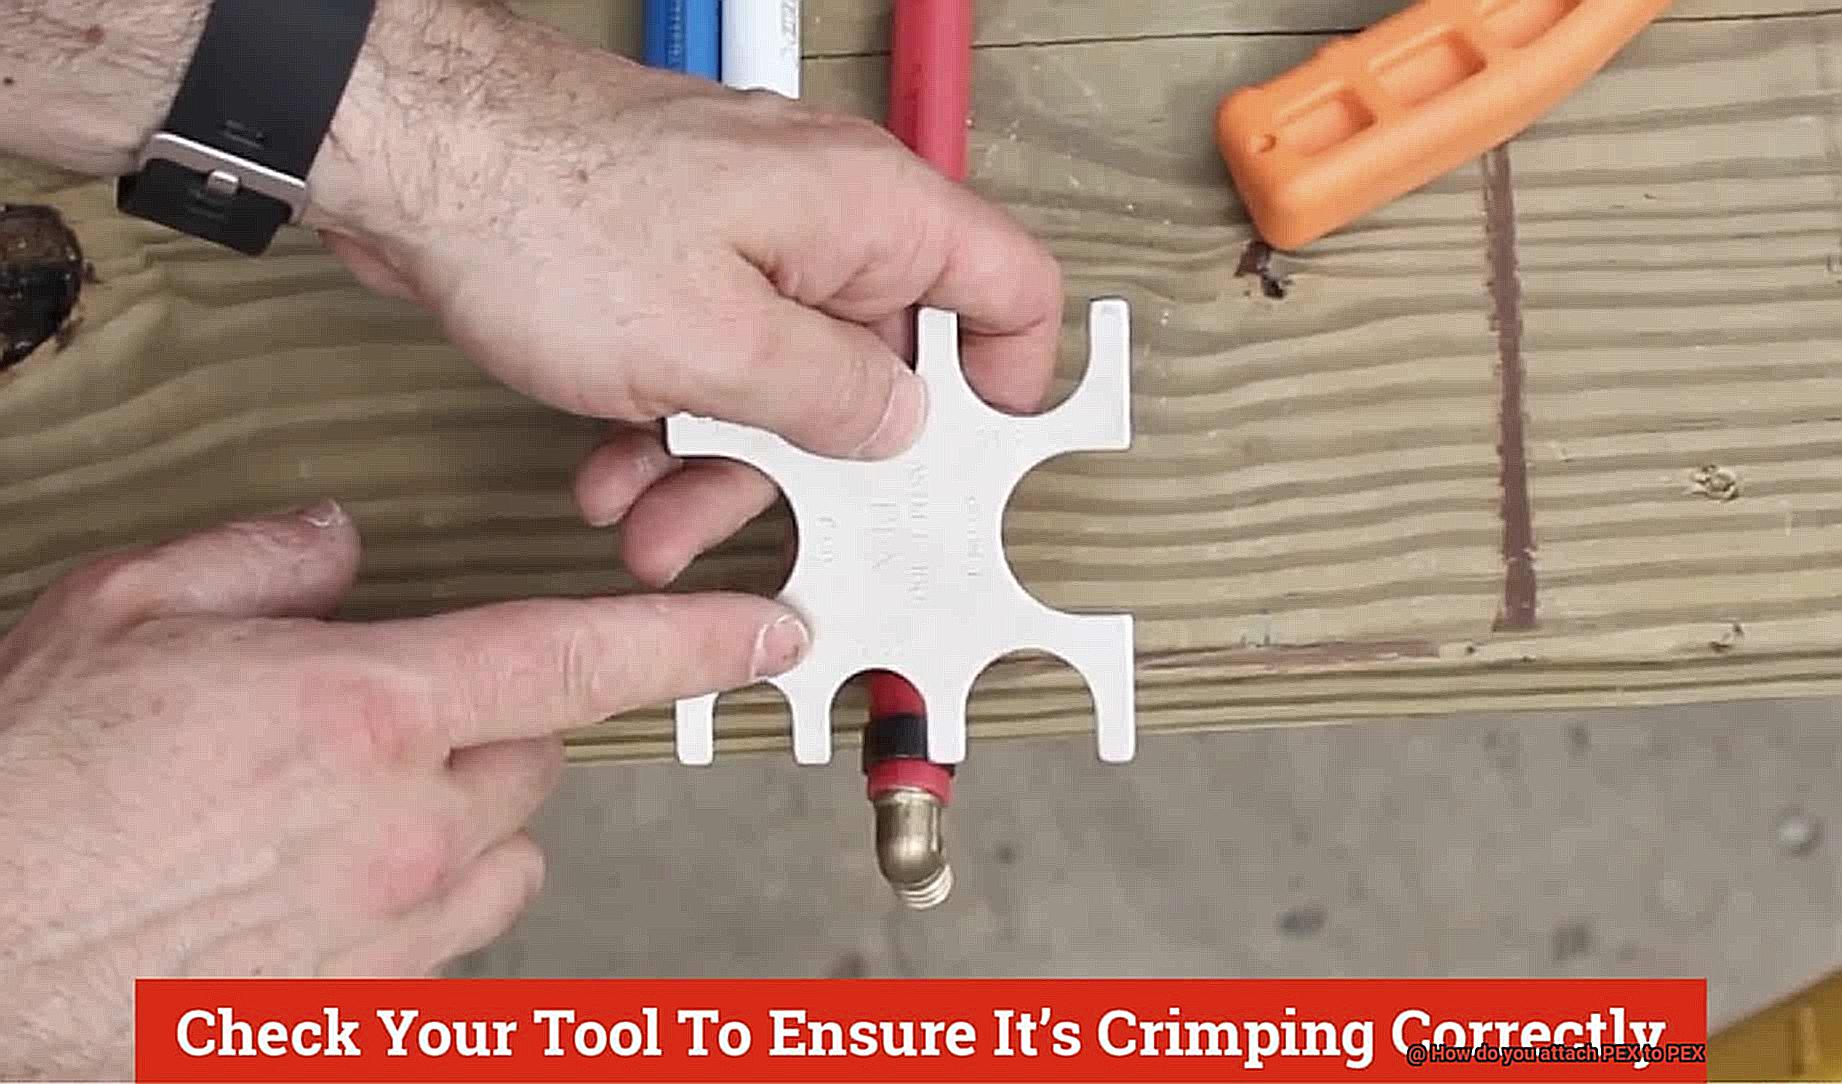
Step 4: Crimping Time.
Here comes the exciting part – crimping. Use a specialized crimping tool designed specifically for PEX connections. Place it over the crimp ring, ensuring that both jaws of the tool are completely aligned with each side of the ring. This alignment guarantees an even and secure crimp. The tool’s design allows for easy maneuverability and control during this critical step.
Step 5: Squeeze and Secure
Now, put some muscle into it. Firmly and evenly squeeze the handles of the crimping tool together until they are fully closed. This action compresses the ring around the tubing, creating a tight and secure connection. Be careful not to over-crimp, as excessive force can damage the fitting or deform the tubing.
Step 6: Inspect and Test
Once you’ve successfully crimped the ring onto the tubing, take a moment to visually inspect the connection. The crimped ring should be evenly and tightly secured around the tubing, with no gaps or deformities. To ensure an extra layer of confidence, perform a water pressure test to check for any leaks before proceeding further with your installation. This step ensures that the connection is not only visually sound but also functionally watertight.
Pressure Testing for Leaks
Pressure testing for leaks is a vital process in the world of PEX plumbing systems. It is the ultimate assurance that your connections are secure and leak-free before putting your system into active use. In this comprehensive guide, we will walk you through the step-by-step procedure of pressure testing for leaks, highlighting the significance of using glue during this critical process.
Step 1: System Preparation
To kick off the pressure testing for leaks, ensure all valves and connections within your PEX system are tightly closed. This will guarantee a closed loop, so turn off the water supply and shut down all faucets and outlets linked to the system.
Step 2: Connection of Pressure Testing Equipment
The next move involves connecting your pressure testing gauge or pump to one end of the PEX system. Attach the gauge directly to a fitting or valve on the system. If you opt for a pump, make use of an adapter to connect it to a faucet or outlet.
Step 3: Gradual Pressure Increase
Exercise caution as you gradually increase the pressure in your system, avoiding sudden bursts or leaks. Start by raising the pressure to approximately 25% of your PEX system’s maximum working pressure and maintain this level for several minutes.
Step 4: Thorough Leak Inspection
During this period, meticulously inspect all connections, fittings, and joints for telltale signs of leaks. Keep an eye out for dripping water, hissing sounds, or any other indicators that water is escaping from the system. Be especially attentive to areas where two sections of PEX are joined together.
Step 5: Pressure Increase and Monitoring
If no visible leaks are detected, continue gradually increasing the pressure until it reaches the maximum working pressure specified by the manufacturer. Hold this pressure steady for an extended duration, typically around 15-30 minutes, while vigilantly monitoring for any signs of leakage.
Step 6: Tackling Leaks Head-On
If leaks become apparent during the pressure test, promptly reduce the pressure and identify their source. Tighten fittings, apply Teflon tape to threaded connections, or replace faulty components as needed.
Step 7: Pressure Release
Upon successful completion of the pressure test with no leaks, slowly release the pressure from the system. Open all valves and outlets to allow the water or air to escape gradually, preventing any sudden bursts or damage to your PEX system.
In a nutshell, pressure testing for leaks is an essential step when joining PEX to PEX. It guarantees the integrity of your connections and exposes any potential weaknesses in the system. By adhering to these steps and taking immediate action against any leaks, you can construct a dependable and leak-free PEX plumbing system that will endure the test of time.
Using Teflon Tape or Thread Sealant
When it comes to connecting PEX to PEX fittings, creating a watertight seal is crucial to prevent leaks and ensure the longevity of your plumbing system. Fortunately, there are two effective and user-friendly methods for achieving this: using Teflon tape or thread sealant. By following a few simple steps and keeping some essential tips in mind, you can confidently tackle this aspect of your plumbing repairs.
To begin, gather all the necessary materials and tools. You’ll need PEX fittings, Teflon tape or thread sealant, and an adjustable wrench or pliers. Having these items ready will make the process smoother and more efficient.
Now, let’s dive into the step-by-step guide for using Teflon tape or thread sealant. First, prepare the fittings by ensuring that the male threads are clean and free of any debris. This will help the tape or sealant adhere properly and create a reliable seal.
If you opt for Teflon tape, start by wrapping it clockwise around the male threads of the fitting. It’s essential to cover all the threads entirely, starting from the base and working towards the end. However, be mindful not to extend the tape beyond the end of the fitting as this could cause complications during the connection process.
On the other hand, if you choose thread sealant, apply it evenly over the entire threaded area of the fitting. You can spread a thin layer of sealant using your finger or a small brush, ensuring that all the threads are adequately covered. This viscous compound provides a robust and durable seal that can withstand high pressures and temperatures.
Once you’ve applied either the Teflon tape or thread sealant, it’s time to connect the fittings. Carefully screw them together, making sure they are tightened securely. However, be cautious not to overtighten as this may damage the fittings or compromise their integrity.
After connecting the fittings, it’s crucial to test for leaks. Turn on the water supply and inspect the connections for any signs of water leakage. If you notice any leaks, tighten the fittings a little more until they are secure and watertight.
To ensure success and avoid potential issues, consider the following tips:
- Choose high-quality Teflon tape or thread sealant that is compatible with PEX and suitable for plumbing applications. Quality products are essential for achieving a reliable and long-lasting seal.
- Wrap the Teflon tape or apply the thread sealant in a clockwise direction. This ensures that the tape or sealant is properly positioned and maximizes its sealing capabilities.
- Avoid using excessive amounts of Teflon tape or thread sealant. Applying too much can lead to difficulties during the connection process and may compromise the effectiveness of the seal.
- Regularly check the connections for leaks, especially after initially installing them. This proactive approach will help identify any potential problems early on, allowing you to address them promptly.
Compatible Fittings and Tools
If you want to achieve professional-level connections when working with PEX pipes, then it’s time to dive into the world of compatible fittings and tools. Trust me, paying attention to the details will ensure leak-free and secure connections that will leave you feeling like a plumbing pro.
Compatible Fittings for PEX to PEX Connections:
When it comes to joining PEX pipes, two star players steal the show: crimp fittings and clamp fittings. Let’s break it down:
- Crimp Fittings: These fittings feature brass or copper bodies with barbed ends specially designed to snugly fit into the PEX pipe. To create an unbreakable seal, a copper ring or crimp is compressed using a crimp tool. It’s a simple yet effective method for achieving rock-solid connections.
- Clamp Fittings: If you prefer a different approach, clamp fittings are your go-to option. These fittings rely on stainless steel rings that are tightened around the PEX pipe using a specialized clamp tool. The precision of this method ensures a secure connection that won’t let you down.
But what about larger diameter PEX pipes? Don’t worry, expansion fittings have got you covered. These fittings require an expansion tool to temporarily expand the pipe’s diameter, making it a breeze to insert the fitting. Once the tool is removed, the pipe shrinks back down and forms a tight seal around the fitting.
The Tools of the Trade:
To conquer your PEX-to-PEX connection project successfully, you’ll need some trusty tools by your side. Remember:
- Crimp Tools: If you opt for crimp fittings, invest in high-quality crimp tools designed specifically for working with PEX pipes. Trustworthy tools ensure proper installation and long-lasting connections.
- Clamp Tools: For clamp fittings, a specialized clamp tool is a must-have. Choose a tool that provides the necessary force to tighten stainless steel rings securely around the PEX pipe.
- Expansion Tools: When dealing with larger diameter PEX pipes and expansion fittings, be sure to have an expansion tool on hand. This tool allows you to easily expand the pipe’s diameter, making installation a breeze.
Why Compatibility Matters:
Now, you might be wondering, why is compatibility so important? Well, my friend, it’s all about achieving reliable connections. Mismatched sizes can lead to loose connections, leaks, or even disastrous plumbing mishaps. Always double-check the sizes and refer to manufacturer guidelines to ensure a perfect match and seamless installation.
SElvliyv61I” >
Conclusion
In conclusion, attaching PEX to PEX is a straightforward process that can be accomplished using a variety of methods. One common method is using PEX crimp fittings, which involve sliding a copper or brass ring over the PEX pipe and then using a crimping tool to compress the ring onto the pipe. Another option is using push-to-connect fittings, which allow for quick and easy installation without the need for special tools. These fittings feature a collet mechanism that securely holds the PEX pipe in place.
Regardless of the method chosen, it is important to ensure that the PEX pipe is cut cleanly and squarely before attaching any fittings. This will help create a tight and reliable connection. Additionally, it is recommended to use compatible PEX tubing and fittings from reputable manufacturers to ensure compatibility and durability.
When attaching PEX to PEX, it’s crucial to follow proper installation guidelines and adhere to local plumbing codes. This includes ensuring adequate support for the pipes, avoiding excessive bends or kinks, and properly securing any connections. Taking these steps will help prevent leaks and ensure a long-lasting and efficient plumbing system.
In summary, attaching PEX to PEX can be accomplished with ease by utilizing various fitting options such as crimp or push-to-connect fittings. By following proper installation techniques and using high-quality materials from trusted manufacturers, you can confidently create secure connections that will stand the test of time in your plumbing system.