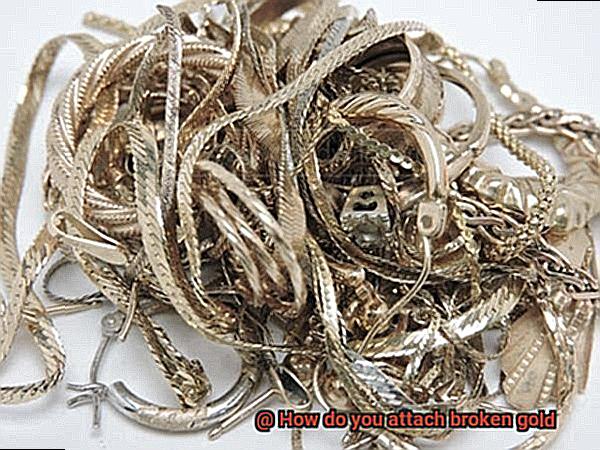
Gold jewelry holds a special place in our hearts – it’s not just about the value, but also the memories and emotions attached to each piece. But what happens when that precious necklace or bracelet breaks? Don’t worry. With a little know-how and the right tools, you can easily repair broken gold jewelry and bring back its former glory.
Before we jump into the nitty-gritty, let’s get one thing straight – repairing gold jewelry requires some finesse and basic knowledge. If you’re unsure about your skills, it’s always smart to consult a professional jeweler or goldsmith. But if you’re feeling brave and want to take matters into your own hands, let’s dive in.
Tools of the Trade:
- Jeweler’s Loupe: This handy magnifying lens lets you examine every tiny detail of the broken piece, helping you pinpoint exactly where repairs are needed.
- Jeweler’s Saw: A thin metal blade that allows you to make precise cuts without causing further damage – perfect for fixing delicate gold items.
- Flux and Bismuth Solder: Flux is like a superhero shield against oxidation during soldering, while bismuth solder has a low melting point ideal for gold repairs.
- Butane Torch: A small but mighty torch that provides just the right amount of heat for soldering gold jewelry with precision.
- Needle Files: These little heroes help shape and smooth out soldered areas, giving your repaired piece that polished finish it deserves.
Repair Techniques:
- Prep Time: Before diving in, set up a clean, well-lit workspace to minimize distractions (and accidental mishaps). Place your jewelry on a soft mat to protect it from scratches. Use your trusty jeweler’s loupe to inspect the damage closely and plan your repair strategy.
- Piece It Together: If your jewelry is in separate pieces, gently align them to see how they fit. This step ensures a seamless repair and avoids any wonky or uneven results.
- Cut and Fit: Time to bring out the jeweler’s saw. Carefully create slots or notches that will help the broken pieces fit snugly together. Remember, slow and steady wins the race – no need for Hulk-like strength here.
- Let’s Solder: Apply a touch of flux to the broken edges, then position the pieces together with precision. With your trusty but
Cleaning Broken Gold Pieces
Contents
- 1 Cleaning Broken Gold Pieces
- 2 Using Jewelry Glue to Attach Broken Gold
- 3 Additional Reinforcement with Gold Solder
- 4 Using Mechanical Means to Attach Broken Gold
- 5 Jump Rings and Clasps for Connecting Broken Pieces
- 6 Complex Repairs Requiring Professional Assistance
- 7 Tips for Ensuring a Secure Bond
- 8 Drying Time and Manipulation of the Joint Area
- 9 Conclusion
Gold jewelry holds an irreplaceable place in our hearts, symbolizing cherished memories and sentimental value. However, what happens when these beloved pieces break? Fear not, as we embark on a journey through the art of cleaning and repairing broken gold pieces. In this comprehensive guide, we will explore the intricate process of cleaning broken gold pieces and discuss various methods for expertly reuniting them. Let us begin our quest to restore the brilliance of your precious gold jewelry.
Cleaning Broken Gold Pieces:
- Assess the condition: Before diving into the restoration process, carefully evaluate the state of your broken gold pieces. If they are concealed under layers of dirt or residue, gently cleanse them using a mixture of warm soapy water and a soft-bristled toothbrush.
- Tarnish removal: For those tarnished or patina-covered treasures, concoct a potent cleaning solution by combining equal parts vinegar and water. Allow the broken gold pieces to soak in this solution for a few minutes, then unleash the power of the brush to delicately scrub away the tarnish.
- Jewelry cleaner: Alternatively, entrust your prized possessions to the care of a commercial jewelry cleaner specially formulated for gold. Adhere to the manufacturer’s instructions to ensure a safe and effective cleansing experience.
- Rinse and dry: After thoroughly cleaning the broken gold pieces, rinse them meticulously with fresh water to eliminate any remnants of residue. Patience is key here – grant ample time for them to air dry completely before proceeding with repairs.
Repairing Broken Gold Pieces:
- Clean the broken edges: Before embarking on any repair work, meticulously remove debris from the fractured surfaces using a soft cloth or brush. This prepares them for a seamless reunion.
- Jewelry glue: With precision and finesse, apply a modest amount of jewelry glue to one of the fractured surfaces. Press the broken pieces together firmly, ensuring accurate alignment.
- Drying time: Allow the glue to cure completely, respecting the manufacturer’s instructions without disturbing or manipulating the glued area. This crucial step ensures a steadfast bond.
- Additional reinforcement: Depending on the severity of the break or personal preference, consider fortifying the repair with gold solder or employing mechanical means such as jump rings or clasps. These reinforcements enhance both strength and aesthetics.
- Professional assistance: For intricate repairs or severe breaks, it is wise to seek the expertise of a professional jeweler proficient in gold restoration. Their skilled touch can guarantee that your beloved piece retains its strength and captivating allure.
Using Jewelry Glue to Attach Broken Gold
Whether it’s a sentimental heirloom or a treasured accessory, using jewelry glue can be the perfect solution for reattaching broken gold. In this comprehensive guide, we will explore the benefits of jewelry glue, step-by-step instructions, and important considerations to ensure a successful repair. So grab your glue and let’s get started.
Choosing the Right Jewelry Glue:
- Jewelry glue is specifically formulated for bonding metals and is ideal for repairing gold.
- Look for a high-quality adhesive that is transparent, strong, and specifically designed for use with jewelry.
- Popular brands include E6000 Jewelry and Bead Adhesive, Aleene’s Jewelry and Metal Glue, and Loctite Ultra Gel Control.
Preparing the Broken Gold Pieces:
- Thoroughly clean the broken ends of the gold pieces using a gentle cleanser and a soft cloth.
- Remove any dirt, oil, or residue that may interfere with the adhesive bond.
- Allow the surfaces to dry completely before proceeding.
Applying the Jewelry Glue:
- Apply a small amount of jewelry glue to one of the broken ends of the gold piece.
- Avoid using too much glue as it may overflow and create a messy appearance.
- Start with a small amount and add more if necessary.
Pressing and Drying:
- Firmly press the broken ends together, ensuring they are aligned properly.
- Hold them in place for a few minutes to allow the glue to set.
- Follow the manufacturer’s instructions regarding drying time, as it can vary among different brands.
Testing and Reapplying:
- Once the glue has dried, check the repaired area for stability.
- Gently tug on the gold pieces to test the strength of the bond.
- If there is any movement or looseness, apply additional glue and repeat the pressing and drying process.
Considering Professional Assistance:
- Complex repairs or extensive breaks may require the expertise of a professional jeweler.
- Seek their assistance for intricate details and delicate gold pieces.
Maintenance and Longevity:
- Regularly inspect the repaired area for any signs of weakness.
- Reapply glue as needed to maintain the integrity of the repair.
- Keep in mind that jewelry glue is not a permanent solution and may require reapplication over time.
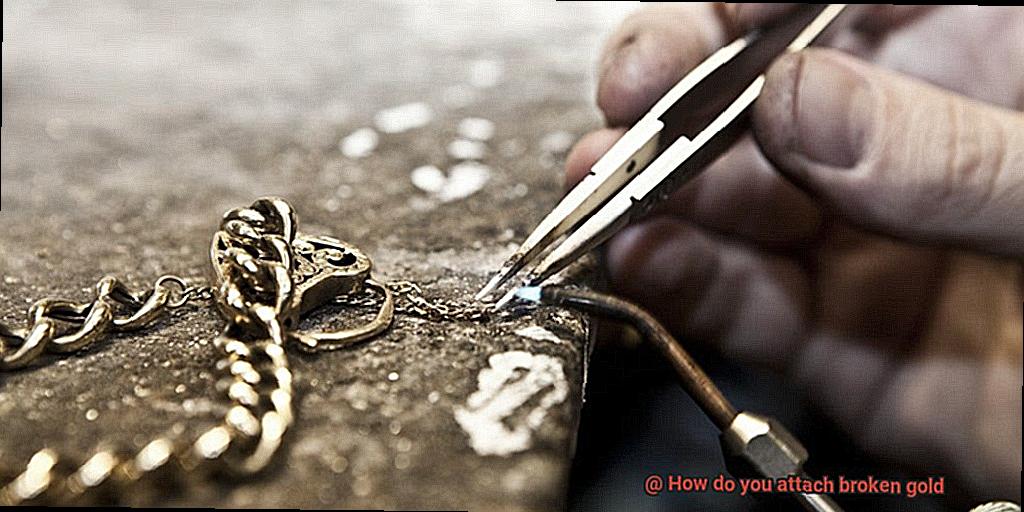
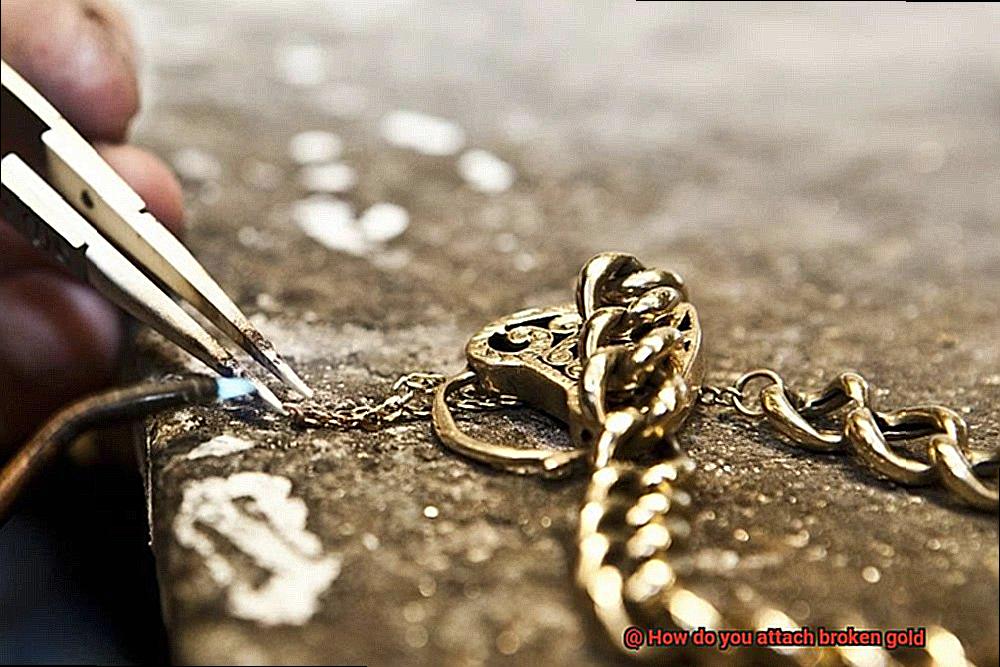
Additional Reinforcement with Gold Solder
Fear not, for in the realm of jewelry repair, there exists a magical solution that can restore your treasure to its former glory – gold solder. In this guide, we will embark on an enchanting journey through the process of additional reinforcement with gold solder. Brace yourself for a spellbinding adventure that will make your jewelry shine brighter than ever before.
Preparing for the Repair:
Before delving into the art of gold soldering, it is crucial to prepare the broken gold pieces. Treat them with reverence, as they hold the potential for transformation. Cleanse them of any impurities using a gentle cleaning solution and a soft brush. Like a jeweler’s alchemical elixir, this process removes dirt and debris, ensuring a pristine surface for the forthcoming magic.
Aligning the Broken Pieces:
With the stage set, it is time to align the broken edges of your precious gold piece. Handle them with care, as though guiding two star-crossed lovers back together. Utilize clamps or tweezers as your trusty assistants, holding the pieces in place with gentle precision. The alignment must be perfect, for any misstep could tarnish the repair’s elegance and strength.
Unleashing the Alchemy: Applying Gold Solder:
Now comes the moment of true enchantment – the application of gold solder. This mystical substance takes the form of thin wires or sheets, glistening with untapped potential. Channel your inner sorcerer as you wield a jeweler’s torch, cautiously heating the solder until it dances with liquid fire. Control is paramount here; too much heat can mar your creation with damage or discoloration.
As you witness the molten transformation, allow the golden alchemy to flow into the joint between the broken pieces. Watch in awe as it fuses the fragments together, creating a bond of unparalleled strength. This is the pivotal moment when brokenness gives way to unity, and your gold piece begins its journey towards renewal.
Perfecting the Spell: Removing Excess Solder:
With the solder now cooled and solidified, it is time to refine your creation. Like an artist wielding their brush, remove any excess solder that may mar the seamless repair. Employ files or sandpaper with a delicate touch, ensuring a smooth finish that rivals the craftsmanship of master jewelry artisans.
Unlocking Hidden Potentials: Additional Reinforcement Techniques:
For those seeking an extra layer of protection and resilience, consider delving deeper into the realm of reinforcement. Explore techniques such as applying a second layer of gold solder, akin to adorning your creation with an impenetrable shield. Alternatively, discover the magic of gold wire wrapping or prong settings, imbuing your repaired piece with an enchanting aura that defies time itself.
Using Mechanical Means to Attach Broken Gold
When it comes to fixing broken gold, relying on glue may not always be the best solution. Sometimes, you need a little more muscle to get the job done. That’s where mechanical means come in – the superheroes of jewelry repair. These methods rely on physical force and specialized tools to bring your broken gold back to life. So grab your soldering iron, buckle up, and let’s dive into the fascinating world of mechanical attachments.
First up, we have soldering. This technique involves melting a metal alloy called solder to create a strong bond between the broken pieces of gold. It’s like welding for jewelry. But fear not, you won’t need a giant blowtorch for this. A trusty soldering iron or torch will do the trick. Just make sure to use flux, a substance that helps the solder flow smoothly and adhere perfectly.
If soldering isn’t your cup of tea, there are other mechanical means at your disposal. Metal clasps and fittings are a popular choice. Think hinges, loops, or hooks that interlock and secure the broken ends together. It’s like giving your gold a stylish accessory that holds everything in place.
Another option is wire wrapping. This technique involves using a thin wire to wrap around the broken ends of the gold, creating a secure connection. It’s like giving your broken gold a fashionable band-aid. The wire can be twisted or bent in various ways to add an artistic touch to the repair.
For those who prefer a more industrial look, riveting is the way to go. By creating small holes in the broken ends and inserting metal pins or rivets through them, you can hammer them flat and voila. Your gold is as good as new. This method provides a sturdy and durable attachment that can withstand wear and tear.
But wait, there’s more. Cold connections such as screws or bolts can also save the day. By drilling small holes in the broken ends and using screws or bolts to hold them together, you’ll have a sturdy attachment that even Thor would be proud of. This method is particularly useful for larger and heavier pieces of broken gold.
Last but not least, tension settings or prongs can be used to hold broken pieces of gold in place. This technique is commonly used for setting gemstones, but it works just as well for attaching broken gold. It’s like giving your gold a gentle yet firm hug. This method provides a secure and aesthetically pleasing attachment.
Remember, not all mechanical means are created equal. The method you choose will depend on factors such as the size, shape, and type of gold being repaired, as well as the desired aesthetic and durability of the attachment. So consider your options and choose wisely.
Jump Rings and Clasps for Connecting Broken Pieces
When a beloved piece of gold jewelry breaks, it can feel like a devastating loss. But fear not. Jump rings and clasps are here to save the day and help you connect those broken pieces back together.
Jump rings are small circular metal rings with an opening that can be used to join broken gold pieces. They come in various sizes and materials such as gold, silver, or stainless steel. Clasps, on the other hand, are used to easily open and close bracelets or necklaces and come in different designs like lobster clasps or spring ring clasps.
To use jump rings and clasps for connecting broken gold pieces, you’ll need a few essential tools like jewelry pliers and wire cutters. Let’s break down the process step by step:
- Assess the damage: Identify the broken pieces that need to be connected and make sure they fit together snugly before proceeding.
- Jump rings: Choose an appropriate size jump ring that matches the thickness of your gold piece. Open the jump ring by twisting it sideways using two pairs of pliers, ensuring that the opening is wide enough to accommodate the broken piece. Insert one end of the broken gold into the open jump ring and close it by twisting it back into shape.
- Clasps: Start by identifying the broken ends that need to be connected. If necessary, trim any jagged edges using wire cutters for a clean connection. Open the clasp by gently pulling apart the two ends, exposing the opening. Insert one end of the broken gold into the open clasp and close it by aligning and gently pressing the ends together until they snap into place.
Remember, it’s important to ensure that both jump rings and clasps are securely closed to prevent any further damage. You can even add a drop of jewelry glue on the closures for extra reinforcement.
Using jump rings and clasps allows for easy repair and can be used in various jewelry designs. However, it’s important to note that these methods may not be suitable for all types of damage or gold pieces. If you’re unsure, it’s always best to consult a professional jeweler who can assess the damage and provide appropriate solutions.
Complex Repairs Requiring Professional Assistance
These repairs often involve intricate designs, delicate settings, and valuable gemstones that demand specialized skills and equipment to handle. Here are some reasons why seeking professional assistance is crucial in these situations.
One of the most common examples of complex repairs is when a gold chain breaks. Reconnecting the broken ends and ensuring a secure and durable bond can be challenging, especially if the chain is fine or has intricate patterns. Professional jewelers have honed their craft through years of experience, allowing them to assess the damage and determine the best method for repair. With their expertise, they can execute the repair with precision, restoring your gold chain to its former glory.
Another complex repair requiring professional assistance is fixing broken prongs on a gold ring. The prongs are like small metal claws that hold a gemstone in place. When a prong breaks, it can compromise the security and stability of the stone. Repairing this requires careful examination of the prong’s condition, determining whether it needs to be re-tipped or replaced, and skillfully executing the repair without causing further damage. Professional jewelers are trained in these techniques and can ensure that your gemstone remains secure while restoring the prongs.
In some cases, attaching broken gold may involve soldering, a technique that fuses metal pieces together using heat. Soldering requires expert control of temperature, knowledge of different solder alloys, and proper alignment of the broken pieces before applying heat. Professional jewelers are trained in these techniques and can ensure that your broken gold is securely attached without causing further damage.
Additionally, complex repairs may involve restoring antique or heirloom pieces that have sentimental or historical value. These treasures require a deep understanding of different eras’ jewelry styles and techniques to maintain their authenticity while ensuring their structural integrity. Professional jewelers possess the knowledge and skill to restore these pieces with care and precision.
Attempting complex repairs without professional assistance may lead to further damage or unsatisfactory results. While it may be tempting to channel your inner handyman or handywoman, the intricate nature of these repairs requires the expertise of a professional. Trusting your broken gold to a professional ensures that it will be handled by someone with the necessary skills, tools, and knowledge to restore it to its original glory.
Tips for Ensuring a Secure Bond
Repairing broken gold can be a daunting task, but with the right tips and strategies, you can ensure a secure bond that restores the beauty and integrity of your precious piece. In this comprehensive guide, we will explore essential steps to follow when attaching broken gold, from cleaning the surfaces to choosing the right adhesive and allowing sufficient drying time. Let’s dive in.
Clean and Prepare the Surfaces:
To ensure a secure bond, start by cleaning the broken surfaces thoroughly. Use a mild soap and warm water solution to remove dirt, oil, or debris from the broken edges. Dry the surfaces completely before proceeding. This step is crucial as it removes any hindrances that could affect bonding, ensuring optimal attachment.
Choose the Right Adhesive:
Selecting the right adhesive is key to ensuring a strong bond when repairing broken gold. Epoxy resin or jewelry glue are commonly used adhesives for this purpose. These adhesives are specifically designed to bond metals and provide a durable hold. Consider factors like drying time, transparency, and compatibility with gold when choosing the adhesive. Read and follow the manufacturer’s instructions carefully to ensure proper usage.
Apply Adhesive Sparingly:
When it comes to applying adhesive for attaching broken gold, less is more. Apply a thin layer of adhesive to one of the broken edges using a small applicator like a toothpick or fine brush. Avoid over-applying the adhesive as it may seep out and create a messy appearance. Remember, a little goes a long way in creating a secure bond.
Align Accurately and Hold Firmly:
Once the adhesive is applied, carefully align the broken pieces together, ensuring they fit snugly and accurately. Use tweezers or clean, dry fingers to hold the pieces in place until the adhesive sets. Exert gentle pressure while holding them firmly to achieve a strong and secure bond. Take your time during this step to ensure proper alignment for a seamless repair.
Allow Sufficient Drying Time:
Each adhesive has its own recommended drying time, so be sure to follow the manufacturer’s instructions. Avoid disturbing or manipulating the bonded pieces during this time to ensure a secure bond. Patience is key in allowing the adhesive to fully set and create a lasting attachment. Rushing this step may compromise the strength of the bond.
Drying Time and Manipulation of the Joint Area
Drying time and manipulation of the joint area are critical factors to consider when attaching broken gold pieces together. The success of your repair depends on these aspects, so let’s dive into the details.
First, let’s talk about drying time. This refers to the amount of time it takes for the adhesive or glue to fully dry and create a secure bond. Choosing the right adhesive is crucial because different adhesives have different properties and drying times. Epoxy, super glue, and jewelry-specific adhesives are commonly used for repairing gold. Epoxy is known for its strength and durability, while super glue provides a quick bonding solution. Jewelry-specific adhesives, recommended by professionals, are specifically designed for jewelry repairs.
Once you’ve selected the appropriate adhesive, follow the manufacturer’s instructions regarding drying time. These instructions will give you an approximate timeframe for the adhesive to dry and reach its full bonding strength. Patience is key here – rushing the drying process may compromise the strength of the bond, and nobody wants their precious gold pieces falling apart again.
Now let’s move on to manipulation of the joint area. Before applying any adhesive, it’s essential to clean and prepare the joint area properly. Remove any dirt, oils, or residue from the surfaces that will be bonded together. A clean and smooth joint area ensures better adhesion and a stronger bond.
To manipulate the joint area effectively, align the broken pieces accurately. Use tweezers or small pliers to hold them in place while applying the adhesive. This helps achieve precise alignment and prevents accidental movement during drying. Applying slight pressure on the joint area after applying the adhesive can also help achieve a stronger bond. Hold the pieces together firmly or use clamps or other tools until the adhesive dries completely.
Once dried, inspect the joint area for any visible gaps or weak spots. If necessary, apply additional adhesive to reinforce the bond and ensure a secure attachment. Remember, a little extra effort in ensuring a strong bond will preserve your repaired gold piece for years to come.
0jkSELbs1dM” >
Conclusion
In summary, when it comes to attaching broken gold, there are several effective methods at your disposal. One option is soldering, where a skilled jeweler uses heat to join the broken pieces seamlessly. Another technique is using adhesives specifically designed for jewelry repairs, ensuring a secure bond without compromising the integrity of the gold.
For more intricate repairs or delicate pieces, laser welding can be an ideal solution. This advanced method precisely fuses the broken parts together with minimal heat impact, preserving both the appearance and value of your gold item.
It’s important to note that attempting these techniques on your own may not yield satisfactory results. Seeking professional assistance from a trained jeweler who possesses the necessary expertise and tools is highly recommended.
Remember, each repair situation is unique, so consulting with an experienced professional will ensure that your broken gold receives the appropriate treatment it deserves. By entrusting your precious jewelry to skilled hands, you can rest assured knowing that it will be restored to its former glory.
So, don’t let a broken piece of gold diminish its sentimental or monetary value.