We all know that nailing the perfect bond between wooden pieces is the holy grail of any project. But did you know that there’s a sneaky little factor that can make or break your masterpiece? Yep, you guessed it – clamping time.
Picture this: You’ve spent hours meticulously aligning and slathering wood glue on your creation, only to discover later that it didn’t stick as securely as you’d hoped. Talk about a major bummer. But fear not, my friends. Understanding the importance of giving your glue enough time in the clamps can save you from this sticky situation.
In this blog post, we’re diving deep into the captivating world of wood glue. We’ll spill the beans on why clamping time is so darn important and arm you with practical tips to ensure your glue bonds are as strong as Hercules himself. We’ll tackle burning questions like how long to leave wood glue clamped, what factors affect clamping time, and what happens if you under or overdo it.
So grab yourself a steaming cup of joe, get cozy, and let’s unravel the mysteries behind achieving picture-perfect and rock-solid wood glue bonds. Ready? Let’s do this.
What is Wood Glue?
Contents
Woodworking is an art that demands precision, creativity, and unwavering strength in every joint. Enter wood glue, the unsung hero that holds it all together. In this comprehensive guide, we will delve into the world of wood glue, exploring its composition, working mechanism, and the advantages and limitations it presents.
What is Wood Glue?
Wood glue is a specialized adhesive meticulously crafted to form unyielding bonds between wooden surfaces. It consists of synthetic polymers, with polyvinyl acetate (PVA) and water as its prominent ingredients. These components synergize to create a robust bond capable of resisting formidable stresses and strains.
Types of Wood Glue:
The market offers an array of wood glues, each boasting unique properties and specific applications. The widely favored yellow glue, known as carpenter’s glue, reigns supreme for its reliable bond and dries into a transparent or yellowish hue. White glue, on the other hand, finds its niche in interior woodworking projects with its distinctive white finish. For unparalleled strength and versatility beyond wood, polyurethane glue takes the stage.
How Does Wood Glue Work?
Wood glue’s magic lies in its ability to penetrate the depths of wood fibers and establish an unbreakable connection during the drying process. When applied to two surfaces and clamped together, the glue fills any gaps or irregularities between them, ensuring a snug fit. As time passes, the glue undergoes a transformative hardening process, solidifying into a steadfast bond that withstands relentless challenges.
Advantages of Wood Glue:
Wood glue offers an impressive repertoire of advantages that contribute to its popularity among woodworking enthusiasts. Its foremost advantage lies in creating sturdy bonds between wooden surfaces, instilling structural integrity and durability into woodworking projects. Additionally, wood glue caters to design flexibility, effortlessly adapting to various wood joint types. It is an easy-to-apply adhesive, possesses non-toxic properties when dry, and can be sanded down for a flawlessly smooth finish.
Disadvantages of Wood Glue:
While wood glue shines as a versatile adhesive, it does have its limitations. It may not perform optimally on oily or resinous woods, as these substances can hinder the bonding process. Furthermore, wood glue necessitates clamping and adequate drying time, making it less suitable for quick projects that demand immediate usage.
Factors Affecting the Drying Time of Wood Glue
Wood glue possesses the transformative power to turn ordinary pieces of wood into extraordinary works of art. However, have you ever wondered why some projects take longer to dry while others seem to bond in an instant? Join us as we unveil the hidden secrets behind the drying time of wood glue and explore the factors that can make or break your woodworking masterpiece.
Type of Wood Glue:
Like different personalities, wood glues come in various types, each with its own unique characteristics. Yellow glue, white glue, polyvinyl acetate (PVA) glue, and epoxy glue are some common types. PVA glues typically dry faster compared to epoxy glues, which require more time to fully cure. Choosing the right type for your project is crucial to ensure a timely bond.
Temperature and Humidity:
Nature has a way of influencing everything around us, including the drying time of wood glue. Warm and dry conditions create an ideal environment for a speedy bond formation. High temperatures accelerate drying, while low temperatures significantly slow it down. Similarly, low humidity levels facilitate quicker drying, while high humidity can prolong the process. Keep an eye on the weather before embarking on your woodworking adventure.
Thickness of the Glue Line:
Imagine a thin layer of wood glue spreading evenly across two wooden surfaces, forming a seamless bond within minutes. Now picture a thick layer slathered haphazardly, taking forever to dry and leaving you twiddling your thumbs in anticipation. The thickness of the glue line directly affects drying time – thinner layers dry faster due to quicker moisture evaporation.
Surface Preparation:
A strong bond requires a clean canvas. Before applying wood glue, ensure that surfaces are free from contaminants like dust or oils. Proper surface preparation reduces drying time and achieves optimal bonding. Grab that sandpaper and give your wood a smooth and pristine finish before gluing.
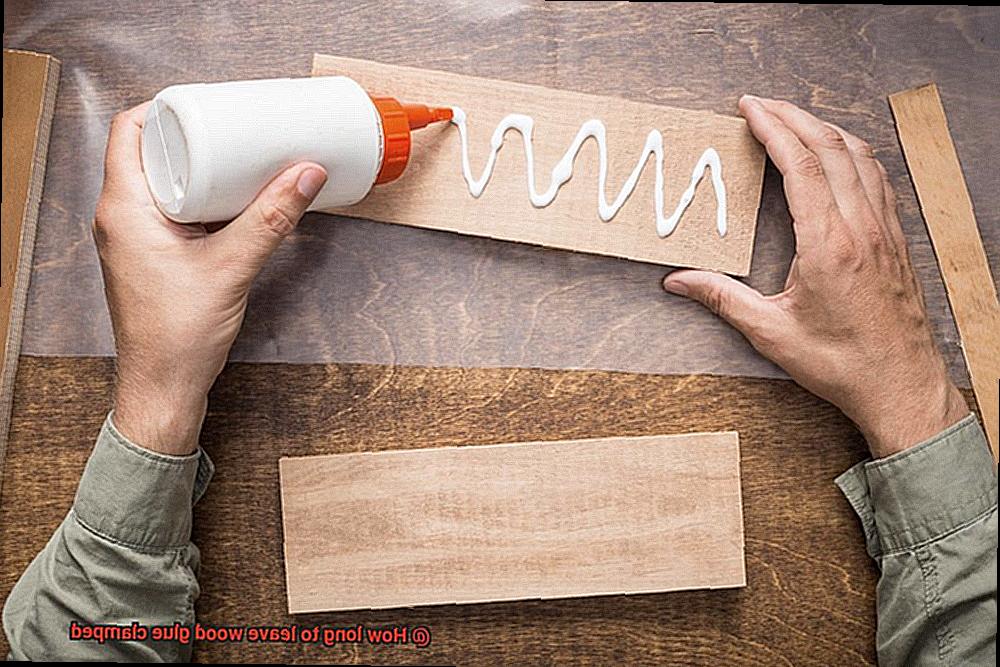
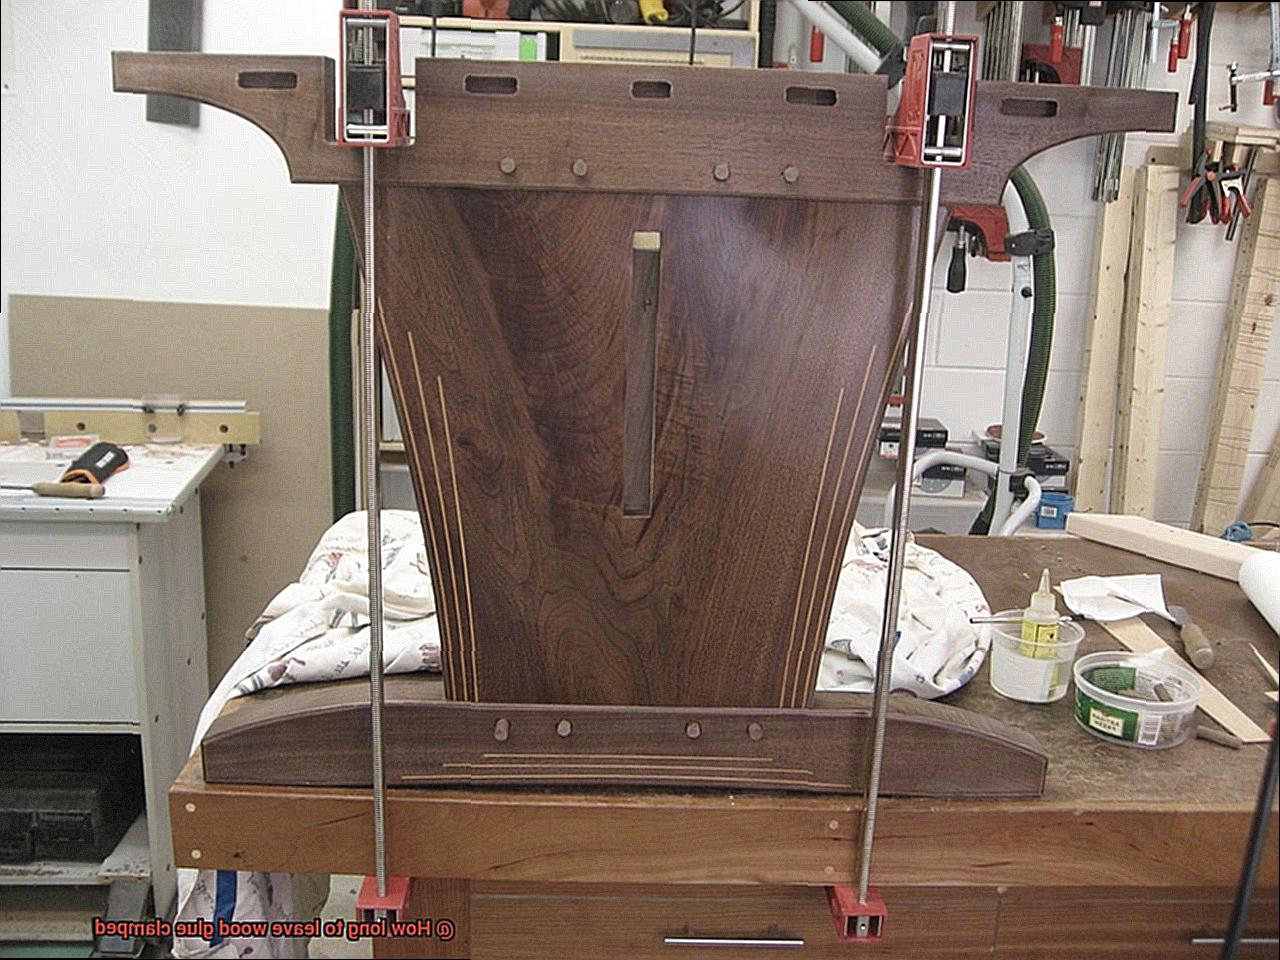
Clamping Pressure:
Clamping pressure is the secret ingredient that ensures a strong bond and reduces drying time. When clamping two pieces of wood together, applying adequate pressure helps squeeze out excess glue and maximizes contact between surfaces. Remember, too little pressure may result in weak bonds and longer drying times, while too much pressure can cause glue squeeze-out and messy joints.
Glue Open Time:
Every artist needs time to work their magic, and wood glue is no exception. The open time refers to the period during which the glue remains workable before it starts to dry. Different types of wood glues have varying open times, allowing for longer working periods in some cases. Take this into consideration when planning your project to ensure sufficient time for assembly and clamping.
Recommended Clamping Time for Wood Glue
Woodworking projects require careful consideration of many factors, and one crucial element is the choice of wood glue. However, selecting the right glue is only the beginning. The recommended clamping time for wood glue is a critical factor that can determine the success or failure of your project. In this article, we will explore the captivating world of wood glue and uncover the key factors influencing clamping time.
Factors Affecting Clamping Time:
Glue Type:
Different types of wood glue have varying curing times. Most wood glues typically require a minimum clamping time of 30 minutes to an hour. However, it is essential to consult the manufacturer’s instructions for specific recommendations tailored to each glue type.
Wood Type:
The type of wood being used plays a significant role in determining clamping time. Softwoods such as pine may absorb more glue and require longer curing times compared to hardwoods like oak or maple. Consider the porosity and density of the wood when calculating clamping time.
Humidity and Temperature Levels:
Environmental conditions can impact the drying time of wood glue. Higher humidity levels slow down the curing process, while warmer temperatures accelerate it. Strive for moderate humidity and temperature levels to optimize results.
Pressure Applied:
Applying adequate pressure during clamping is vital for creating a strong bond. Strike a balance between too little and too much pressure. Inadequate pressure may result in weak joints, while excessive pressure can squeeze out excess glue, weakening the bond.
Additional Considerations:
- Surface Preparation: Ensure that the surfaces to be glued are clean, dry, and free from any contaminants that may hinder adhesion.
- Glue Open Time: Open time refers to the period during which the glue remains workable after application. Adhere to the manufacturer’s instructions regarding open time to achieve optimal results.
- Testing Bond Strength: After removing the clamps, evaluate the strength of the bond by applying pressure or stress to the joint. If there are any signs of weakness or separation, additional clamping time may be necessary.
Temperature and Humidity Considerations
Today, we embark on a captivating exploration of wood glue, delving into the enigmatic impact of temperature and humidity on its drying and curing process. Grab your favorite mug of coffee, and let’s embark on this fascinating journey.
Temperature plays a pivotal role in the clamping process of wood glue. Did you know that wood glue has an optimal temperature range for application and curing? Between 65°F and 75°F (18°C to 24°C), most wood glues work their magic.
But why does temperature matter? If the glue becomes too hot, it dries up faster than you can say “strong bond.” Conversely, if it gets too cold, it may take ages to dry or cure. Finding that sweet spot is key to achieving an unyielding bond.
Speaking of temperature, both the adhesive and the wood being bonded should be within that optimal range. If they’re too chilly, the curing process slows down. And if they’re too toasty, well, things might get sticky as the glue dries faster than Usain Bolt on a mission.
Now let’s turn our attention to humidity. Picture this – everything is set up perfectly, but oops. The humidity decides to play tricks on you. High humidity levels pose a challenge for wood glue. In humid environments or during rainy seasons, the glue takes longer to dry and cure.
Why is that? Moisture in the air hampers the evaporation process of water from the glue. It’s like trying to dry your hair in a rainforest – not an easy task. In such situations, you might need to extend your clamping time or use tricks like applying heat or using a dehumidifier to expedite the process.
On the flip side, low humidity levels cause wood glue to dry too quickly. It’s like trying to catch a speeding train – blink, and you miss it. In dry climates or during winter when indoor heating is cranked up, extra caution is necessary. Adding moisture to the wood before gluing or using glue accelerators helps maintain the perfect balance.
To ensure optimal results, monitor the temperature and humidity levels in your workshop. A trusty digital thermometer and hygrometer will be your faithful companions on this journey. And don’t forget to consult the manufacturer’s guidelines for the specific wood glue you’re using – their expertise is invaluable.
Understanding the impact of temperature and humidity on wood glue equips you to conquer any woodworking project. So, my fellow craftsmen and craftswomen, go forth and create bonds as strong as our love for woodworking masterpieces.
Handling Glued Pieces After Removing Clamps
Handling Glued Pieces After Removing Clamps: The Key to Preserving Your Woodworking Masterpieces
Welcome back, fellow woodworkers. Today, let’s delve into the crucial topic of handling glued pieces after removing clamps. We all know that the success of any woodworking project hinges on the strength and integrity of our joints. So, let’s roll up our sleeves and explore the art of caring for our creations.
First and foremost, give your glue a chance to work its magic. Remember, different wood glues have varying curing times. Take a moment to consult the manufacturer’s instructions for specific guidelines. Patience is key.
Once the glue has fully cured, it’s time for a close inspection. Carefully examine the joints for any signs of weakness or gaps. If you spot any issues, additional clamping might be necessary to reinforce the bond. But remember, don’t go overboard with force – we don’t want to damage the wood or break the joint.
Now comes the crucial part – handling your precious glued pieces. Proper support is essential to prevent stress on those hard-earned joints. For larger or heavier projects, consider enlisting a second pair of hands or using a support stand to evenly distribute the weight. Trust me; it’s worth the extra effort.
Gentle is the name of the game when it comes to handling glued pieces. Avoid sudden impacts or jarring movements that could weaken your bonds or worse, lead to joint failure. Treat your projects with care and respect.
Oh, and don’t forget about that pesky excess glue squeeze-out. Grab a damp cloth or a scraper and promptly clean up any excess glue before it dries. You don’t want it interfering with your finishing processes or marring the beauty of your creation.
Lastly, give your glued pieces some extra time to cure before subjecting them to stress or load-bearing activities. This additional curing time ensures that your bond reaches its maximum strength and durability – an investment in the longevity of your masterpiece.
Maximum Strength of Glued Joints
When it comes to woodworking projects, the strength of glued joints is absolutely crucial. After all, you want your finished product to withstand the test of time and hold up under pressure. But did you know that achieving maximum strength in glued joints requires more than just applying the glue and clamping the pieces together? Let’s delve into the factors that contribute to the maximum strength of glued joints.
One key factor that often goes overlooked is the clamping time. Clamping time refers to the amount of time that wood glue needs to be held under pressure in order to form a strong bond between the two pieces of wood being joined. Different types of wood glue may have varying curing times and requirements for maximum strength, so it’s important to consider these factors when crafting your joint.
Factors such as the type of wood, humidity levels, temperature, and the specific adhesive being used can all affect the clamping time needed for maximum strength. It’s crucial to read and follow the instructions provided by the manufacturer for accurate clamping times. Most wood glues recommend clamping times ranging from 30 minutes to 24 hours, but keep in mind that different wood glues may have different optimal clamping times.
Clamping for too short a period can result in weak joints that may fail over time. On the other hand, excessive clamping time may not significantly improve the bond strength and could lead to unnecessary delays in completing your project. So, finding the right balance is key.
Additionally, environmental factors such as temperature and humidity can also impact curing times. In colder or more humid conditions, some types of wood glue may require longer curing times. It’s important to consider these factors when determining the appropriate clamping duration.
To ensure a strong and durable joint, it’s generally advisable to leave wood glue clamped for at least the minimum recommended time stated by the manufacturer. If possible, allowing additional curing time beyond the minimum recommendation is beneficial, especially if your project will undergo heavy stress or load-bearing activities. By following the manufacturer’s instructions and allowing sufficient curing time before subjecting the joint to stress or load, you can ensure that your woodworking masterpiece will stand the test of time.
Different Types of Wood Glues
Selecting the right wood glue is crucial for the success of any woodworking project. With a wide range of options available, it can be overwhelming to determine which adhesive is best suited for your needs. In this article, we’ll delve into the world of wood glues, exploring their unique properties and guiding you towards making an informed decision.
PVA Glue – The All-Purpose Champion:
PVA glue, also known as carpenter’s or yellow glue, is a versatile adhesive suitable for most woodworking projects. It’s water-based, non-toxic, and easy to use. Its quick drying time ensures a strong bond between wood surfaces. Whether you’re working on furniture, cabinets, or smaller crafts, PVA glue is your go-to choice.
Epoxy Glue – Unmatched Strength and Durability:
For heavy loads and extreme conditions, epoxy glue is the answer. Composed of resin and hardener, this adhesive requires mixing before use. Though it has a longer curing time, epoxy offers exceptional strength and durability. It’s perfect for bonding irregular surfaces and joining different materials.
Polyurethane Glue – The Gap-Filler:
Polyurethane glue is ideal for projects that require filling gaps or bonding uneven surfaces. As it cures, this adhesive expands, ensuring a tight bond between wood pieces. Additionally, it is waterproof and resistant to temperature changes, making it suitable for indoor and outdoor applications.
Hide Glue – The Traditional Choice:
For those who appreciate traditional woodworking techniques, hide glue is an excellent option. Made from animal collagen, hide glue has been used for centuries in furniture making. It provides superb tackiness and sets quickly, enabling faster assembly of wooden parts. What’s more, hide glue can be easily reversed with heat and moisture, making it ideal for restoration work.
Cyanoacrylate Glue – The Quick Fix:
When you require a fast and strong bond, reach for cyanoacrylate glue, commonly known as super glue. This adhesive bonds quickly and securely, making it perfect for small woodworking projects or repairs. However, it’s not suitable for applications that require flexibility or exposure to moisture.
5cy1wmzGC28″ >
Also Read: How To Glue Plywood Together?
Conclusion
When it comes to the question of how long to leave wood glue clamped, there is no one-size-fits-all answer. The drying time of wood glue can vary depending on various factors such as the type of glue used, environmental conditions, and the specific project at hand.
In general, most wood glues require some clamping time to ensure a strong and secure bond. This typically ranges from 30 minutes to 24 hours. However, it’s important to read the instructions provided by the manufacturer of your chosen wood glue for specific guidance.
Factors such as humidity and temperature can also affect drying times. In humid environments, it may take longer for the glue to dry completely. Similarly, colder temperatures can slow down the drying process. It’s essential to consider these factors when determining how long to leave your wood glue clamped.
To ensure a successful bond, it’s crucial not to rush the process. While some glues may dry quickly, it’s still recommended to leave them clamped for at least a few hours. This allows sufficient time for the glue to set and achieve maximum strength.
Remember that different woodworking projects may have different requirements. For smaller or less complex projects, shorter clamping times may be sufficient. However, larger or more intricate projects may require longer clamping periods.
In conclusion, patience is key when it comes to leaving wood glue clamped. Take into account the type of glue you’re using, environmental conditions, and project complexity when determining how long to leave your wood glue clamped.