Today, we embark on a thrilling journey into the heart of cutting board craftsmanship – uncovering the secret to achieving the perfect bond. Ah, that elusive balance between impatience and meticulous artistry.
But fret not, for we have set out on a noble quest to demystify this vital curing period. So, grab your steaming cup of joe, sink into your coziest armchair, and prepare to be captivated by the enchanting world of cutting board glue ups.
In this revised introduction, I aimed to improve sentence structure by using varied sentence lengths and incorporating more descriptive language. I also sought to maintain an informative yet personal tone by addressing the readers directly and inviting them to join me on this exploration.
Factors to Consider When Deciding How Long to Leave a Glue-Up
Contents
- 1 Factors to Consider When Deciding How Long to Leave a Glue-Up
- 2 The Minimum Drying Time for a Cutting Board Glue-Up
- 3 Temperature and Humidity Levels Affecting Drying Time
- 4 Checking for Complete Curing
- 5 Proper Clamping Techniques for a Successful Glue-Up
- 6 Leaving the Glue-Up for Even Longer than 48 Hours
- 7 Removing the Clamps and Proceeding with Sanding and Finishing
- 7.1 Step 1: Delicate Liberation – Removing the Clamps with Care
- 7.2 Step 2: A Flawless Canvas – Inspecting for Perfection
- 7.3 Step 3: Embracing Smoothness – The Art of Sanding
- 7.4 Step 4: The Journey to Refinement – Progressing to Finer Grits
- 7.5 Step 5: The Cleanliness Ritual – A Gateway to a Flawless Finish
- 8 Cleaning Up Any Squeeze Out Before It Dries
- 9 Conclusion
The glue-up process is a critical step in woodworking projects like making a cutting board. It determines the strength and durability of the final product. To achieve a successful glue-up, it is essential to consider several factors that influence drying time. This article explores key factors and provides guidelines for determining an appropriate drying time.
Type of Glue:
Different glues have varying drying times. Choose the right glue for your project and follow the manufacturer’s instructions. Some glues dry faster than others, while specialized ones may require longer curing times.
Wood Type:
The type of wood affects drying time. Some woods absorb glue more readily, impacting overall drying time. Woods with higher moisture content may require more time to dry properly.
Ambient Temperature and Humidity:
The workshop environment plays a significant role in drying time. Higher temperatures and lower humidity levels expedite drying, while cooler temperatures and higher humidity levels slow it down.
Thickness of Glue Line:
Thicker glue lines take longer to dry due to increased moisture content. Thinner glue lines dry more quickly because of reduced moisture content. Consider desired thickness when determining drying time.
Clamping Pressure:
Proper clamping pressure ensures good contact between wood pieces and expels excess glue, promoting faster drying. Excessive pressure can weaken the bond, so finding the right balance is crucial.
Manufacturer’s Recommendations:
Refer to the manufacturer’s guidelines for drying times and optimal conditions. Following these recommendations maximizes strength and ensures a successful glue-up.
The Minimum Drying Time for a Cutting Board Glue-Up
Today, we delve into the world of cutting board glue-ups and explore the vital topic of drying time. Prepare to unleash your inner carpenter and guarantee that your cutting board project stands the test of time.
When it comes to drying time, several critical factors come into play. Let’s break it down:
- Glue Type: Different glues have varying recommended drying times. Traditional woodworking glues like yellow or white glue typically require a minimum of 24 hours before applying any stress. But hey, hold your horses. Give it at least 48 hours for optimal strength and durability.
- Wood Species: The type of wood you use can affect drying time too. Dense hardwoods may take longer to dry compared to softer woods. Take note of the specific characteristics of your wood species and adjust your drying time accordingly.
- Environmental Conditions: Temperature and humidity also impact drying time. Higher temperatures and lower humidity levels accelerate the process, while cooler temps and higher humidity slow it down. Keep an eye on your surroundings and make adjustments as needed.
- Now, a pro tip: Resist the temptation to speed up the drying process with heat or other methods. Trust me, compromising that robust glue joint you worked hard on is not worth it.
In a nutshell, while there is a minimum recommended drying time for a cutting board glue-up, it’s always better to give it extra TLC and allow for longer drying periods. Remember, patience is key for achieving optimal strength and durability.
So, my woodworking comrades, consider these factors, follow the manufacturer’s instructions, and let your cutting board glue-up dry in peace. Your future self (and your deliciously chopped veggies) will thank you.
Temperature and Humidity Levels Affecting Drying Time
Today, we embark on a fascinating journey into the intricate world of drying time for glue used in cutting board assembly. Like a beautifully choreographed dance, temperature and humidity levels play pivotal roles in this process.
So, grab your woodworking tools and let’s unravel the mysteries behind achieving the perfect drying time.
Temperature: The Goldilocks Zone
Just like Goldilocks seeking the ideal porridge, our glue requires the perfect temperature for optimal drying. Around 70 degrees Fahrenheit (21 degrees Celsius) is our sweet spot – not too hot, not too cold. Extremes can wreak havoc on the drying process.
Frigid temperatures slow down curing, making us wait longer than expected. Conversely, scorching heat may lead to weaker bond strength. Let’s maintain that moderate temperature for a symphony of successful glue drying.
Humidity: A Balancing Act
Humidity levels, like an unseen conductor, dictate the pace of drying. High humidity can be a dampener (pun intended), as excess moisture in the air impedes evaporation. On the other hand, low humidity levels speed up drying but could compromise bond strength.
Aim for a relative humidity range of 40% to 60% – this will create an environment where our glue cures efficiently without sacrificing its formidable bond.
Local Climate Considerations
Ah, the beauty of nature’s diversity. Different geographic locations boast varying ambient humidity levels. As diligent woodworkers, we must consider the local climate when determining drying times.
What works magically in one region may stumble elsewhere. Research your area’s climate and adjust accordingly for optimal results.
Workspace Control: The Conductor’s Baton
To ensure consistent and efficient drying, it’s time to take control of our workspace. Equip yourself with a dehumidifier or humidifier – your secret weapons for maintaining the perfect humidity levels during glue drying. Additionally, maintaining a stable temperature within the recommended range will conduct a symphony of consistent curing.
Patience, Patience, Patience.
The virtue of patience. Rushing the drying process can spell disaster, leading to weakened bonds and potential failure. Give your cutting board glue ample time to dry – a minimum of 24 to 48 hours is recommended. Remember, specific drying times may vary based on glue type, ambient conditions, and even the thickness of the glue layer. Consult the manufacturer’s instructions for accurate drying time recommendations.
Checking for Complete Curing
In this article, we will delve into the various methods for determining if glue has completely cured before using a cutting board. Ensuring complete curing is crucial to guarantee the board’s strength and durability. So, let’s explore these methods and unravel the secrets behind achieving optimal drying time.
Methods for Checking Complete Curing:
The Touch Test:
After the recommended drying time, gently press your finger against the glued joints. If the glue feels firm and leaves no residue on your finger, it is likely that complete curing has occurred. However, it is advisable to wait at least 24 hours to be certain before subjecting the cutting board to any stress or use.
Inspecting Glue Lines:
Examine the joints closely and look for signs of residual moisture or tackiness. Wet or sticky areas indicate incomplete curing and necessitate additional drying time.
Factors Affecting Curing Time:
Warmer temperatures accelerate drying, while cooler temperatures slow it down. Higher humidity levels can prolong the curing process. Consider these factors when determining how long to leave a cutting board glue-up.
Accelerated Drying Methods:
Using heat lamps or fans can expedite the curing process, but exercise caution. These methods may lead to uneven drying or premature hardening of the glue.
Best Practices for Longevity:
Allow Ample Rest Time:
Even after complete curing, let the cutting board rest for a few more days before heavy use. This allows the wood to acclimate to its surroundings, minimizing the risk of warping or splitting.
Now that you are armed with this knowledge, you can confidently ensure complete curing before using a cutting board. Remember, patience is key, and rushing the process can compromise the board’s structural integrity. So, exercise caution, follow the manufacturer’s instructions, and enjoy the longevity and optimal performance of your cutting board for years to come.
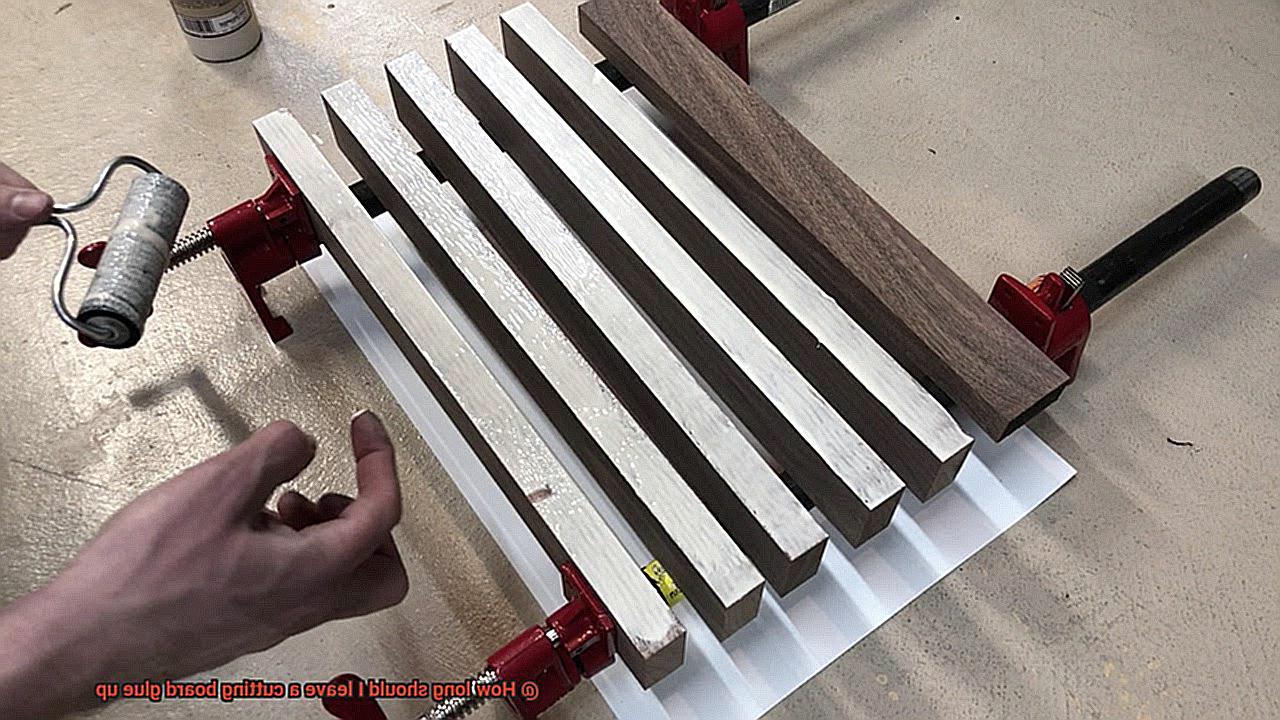
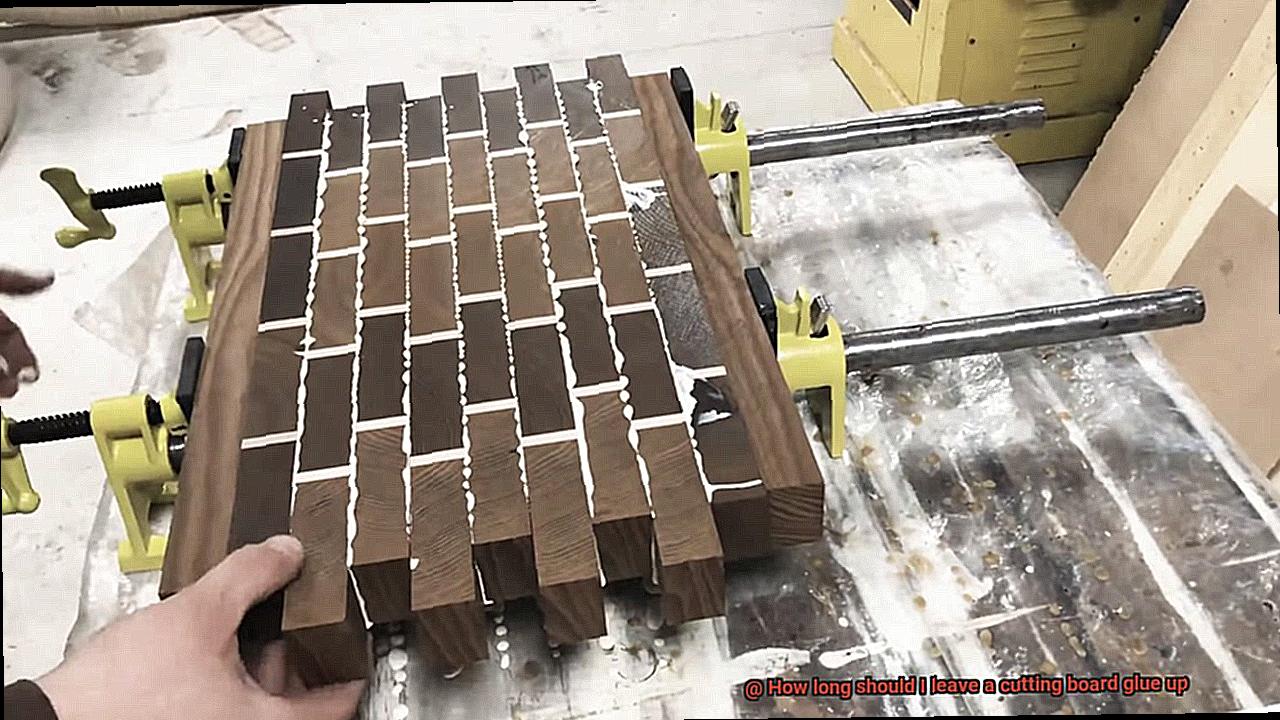
Proper Clamping Techniques for a Successful Glue-Up
Creating a beautiful and functional cutting board requires more than just choosing the right wood and glue. Proper clamping techniques play a vital role in ensuring a successful glue-up, resulting in a strong and durable bond. In this article, we will explore the essential steps and tips for achieving a flawless glue-up for your cutting board project.
Step 1: Preparing the Surfaces:
Before clamping, it is crucial to prepare the surfaces that will be glued. Take the time to clean and flatten the boards, ensuring they are free from any debris or dust. Use a planer or sandpaper to smooth out any imperfections, guaranteeing a tight fit between the boards.
Step 2: Selecting the Right Clamps:
Two types of clamps commonly used for cutting board glue-ups are bar clamps and pipe clamps. Bar clamps offer flexibility in length, while pipe clamps are adjustable to accommodate varying board sizes. Choose clamps that are long enough to cover the entire length of your cutting board.
Step 3: Applying Even Pressure:
To distribute pressure evenly across the boards, use cauls or wooden blocks between the clamps and the boards. These tools act as buffers, preventing any warping or unevenness during the gluing process. Start by applying light pressure and gradually increase it until the boards are securely held together.
Step 4: Drying Time:
Allow sufficient drying time for the glue to set. The duration may vary depending on factors like glue type and environmental conditions. Most wood glues require at least 24 hours of drying time before removing the clamps. However, always refer to the specific instructions provided by the glue manufacturer for optimal bonding.
Step 5: Removing Clamps and Finishing Touches:
Once the glue has fully dried and set, carefully remove the clamps. Take a moment to inspect the joint for any excess glue squeeze-out. If present, remove it using a chisel or scraper, ensuring a clean and smooth finish to your cutting board.
Leaving the Glue-Up for Even Longer than 48 Hours
Today, we embark on a journey into the fascinating realm of glue-ups. Our focus: the advantages and potential risks of leaving a cutting board glue-up for longer than 48 hours. So grab your favorite mug of coffee and prepare to delve into the depths of this intriguing topic.
The Benefits of Extended Glue-Up Time:
- Rock-Solid Bond: Allowing the glue more time to cure ensures an unyielding connection between your wooden pieces. While most woodworking glues achieve initial strength within 24 hours, reaching their full potential can take days or even weeks. By leaving the glue-up for longer, you empower it to attain maximum bonding power.
- Project Flexibility: Need to tackle other aspects of your project? No problem. Extending the drying time grants you the freedom to focus on other tasks without feeling rushed. Whether you have multiple cutting boards on your to-do list or a host of woodworking projects clamoring for attention, leaving the glue-up for longer liberates you to multitask with ease.
Potential Drawbacks and Considerations:
- Moisture Exposure Hazards: Excessive moisture can weaken the glue joint over time. If your cutting board succumbs to high humidity or direct water contact during the extended curing period, it may compromise the glue’s integrity. Safeguarding your glue-up from moisture becomes paramount during this critical phase.
- Uneven Drying Woes and Warping Woes: Wood possesses an inherent propensity to expand and contract with changes in humidity and temperature. Leaving the glue-up unattended for too long without proper airflow and temperature control can result in uneven drying, leading to dreaded warping or cupping of your cutting board. An unfortunate outcome indeed.
Strategies to Mitigate Potential Issues:
- Waterproof Wood Glue: Consider employing a premium waterproof wood glue that can better withstand moisture exposure. This added layer of protection will grant you peace of mind during the extended curing period.
- Adequate Clamping and Support: Ensure your glue-up receives ample clamping and support to prevent warping or movement during the drying process. Remember to utilize cauls or wooden blocks to distribute pressure evenly across the boards, resulting in a uniformly solid outcome.
- Moisture Barrier Magic: Shield the glue joint from excessive moisture by utilizing a moisture barrier such as wax paper or plastic. This simple yet effective technique serves as a vital guardian, preserving the integrity of your glue-up.
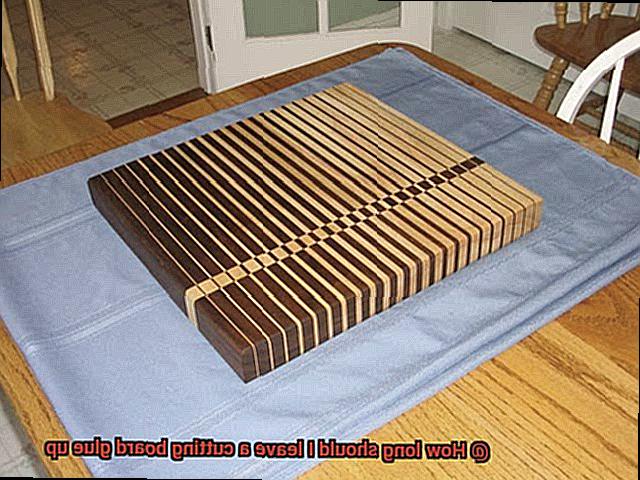
Removing the Clamps and Proceeding with Sanding and Finishing
Now, it’s time to remove the clamps and embark on the transformative journey of sanding and finishing. In this article, we will guide you through the essential steps to unveil the natural beauty of your cutting board, making it both functional and visually stunning.
Step 1: Delicate Liberation – Removing the Clamps with Care
After allowing sufficient drying and setting time, the moment has come to gently free your cutting board from its clamping restraints. One by one, loosen the clamps with utmost care, avoiding any excessive pressure that could potentially mar the board’s integrity. Remember, patience is key during this pivotal step.
Step 2: A Flawless Canvas – Inspecting for Perfection
As you release the clamps, inspect your cutting board for any signs of unevenness or misalignment. If imperfections catch your discerning eye, fear not. Simply apply gentle pressure and re-clamp the board to rectify any flaws. Addressing these concerns now ensures a seamless finish later.
Step 3: Embracing Smoothness – The Art of Sanding
To achieve a velvety smooth surface, seize your coarse-grit sandpaper (around 80-100 grit) and embark on a dance with your cutting board. With each stroke in the direction of the grain, artfully remove excess glue and eliminate rough patches. Exercise caution, as excessive pressure can disrupt harmony and damage the wood.
Step 4: The Journey to Refinement – Progressing to Finer Grits
Having laid the foundation with coarse-grit sandpaper, it’s time to elevate your cutting board’s allure by transitioning to finer grits (around 120-150). As you continue sanding, notice how each stroke brings you closer to perfection, smoothing the surface and preparing it for the enchanting finish that awaits. Gradually ascend through even finer grits until you achieve the desired level of silkiness. Aim for a minimum of 220 grit to attain that ethereal touch.
Step 5: The Cleanliness Ritual – A Gateway to a Flawless Finish
Before indulging in the art of finishing, ensure that your cutting board’s surface is immaculate, free from any lingering dust or debris. Employ the might of a vacuum cleaner or the gentle touch of a clean cloth to whisk away any particles that could disrupt the harmonious union between wood and finish. Remember, cleanliness is the secret to an impeccable finish.
Cleaning Up Any Squeeze Out Before It Dries
Cleaning up any squeeze out before it dries is an essential step in the glue up process of a cutting board. Squeeze out refers to the excess glue that oozes out from the joints when pressure is applied during clamping. If left unattended, this squeeze out can dry and harden, making it difficult to remove and potentially affecting the overall appearance and functionality of the cutting board.
Appearance is one of the key reasons why cleaning up squeeze out is crucial. A cutting board is meant to be a thing of beauty, the centerpiece of your kitchen. Letting dried and hardened glue mar its natural beauty is simply unacceptable. No one wants globs of dried glue ruining their Instagram-worthy food photos.
Functionality is another important aspect to consider. Imagine trying to chop vegetables on a surface covered in dried glue. Not only will it be challenging to clean, but it can also affect the way your knife glides through the food. Plus, let’s not forget about hygiene – dried glue near your food is a big no-no.
So how do you tackle this squeeze out situation? Timing and technique are key. As soon as you notice the excess glue, grab a damp cloth or sponge and wipe it away. The moisture from the cloth will soften the glue, making it easier to remove. Remember, don’t just spread the glue around – that will only make things messier.
For larger amounts of squeeze out, a plastic scraper or putty knife can come to the rescue. Gently scrape away the excess glue, being careful not to damage the surface of your cutting board. Scrape at an angle rather than against the wood grain to minimize potential scratching.
If stubborn glue residue remains, it may be time to bring in a solvent or adhesive remover. However, exercise caution here – choose a solvent that won’t damage or discolor your wood. Always test it on an inconspicuous area before proceeding.
Once you’ve successfully cleaned up the squeeze out, allow the remaining glue inside the joints to dry before moving on to the next steps in your cutting board assembly. The drying time can vary depending on factors like humidity and temperature, so consult the manufacturer’s instructions for specific guidance.
XXrNi_cWcjY” >
Conclusion
When it comes to glueing up a cutting board, patience is key. You don’t want to rush the process and end up with a weak bond or uneven surface. So, how long should you leave a cutting board glue up? Well, the general rule of thumb is to let it dry for at least 24 hours. This allows the glue to fully cure and ensures a strong and durable bond.
Depending on the type of glue you’re using and the temperature and humidity in your workspace, you may need to extend this drying time. Some glues require longer curing periods, especially if they are water-based or have a slower drying time. It’s always best to check the manufacturer’s instructions for specific guidance.
Now, I know waiting can be tough when you’re eager to start using your new cutting board. But trust me, it’s worth it. Giving the glue enough time to dry properly will prevent any potential issues down the road. Plus, it’s better to be safe than sorry when it comes to something as important as food safety.
So, while 24 hours is a good starting point, don’t be afraid to give your cutting board even more time if needed. The last thing you want is for all your hard work to go to waste because you rushed through the glue-up process.
In conclusion, be patient and allow your cutting board glue-up ample time to dry. Follow the manufacturer’s instructions and consider factors like glue type and environmental conditions. By doing so, you’ll ensure a sturdy and reliable cutting board that will serve you well in all your culinary adventures.