Hey there, fellow crafters and DIY enthusiasts. Are you ready to take your adhesive game to the next level? If you haven’t tried E6000 precision tips yet, then buckle up because you’re in for a treat. This industrial-strength adhesive is a game-changer, and with the precision tips, you’ll have even more control over your projects.
Now, let’s be real – using E6000 precision tips isn’t as simple as squeezing glue out of a tube. It takes some practice and finesse to master, but trust us when we say it’s worth it. With these tips, you can create perfectly-placed dots, lines, and even reach those pesky nooks and crannies that regular glue can’t touch.
In this post, we’ll guide you through the basics of how to use E6000 precision tips. We’ll cover everything from preparing your workspace to selecting the right tip for your project. Plus, we’ll share some pro-tips on how to achieve the best results possible.
So whether you’re a crafting newbie or an experienced pro, there’s something in this post for everyone. Get ready to unleash your creativity with E6000 precision tips – trust us; your projects will thank you.
What is E6000 Precision Tip?
Contents
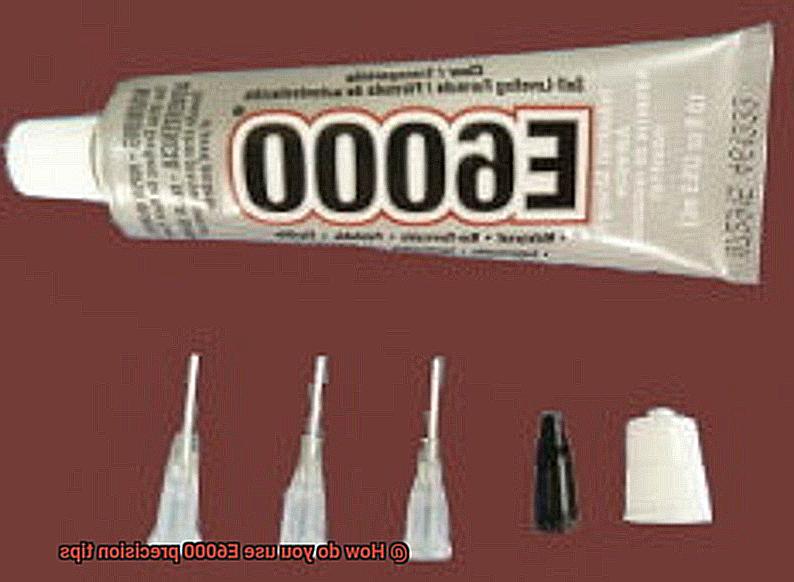
E6000 adhesive is a popular choice in many industries due to its strong bonding capabilities, versatility, and durability. However, if you’re tired of messy glue spills ruining your projects, the E6000 Precision Tip is the solution you’ve been looking for.
This nozzle attachment is specifically designed to fit onto the E6000 adhesive tube, allowing for precise and controlled application. The small opening of the precision tip controls the amount of adhesive being dispensed, ensuring that you get just the right amount without any excess spilling over. This makes it ideal for projects that require accuracy, such as jewelry making, DIY repairs, and crafting.
Attaching the precision tip to your adhesive tube is easy – simply screw it onto the nozzle and gently squeeze to get the glue flowing. It’s important to apply gentle but steady pressure to ensure a consistent flow of glue and prevent clogging.
One thing to note is that the E6000 Precision Tip isn’t a separate product but an attachment that can be purchased separately or included in some E6000 adhesive packages. It’s recommended that you use a new precision tip with each new tube of adhesive for optimal performance.
To ensure that your precision tip lasts as long as possible, be sure to clean it regularly by wiping it with a damp cloth or tissue after each use. You can also use a fine wire or toothpick to clear any dried glue from the tip.
How to Attach the Precision Tip?
If you’re looking to achieve precise and accurate glue application for your crafting projects, the E6000 glue with a precision tip attachment is the perfect solution. Attaching the precision tip to your glue tube may seem intimidating, but with these simple steps, you’ll be able to do it with ease.
Step 1: Remove the Cap
To attach the precision tip, first, remove the cap from your E6000 glue tube. This will expose the nozzle where the precision tip will attach.
Step 2: Screw on the Precision Tip
Take the precision tip and screw it onto the top of the tube where the cap was. Ensure that you tighten it securely, but not too tight, as this could lead to damage or breakage of the tip.
Step 3: Check for a Secure Fit
To ensure that the precision tip is securely attached, gently twist it after screwing it in place. If it feels tight and secure, then you’re good to go.
Step 4: Use with Care
When using the precision tip, apply gentle and steady pressure to get a consistent flow of glue. Applying too much pressure can cause spills or too little pressure can prevent smooth glue flow.
Step 5: Clean Regularly
After each use, wipe down the precision tip with a damp cloth or tissue to prevent any leftover glue from clogging up the tip. You can also use a fine wire or toothpick to clear any dried glue.
Squeezing the Glue Tube for Proper Flow
Crafting is all about precision and accuracy, and having the right tools can make all the difference in achieving your desired outcome. When it comes to using E6000 glue with precision tips, knowing how to properly squeeze the glue out of the tube can be crucial for optimal flow and accurate application.
To start, ensure that the precision tip is securely attached to the tube. This can be done by following the easy steps outlined in our previous section content. Once that’s done, gently squeeze the tube from the bottom up towards the tip. Applying too much force or squeezing too quickly can cause air bubbles and uneven flow. Instead, use a gentle and steady motion to ensure that the glue flows smoothly through the precision tip, allowing for precise application without any mess or waste.
Storing the tube upside down when not in use is another helpful tip to consider. This simple technique can prevent air bubbles from forming in the glue, which can affect its flow and consistency. Wiping off any excess glue that may accumulate on the precision tip after use is also important. Over time, excess glue can harden and clog the tip, making it difficult to achieve precise application.
In summary, follow these simple steps to get the most out of your E6000 precision tips:
- Securely attach the precision tip to the tube.
- Gently squeeze the tube from bottom to top with a slow and steady motion.
- Store the tube upside down when not in use.
- Wipe off any excess glue from the precision tip after use.
Applying Pressure Correctly
Look no further than applying pressure correctly when using E6000 precision tips. As an expert in this area, let me walk you through some key steps to achieving a long-lasting and reliable bond for all of your crafting and DIY projects.
To begin, it’s crucial to clean and dry the surfaces being bonded. Dirt, oil, or moisture can weaken the bond and cause it to fail. Once the surfaces are prepped, apply a small amount of E6000 adhesive to one surface using the precision tip. Be cautious not to use too much glue as this can actually make the bond weaker.
Next, press the two surfaces together firmly and maintain pressure for at least 24 hours. This may mean utilizing clamps, weights, or tape to hold the surfaces together while the glue sets. Remember to avoid any movement or stress on the bond during this time as it can cause it to break before it has fully cured.
It’s important to keep in mind that E6000 adhesive can take up to 72 hours to fully cure. During this time, avoid exposing the bond to water or extreme temperatures. By following these simple steps and allowing ample time for curing, you can achieve a strong and long-lasting bond for all of your crafting and DIY projects.
In summary, applying pressure correctly is vital when using E6000 precision tips. To ensure success, consider these tips:
- Clean and dry the surfaces being bonded
- Use a small amount of glue
- Press surfaces together firmly
- Maintain pressure for at least 24 hours
- Avoid movement or stress on the bond during curing
- Allow ample time for curing (up to 72 hours)
Avoiding Clogging of the Tip
Don’t let it ruin your creative flow. As an expert, I’m here to provide you with some simple steps to prevent clogging of the tip.
First and foremost, after using the glue, always wipe off any excess glue from the tip. This easy step is crucial in preventing residue from drying up and clogging the tip. Use a clean cloth or tissue paper for this purpose.
Next, it’s vital to store your glue in an upright position with the cap tightly closed. This will prevent air from getting into the tube and drying out the glue inside, which can lead to blockage of the tip. So keep your glue safe and secure.
If you’re working on a project that requires frequent use of the glue, try to work in small batches. Dispense only a small amount of glue at a time and then wipe off any excess before capping the tube. This practice will prevent the glue from accumulating in the tip and causing blockage.
In case you notice that the tip is clogged, don’t panic. You can use a pin or needle to unclog it gently. However, be cautious not to poke too hard or too deep and damage the tip. Alternatively, you can use a toothpick or small wire brush to clean it.
Cleaning the Tip Regularly
If you’re anything like us, you know the frustration of dealing with clogged tips and dried-out glue in the middle of a project. But fear not, we have the solution – regularly cleaning the tip of your E6000 precision glue.
Why is this step so crucial, you ask? Well, when we use glue, it’s inevitable that some excess will get stuck to the tip. If left uncleaned, this residue can dry out and harden, rendering the glue useless for future projects. And let’s be real, nobody wants to waste their hard-earned money on a tube of glue that only lasts for one project.
So, here’s what you need to do. After each use, wipe off any excess glue from the tip with a cloth or paper towel. Then, dip the tip into a small amount of acetone or nail polish remover and gently wipe away any remaining residue. Just be sure to avoid getting any of the solution on your skin as it can be irritating.
But wait, there’s more. Once you’ve thoroughly cleaned the tip, replace the cap and store your glue in a cool, dry place. This will help prevent it from drying out over time and ensure that it’s ready for use whenever inspiration strikes.
Benefits of Using E6000 Precision Tips
E6000 Precision Tips are an essential tool for anyone who wants to achieve professional-level results in their adhesive projects. These precision tips are designed to fit snugly onto the end of your E6000 glue tube, providing more control and accuracy when applying glue. Here are five benefits of using E6000 Precision Tips:
- More precise application: With the fine tip of the E6000 Precision Tips, you can apply glue exactly where you need it. This is especially helpful when working on small projects or intricate designs where a small amount of glue needs to be applied. The precision tips allow for more accuracy and precision in your work.
- Better control: With the E6000 Precision Tips, you have better control over the amount of glue that is dispensed. This means you can apply just the right amount of glue needed for the project, reducing the risk of using too much glue, which can result in a messy and uneven application.
- Less waste: Using E6000 Precision Tips helps to reduce waste by allowing you to apply the glue exactly where you need it. With traditional nozzles, it can be challenging to control the amount of glue that comes out, which often leads to excess glue being applied. However, with E6000 Precision Tips, you can apply just the right amount of glue in the precise location, reducing waste and saving you money in the long run.
- Easy to attach and remove: The E6000 Precision Tips are easy to attach and remove from the adhesive tube. This means users can switch between different tips for different projects without having to purchase multiple tubes of adhesive, making it a cost-effective solution.
- Versatile: E6000 Precision Tips make it easier to apply glue in tight spaces or hard-to-reach areas. The tips are designed to fit onto the nozzle of the E6000 tube securely, allowing for greater flexibility when applying glue. This means that you can easily reach into small crevices or apply glue to hard-to-reach areas without getting your fingers or tools covered in glue.
Potential Problems with E6000 Precision Tips
E6000 precision tips are a popular choice for crafters due to their versatility and strong adhesive properties. However, there are some potential problems that may arise when using these precision tips. Here are five sub-sections detailing these potential problems and how to avoid them:
Clogging:
One of the most common issues with E6000 precision tips is clogging. This can occur when the glue dries in the tip, making it difficult to dispense the adhesive. To prevent this, it’s crucial to clean the tip thoroughly after each use by wiping it with a clean cloth or using a pin to remove any dried glue.
Over-application:
Another potential problem is applying too much glue, leading to messy and uneven results. It’s important to use the precision tip sparingly and apply only a small amount of glue at a time. Practicing on a scrap piece of material before applying the glue to your final project can also help avoid this issue.
Skin irritation:
E6000 adhesive can cause skin irritation, making it essential to wear gloves while working with the glue and ensuring proper ventilation in the workspace. Avoid contact with eyes and mouth, and wash hands thoroughly after use.
Odor:
The strong odor of E6000 adhesive may be bothersome to some individuals. To minimize the smell, work in a well-ventilated area or use a mask to cover your nose and mouth while working with the glue.
Proper storage:
Lastly, storing E6000 precision tips properly is crucial to prevent them from becoming damaged or unusable. The glue should be stored in a cool, dry place, and the cap should be tightly sealed after each use. If the tip becomes damaged or clogged beyond repair, it may need to be replaced with a new one.
5BPgTFxNo2U” >
Conclusion
As we conclude, E6000 precision tips are a must-have for anyone who wants to elevate their adhesive game. These tips offer unparalleled control, accuracy, and versatility when applying glue, enabling you to achieve professional-grade results in your projects. However, using these tips requires some finesse and practice to master.
To use E6000 precision tips effectively, attach them securely to the glue tube and apply gentle but steady pressure to get a consistent flow of glue. When not in use, store the glue tube upside down and wipe off any excess glue from the tip after each use to prevent clogging.
When using E6000 adhesive with precision tips, it’s essential to apply pressure correctly, clean the tip regularly, and avoid potential problems such as clogging, over-application, skin irritation, odor, and proper storage.
In summary, whether you’re working on jewelry making or DIY repairs or crafting projects that require accuracy and precision in your work, E6000 precision tips are an indispensable tool that can help you achieve optimal results.
With practice and patience, you can unleash your creativity with E6000 precision tips – trust us; your projects will thank you.