Welcome to our fabulous blog, where we’re all about hair extensions and everything that makes you feel like a total queen. Today, we’re tackling a problem that’s all too familiar for anyone who’s rocked glued-in hair extensions. Whether you’re a seasoned extension lover, a pro stylist, or just plain curious, we’ve got your back with the ultimate guide on how to remove those sticky strands.
Glued-in hair extensions have this magical power to give you length, volume, and that irresistible Hollywood vibe. But let’s be real here: taking them out can be a bit of a nightmare if you don’t know what you’re doing. Don’t panic though. In this post, we’ll walk you through each step of the process so you can bid adieu to your extensions in style.
Get ready to say goodbye to those gluey locks and hello to your natural tresses looking flawless. We’ve got all the expert tips and techniques up our sleeve that will leave your hair unharmed and totally gorgeous. So buckle up, because we’re about to dive into the wonderful world of hair extension removal.
Stay tuned for our next post where we’ll spill all the secrets on how to rock your natural hair like an absolute boss after removing those extensions. Trust us, it’s gonna be epic.
What are Glued-in Hair Extensions?
Contents
- 1 What are Glued-in Hair Extensions?
- 2 The Importance of Patience and Gentleness During Removal
- 3 Professional Assistance is Recommended
- 4 Step-by-Step Instructions for Home Removal
- 5 Additional Tips for a Successful Removal Process
- 6 Clarifying Shampoo to Remove Residue
- 7 Conditioning and Moisturizing the Hair After Removal
- 8 Avoiding Damage to Natural Hair and Extensions
- 9 Conclusion
Glued-in hair extensions, also known as fusion or bonded extensions, offer a seamless and natural-looking solution. In this comprehensive guide, we’ll explore the process of applying glued-in hair extensions, their advantages, and essential maintenance tips to keep your hair healthy and beautiful.
Application Process:
- Sectioning: A professional hairstylist will carefully divide your natural hair into small sections for precise application.
- Bonding: The stylist will attach individual extensions using a strong adhesive or glue, creating a secure and long-lasting bond. This delicate process requires expertise to ensure even distribution and proper attachment.
Advantages of Glued-in Hair Extensions:
- Natural Look: Glued-in extensions, whether made from human hair or synthetic fibers, blend seamlessly with your natural hair for a flawless finish.
- Styling Versatility: Once applied, you can style your hair as desired without fear of the extensions coming loose. From sleek updos to voluminous curls, the possibilities are endless.
- Longevity: With proper care, glued-in extensions can be worn for several months, making them a cost-effective investment.
Maintenance Tips:
- Use Sulfate-Free Products: Opt for shampoos and conditioners specifically designed for hair extensions to maintain the bond between your natural hair and the extensions.
- Gentle Detangling: When brushing or combing your hair, start from the ends and work your way up to prevent unnecessary breakage.
- Protect While Sleeping: Tie your hair in a loose braid or bun before bed to minimize tangling and pulling during sleep.
The Importance of Patience and Gentleness During Removal
Hair extensions have revolutionized the world of hairstyling, providing individuals with the ability to transform their look instantly. However, when it comes to removing glued-in hair extensions, exercising patience and gentleness is paramount to safeguarding both the natural hair and the extensions themselves. In this article, we will delve into the importance of these qualities during removal and offer valuable tips for a successful and damage-free process.
The Fragile Bond:
Glued-in hair extensions rely on an adhesive bond that must be handled with utmost care during removal. Rushing or being overly forceful can result in hair breakage, scalp irritation, or worse – bald spots. By embracing patience, we allow the adhesive to gradually loosen and soften, reducing the risk of damage.
Special Products for Safe Removal:
To ensure a gentle removal process, it is essential to employ specialized products designed specifically for hair extension removal. These products contain ingredients that effectively dissolve the adhesive without causing harm to the natural hair. By utilizing these tailored solutions, we can break down the adhesive bonds efficiently while preserving our hair’s health.
Preserving Extension Reusability:
Gentle removal not only safeguards our natural locks but also ensures that the extensions remain intact and reusable. Rough handling can lead to irreparable damage, rendering the extensions useless for future applications. By practicing patience and gentleness, we extend the lifespan of our beloved extensions and maximize their value.
Promoting Overall Hair Health:
The significance of patience and gentleness during removal extends beyond just preserving extensions; it also promotes overall hair health by minimizing stress on the scalp and follicles. Aggressive actions can weaken hair shafts, resulting in brittleness, split ends, or even progressive hair loss. By exercising extra care during removal, we maintain lustrous and resilient tresses.
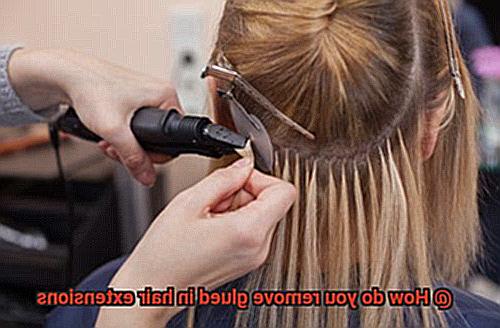
Professional Assistance is Recommended
If you’re considering removing those glued-in hair extensions, hold your scissors and hear us out. Professional assistance is the holy grail when it comes to glue removal. Don’t risk a hair disaster – let us explain why leaving it to the experts is a no-brainer. Sit back, relax, and discover why professional assistance is essential for safe and effective glued-in hair extension removal.
Specialized Tools and Products:
Imagine a professional hair extension technician armed with top-notch adhesive removers specially formulated for safe removal. These magical potions soften the glue without wreaking havoc on your natural hair or scalp. Trust us, grabbing kitchen scissors won’t cut it (pun intended). Professionals have access to the right tools and products that ensure a gentle and effective removal process.
Assessment and Tailored Methods:
Never underestimate the expertise of a pro. They assess your extensions’ condition and determine the best method for removal. From evaluating adhesive types to considering your hair’s health, they’ve got it covered. This personalized approach guarantees that your removal process fits your unique needs, minimizing risks or complications along the way.
Protection for Your Precious Locks:
We all adore our natural hair, right? Well, DIY removal attempts can put it at risk. Mishandling glued-in extensions can lead to breakage, thinning, or even permanent damage. Yikes. But fear not – professional technicians are trained in proper removal techniques that prioritize your hair’s health. They’ll ensure your tresses stay intact and fabulous.
Safety and Peace of Mind:
Let’s face it – removing glued-in extensions can be nerve-wracking. You may worry about damaging your hair or botching the process entirely. But with a professional by your side, you can cast those concerns aside. Their expertise provides safety and reassurance worth its weight in gold (or hair, in this case). Sit back, relax, and let them work their magic while you enjoy peace of mind.
Step-by-Step Instructions for Home Removal
If you’re ready to say goodbye to your glued-in hair extensions, but can’t make it to a professional, fear not. With the right tools, products, and a little patience, you can safely remove them at home. Get ready to embrace your natural locks again.
Step 1: Gather Your Tools
Before starting the removal process, gather all the necessary tools and products. You will need:
- Hair extension remover solution
- Rat tail comb
- Wide-tooth comb
- Spray bottle filled with water
- Clips to section off your hair
Step 2: Dampen the Extensions
Spray water onto the extensions to dampen them. This will help loosen the adhesive and make removal easier.
Step 3: Section Off Your Hair
Using the rat tail comb, gently separate a small section of hair near the scalp where the extensions are attached. Take your time and be careful not to pull or tug on your hair.
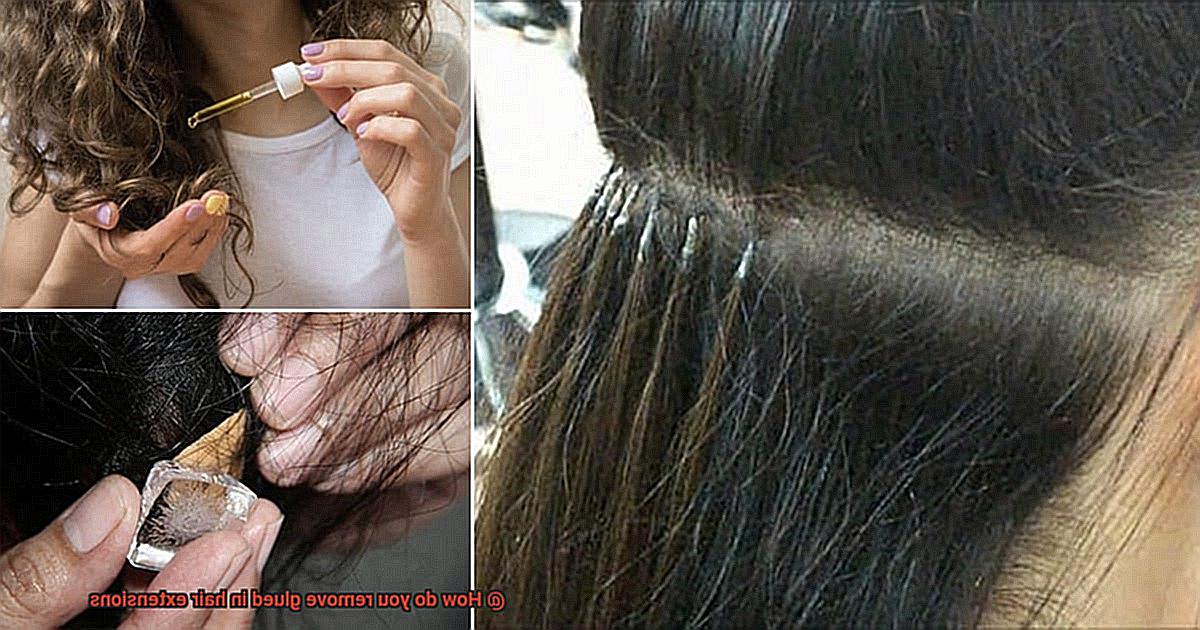
Step 4: Soften the Adhesive
Apply a small amount of the hair extension remover solution onto the glued area. Allow it to sit for a few minutes to soften the adhesive.
Step 5: Comb Through
Using the rat tail comb, carefully work through the section of hair, starting from the bottom and working your way up. Be gentle and patient to avoid damage or breakage. You’ll feel the extensions loosening as you comb through.
Step 6: Deal with Stubborn Areas
If you encounter stubborn areas, apply more of the remover solution and continue combing until all the extensions are completely detached.
Step 7: Detangle Natural Hair
Once all the extensions are removed, use a wide-tooth comb to gently detangle any knots or tangles in your natural hair. You can also use a leave-in conditioner or detangling spray to make this process easier.
Step 8: Wash and Refresh
After removing the extensions and detangling your hair, wash it thoroughly with a mild shampoo and conditioner. This ensures your hair is clean and free from adhesive residue.
Step 9: Air Dry or Use Low Heat
Allow your hair to air dry or use a diffuser on low heat to prevent heat damage. Avoid using styling tools or excessive heat immediately after removing the extensions.
Additional Tips for a Successful Removal Process
When it comes to removing hair extensions, using the right tools and techniques is essential for a smooth and successful process. Not only does this ensure that your natural hair remains undamaged, but it also helps to minimize any discomfort or pain during the removal. Here are some additional tips to help you achieve a successful removal:
Get the Right Tools
Having the right tools is crucial for a successful removal process. Make sure to have a quality adhesive remover, a wide-tooth comb, and some hair clips or bands to section off your hair. These tools will help make the process easier and more efficient.
A good adhesive remover will effectively break down the glue without causing any harm to your natural hair. Using a wide-tooth comb helps to gently separate the extensions from your natural hair, reducing the risk of breakage or damage.
Patience is Key
Removing glued-in hair extensions takes time, so be patient. Rushing or pulling too hard can lead to hair breakage or scalp discomfort. Take your time and work through each section carefully to avoid any mishaps.
If you encounter any stubborn spots where the glue is not coming off easily, apply more adhesive remover and let it sit for a bit longer. This allows the solution to fully penetrate the glue and dissolve the bond between the extensions and your natural hair.
Prepare Your Hair
Before starting the removal process, make sure to brush out any tangles or knots in your hair. Apply a generous amount of adhesive remover to the glued areas and let it sit for a few minutes to penetrate and loosen the bond. This will make it easier to remove the extensions without causing any damage to your natural hair.
Remove with Care
When removing the extensions, be gentle and cautious. You can gently slide a wide-tooth comb under the extensions to loosen them or use your fingers to carefully separate the glued sections. If needed, you can even cut small portions of the extensions to make removal easier. Always start from the bottom and work your way up to avoid any unnecessary tugging or pulling that can lead to hair breakage.
Proper Aftercare
Once the extensions are removed, it’s essential to take care of your natural hair. Use deep conditioning treatments to nourish and hydrate your hair after the removal process. Opt for sulfate-free shampoos and conditioners to avoid stripping your hair of its natural oils.
Avoid heat styling or excessive brushing until your hair has fully recovered from the extension process. This will help prevent any further damage and promote healthy hair growth.
Remember, if you encounter any difficulties or find it challenging to remove the extensions, it’s always best to seek professional help. They have the expertise and knowledge to safely remove your extensions without causing damage to your natural hair.
Clarifying Shampoo to Remove Residue
Say goodbye to that frustration because we have the ultimate solution for you – clarifying shampoo. In this article, we’ll explore how this specially formulated shampoo can effectively remove residue from your glued-in hair extensions, leaving your natural locks free and fabulous.
The Cleansing Powerhouse of Clarifying Shampoo:
Clarifying shampoo is a game-changer when it comes to tackling product buildup, oils, and other impurities in your hair. Unlike regular shampoos, clarifying formulas contain powerful ingredients that provide a deep cleanse, making them perfect for removing adhesive residue from glued-in hair extensions.
Step-by-Step Process:
- Wet your hair thoroughly and apply a generous amount of clarifying shampoo.
- Massage the shampoo into your hair, paying extra attention to the areas where the extensions are attached.
- Allow the shampoo to work its magic for a few minutes. This gives it time to break down and dissolve the stubborn adhesive residue.
- Rinse your hair thoroughly with warm water to wash away all traces of the shampoo and residue. Repeat this process if necessary, depending on the severity of the residue.

Post-Shampoo Tender Loving Care:
While clarifying shampoos are effective in removing residue, they can be drying to your hair. To restore moisture and nourishment, follow up with a moisturizing conditioner or treatment. This step is crucial for maintaining healthy, luscious locks.
Seek Professional Guidance:
Before attempting to remove glued-in hair extensions on your own, it’s always best to consult with a professional hairstylist or extension specialist. They can assess your specific situation and provide personalized advice on the best products and techniques for removal.
Conditioning and Moisturizing the Hair After Removal
Removing glued-in hair extensions can take a toll on your natural hair, leaving it dry and damaged. But fear not. With the right conditioning and moisturizing techniques, you can breathe life back into your locks. In this comprehensive guide, we’ll explore the best methods for restoring your hair’s health and vitality after extension removal. Get ready to unleash the lusciousness.
Step 1: Indulge in Deep Conditioning
- Look for a deep conditioning treatment designed for damaged or chemically treated hair.
- Generously apply the conditioner to the mid-lengths and ends of your hair, where the extensions were attached.
- Let the conditioner work its magic for the recommended time (usually 5-10 minutes), allowing it to penetrate and hydrate every strand.
- Rinse thoroughly with lukewarm water to remove any residue.
Step 2: Quench Your Hair’s Thirst with Moisturizing Treatments
- Opt for leave-in conditioners or hair oils enriched with argan oil, coconut oil, or shea butter — ingredients renowned for their moisturizing properties.
- Rub a small amount of the moisturizer between your palms and gently distribute it through your damp hair, focusing on the ends.
- Be mindful not to overload your roots, as this can weigh down your hair and leave it looking greasy.
Step 3: Style Smartly and Maintain Properly
- Shield your strands from heat damage by applying a heat protection product before using hot styling tools, and minimize heat styling whenever possible.
- Establish a regular hair care routine that includes gentle cleansing, conditioning, and moisturizing to keep your natural hair healthy.
Top Tips:
- Seek professional guidance before attempting removal yourself, ensuring personalized advice from experts who understand your unique needs.
- Consult a hairstylist for recommendations on deep conditioning treatments and moisturizers tailored to your hair type.
- Steer clear of products containing harsh chemicals or sulfates, which can further strip moisture from your hair.
- Pamper your hair with a weekly hair mask or hot oil treatment to provide extra hydration and nourishment.
- Protect your precious tresses at night by sleeping on a satin or silk pillowcase, preventing friction and breakage.
Avoiding Damage to Natural Hair and Extensions
It’s an excellent decision, my beautiful friend. But before you embark on this transformative journey, let’s ensure you know how to remove those extensions without causing any damage. Your precious locks will thank you later.
- Lay a Solid Foundation: It all starts with proper application. Choosing a skilled professional who knows their way around glue is crucial. If your extensions weren’t applied correctly in the first place, removing them can turn into a nightmare.
- Arm Yourself with the Right Tools: To safely remove glued-in extensions, you’ll need a specialized extension glue remover or solvent. These magical potions dissolve the adhesive without wreaking havoc on your natural hair. Remember, less is more. Follow the instructions carefully and use only the recommended amount.
- Handle with Tender Loving Care: No rough treatment allowed. Treat your strands like delicate flowers during the removal process. Avoid pulling or tugging, as it can result in breakage and tears (and not the good kind.). Instead, gently loosen the adhesive and slide those extensions out.
- Patience is Key: Rome wasn’t built in a day, and neither should your hair be rushed through the removal process. Take your time, darling. Slow and steady wins the race when it comes to avoiding damage and preserving your natural hair’s integrity.
- Seek Professional Assistance: If you feel unsure or simply want that extra peace of mind, don’t hesitate to seek professional help. An experienced stylist can remove your extensions safely, ensuring your natural hair remains unscathed.
- Shower Your Natural Hair with Love: After removing those extensions, pamper your natural hair with deep conditioning treatments and regular trims. This will help restore any damage that may have occurred during the removal process. Your hair will bounce back stronger than ever.
Remember, preventing damage isn’t just about removing extensions safely; it’s a lifestyle. Proper maintenance and regular visits to your stylist are essential for maintaining both your natural hair and extensions.
jCfr7Ubzi2Y” >
Conclusion
Removing glued in hair extensions can be a daunting task, but with the right technique and patience, you can achieve success.
To begin, carefully apply a generous amount of adhesive remover to the bonded area. Allow it to sit for a few minutes, allowing the product to break down the glue.
Gently loosen the extensions using a fine-tooth comb or your fingers, being careful not to pull or tug too hard. Slowly work your way up from the ends towards the roots until all extensions are free.
Once removed, cleanse your natural hair thoroughly to remove any residue left behind.