Sick of your laminated surfaces looking like they’ve gone through a hurricane?
Want to keep your laminated furniture looking fly? Well, you’re in luck.
In this blog post, we’re spilling the beans on how to glue lamination like a boss. Whether it’s a swanky countertop, a snazzy floor, or a funky piece of furniture, laminates can take any space from drab to fab.
But let’s face it – life happens and sometimes those laminates start peeling or getting loose. No worries though.
Armed with the right tools, techniques, and a sprinkle of patience, you can easily stick that lamination back where it belongs and make it look flawless once again. So grab your glue gun and get ready for some serious lamination magic.
We’ll show you how to fix it up, reinforce it like a pro, and have you enjoying those slick surfaces in no time – no stress involved.
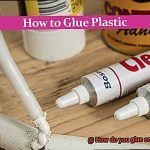
Types of Adhesives for Lamination
Contents
- 1 Types of Adhesives for Lamination
- 2 Preparing the Surfaces for Gluing
- 3 Applying the Adhesive
- 4 Aligning and Pressing the Materials Together
- 5 Curing and Drying Time
- 6 Tips and Tricks for Successful Lamination Glue Application
- 7 Common Mistakes to Avoid When Gluing Lamination
- 8 Benefits of Gluing Lamination
- 9 Conclusion
Get ready to dive headfirst into the exhilarating world of lamination. In this thrilling adventure, we will explore the different types of adhesives used for laminating materials. From the versatile PVA adhesive to the unbreakable bond of epoxy, we’ve got you covered.
PVA Adhesive – The All-Rounder:
When it comes to laminating paper-based materials like books or crafts, PVA adhesive is your trusty sidekick. With its water-based formula, it dries clear and non-toxic, making it a hero in the adhesive world. Picture an adhesive that’s flexible, easy to use, and sticks like a champ.
Epoxy Adhesive – The Unbreakable Bond:
For heavy-duty laminations that require industrial-strength durability, look no further than epoxy adhesive. This powerful adhesive boasts a two-component magic (resin and hardener) that creates bonds capable of withstanding anything – wood, metal, glass, plastic – you name it.
Contact Cement – Fast and Furious:
Sometimes you need an adhesive that works like a secret agent, operating with lightning speed. Enter contact cement. With its ability to form an instant bond when surfaces coated with this adhesive come in contact with each other, it’s perfect for big laminations or when you need that quick stick.
Spray Adhesive – Misty Marvels:
Imagine a fine mist of adhesive enveloping large areas effortlessly. Sound dreamy? Well, spray adhesives make dreams come true. These magical cans of convenience make lightweight laminations a breeze. Think paper, fabric, foam – all easily bonded with just a spray.
Hot Melt Adhesive – Glue Gun Goodness:
Have you ever witnessed the awe-inspiring glue guns in action? Well, they rely on hot melt adhesives. These solid sticks of glue transform into a liquid when heated, creating strong bonds in a flash. Perfect for packaging and crafting, hot melt adhesives are versatile and fast-acting.
Solvent-Based Adhesive – The Mysterious Marvel:
Last but not least, we have the enigmatic solvent-based adhesives. Formulated with solvents that evaporate during drying, they leave behind a mighty bond. Excellent for laminating flexible materials like vinyl or fabric, these adhesives can stick almost anything together.
Conclusion:
Now armed with adhesive knowledge, you’re ready to conquer the world of lamination. Remember to choose the right adhesive for your specific project, follow proper surface preparation techniques, and apply the adhesive with care. With these tips, you’ll be laminating like a pro in no time.
Preparing the Surfaces for Gluing
Today, we embark on a journey into the often overlooked realm of surface preparation for lamination. Get ready to tap into your inner adhesive expert as we unlock the secrets to achieving an unbreakable bond.
So, strap in and let’s dive right in.
Step 1: The Power of Cleanliness
Before we embark on our gluing adventure, it is paramount to ensure that our surfaces are pristine. We must banish any lingering dirt, dust, or debris using a clean cloth or a gentle detergent solution. Remember, a spotless surface sets the stage for a flawless lamination.
Step 2: Roughen Up for Success
To forge an indestructible union between the glue and the lamination, it’s time to add some texture. Gently sand the surfaces with fine-grit sandpaper, creating a roughened terrain that allows the glue to grip with tenacity. Smoothness is not our goal here.
Step 3: Dust Be Gone.
After sanding, we must eliminate any pesky particles that might sabotage our bonding triumph. Employ a trusty tack cloth or unleash compressed air to whisk away every trace of dust or residue. Don’t forget, a pristine surface is the secret ingredient for optimal adhesion.
Step 4: Primer or Sealer (When Necessary)
Some materials, like wood, have a notorious ability to absorb moisture from glue, leading to warping or other issues. In such cases, applying a primer or sealer saves the day. This step seals pores and provides an even surface primed for gluing.
Step 5: The Art of Glue Application
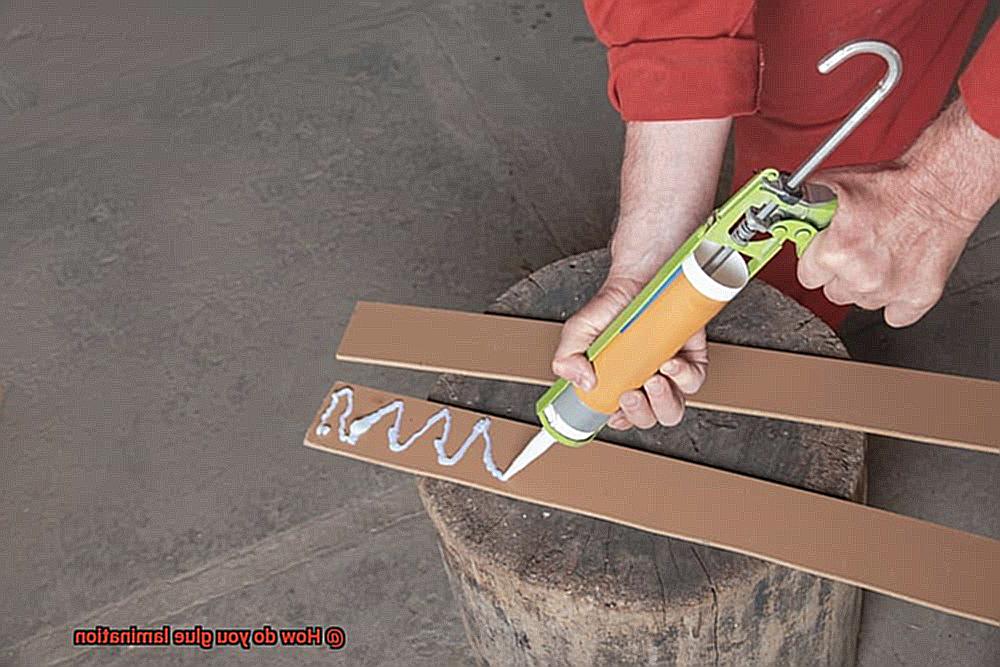
Ah, we’ve arrived at the moment you’ve been eagerly awaiting – gluing time. Select the ideal adhesive for your project and adhere to the manufacturer’s instructions with unwavering precision. Apply a uniform layer of glue on both surfaces to be laminated, ensuring complete coverage.
Step 6: The Perfect Union
Now comes the thrilling part – joining the surfaces together. Align the edges or corners of the laminates and exert firm pressure. This ensures impeccable contact between the surfaces, forging a bond that can withstand the test of time.
Step 7: Embrace Patience
Once the surfaces are united, we must maintain unwavering pressure until the glue dries completely. For larger laminations or materials prone to warping, enlist clamps or weights. Remember, my friends, patience is the key to a robust bond.
Step 8: Dance with Drying
Now, we must resist the urge to rush the drying process. Allow the glue to dry thoroughly according to the manufacturer’s instructions. Premature handling or further processing jeopardizes all our hard work.
Applying the Adhesive
When it comes to applying adhesive for lamination, it may seem like a simple task, but there are important steps to follow to ensure a strong and durable bond. In this comprehensive guide, we will walk you through the process, from selecting the right adhesive to cleaning up any excess glue.
- Choose the right adhesive: With a variety of adhesives available, it is crucial to select one that suits your needs. Solvent-based adhesives offer quick drying times, while water-based adhesives are more environmentally friendly. Pressure-sensitive adhesives instantly bond without the need for heat or pressure.
- Prepare the surfaces: Before applying adhesive, ensure that the surfaces are clean, dry, and free from dust or debris. Use a damp cloth or sponge to remove any dirt. Sand down any unevenness or imperfections on the surfaces to guarantee a smooth and even bond.
- Follow the manufacturer’s instructions: Different adhesives have specific temperature and humidity requirements for optimal performance. It is vital to read and adhere to the instructions provided by the manufacturer to achieve the best results.
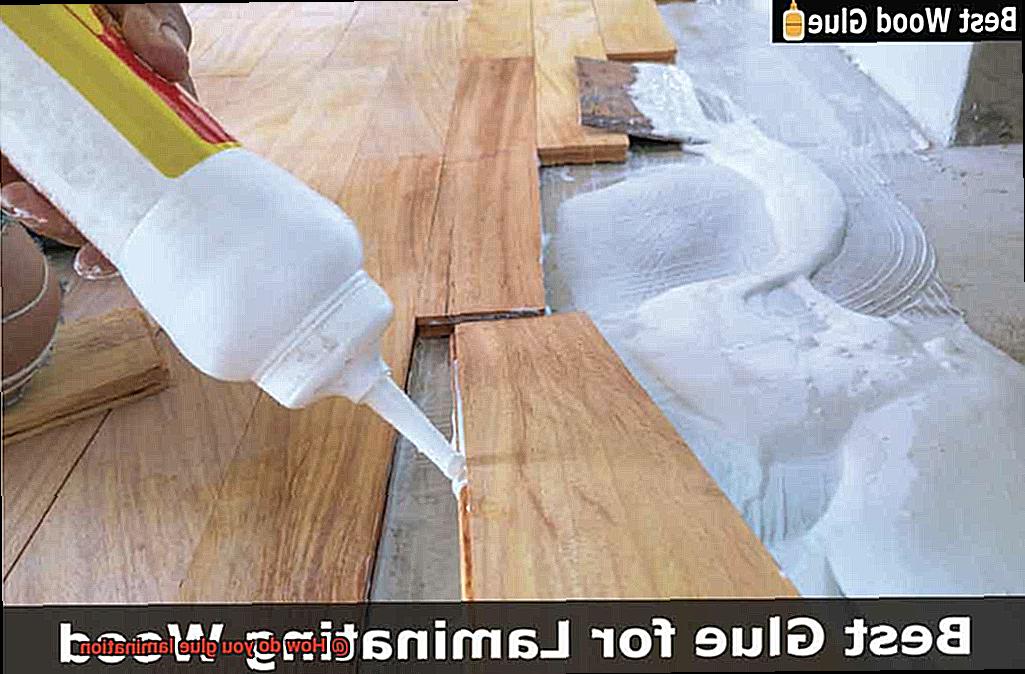
- Apply the adhesive evenly: Depending on the adhesive type, you may need to use a brush, roller, or spray to apply it. Ensure that you apply the adhesive in a thin and even layer, avoiding excess glue that can lead to uneven lamination.
- Join the laminates together: Align the edges of the laminates carefully and press them firmly together. Use a roller or brayer to apply even pressure across the entire surface. This step creates a strong bond between the laminates.
- Allow sufficient curing time: After joining the laminates, give them enough time to cure or dry. The curing time varies based on factors like temperature, humidity, and adhesive type. Rushing this step can result in weak bonds, so be patient and allow the adhesive to fully cure.
- Clean up excess glue: Finally, wipe away any excess glue that may have squeezed out during the lamination process. Use a damp cloth or sponge to gently clean the laminated surfaces without causing damage.
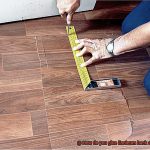
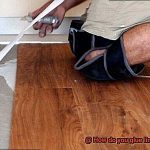
Aligning and Pressing the Materials Together
Today, we’re diving into the world of gluing materials together through aligning and pressing. Whether you’re a crafting enthusiast or a professional in the industry, mastering this technique is essential for creating a seamless and durable bond. So, grab your wand (or adhesive) and let’s get started.
First things first, preparation is key. Before you embark on the lamination process, take a moment to ensure that your materials are clean, dry, and free from any debris. Trust me, you don’t want any unexpected bumps ruining your masterpiece. Once your surfaces are pristine, it’s time to apply the adhesive.
Now, selecting the right adhesive is crucial for a successful lamination. Consider factors such as the materials you’re working with and their intended use. Once you’ve found the perfect adhesive match, apply a thin and even layer onto one surface of the materials. Remember, less is more – we don’t want any glue oozing out from the sides.
With the adhesive expertly applied, it’s time to align your materials like a pro. Take a moment to ensure that the edges match up perfectly by paying close attention to detail. For those perfectionists among us (myself included), using a ruler or straight edge can be a handy tool for achieving precise alignment.
To prevent any misalignment mishaps during the pressing process, guides or registration marks are your best friends. These little helpers can be temporary markings on the materials or fixed guides such as clamps or jigs. They keep everything in place and ensure that your creation stays on track.
Now comes the fun part – applying pressure. Take hold of your trusty roller or squeegee and evenly distribute pressure across the entire surface of your materials. This helps the adhesive spread evenly and creates a bond as strong as steel (or close enough). If you’re working with larger objects, placing weights on top can do the trick.
But wait. Before you admire your perfectly aligned and pressed masterpiece, remember to give it some time to cure. The adhesive needs time to work its magic and fully develop the bond. Check the manufacturer’s instructions for the recommended curing time – patience is a virtue, my friends.
Curing and Drying Time
In this blog post, we will explore the captivating realm of curing and drying time when it comes to gluing lamination.
Discover how temperature, humidity, material thickness, and adhesive type intertwine to create flawless and durable bonds.
So, grab your adhesive wand and let’s embark on this captivating journey.
Temperature:
The temperature in your workspace can work wonders or wreak havoc on your lamination project. Higher temperatures have an enchanting effect, accelerating both curing and drying processes. On the other hand, lower temperatures slow down these magical transformations. To ensure success, work in an environment with a temperature range recommended by the adhesive manufacturer. Avoid excessively hot or cold conditions, as they can cast a dark shadow on bond quality.
Humidity:
Humidity can be a mysterious force that either aids or hinders the evaporation process during lamination. High humidity levels can hold back the evaporation of solvents or water in the adhesive, causing delays in drying.
Consult the recommended humidity range provided by the adhesive manufacturer and strive to work within those limits. If the humidity is too high, create a favorable environment for drying by using dehumidifiers or fans to whisk away excess moisture.
Material Thickness:
The thickness of your materials is a crucial element that affects curing and drying times. Thicker materials require a more patient approach, as they demand longer curing and drying times to ensure a proper bond.
The adhesive needs time to penetrate and form a strong connection with each layer of material. Adjust your curing and drying times accordingly to achieve stunning results regardless of material thickness.
Adhesive Type:
Adhesive types possess their own unique charm when it comes to curing and drying characteristics. Each type has its own set of rules, so always follow the manufacturer’s instructions for the specific adhesive you are using.
Water-based adhesives hold a captivating secret: they require drying time for the water content to evaporate completely. Meanwhile, some adhesives contain solvents that lend a touch of mystery during application but need to be evaporated for the bond to fully set.
Tips and Tricks for Successful Lamination Glue Application
Lamination is a popular technique used to protect and enhance the appearance of various materials such as paper, fabric, or wood. Whether you’re laminating a school project or creating a professional presentation, successful glue application is crucial for achieving a strong and durable bond. In this blog post, we will explore the essential steps that will help you master the art of lamination glue application.
Choose the Right Glue:
The first step towards successful lamination is selecting the right glue. Consider factors such as the type of material you’re laminating, the level of durability required, and the drying time of the adhesive. Opt for adhesives specifically designed for laminating purposes to ensure a long-lasting bond.
For example, if you’re laminating a paper document, choose a PVA glue that is suitable for paper bonding. If you’re laminating fabric, opt for an adhesive specifically formulated for fabric lamination.
Prepare the Surfaces:
Proper surface preparation is key to a successful lamination. Clean both surfaces thoroughly to remove any dust, dirt, or grease using a mild detergent or solvent. Take care to remove any residue that may interfere with the bonding process.
Additionally, lightly sand smooth surfaces to create a rough texture that improves adhesive adhesion. This step ensures that the adhesive has a clean and receptive surface to bond with, enhancing its effectiveness.
Apply an Even Coat:
To achieve uniform adhesion, apply an even coat of glue on both surfaces using a brush or roller. Ensure that the glue is spread evenly across the entire surface area without excess buildup or gaps.
Avoid applying too much glue, as it can cause uneven bonding and result in warping or bubbling of the laminate. A thin and even coat of adhesive ensures a strong and seamless bond between the laminates.
Allow Proper Drying Time:
Following the manufacturer’s instructions regarding drying time and temperature requirements is crucial for successful lamination. Give sufficient drying time before pressing the laminates together to ensure proper alignment and avoid shifting or misalignment.
Rushing the process can compromise the bond and result in a weak lamination. Be patient and allow the adhesive to fully dry and cure before proceeding to the next step.
Use Proper Pressure:
Applying appropriate pressure during lamination is essential for a strong bond. Utilize clamps, weighted objects, or a laminating machine to distribute pressure evenly across the entire surface area. This helps eliminate air bubbles and gaps between the laminates, ensuring a smooth and seamless finish. Apply consistent pressure and check for any areas that may require additional pressure to achieve optimal adhesion.
Common Mistakes to Avoid When Gluing Lamination
Lamination is a great way to enhance the durability and appearance of materials, but gluing them together requires attention to detail. In this blog post, we will discuss the most common mistakes to avoid when gluing lamination. By understanding these pitfalls, you can ensure a successful lamination process and achieve professional-looking results.
Using the wrong type of glue:
Opting for regular glue or adhesive is a common mistake when laminating materials. Instead, choose a glue specifically designed for lamination, such as laminating adhesive or epoxy resin. These specialized adhesives provide the necessary strength and durability required for laminating materials.
Insufficient surface preparation:
Properly preparing the surfaces before applying the glue is crucial for a strong bond. Ensure that the surfaces are clean, dry, and free from any dust, dirt, or grease. Any contaminants on the surfaces can compromise the adhesion and weaken the lamination.
Applying too much or too little glue:
The amount of glue applied during the lamination process is critical. Applying too much glue can result in messy edges and excess squeezing out, while using too little glue may result in weak adhesion between the layers. Follow the manufacturer’s instructions for the recommended amount of glue to achieve optimal bonding.
Inadequate drying or curing time:
Rushing through the drying or curing process can lead to poor bonding and weak adhesion. It is important to follow the instructions provided by the manufacturer regarding the recommended drying or curing time for the specific type of glue being used. Patience is key to achieving a strong and durable lamination.
Ignoring temperature and humidity conditions:
Temperature and humidity levels can significantly impact the lamination process. Extreme temperatures or high humidity can interfere with the gluing process and compromise the quality of the lamination. Work in an environment with stable temperature and humidity conditions to ensure consistent results.
Applying uneven pressure:
Uneven pressure during lamination can result in uneven bonding and the formation of lumps or bubbles in the finished product. Use a roller or a press to apply even pressure across the entire surface, depending on the size of the lamination. This will ensure a smooth and consistent bond between the layers.
Not allowing for proper ventilation:
Some glues emit fumes during the drying or curing process, which can be harmful if inhaled. It is essential to work in a well-ventilated area to avoid any potential health risks. If necessary, wear a mask or work in an area with proper ventilation to protect yourself.
Benefits of Gluing Lamination
In this blog post, we will delve into the advantages of using glue for lamination and explore why it is the superior choice for your laminated materials. Whether you are a DIY enthusiast or a professional seeking high-quality laminated products, understanding these benefits will empower you to make informed decisions and achieve flawless results in your lamination projects.

Enhanced Durability:
Say goodbye to flimsy laminations. Gluing lamination offers unparalleled durability to your laminated materials. The adhesive used in the gluing process creates a Herculean bond between the layers, making your items resistant to tearing, peeling, and other forms of damage. Embrace the strength that gluing lamination brings and enjoy long-lasting results that withstand the test of time.
Increased Stability and Rigidity:
Stability is the backbone of any successful lamination project. Glued lamination guarantees that your layers stay firmly bonded together, eliminating any possibility of shifting or separation. Even under heavy use or stress, your laminated items retain their shape and structure, unfazed by the demands placed upon them. Bid farewell to worries about your laminations coming undone.
Improved Appearance:
Prepare to elevate aesthetics to new heights with glued lamination. The adhesive used in this process acts as a magician’s wand, filling any gaps or imperfections between the layers and leaving behind a surface that is smooth and seamless.
No more unsightly air bubbles or wrinkles that tarnish the appearance of your laminated materials. With glued lamination, your final product exudes a polished and professional charm.
Better Protection:
Moisture and environmental factors can unleash havoc on laminated items. Fear not, for glued lamination stands as an impenetrable shield. The adhesive forms a protective barrier that repels water, dirt, dust, and other contaminants from infiltrating your laminated materials. Whether you need outdoor signage or documents that can withstand spills or humidity, glued lamination keeps your important belongings safe and secure.
Easier Handling and Processing:
Navigate the world of laminated materials with ease through glued lamination. The adhesive ensures that the layers remain securely bonded together throughout cutting, trimming, and other post-lamination processes. Delamination or damage become mere tales of the past, as manufacturers and end-users alike revel in the simplicity of working with glued lamination. Save time and effort while achieving impeccable results.
Extended Lifespan:
Harness the power of glued lamination to extend the lifespan of your laminated materials. The robust bond created by the adhesive prevents wear and tear, ensuring that your laminated items remain intact and functional for an extended period. From frequently used items to those exposed to harsh conditions, glued lamination bestows upon them the gift of longevity. Embrace the endurance of your laminations.
BwrcrkN_VgU” >
Conclusion
The process of gluing lamination requires careful attention and precision. To achieve a strong bond, it is essential to follow the correct steps and use the right adhesive. Here are some tips on how to glue lamination effectively.
Firstly, ensure that the surface you are working with is clean and free from any debris or dust. This will allow the adhesive to adhere properly and create a solid bond.
Next, choose an appropriate adhesive for your lamination project. There are various types available, such as epoxy, cyanoacrylate (super glue), or polyurethane-based adhesives. Consider factors like the materials being laminated and the desired strength of the bond when selecting an adhesive.
Before applying the adhesive, it is advisable to test it on a small area to check compatibility and ensure it does not damage or discolor the lamination material.
Once you have selected your adhesive, apply a thin layer evenly onto one side of the lamination material using a brush or applicator. Be sure not to use too much adhesive as this can result in excess seepage or uneven bonding.
After applying the adhesive, carefully align and press together the two pieces of lamination material. Use firm pressure to ensure proper contact between them.
To further enhance the bond, consider using clamps or weights to keep the laminated pieces in place while the adhesive cures. This will help prevent any shifting or movement that could compromise the integrity of the bond.
Allow sufficient time for the adhesive to cure according to the manufacturer’s instructions before handling or applying any stress on the laminated material. Rushing this step may result in a weak bond that could easily come apart.
In conclusion, gluing lamination requires attention to detail and choosing an appropriate adhesive for optimal results.