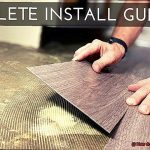
Laminates are the superheroes of home design, offering durability, versatility, and style. From sleek kitchen countertops to trendy office furniture, laminates have become a go-to choice for many. But what happens when you need to join two laminate surfaces seamlessly? That’s where the art and science of gluing laminate to laminate come in.
Gluing laminate to laminate may seem like a walk in the park, but it requires careful consideration and the right techniques for a strong bond that stands the test of time. In this guide, we’ll take you through each step of the process, reveal the essential materials and tools, and share expert tips for flawless results.
From creating a level playing field to choosing the perfect adhesive for your project, we’ll cover every aspect of gluing laminate to laminate. Whether you’re a DIY enthusiast or a seasoned pro looking for that perfect finish, get ready to dive into the world of laminate gluing and unlock the secrets to achieving an impeccable bond.
So let’s roll up our sleeves and embark on this bonding adventure together. Get ready to create a durable, visually stunning connection between your laminates that will leave everyone in awe.
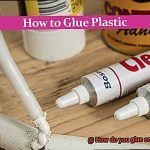
Choosing the Right Adhesive
Contents
Choosing the right adhesive is crucial for a successful and long-lasting bond when laminating laminate. With various options available, it can be overwhelming to determine which adhesive is best for your project. In this guide, we will explore different types of adhesives and provide tips on how to choose the right one for your specific needs.
Types of Adhesives:
- Contact Cement: Known for its instant bond, contact cement is ideal for projects that require immediate adhesion, such as laminating countertops or cabinets. However, it requires careful application due to its strong odor and proper ventilation.
- Carpenter’s Glue (PVA glue): Carpenter’s glue offers a strong bond, easy cleanup, and good resistance to heat and moisture. It is suitable for laminating large surfaces but may take longer to dry compared to other adhesives.
- High-Temperature Adhesive: For projects that require high heat resistance, choose an adhesive specifically designed for high temperatures. These adhesives can withstand heat without compromising the bond.
- Water-Resistant Adhesive: Opt for a water-resistant adhesive when laminating surfaces in moisture-prone areas like bathrooms or kitchens. These adhesives offer protection against water damage.
- Flexible Adhesive: Select a flexible adhesive when laminating curved or uneven surfaces, as it allows for some movement without breaking the bond.
Choosing the Right Adhesive:
Consider the following factors when choosing an adhesive for laminating laminate:
- Type of laminate material: Different adhesives work better with specific laminate materials. Check with the manufacturer for compatibility.
- Intended use of the laminated surface: Consider environmental conditions like heat, moisture, or chemicals that the laminate will be exposed to. Choose an adhesive that offers the necessary resistance.
- Application method: Some adhesives require specific application techniques, such as brushing or rolling. Ensure you have the necessary tools and skills for proper application.
- Manufacturer’s recommendations: Always follow the adhesive manufacturer’s instructions for best results.
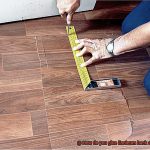
Preparing the Surfaces
In this guide, we will explore the crucial steps involved in achieving a durable and long-lasting bond between laminates. So put on your safety goggles and let’s delve into the fascinating process of preparing surfaces for laminate bonding.
Cleanliness is Crucial:
Before embarking on your laminate bonding journey, it is vital to ensure that both surfaces are impeccably clean. Dust, dirt, or grease can create barriers between the adhesive and the laminates, compromising the strength of the bond. To achieve cleanliness perfection, wipe down the surfaces with a mild detergent or specialized laminate cleaner.
Roughening for Enhanced Adhesion:
To boost adhesion, a touch of roughening is required. Armed with fine-grit sandpaper, gently sand the laminate surfaces in a circular motion. This step creates a slightly textured surface that allows the adhesive to grip more effectively. After sanding, remove any debris or dust particles using a vacuum cleaner or soft brush.
Selecting the Right Adhesive:
Now comes the exciting part – choosing and applying the adhesive. There are various types available, such as contact cement or adhesive sheets. The selection depends on your preferences and the manufacturer’s recommendations. Remember, less is more when it comes to adhesive application; a thin, even layer is all you need.
Allowing Tacky Time:
After applying the adhesive, exercise patience and let it become tacky. This waiting period allows the adhesive to achieve its optimum stickiness level. Refer to the manufacturer’s instructions for specific drying times as they can vary depending on the type of adhesive used.
Uniting the Laminates:
Once the adhesive is appropriately tacky, it’s time for the grand union of our laminates. Apply even pressure using a roller or laminate press to ensure full contact between the surfaces and the adhesive. Too little pressure may result in weak spots, while excessive pressure can damage the laminates. Find that perfect balance.
Embracing the Curing Process:
Resist the temptation to test the bond immediately. Allow sufficient curing time for the adhesive to fully bond with the laminates. This duration varies depending on the type of adhesive used, so consult the manufacturer’s instructions for guidance. During this crucial period, avoid any stress or movement that could jeopardize the bond.
Applying the Adhesive
Join us on an intriguing journey into the world of laminate bonding. Brace yourself for an exploration of the intricate process involved in applying adhesive to seamlessly glue laminate to laminate. We’ll unravel the mysteries behind creating an unyielding and long-lasting bond, all while maintaining a casual, professional, and engaging tone. Let’s dive in and unlock the secrets together.
Choosing the Perfect Adhesive:
- Different types of laminates necessitate specific adhesives.
- Factors like desired bond strength and environmental conditions must be considered when selecting the adhesive.
- To ensure optimal results, consult professionals or adhere to the manufacturer’s recommendations for adhesive selection.
Preparing the Surfaces:
- Cleanliness is paramount. Ensure both laminates are immaculate, dry, and devoid of any dust or debris.
- Gently roughen the surfaces using sandpaper, enhancing adhesion and promoting a flawless bond.
Contact Cement: The Expedient Bonding Solution:
- Using a brush or roller, apply a thin and even layer of contact cement to both laminates.
- Abide by the manufacturer’s instructions regarding drying time.
- Once dry to the touch, meticulously align the laminates and exert firm pressure during bonding.
- Bear in mind that contact cement bonds rapidly and cannot be repositioned once contact is made.
Epoxy Resin: The All-Purpose Adhesive:
- Follow the manufacturer’s instructions to mix epoxy resin and hardener correctly.
- Utilize a brush or spatula to apply a thin layer of mixed epoxy resin onto both laminates, ensuring comprehensive coverage.
- Carefully align the laminates and firmly press them together.
- Allow ample time for curing before subjecting the laminates to stress or load, ensuring an unshakeable bond.
Joining the Laminate Pieces Together
Joining laminate pieces together may initially seem like a daunting task, but fear not. With the right adhesive and proper application techniques, you can achieve a bond that will endure the test of time. So, let’s dive into the captivating world of laminate bonding.
First things first, we must prepare our laminate surfaces. Give them a thorough cleaning to remove any dirt, dust, or grease that could sabotage the adhesive’s performance. A dirty surface is like a treacherous slope for a successful bond, so make sure to give it a good scrubbing.
Next, let’s add some texture to the surfaces by gently roughening them with sandpaper. This creates an inviting surface for the adhesive to grip onto, ensuring a formidable bond. Just a touch of sanding will do the trick.
Now it’s time to introduce our adhesive ally. A high-quality contact adhesive will be our best friend throughout this endeavor. Follow the manufacturer’s instructions carefully and apply a thin and even layer of adhesive to both laminate surfaces. You can use a brush or roller for this step, whichever floats your boat.
Once the adhesive has been applied, exercise patience and allow it to dry for a specified period of time. This allows it to become delightfully tacky and ready for bonding. Patience is key here, my friends.
Now comes the enchanting moment – joining the laminate pieces together. Carefully align them and press firmly along the entire surface. By applying even pressure, we ensure that the adhesive spreads evenly and forms an unbreakable bond. To assist in this endeavor, you can use a laminate roller or a wooden block wrapped in a cloth to press down evenly and banish any pesky air bubbles.
After joining the pieces, we must secure their union by clamping them firmly in place for a specific period of time. This final step allows the adhesive to fully cure, creating an unyielding bond between the laminates. The clamping time may vary depending on the adhesive used, so consult your adhesive’s instructions for guidance.
Lastly, let’s tidy up any excess adhesive that may have oozed out during the joining process. A solvent recommended by the adhesive manufacturer should do the trick. A clean and pristine finish is the cherry on top of your laminate bonding adventure.
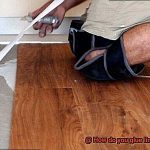
Applying Pressure to Achieve a Strong Bond
In this remarkable article, we will dive headfirst into the art of applying pressure to forge an unbreakable connection when gluing laminate to laminate. With ingenious techniques and the right tools at your disposal, you can create a bond that defies the ravages of time.
The Mighty Force of Pressure
Applying pressure is the cornerstone of eliminating air bubbles and bridging gaps between laminate surfaces, ensuring a steadfast and resilient bond. Let’s embark on an exploration of diverse methods to achieve this feat:
Clamps and Weights
One approach that reigns supreme is the strategic deployment of clamps or weights. Once the laminate pieces are united with adhesive, strategically position clamps along the edges, gripping them tightly in a symphony of force.
This symmetrical pressure distribution envelops the entire surface, guaranteeing a harmonious and unwavering bond. Alternatively, if clamps are scarce, bestow upon your laminate kingdom the weighty presence of books or bricks.
These steadfast allies can be positioned across the surface, their influence evenly distributed like guardians protecting a sacred realm.
Roller or Brayer
Behold the magic of a roller or brayer specifically crafted for laminates. As it glides across the surface, it bestows upon it an even pressure, vanquishing any lurking air bubbles or crevices.
This enchanting technique ensures seamless adhesion and imparts a velvety smoothness to your creation.
Unleashing Inner Strength
In addition to external pressure, internal fortitude can be harnessed to forge an indomitable bond. Let us delve deeper into this realm:
Vacuum Press or Vacuum Bag
Venture forth into the realm of vacuum press or vacuum bag, where the invisible hand of pressure reigns supreme. Place your laminate pieces within this ethereal vessel and, with the aid of a vacuum pump, usher out the air that dares to challenge your bond.
As the air dissipates, an oasis of pressure is created, enveloping every inch of your laminate kingdom. In this vacuum embrace, voids are obliterated, ensuring a bond that is sturdy beyond measure.
Cleaning Up Any Excess Adhesive
Today, we delve into the final step of creating a flawless laminate installation – cleaning up any excess adhesive.
Don’t fret if mistakes happen, because with our expert tips and tricks, you’ll conquer any sticky situation and achieve a jaw-dropping professional finish. Let’s dive in.
Act Swiftly, Clean Efficiently:
Time is of the essence when it comes to cleaning up excess adhesive. Act quickly to make removal easier. Grab a damp cloth or sponge and gently wipe the affected area. Remember, excessive moisture can harm the laminate, so avoid soaking.
Scrape with Care:
If the adhesive has hardened, fear not. Use a scraper or putty knife to scrape off the excess. Hold the tool at a slight angle to prevent scratches. With finesse, remove the adhesive without harming the laminate surface.
Solvents to the Rescue:
When all else fails, solvents save the day. Select a solvent designed for removing adhesive residue that is safe for laminates.
Test it on an inconspicuous area first. Apply a small amount using a clean cloth or sponge, allowing it to work its magic. Gently wipe away the softened adhesive.
Ventilation and Protection:
Always work in a well-ventilated area when using solvents – fresh air is your friend. Protect your hands by wearing gloves to prevent direct contact with the solvent.
Allowing Time for Curing
Glue, that seemingly simple tool, holds the power to create a bond that withstands the test of time. If you want a strong and durable connection between laminates, there’s one crucial step you can’t afford to overlook: allowing sufficient time for curing.
In this blog post, we will explore why curing time is vital in gluing laminate to laminate and provide valuable insights on how to achieve a flawless finish that stands the test of time.
Why is curing time important?
- Bond Strength: Rushing the curing process is a recipe for disaster. Adequate curing time ensures a bond of maximum strength and durability, giving your laminates the resilience they need.
- Adhesive Type: Different adhesives have varying curing times. To achieve optimal results, it’s crucial to follow the manufacturer’s instructions and recommendations specific to the adhesive you’re using—found on the packaging or technical data sheet.
- Environmental Factors: Temperature, humidity, and adhesive layer thickness influence curing time. To create an ideal setting for proper curing, maintain optimal environmental conditions. Adjust temperature and humidity levels and consider using dehumidifiers or heaters as needed.
- Preventing Bond Failure: Patience pays off when it comes to bonding success. Disturbing or applying stress on laminated surfaces before sufficient curing can lead to bond failure. Avoid excessive movement during the curing period to ensure a successful lamination.
- Post-Curing Enhancements: Some adhesives require additional post-curing steps, such as pressure or heat application, to further enhance bonding strength. Follow adhesive manufacturer recommendations for these steps to optimize results.
hUvTY6bFhSE” >
Conclusion
In conclusion, the process of gluing laminate to laminate requires careful consideration and the use of proper techniques to achieve a bond that is strong and long-lasting. The choice of adhesive is crucial, as there are several options available depending on your specific project needs.
Take into account factors such as the type of laminate material, intended use of the laminated surface, application method, and manufacturer’s recommendations when selecting an adhesive.
Preparing the surfaces is another vital step in ensuring a durable bond. Thoroughly cleaning the surfaces and roughening them with sandpaper will enhance adhesion and promote a flawless connection. It’s also essential to apply the adhesive correctly. Whether you opt for contact cement or epoxy resin, following the manufacturer’s instructions for application and drying times is paramount.
Applying pressure plays a key role in achieving a strong bond between laminates. Utilize clamps or weights, along with a roller or brayer, to eliminate air bubbles and ensure even pressure distribution. For more advanced techniques, consider using vacuum presses or vacuum bags to provide internal pressure for an unyielding connection.
Efficiently cleaning up any excess adhesive is crucial. Damp cloths or solvents designed specifically for removing adhesive residue should be used promptly. Finally, allowing sufficient time for curing is vital to ensure maximum bond strength and durability.
By following these steps and considering all necessary factors, you can achieve a flawless finish that will withstand the test of time when gluing laminate to laminate.