Tired of all that hard work you put into completing a puzzle, only to see it crumble into a million pieces? Well, worry no more, because today we’re diving headfirst into the world of gluing and preserving puzzles.
Whether you’re a puzzle pro or just someone who loves showing off their masterpiece, this blog post is your golden ticket. We’ll be exploring all the nifty techniques, insider tips, and clever tricks to make sure your precious puzzle stays intact for years to come.
So grab your trusty puzzle and get ready to unleash your inner glue guru as we unravel the secrets of how to glue and preserve a puzzle like nobody’s business.
Materials Needed
Contents
Puzzles are not mere pastimes; they are captivating works of art that deserve to be preserved and displayed. Whether you wish to immortalize a challenging puzzle you conquered or transform it into a unique decor piece, gluing and preserving your puzzle is the ultimate solution.
Join us on this preservation journey as we guide you through the step-by-step process, showcasing the essential materials needed to ensure your puzzle remains intact for years to come.
Step 1: Completing the Puzzle
Before delving into the gluing process, take a moment to admire your masterpiece and ensure every single piece is in its rightful place. Embrace the satisfaction of a completed puzzle before moving forward.
Step 2: Materials Preparation
Embark on this preservation adventure by gathering the following materials:
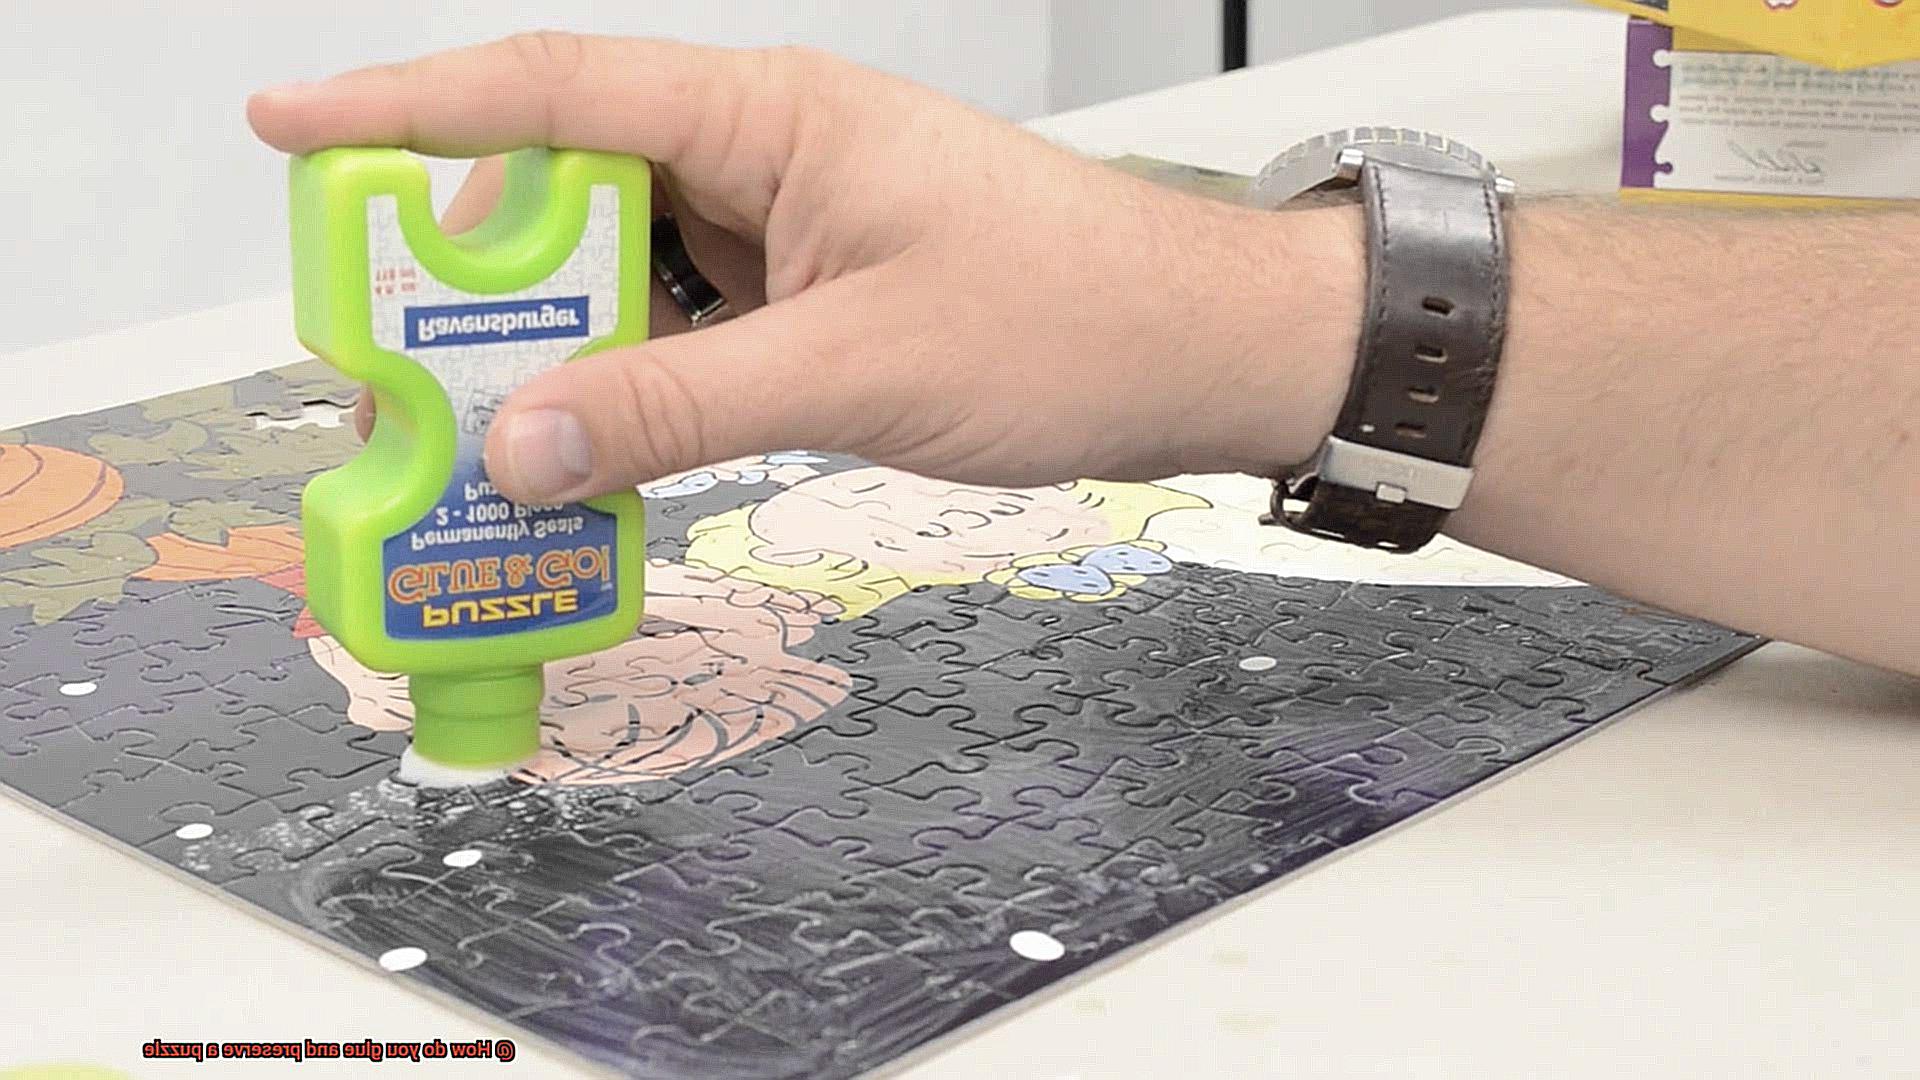
- Puzzle glue or puzzle conserver: Choose a high-quality, transparent adhesive specifically designed for puzzles. This glue will seamlessly hold your puzzle together without sacrificing its aesthetic appeal.
- Foam brush or sponge: Armed with a foam brush or sponge, you can effortlessly apply the glue or conserver evenly across the surface of your puzzle. Say goodbye to streaks and uneven coverage.
- Wax paper or plastic wrap: Shield your work surface from accidental sticking by placing wax paper or plastic wrap underneath your puzzle. Create an environment where artistry and preservation harmoniously coexist.
- Puzzle board or cardboard: Select a robust backing material, such as a puzzle board or cardboard, to provide unwavering support and stability for your preserved puzzle. Let it become a showcase for your masterpiece.
- Rolling pin or brayer: Harness the power of a rolling pin or brayer to firmly press the puzzle pieces onto the backing material, ensuring impeccable adhesion. Bid farewell to air bubbles and embrace optimal preservation.
- Gloves: Protect your hands from irritation and stickiness by donning disposable gloves. Maintain the sanctity of your puzzle with hands that are free from residue.
- Optional: Frame or display case: Elevate the presentation of your preserved puzzle by investing in a frame or display case that perfectly complements its dimensions. Let your masterpiece captivate all who behold it.
Completing the Puzzle
Now, it’s time to take your masterpiece to the next level and transform it into a captivating work of art. In this comprehensive guide, we will delve into the fascinating process of gluing and preserving your puzzle, unveiling the secrets that will make your creation stand the test of time.
Step 1: Mastering the Puzzle
Before we delve into the captivating world of gluing and preservation, let us first revisit the art of completing a puzzle. Begin by assembling the border or edge pieces, establishing a robust framework for your artistic endeavor.
Sorting the remaining pieces by color or pattern allows you to conquer one section at a time, adding depth and intrigue to your creation. Remember, a clean and clutter-free workspace is crucial to protect your puzzle from accidental damage or loss.
Step 2: Choosing the Perfect Glue
Now that your puzzle is complete, it’s time to select the glue that will preserve its beauty for years to come. Opt for specialized puzzle glue or adhesive sheets designed specifically for this purpose.
These expertly crafted products provide an unrivaled bond while ensuring no harm comes to the delicate surface of your puzzle. With user-friendly instructions accompanying most puzzle glue options, artists of all skill levels can effortlessly preserve their masterpiece.
Step 3: The Art of Application
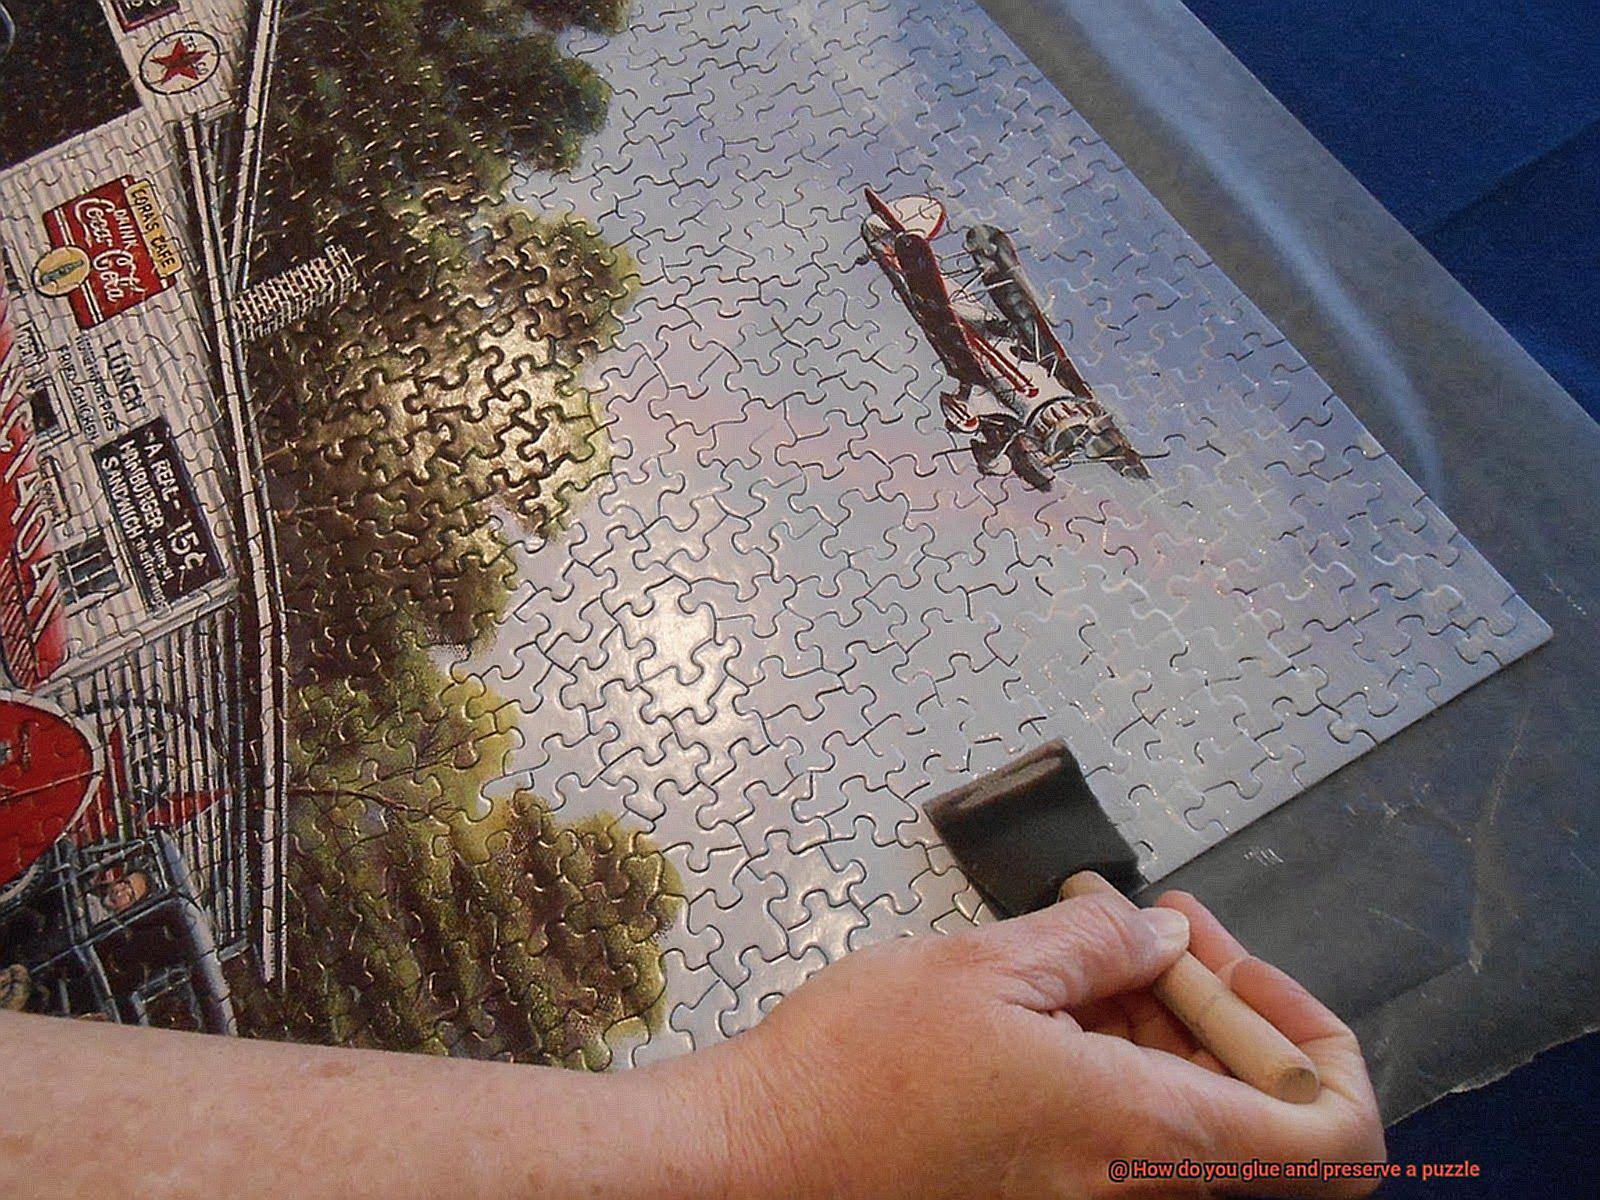
Prepare your puzzle for its transformation by ensuring it lies flat and is free from any dust or debris. Using either a sponge or brush, gently and evenly spread the glue across the entire surface of the puzzle. Pay careful attention to every edge and corner, securing each piece with finesse. Take your time during this process; rushing may result in pieces shifting or becoming misaligned, tarnishing your artistic vision.
Step 4: The Waiting Game
Allow the glue to dry completely, adhering to the recommended drying time specified on the product label. This vital step guarantees the preservation of your puzzle’s integrity. Once dry, conduct a meticulous inspection, identifying any areas that may require additional glue. Apply the adhesive as needed, ensuring every piece is securely held in place.
Step 5: Preserving and Showcasing Your Artistry
To preserve your glued puzzle, consider mounting it on a sturdy backing material such as foam board or cardboard. This provides stability, preventing any warping or bending over time. Trim the excess backing material to match your puzzle’s dimensions, creating a sleek and polished finish.
For those eager to showcase their artistry, framing is an excellent choice. Select a frame that harmonizes with the size and style of your puzzle. You can either directly mount the puzzle onto a mat board or utilize a specialized jigsaw puzzle frame designed for this purpose. Ensure each piece is securely held in place before framing, allowing your creation to captivate all who behold it.
Gluing the Puzzle with Puzzle Glue/Conserver
Unleash the artist within and elevate your completed puzzle from a mere challenge conquered to a captivating work of art. Today, we embark on a journey into the enchanting process of gluing and preserving your masterpiece, revealing the secrets that will ensure its timeless beauty withstands the test of time.
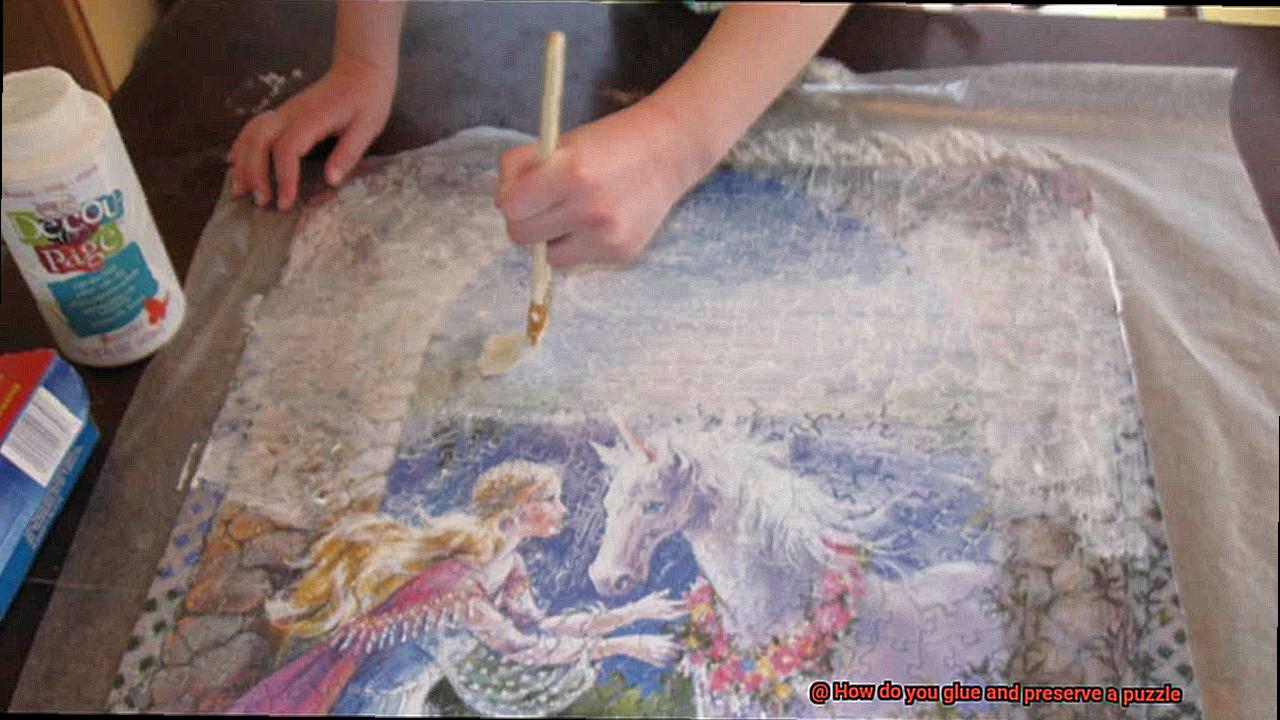
Puzzle glue, also known as puzzle conserver, is your ticket to preserving and protecting your completed jigsaw puzzle. This special adhesive, designed specifically for this purpose, comes in liquid form, ready to transform your puzzle into a durable masterpiece. Applying it is a breeze with the help of a brush or sponge applicator, allowing you to create a protective layer that prevents those hard-earned pieces from falling apart.
Before you dive into the gluing process, it’s crucial to make sure that your puzzle is fully completed and all pieces are in their correct positions. Once you’re confident in your masterpiece, let’s get started.
To begin, lay down a large sheet of wax paper or plastic wrap underneath the puzzle. This simple step not only protects your work surface from any glue spills or drips but also ensures an easy cleanup. Safety first, my fellow puzzle enthusiasts.
Now, here comes the fun part. Carefully lift one corner of the puzzle and prepare to bring it to life with the glue. With your brush or sponge applicator in hand, apply a thin layer of glue to the backside of the puzzle. Take your time and be meticulous in covering the entire surface evenly. Pay extra attention to the edges and corners to ensure every single piece is secured in place. Work in small sections to avoid any bubbles or streaks that might mar the final result.
Once you have applied the first layer of glue, exercise patience and allow it to dry completely. Depending on the brand of glue and the thickness of the application, this can take several hours or even overnight. Remember, good things come to those who wait, especially when it comes to preserving puzzles.
If you desire an extra layer of protection (because we all love layers), feel free to add additional coats of glue. Apply each layer in the same careful manner as before, allowing sufficient drying time between coats. Some puzzle glues offer a glossy finish, while others provide a matte finish. Choose the type of glue that best suits your preference and desired result, adding that perfect touch to your completed masterpiece.
Once all layers of glue have dried completely, it’s time to put the finishing touches on your artwork. Carefully trim away any excess wax paper or plastic wrap from the edges of the puzzle, revealing its full glory. Now, your glued puzzle is ready to be displayed or framed.
To secure your puzzle within a frame or backing board, you can use adhesive strips or mounting putty. These handy tools ensure that your work of art stays intact and doesn’t shift around, preserving its intricate design for years to come.
Drying Time and Precautions
You’ve just completed a stunning puzzle masterpiece, and now you’re ready to take the next step in preserving your hard work. Gluing and preserving a puzzle is a fantastic way to display your accomplishment, but it’s essential to understand the significance of drying time and the precautions necessary to ensure a successful outcome.
When it comes to drying time, patience is key. You’ve spent hours carefully assembling your puzzle, so rushing through the drying process could lead to disaster. Imagine the frustration of seeing your carefully arranged pieces shift or come apart because you didn’t give the glue enough time to dry completely. To avoid this nightmare, resist the temptation to move or touch your puzzle until the glue has fully dried. Remember, good things come to those who wait.
Proper ventilation is crucial during the drying process. A well-ventilated area with good air circulation will expedite the drying time and prevent any moisture buildup that could compromise the quality of your preservation. Find a spot where your glued puzzle can bask in the gentle flow of fresh air, ensuring a speedy and effective drying experience.
To ensure that your puzzle remains flat and intact during drying, consider using a weight distribution technique. By placing a weight evenly on top of your puzzle, you can prevent any warping or curling of the puzzle pieces while providing an even distribution of pressure. However, exercise caution not to use excessive weight that may damage or deform your masterpiece.
Taking precautions during drying is equally important. Keep children and pets away from the drying area to avoid any accidental damage or disturbance. Additionally, cover your puzzle with a clean cloth or plastic sheet to protect it from dust or debris that may settle on its surface. We want your puzzle to be pristine.
Humidity considerations can also impact the drying process. High humidity can prolong drying time, while low humidity may cause the glue to dry too quickly, potentially compromising the bond. For optimal results, work in an environment with moderate humidity levels.
Lastly, before considering your puzzle completely dry, it’s essential to perform a simple test. Gently touch the surface of the puzzle in a discreet area to check for any tackiness or stickiness. If the puzzle feels dry and no residue transfers to your fingertips, it’s likely safe to proceed with further handling and preservation.
Applying Puzzle Preserver (Optional)
Preserving your completed puzzle is like encapsulating a cherished memory. While optional, this step can make all the difference in ensuring that your hard work remains intact for years to come. In this post, we will delve into the process of applying puzzle preserver and share some tips to help you achieve puzzle preservation success.
Before diving into the application process, it is crucial to prepare your puzzle for preservation. Take a moment to double-check that all the pieces are in place and that your puzzle lies flat on a clean and smooth surface. To make handling easier during the preservation process, consider using a puzzle mat or a large piece of cardboard as a sturdy base.
Now, let’s explore the puzzle preserver options available. You have two choices: spray-on or liquid preserver. The spray-on preserver offers convenience, providing an even coating without requiring any additional tools. On the other hand, the liquid preserver offers a hands-on approach and necessitates a brush or sponge applicator.
For those opting for spray-on preservers, hold the can about 12 inches away from the puzzle and apply an even coat across the entire surface. Don’t forget to cover the edges and corners. Ensure you avoid overspray, as it may cause warping or discoloration. Remember, multiple thin coats are preferable to one thick coat for optimal results.
If you prefer using a liquid preserver, pour a small amount into a tray or container. Dip your brush or sponge applicator into the solution and carefully apply it onto the puzzle surface. Starting from one corner, work your way across, ensuring that every piece receives an even layer of protection.
Regardless of your chosen preserver type, it is essential to adhere to the manufacturer’s instructions regarding drying time. Typically, it takes a few hours for the preserver to dry completely. Should you desire added protection, you can apply additional coats; however, exercise caution not to overdo it, as excessive layers can render your puzzle stiff and compromise its original texture.
Once all the coats have dried and cured, carefully inspect the puzzle for any touch-up areas that may require an extra layer of preserver. Apply a thin layer to those spots and allow them to dry before proceeding.
Congratulations. Your puzzle is now ready for display or framing. Puzzle preservers create a clear and protective coating that shields your masterpiece from dust, moisture, and accidents.
Alternative Method: Using Clear Adhesive Sheets/Contact Paper
Preserving your completed puzzle is like capturing a precious memory in a time capsule, safeguarding your hard work for years to come. While traditional methods involve glue or puzzle preserver, let me introduce you to an alternative approach that’s just as effective, if not easier: clear adhesive sheets or contact paper.
Imagine the convenience and simplicity of these transparent sheets, sticky on both sides, perfectly designed for adhering to the front and back of your puzzle. Here’s a step-by-step guide on how to use them to preserve your masterpiece:
Start by flipping the puzzle over onto a clean, smooth surface, ensuring the front faces downwards.
Cut a piece of clear adhesive sheet slightly larger than your puzzle’s size. Peel off the backing, revealing the sticky side.
With utmost care, place the adhesive sheet onto the back of the puzzle, starting from one corner and smoothly gliding your way across. Take your time to avoid pesky air bubbles or unsightly wrinkles.
Once the adhesive sheet is firmly attached, flip the puzzle over and trim any excess sheet hanging over the edges.
Repeat this process for the front of the puzzle. Cut another piece of clear adhesive sheet, peel off the backing, and gently place it onto the front, smoothing it down as you go.
Trim any excess sheet from the front as well, ensuring a neat and polished look.
Voila. Your puzzle is now sealed and safeguarded on both sides. No more worrying about loose pieces or accidental damage.
To display your preserved puzzle, you can choose from various options like framing it or mounting it on a foam board. The choice is entirely yours.
However, bear in mind that using clear adhesive sheets may slightly alter your puzzle’s appearance. The adhesive can create a glossy finish, which some may find appealing while others may prefer a more matte look.
Handling and Care Tips
Puzzles are not merely a source of entertainment; they are also works of art that deserve preservation and protection.
Whether you wish to showcase your completed puzzle or keep it intact for future enjoyment, the proper techniques for gluing and caring for puzzles are crucial.
In this comprehensive guide, we will explore the steps and methods for gluing and preserving your puzzles, ensuring their longevity and safeguarding them from damage.
Handling and Care Tips:
Choosing a Suitable Workspace:
To begin the gluing process, it is essential to have a clean and flat workspace. A large table or puzzle board designed specifically for this purpose will provide an ideal surface. Ensure that the workspace is free from potential hazards or disruptions, allowing you to focus on the task at hand.
Handle with Utmost Care:
Before applying glue, handle the puzzle delicately to avoid any damage or displacement of pieces. Hold the puzzle from opposite edges, gently supporting it with your hands or utilizing a puzzle mat to prevent bending or twisting. Treat each piece as a fragile masterpiece, recognizing its value and ensuring its protection.
Cleaning the Surface:
Prior to gluing, ensure that the surface is clean and free from dust or debris. Wipe the table or puzzle board with a damp cloth to create a smooth base for gluing. This step not only ensures optimal adhesion but also enhances the overall appearance of the finished puzzle.
Application Technique:
There are several methods for gluing a puzzle, but one popular technique involves using puzzle glue or Mod Podge. To begin, apply a thin, even layer of glue across the entire surface of the puzzle using a sponge brush or foam roller. Pay special attention to coating every piece, particularly along the edges where they are most vulnerable.
Allow Sufficient Drying Time:
After applying the glue, it is crucial to allow ample drying time before moving or framing your puzzle. Refer to the manufacturer’s instructions for accurate drying times, as they can vary depending on the type of glue used. Patience during this stage will ensure a sturdy bond and minimize the risk of damage.
Displaying the Preserved Puzzle
Completing a puzzle is a gratifying feat, blending imagination and precision. Preserving it allows you to share your labor of love and relish it for years to come. In this enlightening discourse, we will explore an array of captivating methods and techniques for displaying your preserved puzzle.
From framing to mounting on foam board, employing puzzle conserver sheets, or exploring other innovative options, there are myriad ways to showcase your masterpiece.
Framing: Transforming Puzzles into Timeless Art
Framing your preserved puzzle is a perennial favorite as it metamorphoses it into a unique piece of artwork. Begin by ensuring the puzzle is impeccably dry and flat before flipping it over onto its back.
Apply a thin layer of puzzle glue or clear adhesive to the front surface, allowing it to dry thoroughly before placing it into the frame. To prevent any untoward shifting, secure the puzzle to the backing board using adhesive tape or small pins. The result? A striking display that captures attention.
Mounting on Foam Board: Lightweight Charm Meets Portability
For those seeking a lightweight and portable option, consider mounting your preserved puzzle onto foam board. Trim the edges with meticulous care, ensuring a seamless fit onto the foam board. Apply puzzle glue or clear adhesive to the entire back surface, exerting even pressure as you affix the glued puzzle firmly onto the foam board. After allowing ample drying time, you can prop it up on a tabletop or attach hanging hardware for an eye-catching wall display.
Puzzle Conserver Sheets: Preserving Puzzles with Elegance
Puzzle conserver sheets offer an elegant solution for preserving puzzles while facilitating effortless display on flat surfaces. Effortlessly slide the specially designed sheet under the completed puzzle, expertly smoothing out any pesky bubbles or wrinkles. Trim off any excess sheet, and voila. Your puzzle remains intact, primed for showcasing on a coffee table or countertop – a conversation starter extraordinaire.
Other Innovative Options: Adding a Touch of Distinctiveness
For those yearning for a rustic allure, consider gluing your preserved puzzle onto a wooden board or canvas. This unique presentation adds an eclectic touch and can be easily displayed on a wall or shelf. Additionally, puzzle frames or display stands specifically created for preserving and showcasing puzzles offer alternative avenues for your creative vision to shine.
u9VPvG03_Y4″ >
Also Read: How To Glue Together A Puzzle For Framing?
Conclusion
Preserving a puzzle is not just about keeping the pieces intact, but also about capturing the memories and hard work that went into completing it. Gluing a puzzle is a great way to ensure its longevity and turn it into a beautiful piece of art. To glue a puzzle, you will need some puzzle glue or Mod Podge, a brush, wax paper, and patience.
Start by carefully sliding a sheet of wax paper under your completed puzzle to protect your work surface. This will also make it easier to move the puzzle once it’s glued. Next, mix your puzzle glue or Mod Podge according to the instructions on the bottle. Make sure to stir it well to eliminate any clumps.
Using a brush, apply the glue evenly over the entire surface of the puzzle. Be gentle and take your time to avoid damaging any delicate pieces. Pay extra attention to the edges as they tend to be more prone to coming loose.
Once you’ve applied the glue, let it dry completely. This can take anywhere from a few hours to overnight depending on the type of glue you used and the humidity in your environment. It’s important not to rush this step as premature moving or handling can cause pieces to shift or come apart.
After the glue has dried, carefully flip the puzzle over and repeat the gluing process on the backside. This will provide added stability and help prevent warping over time.
Finally, once both sides are completely dry, you can remove the wax paper from underneath your puzzle masterpiece. Trim any excess glue that may have seeped onto the edges for a clean finish.
By following these steps and taking your time, you can transform your completed puzzle into a durable piece of art that can be proudly displayed for years to come.