Tired of the constant hassle of tightening screws on your sink top or dealing with pesky leaks in your bathroom? Fear not, because the solution might be simpler than you think – glue. Yes, you heard that right – glue. Gluing your sink top to your vanity can provide a secure and long-lasting bond, preventing any water damage caused by leaks. In this blog post, we’ll dive into the details of how to properly glue a sink top to a vanity, so you can finally bid farewell to all your plumbing woes.
First things first – choosing the right adhesive for the job is crucial. Different materials require different types of glue, and using the wrong one can result in an unstable bond between your sink top and vanity. We’ll also cover important preparation steps such as cleaning both surfaces thoroughly and ensuring they are free of debris.
But wait, there’s more. Our expert tips and tricks will ensure that your sink top remains securely attached to your vanity for years to come. From using clamps to applying pressure evenly, we’ve got all the insider knowledge you need. Say goodbye to constantly tightening screws or dealing with water damage caused by leaks – our guide will have you effortlessly gluing your sink top to your vanity for a functional and beautiful bathroom that lasts.
Selecting the Right Adhesive for the Job
Contents
- 1 Selecting the Right Adhesive for the Job
- 2 Preparing the Surfaces
- 3 Applying Adhesive and Positioning the Sink Top
- 4 Securing the Sink Top in Place
- 5 Allowing Adhesive to Dry Completely
- 6 Removing Excess Adhesive
- 7 Sealing Around the Edge of the Sink Top
- 8 Caring for your Newly Glued Sink Top
- 9 Conclusion
When it comes to bathroom renovations, gluing a sink top to a vanity is a vital task that requires careful consideration of the adhesive used. Selecting the right adhesive can ensure a secure and long-lasting bond, while selecting the wrong one can result in a frustrating and messy project. So, what factors should you consider when choosing the perfect adhesive for this job?
Firstly, you want an adhesive that can withstand moisture and temperature changes that are common in bathrooms. Silicone caulk is an ideal option for this task. It offers excellent water resistance and flexibility, allowing it to expand and contract with changes in temperature. Applying it using a caulking gun makes it easy to use.
Another critical factor to consider is the materials being bonded. Epoxy adhesive is a strong option that can be used on various surfaces like wood, metal, and ceramics. If you prefer eco-friendly options, plant-based adhesives made from natural ingredients like soybeans and cornstarch are available in the market.
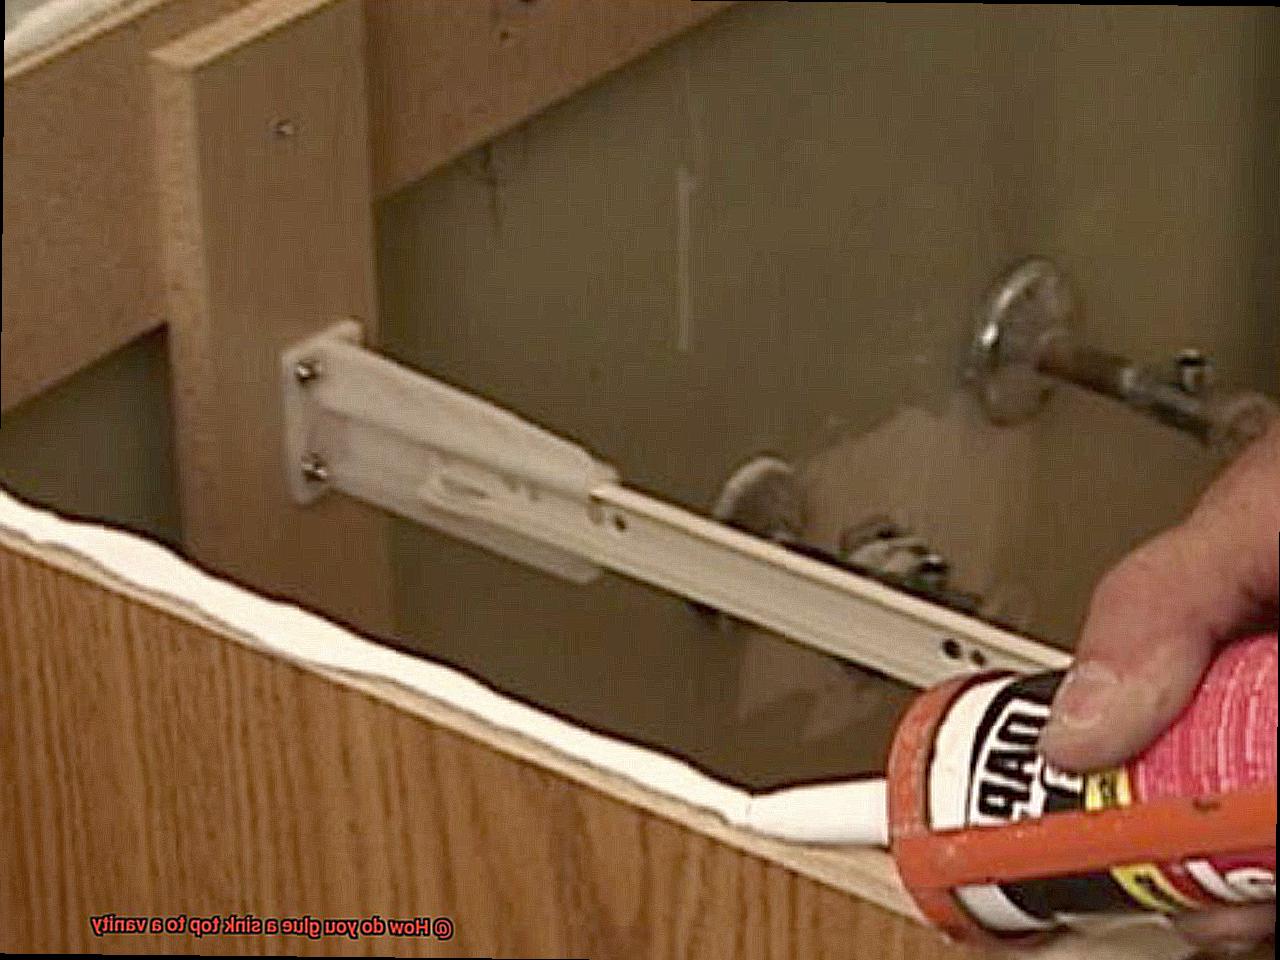
Before applying any adhesive, ensure that the sink top and vanity surface are thoroughly cleaned to remove any dirt or debris that could interfere with the bond between the two surfaces.
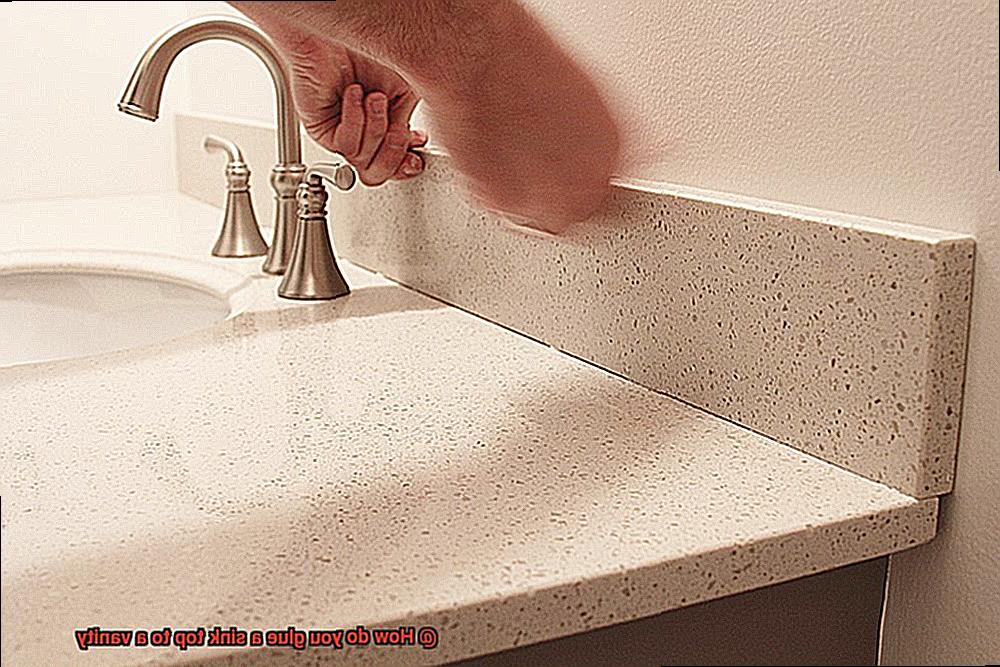
Once the surfaces are clean and dry, apply a generous amount of adhesive around the perimeter of the vanity surface, leaving enough space around the edges for excess adhesive to squeeze out when pressure is applied. Carefully position the sink top onto the vanity surface, ensuring that it is centered and level.
To create an even and robust bond between the two surfaces, apply firm pressure across the entire surface. Once you have done this, use clamps or heavy objects to hold it securely in position while the adhesive dries.
The drying time varies depending on factors such as humidity and temperature, so follow the manufacturer’s instructions for drying time. After the adhesive has dried completely, carefully remove any excess using a sharp knife or scraper.
Finally, run a bead of caulk around the outer edge of the sink top to create a watertight seal between the sink and vanity surface. With proper care and maintenance, your newly glued sink top should provide many years of reliable use in your bathroom.
Preparing the Surfaces
If you’re looking to upgrade your bathroom with a new sink top, it’s important to know that proper surface preparation is crucial for creating a strong and long-lasting bond between the sink top and vanity. To help ensure that your surfaces are ready for gluing, follow these simple yet effective tips:
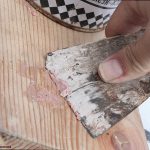
Firstly, remove any old adhesive or caulking from the surface using a scraper or putty knife. It’s important to remove as much of the old adhesive as possible because it can interfere with the new adhesive’s ability to bond correctly.
After removing old adhesive, clean the surfaces with a non-abrasive cleaner and a soft cloth. Then, rinse the surfaces thoroughly with water and dry them completely before proceeding with glue application.
Next, ensure that both the sink top and vanity are level before gluing them together. This step is essential because uneven surfaces can cause stress on the bond, leading to potential damage in the future.
Additionally, it’s necessary to make sure that both surfaces are flush against each other. Any gaps or unevenness can result in an imperfect bond that may fail over time.
Remember that any dirt or particles left behind on the surfaces can affect the strength of the bond, causing the sink top to loosen over time. So, take your time in preparing the surfaces to ensure a secure and long-lasting attachment between the sink top and vanity.
Applying Adhesive and Positioning the Sink Top
When it comes to installing a new sink top, applying adhesive and positioning it correctly can make all the difference. As an expert on this topic, I’m here to guide you through the process step by step.
Before applying any adhesive, it’s crucial to ensure that both the vanity and sink top are clean and dry. Once you’ve done that, select the right adhesive for your project. Whether it’s silicone or construction adhesive, make sure to choose one that suits your needs.
Now it’s time to apply the adhesive. Begin by applying a bead of adhesive along the edge of the vanity. It’s important to make sure that the bead is evenly distributed and not too thick or thin. Applying too much adhesive will result in a longer drying time, while too little adhesive won’t provide enough support.
Carefully place the sink top onto the vanity, ensuring that it is centered and level. Take your time during this step to ensure everything is lined up correctly. Once you’re sure everything is in place, apply pressure to the sink top to secure it firmly onto the vanity.
Patience is key when installing a new sink top. Allow the adhesive to dry completely before using the sink. Depending on the type of adhesive used and humidity levels, this can take anywhere from 24 to 48 hours. Afterward, check that the sink top is securely attached to the vanity by gently pushing on it.
In some cases, brackets or clips may be necessary to provide extra support. Follow manufacturer instructions when installing them and place them where they won’t interfere with plumbing or other fixtures.
Securing the Sink Top in Place
But, before you can start enjoying it, you must make sure it’s properly secured in place. Securing the sink top in place is a crucial step in the installation process. It may seem like a daunting task, but with the right tools and some patience, you can easily get it done.
One of the most commonly used adhesives for securing sink tops is silicone adhesive. This waterproof adhesive creates a sturdy and flexible bond between the sink top and vanity, allowing for expansion and contraction due to temperature changes. Here are some steps you should follow to secure your sink top using silicone adhesive:
Step 1: Clean and Dry Both Surfaces
Start by cleaning and drying both the sink top and vanity thoroughly. Any dirt, dust, or debris can prevent the adhesive from creating a strong bond.
Step 2: Apply Silicone Adhesive
Next, apply a bead of silicone adhesive around the perimeter of the vanity where the sink top will be placed. Make sure to apply enough adhesive to create a solid bond but not so much that it will squeeze out when pressure is applied.
Step 3: Center the Sink Top Carefully
Once the adhesive has been applied, carefully lower the sink top onto the vanity, making sure that it’s properly aligned. Use gentle pressure to ensure that the sink top is fully seated on the vanity and that there are no gaps between the two surfaces. Avoid applying too much pressure as this can cause excess adhesive to squeeze out.
Step 4: Allow Adhesive to Dry Completely
Now that your sink top is in place, give it time to dry completely according to the manufacturer’s instructions. This usually takes 24-48 hours. It’s important not to use the sink during this time as any movement or weight on the sink can compromise the bond created by the adhesive.
Allowing Adhesive to Dry Completely
When it comes to installing a sink top onto your vanity, you want to make sure that the adhesive you use is completely dry before you start using your sink. Failure to wait for the adhesive to fully cure can result in a loose or even fallen sink top. In this article, we will delve into why allowing adhesive to dry completely is so important when gluing a sink top to a vanity.
To begin with, the drying time for adhesive will depend on the type of glue you use, and it is essential to follow the manufacturer’s instructions for drying time. If you opt for silicone adhesive, which is a popular option for sink top installation, it can take up to 24 hours to dry completely. However, it may be safe to use after just a few hours. On the other hand, construction adhesive has a shorter drying time of around 30 minutes to an hour.
While waiting for the adhesive to dry can be tedious, it’s crucial not to rush the process. Applying pressure or weight to your sink top before the adhesive has fully cured can cause your sink top to become loose or even fall off completely. So be patient and allow the adhesive to do its job.
Another crucial point to consider is that the area where your sink top will be attached needs to be clean and free of any debris or dust. This ensures that the adhesive adheres properly and creates a strong bond between your sink top and vanity.
In summary, here are some key takeaways:
- Allow adhesive to dry completely before using your sink.
- Follow the manufacturer’s instructions for drying time.
- Be patient and don’t rush the process.
- Make sure the area where your sink top will be attached is clean and free of any debris or dust.
Removing Excess Adhesive
You’ve finally managed to glue your sink top to your vanity, but now you’re faced with the daunting task of removing excess adhesive. Fear not, for I am here to guide you through this process and ensure that your sink and vanity remain unscathed.
The first step in removing excess adhesive is to wait until it has dried completely. This can take anywhere from 24-48 hours, depending on the type of adhesive used. Once the adhesive has dried, you can begin to carefully scrape away any excess using a putty knife or scraper. Remember to take your time and work slowly, so as not to damage the surface of your sink or vanity.

If you find that there are still stubborn spots of adhesive that refuse to budge, don’t fret. You can try using a solvent that is specifically designed for removing adhesive. These solvents are readily available at hardware stores or online, and they work by breaking down the adhesive so that it can be wiped away easily. Be sure to follow the instructions on the solvent carefully, and wear protective gloves and eyewear to avoid any skin or eye irritation.
Once you have successfully removed all the excess adhesive, it’s important to give your sink and vanity a thorough cleaning with soap and water. This will ensure that any remaining residue is removed and that your newly-glued sink top looks clean and polished.
In summary, here are some key points to remember when removing excess adhesive:
- Wait until the adhesive has fully dried before attempting to remove it.
- Use a putty knife or scraper to gently scrape away any excess adhesive.
- If necessary, use a solvent specifically designed for removing adhesive.
- Always follow the instructions on the solvent carefully, and wear protective gloves and eyewear.
- Clean your sink and vanity thoroughly with soap and water after removing all excess adhesive.
Sealing Around the Edge of the Sink Top
One important step in ensuring that your sink stays securely in place is properly sealing around the edge of the sink top. As an expert in this area, I have researched and compiled some notes to guide you through this crucial process.
Firstly, it’s important to choose the right sealant for your particular sink top. Silicone caulk and adhesive tape are both excellent options, with silicone caulk providing a strong, waterproof seal and adhesive tape being a quick and effective solution. Ultimately, the choice depends on personal preference and the type of sink top you have.
Once you’ve chosen your sealant, it’s time to prep the area around the edge of the sink top. Before applying any sealant, ensure that the area is clean and dry. This will ensure that the sealant adheres properly and creates a strong bond.
For silicone caulk, apply a bead of caulk along the edge of the sink top, filling any gaps or cracks as you go. Then use a caulk smoothing tool or your finger to smooth out the caulk and create an even seal. Allow the caulk to dry completely before using your sink.
If you’re using adhesive tape, cut it to size and place it along the edge of the sink top, pressing down firmly to ensure a strong bond. Some types of adhesive tape may require additional steps such as heating with a hairdryer or using a special primer, so be sure to follow the manufacturer’s instructions carefully.
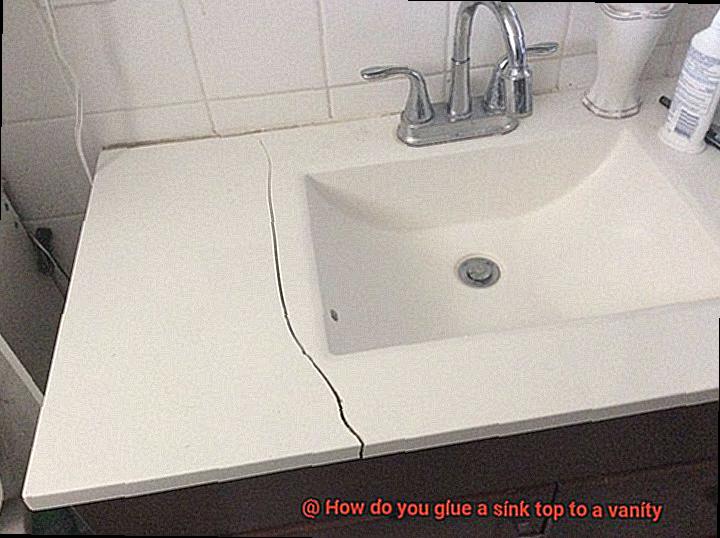
Properly sealing around the edge of your sink top is vital in ensuring that your sink stays securely in place for years to come. By taking these simple steps and following proper application techniques, you can rest easy knowing that your sink is properly sealed and protected from any potential water damage.
Caring for your Newly Glued Sink Top
You’ve made a wise decision in securing your sink top with adhesive, ensuring a long-lasting and sturdy bond. However, proper care is necessary to ensure your sink top stays in great condition for years to come. Here’s what you need to know.
Firstly, give the adhesive enough time to dry and set properly. Avoid using the sink or placing any heavy objects on top of it for at least 24 hours after installation. This will allow the adhesive to fully cure and create a strong bond between the sink and vanity.
Once the 24-hour period has passed, you can start using your sink as normal. However, it’s crucial to be gentle when cleaning it for the first few weeks. Abrasive cleaners or scrubbers can damage the finish of the sink top and weaken the bond between the sink and vanity. Instead, use a non-abrasive cleaner and a soft cloth or sponge to clean the sink.
To protect your newly glued sink top from scratches and stains, apply a layer of wax or sealant. Follow the manufacturer’s instructions for the specific type of sealant you are using. This will not only protect your sink top but also make it easier to clean in the future.
In addition to being gentle with your newly glued sink top, avoid exposing it to extreme temperatures. Placing hot pans or appliances directly on top of the sink can cause thermal shock and weaken the adhesive bond. Use trivets or hot pads under hot items before placing them on the sink.
Here’s a quick checklist for caring for your newly glued sink top:
- Avoid using or placing heavy objects on the sink for 24 hours after installation.
- Be gentle when cleaning for the first few weeks.
- Use non-abrasive cleaners or scrubbers.
- Apply a layer of wax or sealant to protect against scratches and stains.
- Avoid exposing it to extreme temperatures.
0dik4TMKR_U” >
Conclusion
In conclusion, gluing a sink top to a vanity is the perfect solution for preventing leaks and ensuring a long-lasting bond between the two surfaces. To achieve success, it’s essential to choose an adhesive that is compatible with different materials and resistant to moisture. Proper surface preparation is key, involving removing old adhesive or caulking, cleaning thoroughly, and ensuring levelness and flushness of surfaces before applying adhesive.
When applying the adhesive, even distribution along the edge of the vanity surface is crucial. Careful positioning of the sink top onto the vanity surface with firm pressure applied across the entire surface while clamping or weighting it down until drying time is complete will ensure a sturdy bond.
After drying completely according to manufacturer instructions, excess adhesive must be removed carefully using a putty knife or scraper before cleaning with soap and water. Sealing around the edge of the sink top helps protect against water damage, while caring for your newly glued sink top involves being gentle when cleaning for the first few weeks using non-abrasive cleaners or scrubbers.
Applying wax or sealant protection against scratches and stains will keep your sink top looking brand new while avoiding exposure to extreme temperatures.