Are you a puzzle enthusiast who wants to preserve your masterpiece for all eternity? Well, get ready to dive into the captivating world of gluing puzzles with Elmer’s clear glue. This simple but effective method will turn those loose pieces into a jaw-dropping work of art that you can proudly showcase.
Gluing a puzzle might sound intimidating, but fear not. With the right materials and a little patience, you’ll become a pro in no time. Elmer’s clear glue is your go-to crafting companion for this project. It’s affordable, easy to find, and delivers a durable and transparent finish that will make your puzzle shine.
First things first, set up shop on a clean, flat surface. Lay out your completed puzzle and take a moment to admire your handiwork. Now, let’s gather our supplies. Alongside Elmer’s clear glue, grab a foam brush or disposable sponge brush, wax paper or a plastic drop cloth to protect your workspace, and something heavy like books or puzzle mats to weigh down the puzzle.
Flip your puzzle over carefully so that the completed image faces downward. This step ensures that the glue sticks to the back of the pieces for maximum hold. Next up, apply a thin and even layer of Elmer’s clear glue to the back of the puzzle using your foam or sponge brush. The goal here is full coverage without creating clumps or excess pooling.
Once you’ve applied the glue, let it dry completely. Be patient – this could take several hours or even overnight depending on your puzzle’s size and thickness. Rushing through this step might lead to warping or bubbling, so take it slow.
When the glue is dry as can be, it’s time to reinforce your puzzle’s strength. Flip it back over carefully and give it another coat of Elmer’s clear glue on the front side using your foam brush or sponge brush again. This second layer will add extra sturdiness and provide a protective seal.
Let the puzzle dry once more after applying the second coat. Don’t fret if Elmer’s clear glue looks slightly milky when wet – it dries transparent, so it’ll look perfect in due time.
Once that final coat is dry, you’ve successfully glued your puzzle with Elmer’s clear glue. Now you can display it proudly, knowing that your masterpiece is preserved for all to see. So go ahead, show off your puzzle prowess with confidence.

What You Need to Glue a Puzzle with Elmer’s Clear Glue
Contents
- 1 What You Need to Glue a Puzzle with Elmer’s Clear Glue
- 2 Preparing the Puzzle for Gluing
- 3 Applying the Elmer’s Clear Glue
- 4 Allowing Adequate Drying Time
- 5 Finishing the Puzzle
- 6 Additional Tips for Gluing Puzzles with Elmer’s Clear Glue
- 7 Disadvantages of Using Elmer’s Clear Glue
- 8 Alternatives to Elmer’s Clear Glue for Gluing Puzzles
- 9 Conclusion
Puzzles are not only a fun activity but can also be beautiful pieces of art. If you’ve completed a puzzle that you want to preserve and display, gluing it with Elmer’s clear glue is the perfect solution. In this guide, we’ll walk you through the step-by-step process of gluing a puzzle with Elmer’s clear glue to ensure your masterpiece stays intact for years to come.
Step 1: Gather Your Materials
Before starting the gluing process, gather all the necessary materials, including:
- Elmer’s clear glue: Make sure you have enough glue to cover the entire puzzle surface.
- Puzzle: Choose a completed puzzle that you want to preserve and display.
- Puzzle board or cardboard: This will serve as the base for your glued puzzle.
- Wax paper or plastic wrap: To protect your work surface from any excess glue.
- Paintbrush or foam brush: This will be used to apply the glue evenly on the puzzle.
- Optional: Puzzle preserver or conserver spray for added protection.
Step 2: Prepare Your Workspace
Create a clean and flat workspace by laying down wax paper or plastic wrap to protect your surface from any excess glue.
Step 3: Set Up Your Puzzle
Place your completed puzzle on top of a puzzle board or sturdy piece of cardboard that is slightly larger than the puzzle itself. This will provide ample space for gluing and framing later on.
Step 4: Apply the Glue
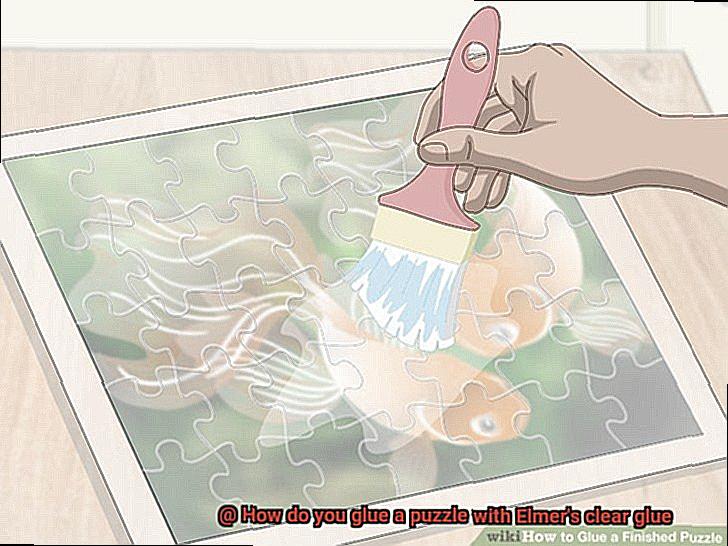
Shake the bottle of Elmer’s clear glue well before opening. Using a paintbrush or foam brush, apply a thin layer of glue to the backside of the puzzle, starting from one corner and working your way across. Be sure to cover all areas evenly.
Step 5: Allow the Glue to Dry
Let the first layer of glue dry completely, which may take a few hours. Avoid rushing this step as any moisture trapped beneath the glue could cause warping or mold over time. Once dry, apply a second layer of glue in the same manner as before for added reinforcement.
Step 6: Final Drying and Preservation
Allow the second layer of glue to dry completely. Once dry, carefully lift the puzzle from the puzzle board or cardboard. If desired, you can further protect your glued puzzle by applying a puzzle preserver or conserver spray for added durability.
Step 7: Display Your Masterpiece
Now that your puzzle is fully dried and preserved, you can proudly display it in a frame or on a shelf. Enjoy the beauty of your completed puzzle for years to come.
Preparing the Puzzle for Gluing
Completing a puzzle is an accomplishment in itself, but preserving and displaying it can be just as rewarding. Gluing your puzzle with Elmer’s clear glue is a simple yet effective way to turn it into a stunning work of art that will withstand the test of time. In this guide, we will take you through the step-by-step process of preparing your puzzle for gluing, ensuring a seamless and professional finish.
Step 1: Ensure Completeness:
Before starting the gluing process, take a moment to appreciate your completed puzzle. Check that all the pieces are in place, making any necessary adjustments to secure loose or missing pieces. This step ensures that your puzzle will be preserved in its entirety.
Step 2: Protect Your Surfaces:
To prevent any unwanted glue mishaps, lay down a protective surface underneath your puzzle. A plastic tablecloth or wax paper will safeguard your working area and make it easier to move the puzzle during the gluing process if needed. Think of it as a safety net for your masterpiece.
Step 3: Cleanse the Canvas:
Give your puzzle a gentle cleanse before applying the glue. Using a soft brush or cloth, delicately remove any dust or debris from the surface. This meticulous step guarantees a smooth finish when the glue dries, allowing the beauty of your puzzle to shine through.
Step 4: Apply Elmer’s Clear Glue:
Now comes the transformative moment—applying Elmer’s clear glue. Begin by pouring a small amount onto the puzzle’s surface, embracing the anticipation bubbling within you. Use a foam brush or sponge brush to spread the glue evenly, ensuring every piece is covered. Be mindful not to overwhelm your creation with an excess of glue; a thin layer will suffice for an elegant and polished result.
Step 5: Allow Sufficient Drying Time:
Patience is key at this stage. Allow the glue to dry undisturbed for at least 24 hours, giving it ample time to cure and solidify. Keep your puzzle flat during this period to prevent any shifting or misalignment of the pieces. Like a caterpillar in its chrysalis, your puzzle will undergo a metamorphosis, emerging as a vibrant and robust work of art.
Step 6: Display or Frame Your Puzzle:
With the glue now fully dried, it’s time to unveil your masterpiece. Carefully lift and move the puzzle onto a display surface or frame it according to your vision. Elmer’s clear glue provides a transparent finish, allowing the intricate details and vivid colors of your puzzle to captivate all who lay eyes upon it.
Applying the Elmer’s Clear Glue
Look no further than Elmer’s clear glue. This remarkable adhesive not only dries transparent, maintaining the puzzle’s beauty, but it also forms a robust bond, ensuring that every piece stays securely in place. With its ease of use and wide availability, Elmer’s clear glue is the go-to choice for puzzle preservation.
To apply Elmer’s clear glue to your completed puzzle, follow these simple steps:
- Prepare a flat surface that you can easily protect from potential glue spills. Safety should always come first.
- Carefully flip your completed puzzle over so that the front side is facing down. This is the side on which we’ll be applying the glue.
- Squeeze a small amount of Elmer’s clear glue onto the back of the puzzle. Start with a conservative amount to avoid excess glue seeping through the puzzle pieces.
- Grab a brush or foam applicator and spread the glue evenly across the back of the puzzle. Ensure that every piece receives a thin layer of glue, including those tricky edges.
- Patience is key – allow the first layer of glue to dry completely. Depending on the thickness of your glue layer, this may take a few hours or even overnight.
- Inspect your puzzle for any areas that require additional glue. Apply more Elmer’s clear glue as needed, ensuring an even spread across all pieces.
- Once again, let the second layer of glue dry completely. This step ensures a secure bond between all puzzle pieces.
- Flip your puzzle over and check for any excess glue or residue on the front side. Gently remove any traces using a clean cloth or sponge dampened with water.
- Exercise patience one final time and let your puzzle sit undisturbed for at least 24 hours. This allows the glue ample time to fully set and cure.
You have successfully applied Elmer’s clear glue to your completed puzzle, transforming it into a stunning work of art that will withstand the test of time. Display your masterpiece with pride, knowing that no pieces will ever fall out.
Allowing Adequate Drying Time
If you’re eager to learn the secrets of a secure and long-lasting puzzle masterpiece, you’ve landed in the right spot. Today, we’ll delve into the importance of allowing adequate drying time when using Elmer’s Clear Glue to assemble your jigsaw puzzles.
A Rock-Solid Foundation:
To achieve a sturdy and stable puzzle structure, granting ample drying time is paramount. Rushing through this crucial step could result in feeble bonds and a flimsy puzzle that crumbles at the slightest touch.
The Clock is Ticking:
Elmer’s clear glue boasts quick-drying properties, but don’t be fooled – it still requires adherence to the recommended drying time. Typically, a 24-hour period does the trick, though external factors like temperature and humidity can sway the process. Adjustments may be necessary based on these variables.
The Force of Gravity:
Lay your newly glued puzzle on a flat surface and resist the urge to disturb it for at least 24 hours. Let gravity work its magic as it ensures a seamless distribution of glue across every nook and cranny of your masterpiece.
Patience Unleashed:
Hold back from handling or moving the puzzle prematurely, even if the surface feels dry to the touch. Beneath that seemingly dry exterior, layers of glue may still be wet and in need of full curing.
Battling Moisture and Temperature:
In high humidity environments, drying time may extend due to sluggish moisture evaporation. Conversely, colder temperatures can also delay the process. To speed things up in chilly weather, find a warm and well-ventilated area to house your puzzle while it dries.
The Manufacturer Knows Best:
Keep an eye out for any specific recommendations on the Elmer’s clear glue bottle regarding drying time and conditions. By following these guidelines, you’ll unlock the secret to optimal results.
Inspect and Reinforce:
Once the recommended drying time has elapsed, conduct a thorough inspection of your glued puzzle. Ensure every piece is firmly secured, leaving no room for loose ends. If necessary, administer a touch of additional Elmer’s clear glue to reinforce any weak or unglued sections.
Conclusion:
Allowing adequate drying time isn’t just about preserving the structural integrity of your puzzle; it’s a recipe for long-term preservation. By embracing patience and following these guidelines, your masterpiece will remain intact and ready to be displayed or framed without any fear of damage or pieces shifting.
Finishing the Puzzle
Now it’s time to take the necessary steps to preserve your hard work and ensure its durability. In this comprehensive guide, we will explore the process of finishing a puzzle using the reliable choice of Elmer’s clear glue. Known for its transparency and effective adhesion, Elmer’s clear glue will help you create a beautifully finished puzzle ready to be displayed or stored for years to come.
Preparation: Setting the Stage for Success
Before starting the gluing process, make sure your puzzle is fully completed and all pieces are in place. Choose a clean and flat surface that allows you to focus on your puzzle without any disturbances. To protect the surface and prevent sticking, lay a sheet of wax paper or plastic wrap underneath the puzzle.
Applying the Glue: A Delicate Touch
Using a foam brush or small paintbrush, apply a thin layer of Elmer’s clear glue to the front side of the puzzle. Ensure every area is covered with a thin, even layer of glue, paying extra attention to edges and corners. Allow this first layer to dry completely, which may take several hours or even overnight depending on climate and humidity levels.
Adding Strength: Layer Upon Layer

Once the first layer is dry, apply a second layer of glue using the same technique as before. This second layer provides additional strength and stability to your puzzle masterpiece. Again, allow it to dry completely before moving on to the next step.
The Backside: Completing the Puzzle’s Armor
Carefully flip the puzzle over onto a clean surface. Repeat the gluing process on the backside, applying two layers of Elmer’s clear glue with sufficient drying time between each layer. Don’t forget to cover all areas, including corners and edges, with a thin, even layer of glue.
Trimming Excess: The Finishing Touch
Once both sides of the puzzle are fully dry, use scissors to carefully trim any excess wax paper or plastic wrap around the edges. This final step adds a touch of neatness to your finished puzzle.
Touch-ups: A Keen Eye for Detail
Inspect the glued puzzle for any visible gaps or areas where glue may have been missed. If necessary, touch up these areas with a small amount of Elmer’s clear glue.
Patience is Key: Allow for Proper Drying Time
To ensure maximum durability, allow the puzzle to dry completely for at least 24 hours before handling or framing it. This ensures that the glue has fully set and provides long-lasting protection.
Additional Tips for Gluing Puzzles with Elmer’s Clear Glue
With its transparent finish and strong bond, Elmer’s clear glue is an excellent choice for gluing puzzles. In this guide, we will share some additional tips to ensure a successful gluing process using Elmer’s clear glue.
Prepare Your Puzzle Surface:
Before applying the glue, make sure your puzzle is fully completed and all the pieces are in place. To protect your work surface, place a plastic sheet or wax paper underneath the puzzle. This will prevent the glue from sticking to the surface and making it difficult to remove later.
To ensure a stable working area, consider using a puzzle mat or board. This will provide additional support and prevent any damage or shifting of puzzle pieces during the gluing process.
Apply Glue with Care:
Using a foam brush or paintbrush, apply a thin layer of Elmer’s clear glue to the entire backside of the puzzle. Start from one edge and work your way across, making sure to cover all areas evenly. Avoid using too much glue as it can seep through the puzzle pieces and create a mess.
To achieve an even distribution of glue, consider using a spreader tool such as a plastic spatula or an old credit card. Gently spread the glue across the puzzle surface, ensuring that all puzzle pieces are properly coated. This will help in avoiding excess glue buildup and create a smooth finish.
Allow Sufficient Drying Time:
After applying the glue, allow it to dry completely. This process usually takes around 24 hours, but leaving it for at least 48 hours is recommended to ensure that the glue has fully cured. Place heavy books or a puzzle mat on top of the puzzle while drying to keep it flat and prevent warping.
If you live in a humid environment or want to speed up the drying process, consider using a fan to increase air circulation. However, avoid direct heat sources such as hairdryers as they can cause the puzzle to warp or the glue to bubble.
Lift with Care:
Once the glue has dried completely, carefully lift the glued puzzle from the wax paper or plastic sheet. Use a sharp craft knife or scissors to trim off any excess glue that may have seeped out from between the puzzle pieces. Be cautious not to damage the puzzle during this process.
Additional Protection:
If you want added protection or plan to use the puzzle in a high-traffic area, consider applying a clear adhesive sealant over the dried glue. This extra step will provide additional durability and protection against accidental spills or damage. Look for sealants specifically designed for puzzles or crafts, and follow the instructions provided for application.
Disadvantages of Using Elmer’s Clear Glue
Preserving a completed puzzle masterpiece requires choosing the right glue. While Elmer’s clear glue may appear convenient, it is essential to consider its potential drawbacks. In this informative essay, we will explore the disadvantages associated with using Elmer’s clear glue and provide insights to help you make an informed decision.
Lack of Strength:
Elmer’s clear glue falls short in holding puzzle pieces securely, especially for larger or intricate puzzles. Over time, these puzzles may experience pieces coming loose due to the inadequate strength of the glue.
Lengthy Drying Time:
One major inconvenience with Elmer’s clear glue is its long drying time. It can take several hours or even days for the glue to fully dry and set. This delay can be frustrating if you wish to promptly display or frame your puzzle.
Visible Residue and Film:
Using Elmer’s clear glue can leave behind a visible residue or film on the puzzle’s surface, significantly affecting its overall appearance. This residue makes the puzzle look less polished and professional.
Lack of Moisture Protection:
Elmer’s clear glue is not moisture-resistant or waterproof. If your puzzle is exposed to moisture or humidity, the glue may not provide adequate protection, leading to warping or damage to the puzzle pieces over time.
Insufficient Adhesive Properties:
Since Elmer’s clear glue is not designed specifically for puzzles, it may lack the necessary adhesive properties to keep all the pieces in place securely. This becomes particularly problematic if you frequently handle or move the puzzle.
Messy Application Process:
Applying Elmer’s clear glue directly onto the puzzle’s surface can be messy and imprecise. Uneven coverage and excess glue seeping out between the pieces are common issues that can impact the final result.
Lack of Repositioning Options:
Once Elmer’s clear glue dries, it becomes permanent and cannot be undone without damaging the puzzle. Unlike some other glues, there is no option for repositioning or adjusting the puzzle pieces after gluing.
Alternatives to Elmer’s Clear Glue for Gluing Puzzles
Preserving your puzzle masterpiece requires the right adhesive, and while Elmer’s clear glue is a popular choice, alternatives can offer stronger adhesion, quicker drying times, and a more seamless finish. In this article, we will explore some of the top alternatives to Elmer’s clear glue for gluing puzzles.
Mod Podge:
Mod Podge is a versatile crafting glue that excels in puzzle gluing. Available in matte, gloss, and satin finishes, Mod Podge allows you to choose the desired look for your finished puzzle. It provides a strong bond between puzzle pieces and dries clear, ensuring a seamless finish.
Puzzle Glue:
Specifically designed for gluing puzzles, puzzle glue guarantees both a strong bond and the preservation of the puzzle’s integrity. It comes in liquid form or as adhesive sheets that can be applied directly to the back of the puzzle. Puzzle glue typically dries clear and provides a long-lasting adhesive solution.
Craft Adhesives:
While not all craft adhesives are suitable for puzzle gluing, some options like rubber cement or spray adhesive can work effectively. However, it is crucial to check product labels and instructions to ensure compatibility with puzzles. Certain adhesives may cause warping or discoloration of the puzzle pieces.
l6x4SMKLUw8″ >
Conclusion
Gluing a puzzle with Elmer’s clear glue is a simple and satisfying process. To begin, make sure you have a clean, flat surface to work on. Lay out the puzzle pieces in their completed form, ensuring that all the edges fit snugly together.
Next, carefully lift each piece of the puzzle and apply a small amount of Elmer’s clear glue to the back. Be sure to spread the glue evenly using a brush or your finger, covering the entire surface.
Gently place each glued piece back into its original position on the puzzle board. Take your time to align the edges perfectly for a seamless finish.
Allow the glue to dry completely before moving or displaying your newly glued puzzle. This may take anywhere from 24 to 48 hours, depending on the humidity and temperature of your environment.
Once dry, your puzzle will be solidly held together by Elmer’s clear glue, creating a durable and long-lasting masterpiece. You can proudly frame it or hang it up as a beautiful decoration in your home.
Remember, when gluing a puzzle with Elmer’s clear glue, patience is key. Take your time and enjoy the process as you transform loose pieces into a stunning work of art.
In conclusion, gluing a puzzle with Elmer’s clear glue is an enjoyable and rewarding activity that allows you to preserve and display your completed puzzles for years to come.