Imagine this: a backyard oasis, complete with vibrant greenery and a stylish patio. But there’s something missing. You yearn for the rustic allure of a wooden deck, yet the unyielding concrete slab beneath your feet stands in your way. Don’t fret. Today, we embark on a quest to unlock the secrets of attaching wood to a concrete slab.
When it comes to marrying the durability of concrete with the cozy charm of wood, many homeowners find themselves scratching their heads. Can these two materials coexist harmoniously? Absolutely. In this captivating guide, we’ll explore methods that will transform your outdoor space into an enchanting haven.
Within these paragraphs lie essential tools and techniques to bridge the gap between wood and concrete, securing your dreams firmly in reality. From traditional methods involving screws and adhesives to innovative approaches like using railway sleepers or concrete anchors, we’ve got you covered.
Embark on an enlightening journey as we dive into the nuances of attaching wood to a concrete slab. Discover the secrets behind surface preparation, selecting ideal fasteners, and reinforcing bonds for long-lasting results. Whether you aspire to create a breathtaking rooftop oasis or enhance your basement with a cozy wooden floor, this guide empowers you to bring your vision to life.
So grab your hammer, put on your thinking cap, and get ready to explore the enchanting world of blending wood and concrete. Let’s dive in and demystify the art of attaching wood to a concrete slab.
Types of Adhesives for Bonding Wood to Concrete
Contents
- 1 Types of Adhesives for Bonding Wood to Concrete
- 2 Preparing the Concrete Surface
- 3 Applying the Adhesive
- 4 Enhancing the Bond with a Bonding Agent or Primer
- 5 Securing the Wood in Place with Clamps or Weights
- 6 Adhesive Bonding May Not Be Suitable for Heavy Loads or Structural Applications
- 7 Using Concrete Screws or Anchors
- 8 Drilling Pilot Holes for Fasteners
- 9 Conclusion
In this article, we will delve into the world of adhesives specifically designed for bonding wood to concrete. These adhesives offer a reliable and long-lasting bond, eliminating the need for mechanical fasteners. Let’s embark on this adhesive journey together.
Epoxy Adhesives: Unleashing Super Strength and Durability
When it comes to bonding wood to concrete, epoxy adhesives rise above the rest. They possess unparalleled strength and durability, making them the superheroes of adhesives. Comprising two components, a resin and a hardener, these adhesives must be mixed before use. Once applied, they create an incredibly strong bond capable of withstanding heavy loads. Furthermore, epoxy adhesives boast excellent resistance to moisture and chemicals, making them the ideal choice for outdoor or high-moisture environments.
Polyurethane Adhesives: Versatility Personified
For those seeking versatility in their adhesive selection, look no further than polyurethane adhesives. These adhesives provide exceptional bonding strength on both porous and non-porous surfaces.
Available in one-component or two-component formulations, they cater to different application requirements. One-component polyurethane adhesives cure upon exposure to moisture in the air, while their two-component counterparts necessitate pre-mixing.
Their flexibility allows them to absorb vibrations, making them suitable for applications where movement or expansion between wood and concrete may occur.
Construction Adhesives: The Go-To Choice
When it comes to bonding wood to concrete in numerous projects, construction adhesives reign supreme. Conveniently packaged in tubes compatible with caulking guns, these adhesives are incredibly easy to apply while providing a robust bond. Whether you opt for a solvent-based or water-based formulation, construction adhesives offer excellent resistance to weathering, moisture, and temperature fluctuations. Their versatility makes them an excellent choice for bonding large areas or heavy objects.
Contact Cement: Instant Bonding Power
When dealing with thinner wood materials like laminates or veneers, contact cement is the adhesive of choice. This unique adhesive forms an instant bond when the surfaces are pressed together. Applied to both the wood and concrete surfaces, it is allowed to dry until tacky before being firmly pressed together. Contact cement provides a strong bond and exhibits impressive resistance to heat and moisture, ensuring a reliable connection.
Structural Adhesives: Bearing the Weight of Heavy-Duty Applications
For applications that demand a load-bearing bond, structural adhesives come to the rescue. These adhesives offer exceptional strength and can withstand heavy loads and stress. Widely utilized in construction or furniture assembly, structural adhesives are available in various forms, including tapes.
Preparing the Concrete Surface
In this comprehensive guide, we will take you through the essential steps of preparing your concrete surface like a pro.
Step 1: Cleanse and Purify
Before diving headfirst into the attachment process, it’s imperative to start with a clean slate. Banish any traces of dirt, dust, or debris with the precision of a magician. Equip yourself with a trusty broom or vacuum cleaner and sweep away every last particle. Remember, a pristine and velvety-smooth surface guarantees the finest results for your wood attachment masterpiece.
Step 2: Inspect and Mend
Once your canvas is immaculate, it’s time to embark on an investigative journey across your concrete surface. Seek out any hidden cracks, unevenness, or blemishes that threaten the structural integrity of your project. Armed with an appropriate concrete patching compound, fill in these imperfections and level them off with the grace of an artist wielding a trowel.
Step 3: Tame the Beast of Rough Textures
If your concrete surface harbors a rough and unruly texture, it’s time to unleash the forces of refinement. Consider employing the powers of grinding or sanding to tame this wild beast. By doing so, you’ll unveil a smoother surface that encourages a harmonious bond between concrete and wood. Not only will this enhance adhesion, but it will also bestow upon your creation an air of sophistication and professionalism.
Step 4: Vanquish Moisture’s Wrath
Moisture, like a treacherous foe lying in wait, can wreak havoc on your wood-to-concrete attachment dreams. Before proceeding, you must ensure that the concrete surface is devoid of any moisture-induced perils.
Employ a simple yet effective test: tape a plastic sheet tightly onto the concrete and leave it undisturbed for a day.
If condensation or moisture buildup mars the underside of this transparent shield, postpone your attachment endeavors until the concrete basks in complete dryness.
Applying the Adhesive
In our journey to conquer concrete, we’ve tackled the cleaning and preparation stages. Now, it’s time to unlock the secret to a strong and durable bond – applying adhesive. Get ready to dive into the world of sticky wonders as we explore the ins and outs of attaching wood to concrete like true professionals. So grab your tools, and let’s get started on this adhesive adventure.
Choosing the Right Adhesive:
First things first, my friends – selecting the perfect adhesive is crucial. Meet your trusty sidekick for this mission: construction adhesive. This heavyweight champion is specifically designed for bonding wood to concrete, making it the ultimate solution for our project. Conveniently packaged in tubes or cartridges, it’s a breeze to apply directly onto the concrete surface.
Preparation is Key:
Before we plunge into the sticky business, let’s prepare our canvas for this masterpiece. Picture yourself as an artist prepping a fresh canvas – that’s exactly what we’re doing here. Sweep away any dirt and debris using a broom or vacuum cleaner. Our concrete slab must be clean, dry, and devoid of any loose particles. And if there are any stubborn existing coatings or sealants, they must be relinquished through sanding or scraping.
Applying the Adhesive:
Now that our stage is set, it’s time to unleash our adhesive prowess. Begin by cutting the nozzle of your adhesive tube at a 45-degree angle. This creates a perfect opening for smooth and controlled application. To double-check its flow, squeeze out a small amount onto a scrap piece of wood or cardboard – a simple yet essential step.
Equip yourself with either a caulk gun or an adhesive applicator – it’s showtime. Apply a continuous bead of adhesive along the length of the wood that will come into contact with the concrete slab. Ensure that this adhesive line covers the entire surface area to be bonded. For optimal coverage, strive for neat vertical lines rather than sporadic dots. We’re aiming for a rock-solid bond here.
Enhancing the Bond with a Bonding Agent or Primer
In our previous chapter, we delved into the artistry of attaching wood to concrete with construction adhesive. But today, we unveil the secret sauce that will take your bond from good to extraordinary. Prepare to be enchanted by the world of bonding agents and primers – those mystical substances that wield the power to enhance the connection between wood and concrete. Grab your brushes and rollers, for we are about to embark on a journey that will unlock the true potential of these sticky wonders.
The Mighty Bonding Agents:
Imagine this: you’ve meticulously prepped your concrete slab, applying a continuous bead of adhesive. However, to achieve a bond that stands the test of time, you need an extra touch of magic – enter the bonding agent. This formidable substance holds the key to building a robust and enduring connection between wood and concrete.
But how does it work, you ask? Well, my fellow adhesive enthusiasts, a bonding agent is the trusty sidekick that improves adhesion while thwarting any attempt at separation between the materials. Think of it as the guardian angel ensuring that your wood remains steadfastly attached to that concrete slab for years to come.
Preparation is Paramount:
Before you embark on your bonding adventure, ensure that both the wood and concrete surfaces are pristine. Just like an artist prepping their canvas, removing any debris or dust is crucial for creating a flawless surface for the bonding agent.
Unleashing the Bonding Agent:
Now that your surfaces gleam with cleanliness, it’s time to unleash some magic. Take hold of your brush or roller and apply the bonding agent evenly onto both the wood and concrete surfaces. Remember to heed the manufacturer’s instructions diligently because their wisdom is unparalleled.
The Virtue of Patience:
Patience is the key that unlocks the door to an unbreakable bond. Allow the bonding agent ample time to cure before proceeding with attaching the wood to the concrete slab. Follow the recommended curing time, and you shall be rewarded with a bond that surpasses all expectations.
Supercharging with Primers:
But hold on, there’s an additional twist. To elevate your bond to extraordinary heights, consider joining forces with a primer. Primers are the superheroes of the adhesive realm – they penetrate and seal porous surfaces, establishing an unyielding foundation for your bonding agent.
Securing the Wood in Place with Clamps or Weights
Today, we’re delving deep into the magical world of securing wood in place on a concrete slab. Whether you’re crafting a masterpiece or adding a touch of elegance to your outdoor oasis, mastering the art of securing wood is a must.
In this section, we’ll unravel the secrets of using clamps and weights to ensure your wood remains steadfast.
So, grab your tools and let’s embark on this thrilling journey.
Step 1: Prep the Surface – Where Cleanliness is Key
Before bonding your wood to the concrete slab, it’s vital to create a pristine canvas. Sweep away those pesky debris and banish any lingering dust particles that threaten to sabotage the bond between wood and concrete. Trust us, this little act of preparation goes a long way in ensuring a rock-solid connection.
Step 2: Choose the Right Clamp – Finding Your Superhero
Clamps are the caped crusaders of the woodworking realm, providing an unyielding grip. But fear not, for there are various types of clamps at your disposal. C-clamps, bar clamps, and pipe clamps stand ready to save the day, offering versatility and flexibility based on your wood’s size and shape. Choose wisely, dear DIY champion.
Step 3: Position and Tighten – Locking Down Perfection
Now that you’ve readied your surface and selected your trusty sidekick clamp, it’s time to secure that wood. Place your wood precisely where desired on the concrete slab and gently tighten the clamp around it. Begin with a firm but gentle pressure, gradually increasing it until you feel that euphoric sense of absolute security.
Step 4: Even Pressure is Key – Harmonizing Strength
To ward off any potential warping or distortion, it is crucial to distribute the clamping pressure evenly across every nook and cranny of the wood’s surface. This symphony of pressure ensures a harmonious hold, allowing you to work your magic with peace of mind.
But what if clamps are not readily available or suitable for your heroic endeavor? Fear not, for weights come to the rescue.
Adhesive Bonding May Not Be Suitable for Heavy Loads or Structural Applications
In our previous section, we explored the thrilling world of attaching wood to a concrete slab, using clamps and weights to achieve a rock-solid connection. But hold on tight, because today we’re diving into the fascinating topic of adhesive bonding. Get ready to unleash the power of glue.
Now, adhesive bonding is a nifty process that involves using an adhesive or glue to join two materials together. It’s a convenient and efficient method for various applications, including attaching wood to a concrete slab. But here’s the thing – adhesive bonding may not always be suitable for heavy loads or structural applications. Why, you ask? Well, let me break it down for you.
First off, adhesive bonds primarily rely on the strength of the adhesive itself. And while glue can work wonders in many situations, it may not be able to withstand the significant forces exerted on joints when heavy loads or structural stresses come into play. We’re talking about some serious pressure here, folks.
That’s where mechanical fasteners come in to save the day. Think screws, bolts, or anchors – these bad boys provide a more secure and reliable connection for those heavyweight situations. They can handle the muscle needed to keep that wood firmly attached to the concrete slab, even when faced with heavy loads or structural stresses.
But hey, don’t completely write off adhesive bonding just yet. It can still play a role in these scenarios. Picture this – mechanical fasteners teaming up with adhesive bonding for added strength and stability. It’s like a superhero duo fighting crime together.
The mechanical fasteners take the lead, providing the primary attachment, while the adhesive acts as a trusty sidekick, offering additional support to ensure everything stays in place.
Now, before you go all-in on adhesive bonding or mechanical fasteners, it’s essential to consider your specific application’s requirements. If your load is expected to be light or doesn’t involve significant forces, adhesive bonding may be a viable option. It’s like a low-stakes mission where glue can shine.
However, if you’re dealing with heavy loads or structural stresses, I recommend shifting gears and going full-force with mechanical fasteners. They’re the heavyweight champions in these situations, providing the strength and durability needed to keep everything secure.
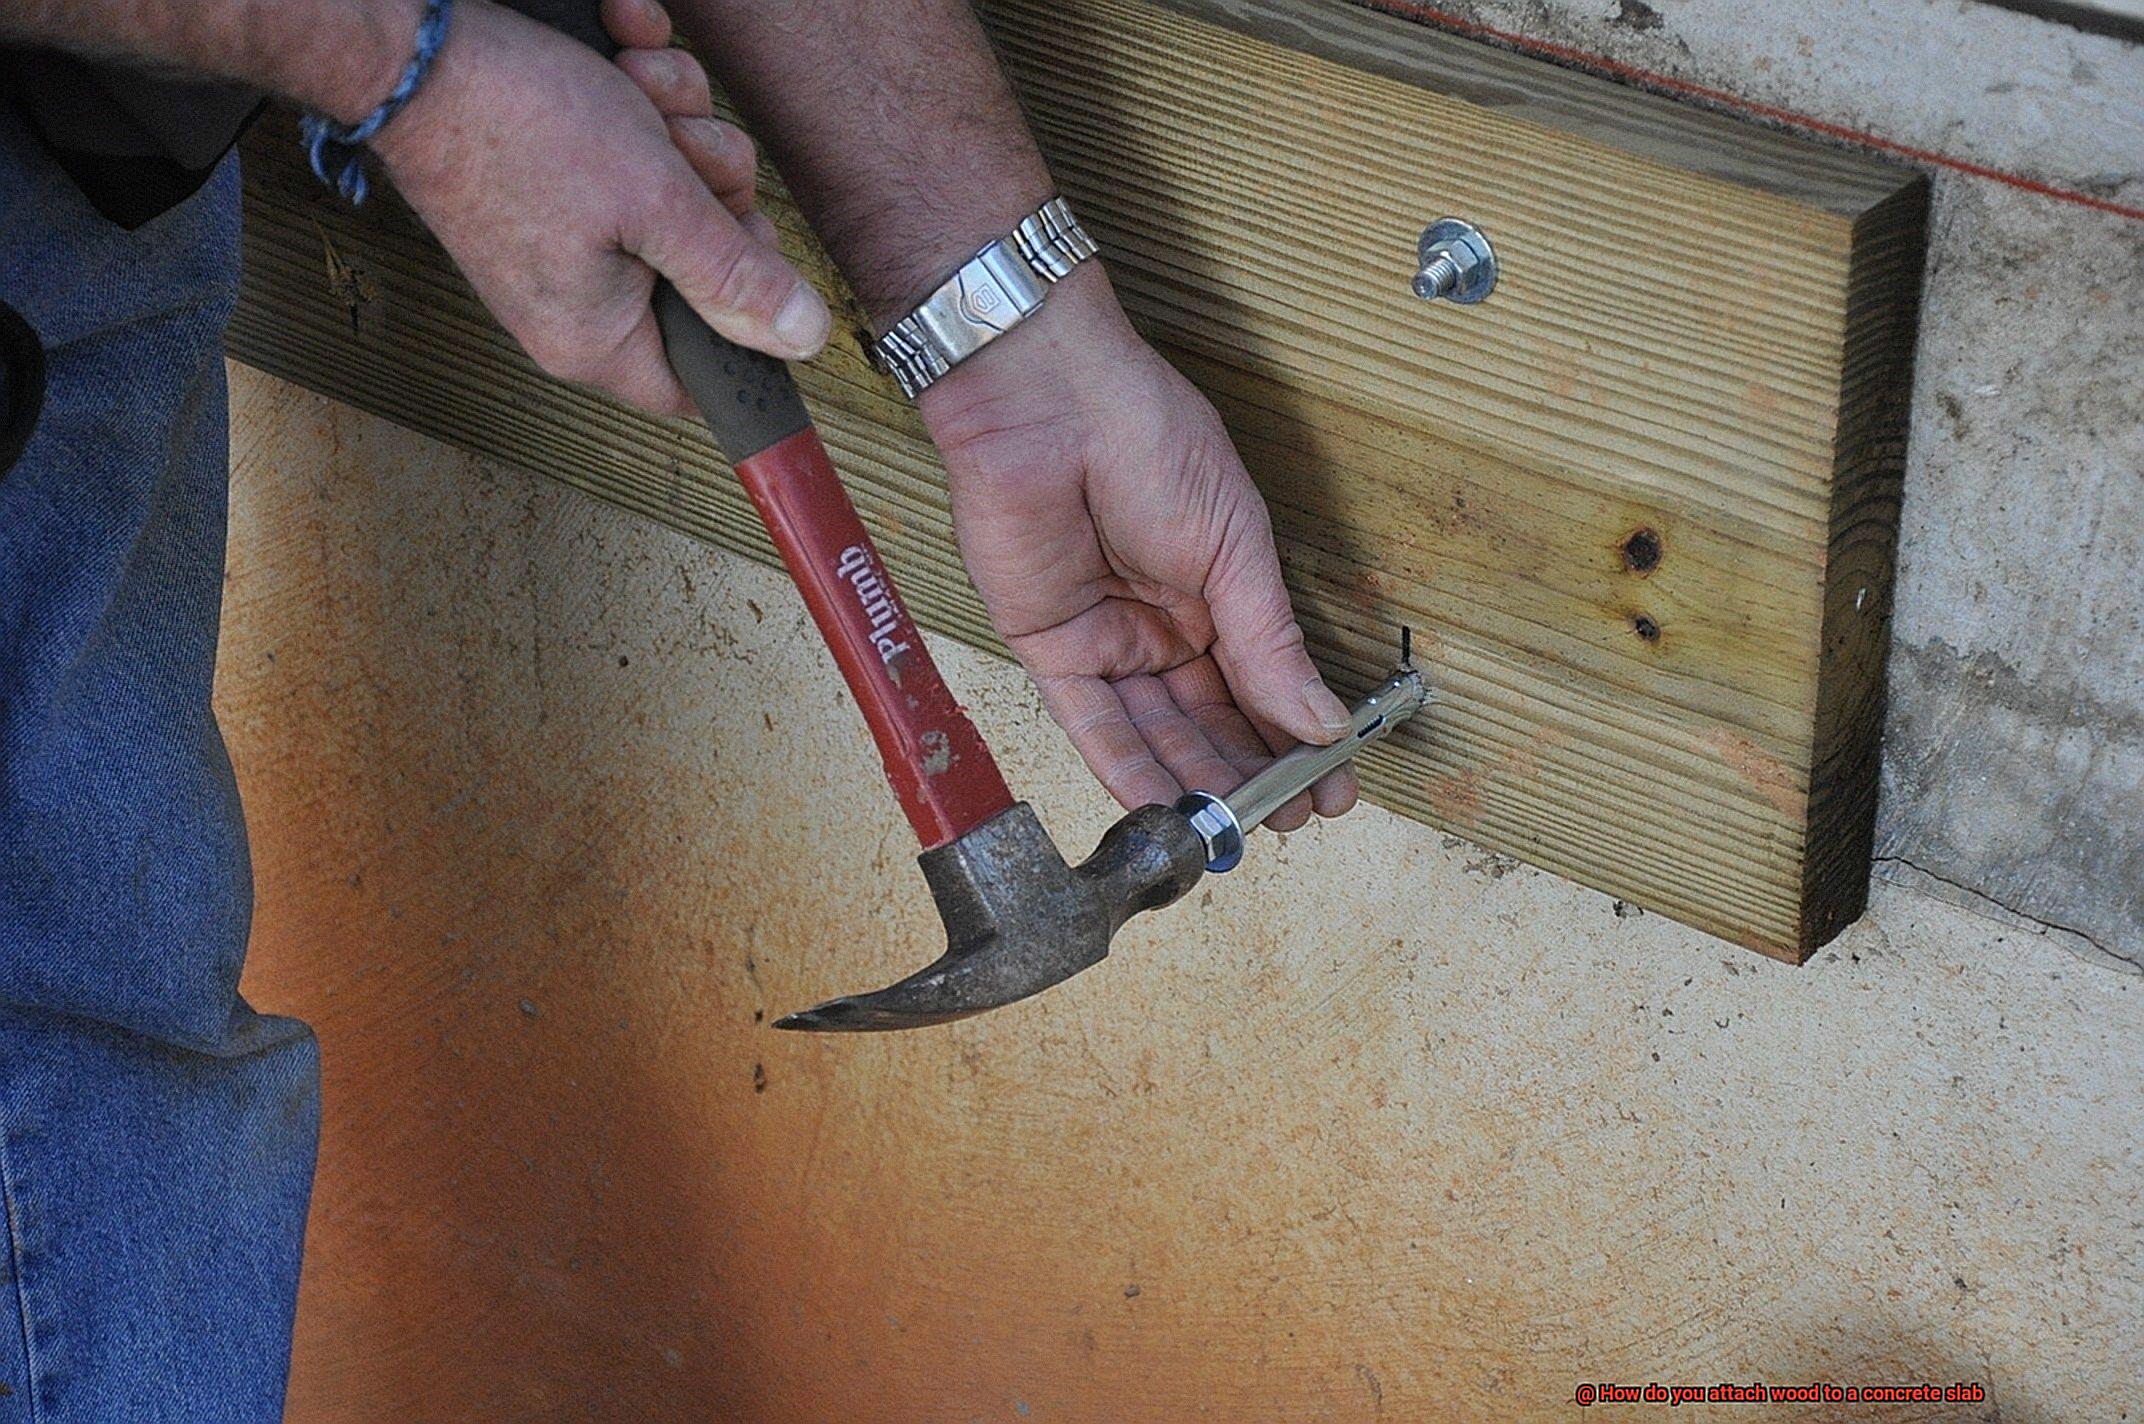
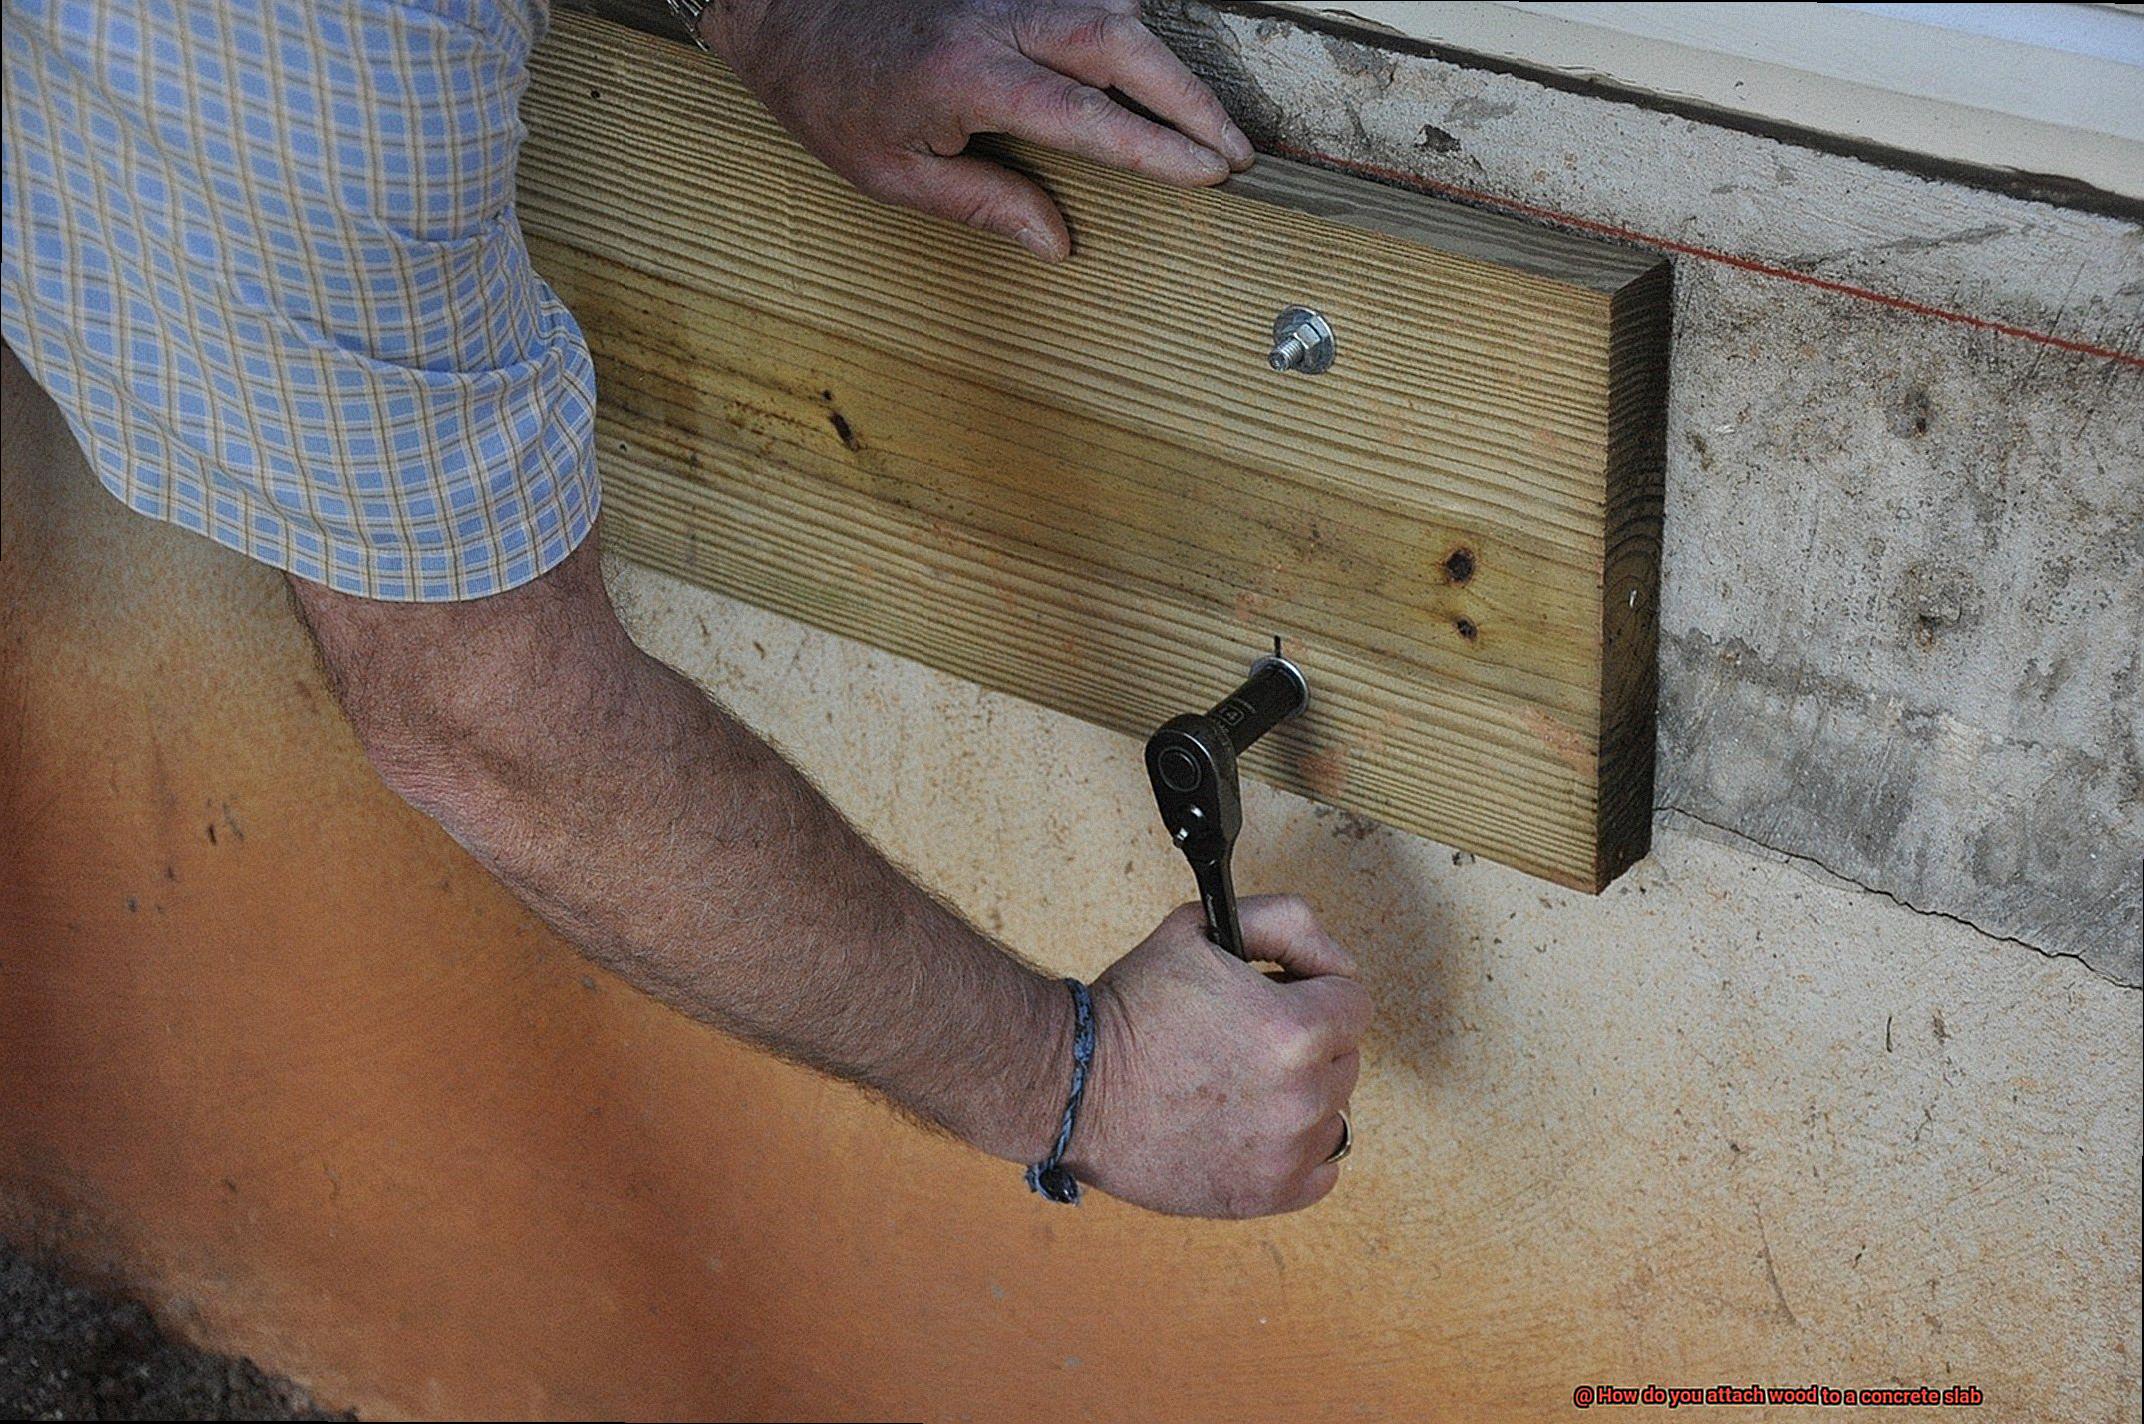
Using Concrete Screws or Anchors
Prepare to be amazed by the power of concrete screws and anchors – the ultimate superheroes of fasteners. With their incredible strength and reliability, they ensure that your project stands tall and secure. Let’s delve into the process of using these mighty tools.
Concrete screws, with their hardened steel construction and unique thread design, are built to be driven directly into concrete. But before you start driving those screws, you’ll need to pre-drill some holes using a masonry drill bit. Remember, the size of the bit should match the screw for a perfect fit.
Once you’ve got your holes drilled, it’s time for the fun part – inserting those concrete screws. Grab your power drill or screwdriver, and start driving those screws into the holes. If you’re dealing with larger screws or tougher concrete, a hammer drill might be your weapon of choice. Just make sure those screws are snugly fit for an unbreakable hold.
Now, let’s shift our focus to anchors. These remarkable devices are inserted into pre-drilled holes in the concrete. When tightened, they expand and create an iron grip on the concrete. There are different types of anchors available, such as wedge anchors, sleeve anchors, and drop-in anchors. Your choice depends on factors like weight and load requirements.
To use anchors, begin by drilling holes into the concrete with a masonry drill bit. The size of the hole will depend on the type and size of anchor you’re using, so consult the manufacturer’s instructions for guidance. Once you’ve drilled your holes, insert the anchor and tighten it with a wrench or socket. As it tightens, watch in awe as the anchor expands, creating an unyielding hold in the concrete.
Now, here’s a crucial tip – prepare your wood before attaching it to the concrete. Consider countersinking holes or using washers to distribute the load evenly. This extra step ensures the wood remains intact and undamaged.
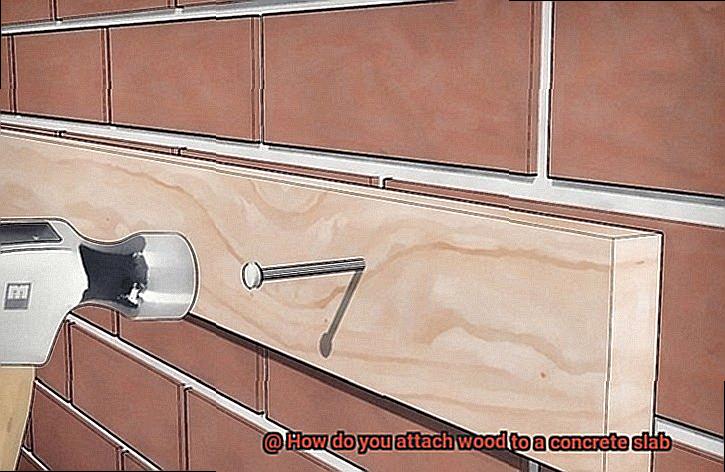
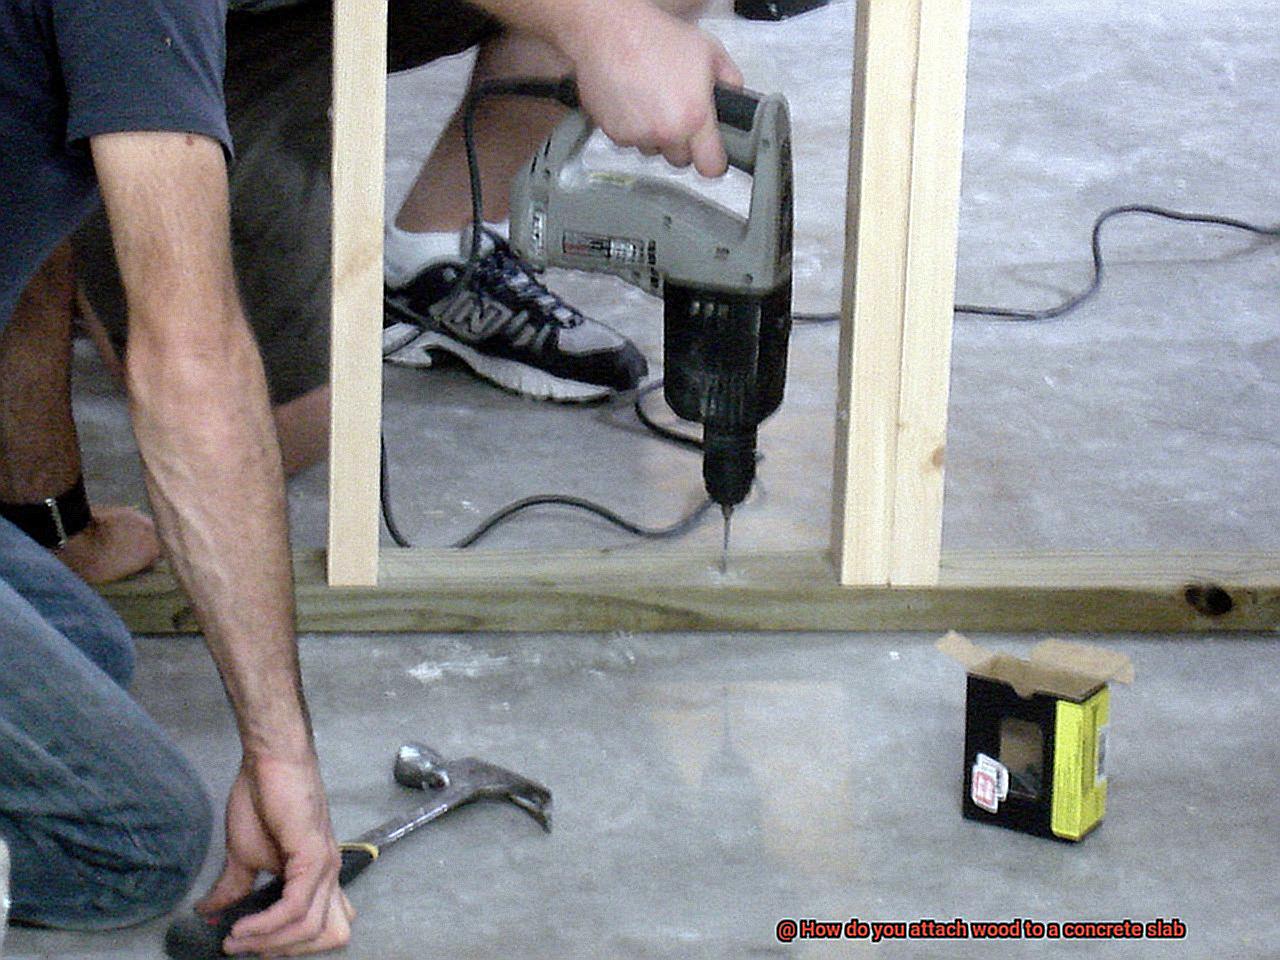
Drilling Pilot Holes for Fasteners
Today, we delve into the art of drilling pilot holes for fasteners – a crucial step that ensures a secure and long-lasting installation. So grab your trusty drill and let’s embark on this thrilling quest.
The Importance of Pilot Holes:
Imagine the challenge of driving fasteners directly into concrete, risking wood splitting or loose connections over time. Fear not, for our heroes – the pilot holes – come to the rescue. These small pre-drilled holes provide a safe pathway for your fasteners to penetrate concrete without causing any damage.
Marking Your Territory:
Before we begin drilling, it’s essential to mark the exact locations where you want to attach the wood to the concrete slab. Take precise measurements and mark corresponding positions on both the wood and the concrete surface. This meticulous preparation ensures a neat and professional-looking installation.
Choosing the Right Tools:
To drill pilot holes like a pro, arm yourself with a drill equipped with a masonry bit matching your fastener’s diameter. Securely attach the masonry bit to your drill and set it to drill mode. And don’t forget your safety goggles and work gloves – we want you protected from any unwanted flying debris.
Drilling Like a Champ:
Position the drill tip over one of your marked locations on the concrete slab. Apply steady pressure as you start drilling, beginning at a slow speed. Gradually increase the speed as you penetrate through the concrete, ensuring that your drill remains perpendicular to the surface for straight pilot holes.
Clearing the Pathway:
Once you’ve drilled through the concrete surface, take a moment to remove any dust or debris from the hole. A brush or compressed air will do the trick, creating a clean and debris-free pathway for your fastener.
Guiding Your Fasteners:
Position your wood piece over the drilled hole, aligning it with your markings. Insert your fastener into the pilot hole and drive it into place using a screwdriver or hammer, depending on whether you’re using screws or nails. The pilot hole acts as a guide, ensuring a smooth journey for your fastener into the wood without any splitting.
7m4EEi-pIe8″ >
Conclusion
When it comes to attaching wood to a concrete slab, there are a few methods you can consider.
One option is using adhesive or epoxy to bond the two materials together. This creates a strong and durable connection that can withstand the test of time.
Another method is using concrete screws or anchors, which provide a secure hold by drilling into the concrete and then screwing in the wood. Additionally, you can use metal brackets or straps to fasten the wood to the concrete, ensuring stability and strength.
Whichever method you choose, it’s important to properly prepare the surface by cleaning it thoroughly and making sure it’s free from any debris or moisture.