If you’ve ever dreamed of rocking flawless nails that turn heads without breaking the bank at a fancy salon, then listen up. This guide is about to spill all the tea on how to effortlessly glue fake nails, taking your manicure game from zero to hero in no time.
Fake nails are like a blank canvas waiting for your personal touch – whether you’re into classic French tips or dazzling bedazzled finishes. But don’t worry if you’re new to this whole shebang. We’ve got your back with an easy-peasy step-by-step breakdown that’ll have you applying fake nails like a pro.
So grab your go-to polish, say goodbye to those chipped and sad-looking nails, and let’s dive headfirst into the fabulous world of gluing on fake nails. Get ready for some seriously stunning talons that’ll stop traffic.
Instructions:
- Nail Prep: Start by giving your natural nails some love. Make sure they’re clean, dry, and well-shaped. Gently buff the surface for a smooth base. If you’ve got old polish hanging around, use an acetone-based remover to wipe it away.
- Nail Measurement: Time to find the perfect fit. Choose artificial nails that match the width and curve of your natural ones. Lay them out flat to ensure they’re just right for each finger. And hey, if you want to customize the length or shape, feel free to file away.
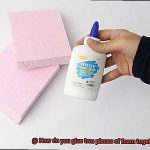
- Glue Application: Now comes the glue party. Squeeze a tiny drop of nail glue onto the center of your natural nail, right below the cuticle line. Remember, less is more here – a little dab will do ya. To control the flow, hold the glue bottle at a 45-degree angle.
- Securing the Artificial Nail: Time to get hands-on. Carefully place the fake nail onto your natural one, starting from the cuticle area. Press it down firmly, making sure it aligns perfectly with the sides of your natural nail. Hold it there for a few seconds to let that glue work its magic.
- Repeat and Perfect: Keep on gluing, my friend. Apply the remaining fake nails one by one, ensuring each is snugly secured. Give ’em a gentle press on
What You’ll Need for Gluing Fake Nails
Contents
Well, you’re in luck. Gluing fake nails is a cost-effective and convenient way to achieve stunning, long-lasting nails from the comfort of your own home. In this comprehensive guide, we’ll take you through all the essential items you need for a successful fake nail application.
Fake Nails: The Foundation of Your Perfect Manicure
To begin, you’ll need a set of fake nails. These can be easily found at drugstores, beauty supply stores, or online retailers. Choose from an array of shapes, sizes, and designs that suit your style and preference. From classic French tips to trendy stiletto shapes, the possibilities are endless.
Nail Glue: The Magic Adhesive
Nail glue is the holy grail of fake nail application. Look for a high-quality adhesive specifically designed for attaching fake nails to your natural nails. Opt for a strong adhesive that dries quickly and lasts for days or even weeks. This will ensure your nails stay securely in place, no matter what activities you engage in.
Nail Prep Tools: Building the Perfect Base
Before applying the fake nails, it’s crucial to properly prep your natural nails. Gather these essential tools for a flawless base:
- Nail polish remover or alcohol: Cleanse your natural nails thoroughly to eliminate any oils or residue that could interfere with the adhesive.
- Cuticle pusher or orangewood stick: Gently push back your cuticles to create a clean surface for the fake nails to adhere to.
- Nail file or buffer: Shape and smooth your natural nails using these tools, ensuring a seamless application.
- Nail clippers (if needed): Trim the fake nails to perfectly fit your nail beds for a natural look.
Nail Glue Remover: A Must-Have for Easy Removal
While fake nails are designed to stay on for an extended period, there may come a time when you want to remove them. Having a nail glue remover on hand can simplify the removal process and prevent any damage to your natural nails.
Preparing Your Natural Nails
Before diving into the world of stunning manicures, it’s crucial to properly prepare your natural nails. In this comprehensive guide, we will walk you through each step to ensure a flawless and long-lasting application of fake nails using glue. So, grab your favorite nail polish remover, roll up your sleeves, and let’s get started on transforming your natural nails into works of art.
Step 1: Remove Old Nail Polish
Begin by wiping away any remnants of old nail polish using a gentle, non-acetone nail polish remover. This ensures that your natural nails are clean and ready for the next steps in the preparation process.
Step 2: Shape Your Nails
Grab a trusty nail file and shape your natural nails to your desired length and shape. Remember to file in one direction only, as back-and-forth filing can weaken the nails. Whether you prefer a classic square shape or a trendy almond shape, take the time to achieve the perfect foundation for your fake nails.
Step 3: Push Back Cuticles
Gently push back your cuticles using either a specialized cuticle pusher or an orangewood stick. This simple step creates a clean canvas for applying the fake nails and allows them to sit flush against your natural nail bed.
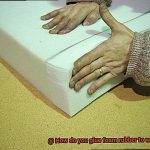
Step 4: Buff the Surface
Using a high-quality buffing block, gently buff the surface of your natural nails. This step removes any shine and oil, creating a better surface for the glue to adhere to. Remember, a little buffing goes a long way—don’t overdo it.
Step 5: Remove Excess Oils
To ensure optimal adherence, swipe each nail with a cotton pad soaked in rubbing alcohol or a nail dehydrator solution. This effectively eliminates any excess oils or residues that could compromise the longevity of your fake nails.
Step 6: Measure and Select the Right Size
Take a moment to carefully measure and select the right size fake nails for each nail. Proper fit is crucial, as it prevents discomfort and ensures a seamless, natural look. If needed, trim or file down the sides of the fake nails for a perfect match.
Step 7: Apply Nail Glue
Now, it’s time to unleash the power of nail glue. Apply a small amount of glue to the back of each fake nail, focusing on the center and edges. Avoid excessive glue, as it can lead to lifting or instability. Remember, less is more.
Step 8: Place and Press Firmly
With precision and care, align each fake nail with your natural nail bed, starting at the cuticle. Press firmly for a few seconds, ensuring a secure bond between the fake nail and your natural nail. This step is essential for long-lasting wear.
Trimming and Shaping the Fake Nails
Trimming and shaping fake nails is a vital step in achieving a natural and polished look. It not only ensures that the nails fit well but also enhances the overall appearance of your hands. By following these simple tips and techniques, you can achieve a professional finish that will make your manicure look flawless.
First, it is important to select the appropriate size of fake nails for each of your natural nails. Choosing sizes that closely match the width and shape of your own nails will help achieve a seamless look. If needed, you can file down the sides of the fake nails to get a better fit.
Once you have chosen the right size, it’s time to trim the length of the fake nails. To do this, use a nail clipper or nail scissors to carefully cut off the excess length. Start by trimming them slightly longer than your desired length, as you can always file them down further later. Remember to cut straight across the nail, avoiding any curved or angled edges. This will help maintain a neat and professional-looking shape.
If you prefer a specific nail shape, such as square, round, or oval, you can use a nail file to shape the edges accordingly. After trimming, it is essential to file the nails to smooth out any rough edges and create a polished finish. Start with a coarse-grit file to shape the edges and remove any sharp corners. Then switch to a finer-grit file to refine and smoothen the surface of the fake nails.
When filing, always move in one direction to prevent damage or splitting of the nails. Avoid using a sawing motion back and forth as this can weaken the fake nails and make them more prone to breakage.
Take your time when trimming and shaping the fake nails to ensure precision and accuracy. It’s better to make small adjustments gradually rather than cutting too much at once. Remember, you can always trim and file more if needed, but it’s difficult to undo excessive trimming.
Once you are satisfied with the shape and length of the fake nails, it’s time to move on to the next step of gluing them onto your natural nails. This will be covered in the subsequent sections of this article.
Applying the Glue
In this article, we’ll take you through a step-by-step process that will leave your nails looking salon-quality. So, grab your favorite nail products and let’s dive in.
Step 1: Clean and Prep:
To create a smooth foundation, start by removing any existing polish and gently pushing back your cuticles using a cuticle pusher or wooden stick. This crucial step ensures a clean canvas for the application of fake nails.
Step 2: Select the Perfect Fit:
Choosing the right size and shape of fake nails is key to achieving a natural and seamless look. Take your time to find nails that match the width and shape of your natural nails. Remember, perfect fit equals salon-quality results.
Step 3: Prep Your Natural Nails:
To create a strong bond between your natural and fake nails, lightly buff the surface of your natural nails using a nail buffer. This creates a slightly rough texture that allows the glue to adhere better, ensuring long-lasting results.
Step 4: Apply the Glue:
Now comes the exciting part – applying the glue. Less is more in this case, so squeeze a small amount of glue onto the back of the fake nail near the cuticle area. Excessive glue can lead to messy applications, so be mindful of how much you use.
Step 5: Press and Seal:
Gently press the fake nail onto your natural nail, starting from the cuticle area and moving towards the tip. Applying slight pressure for a few seconds ensures a strong bond. Take your time and repeat this process for all your nails, ensuring proper alignment and a snug fit.
Step 6: Trim and Shape:
Once all the fake nails are applied, it’s time to customize them to your desired length and style. Use a nail file or nail clippers to trim and shape your nails, creating the perfect look. Take it slow and steady to avoid any accidents.
Step 7: Add Some Flair:
To give your fake nails a polished finish, consider applying a top coat or polish. This adds an extra layer of protection and prevents any lifting or chipping of the glue. Get creative with nail art or choose your favorite color – let your personality shine.
Attaching the Fake Nails
Fake nails are the ultimate secret weapon for achieving salon-quality perfection right at home. Whether you’re gearing up for a special event or simply want to add a touch of glamour to your everyday look, attaching fake nails with precision and finesse is essential. Get ready, because we’re about to dive into a comprehensive guide that will leave your nails looking absolutely fabulous.
Before we jump into the nitty-gritty of attaching fake nails, it’s crucial to properly prepare your natural nails. Begin by removing any lingering traces of nail polish and gently push back your cuticles with a cuticle pusher.
This step creates a clean and smooth canvas for the fake nails to adhere seamlessly.
Now, let’s talk about finding the perfect fit. Fake nails come in all shapes and sizes, so take your time in choosing ones that closely match the shape and width of your natural nails. This ensures a comfortable and natural-looking fit that will have everyone fooled.
Once you’ve found your ideal match, it’s time to bring out the glue. Apply a thin layer of nail glue onto the back of the fake nail using either a small brush or the applicator provided in your fake nails kit.
Remember, less is more when it comes to glue – using too much can result in a messy application and potential early pop-offs.
Now comes the moment of truth – aligning and pressing down the fake nail onto your natural nail bed. Start from the cuticle area and gently press down on the fake nail, applying even pressure for a few seconds. This allows the glue to bond effectively, ensuring a seamless and secure attachment. Take note: proper alignment is key for a flawless finish.
Repeat these steps for each nail, tackling them one at a time with unwavering patience. Ensure that each fake nail is firmly attached before moving on to the next one. Rome wasn’t built in a day, and neither are impeccable nails.
Once you’ve attached all the fake nails, it’s time for a little fine-tuning. Trim and shape them to your heart’s desire using a trusty nail file. Whether you prefer a sleek stiletto or a classic square shape, this step allows you to showcase your personal style.
To fortify your handiwork and extend the lifespan of your fake nails, apply a clear top coat over the entire nail surface. This additional layer acts as armor, sealing in the glue and preventing unwanted lifting or peeling.
Now, brace yourself for the hardest part – waiting. Allow the glue to dry and set fully before engaging in activities that may stress your nails. While it typically takes only a few minutes for the glue to dry, it’s wise to wait at least 30 minutes to ensure it has fully cured and your fake nails are firmly in place.
Cleaning Up Excess Glue
You may have encountered the common problem of excess glue. But fear not. Today, we’ll explore various methods for cleaning up that pesky glue and achieving a flawless finish.
Let’s start with everyone’s go-to solution – acetone or nail polish remover. These powerful solvents can dissolve most adhesives, including nail glue. Grab a small container filled with acetone or nail polish remover, along with cotton balls or swabs. Dip the cotton ball or swab into the acetone and gently rub it over the area with excess glue. Watch as the glue dissolves away, easily wiped off with the cotton ball or swab. Just remember to be gentle to protect your fabulous fake nails.
Next up is using a nail file or buffer. This method is ideal when there’s only a small amount of excess glue. Take your trusty nail file or buffer and gently file away the excess glue until it disappears. Remember, a little goes a long way, so be cautious not to cause any damage.
For those who prefer natural remedies, warm soapy water is the way to go. Fill a basin with warm water and add a small amount of mild soap. Soak your hands in this soothing concoction for a few minutes to soften the glue. Then, grab a soft cloth or sponge and gently wipe away the excess glue. Rinse your hands thoroughly and pat them dry for a clean and fresh finish.
Sometimes, stubborn residue may linger even after trying these methods. In such cases, it’s time to bring out the big guns – a cuticle pusher or an orangewood stick. With caution, delicately scrape away the remaining glue. Take your time and be gentle to avoid any damage to your nails.
Remember, different glues may require different cleaning methods, so always consult the manufacturer’s instructions for the best results. And it’s always a good idea to test any cleaning method on a small area before going all out.
Letting the Glue Set and Dry
Today, we’re going to dive into the importance of letting the glue set and dry properly for long-lasting and fabulous fake nails. So, grab your favorite beverage, sit back, and let’s get started.
Why is this step so crucial? Allowing the glue to set and dry completely ensures a strong bond between the fake nail and your natural nail. This means your gorgeous new nails will stay in place for weeks, rather than popping off after a few days. And who wants their nails falling off prematurely? Not us.
Let’s break it down into some key points:
- Patience is key: It can be tempting to rush through this step and show off your new nails immediately. But trust me, exercising patience is well worth it. Giving the glue enough time to set and dry completely will ensure a secure bond that can withstand daily wear and tear.
- Follow the instructions: Different glues have different drying times, so make sure to read and follow the instructions provided with your chosen adhesive. These instructions will give you a recommended drying time for optimal results. Trust me, following instructions is always a good idea.
- Avoid water exposure: Water and glue don’t mix well. So, for at least an hour after applying your fake nails, try to avoid immersing your hands in water. No dishwashing, no swimming, and definitely no hand washing marathons. Moisture can weaken the bond between the fake nail and your natural nail, leading to premature lifting or detachment.
- Take it easy: While waiting for the glue to dry, it’s best to avoid activities that put unnecessary stress on your nails. Hold off on intense typing sessions or heavy cleaning tasks for a little while. Let your nails dry peacefully and undisturbed, and they’ll thank you by staying put for longer.
Need for speed? Feeling impatient? Try a nail drying solution. These magical potions accelerate the drying time of nail products, including glues. Just choose a reputable product and follow the instructions provided.
So there you have it. Allowing the glue to set and dry properly is critical for achieving fabulous and long-lasting fake nails. By exercising patience, following instructions, avoiding water exposure, taking it easy on your nails, and maybe trying a nail drying solution, you’ll be on your way to flawless nails that turn heads.
Removing the Fake Nails
If you’re ready to bid adieu to your fabulous fake nails and give your natural nails some much-needed TLC, you’ve come to the right place. In this comprehensive guide, we will delve into the art of safely removing fake nails, focusing specifically on the removal of pesky glue. Get ready to pamper your nails and embrace the beauty of your natural tips. Let’s dive in.
Step 1: Soak and Soften
Indulge in a luxurious warm soapy water soak for around 10-15 minutes. This blissful bath not only relaxes your hands but also works its magic by softening the glue holding those fake nails in place. Feel the tension melt away as your natural nails prepare for their grand reveal.
Step 2: Gently Lift those Edges
Once your nails have soaked, it’s time to delicately lift the edges of your fake nails using a cuticle pusher or an orange stick. Approach this step with patience and finesse – no forcing or prying allowed. Slowly and gently coax the false tips away from your natural ones.
Step 3: Repeat and Soak
Sometimes, stubborn fake nails just won’t budge. Don’t fret. Give them a second chance by treating them to another relaxing soak for a few more minutes. The glue will further soften, making it easier to lift those tenacious edges. Persistence pays off in the pursuit of perfect nail liberation.
Step 4: Acetone Magic
For those gel or acrylic nails that put up a fierce fight, acetone becomes our secret weapon. Soak a cotton ball in acetone and place it directly on top of each nail. To ensure maximum efficacy, secure it with a small piece of aluminum foil. Let this dynamic duo work their magic for 15-20 minutes while the acetone breaks down the stubborn glue.
Step 5: Gentle Removal
With a sense of anticipation, remove the foil and cotton balls. Marvel at the newfound freedom of your natural nails as they bid farewell to their fake counterparts. Use your trusty cuticle pusher or orange stick to gently pry off the remaining fake nails. Remember, be gentle and mindful of your natural nails’ well-being throughout this process.
Step 6: Show Some Love to Your Natural Nails
Now that your natural nails are liberated, it’s time to lavish them with love and care. Trim and file them if needed, shaping them to perfection. Show your appreciation by applying a nourishing nail oil or cuticle cream, allowing your nails to bask in their newfound freedom while keeping them healthy and strong.
Also Read: How To Glue On Fake Nails?
Conclusion
Gluing fake nails is a simple and effective way to achieve beautiful, long-lasting manicures.
To ensure a successful application, follow these steps: First, start by preparing your natural nails. Remove any old polish and gently push back your cuticles.
Next, select the appropriate size of fake nails for each finger. Apply a small amount of nail glue onto the back of the fake nail and press it firmly onto your natural nail.
Hold it in place for a few seconds to allow the glue to bond. Repeat this process for all your fingers.
Once all the nails are glued on, file and shape them to your desired length and style. Finally, apply a top coat to seal the edges and add shine to your new set of nails. With proper care, your glued-on fake nails can last up to two weeks before needing a touch-up or replacement.