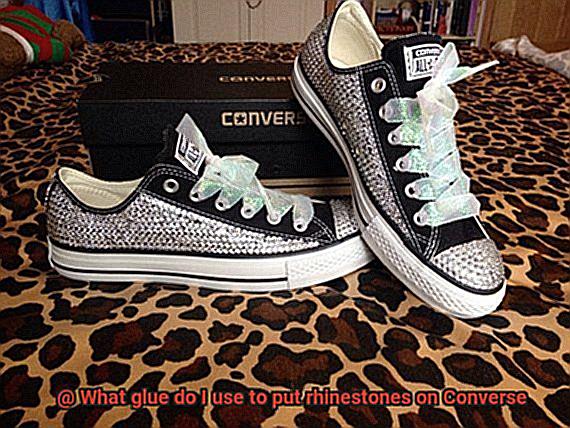
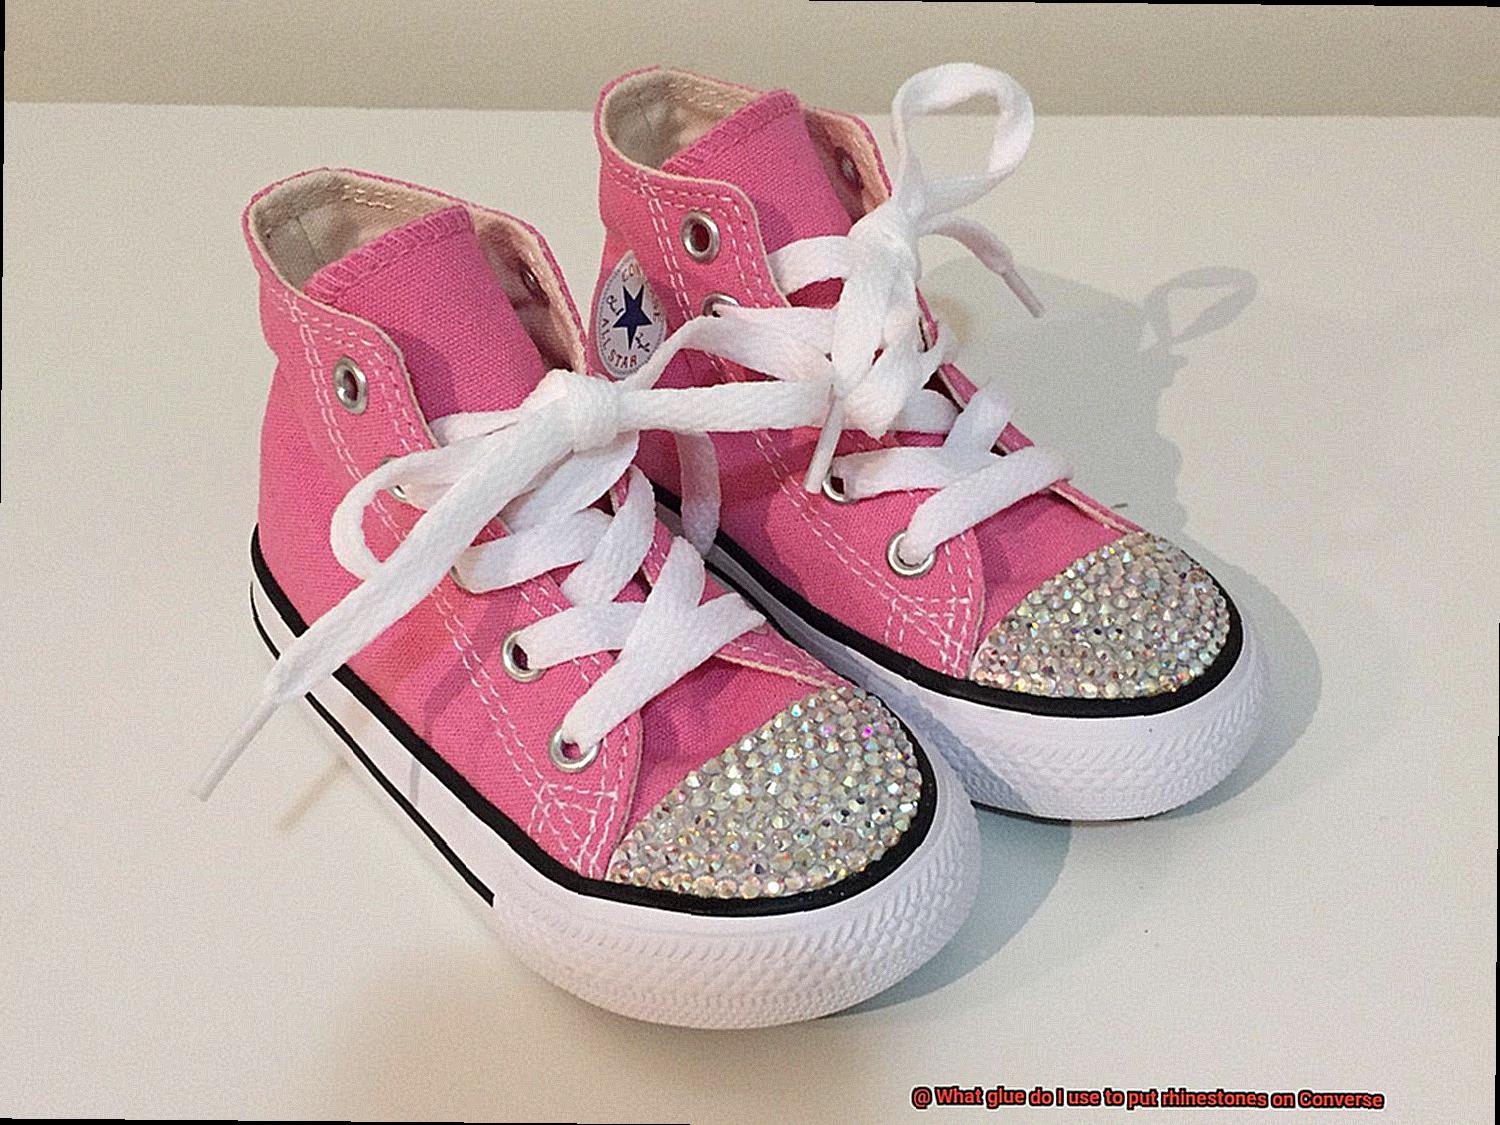
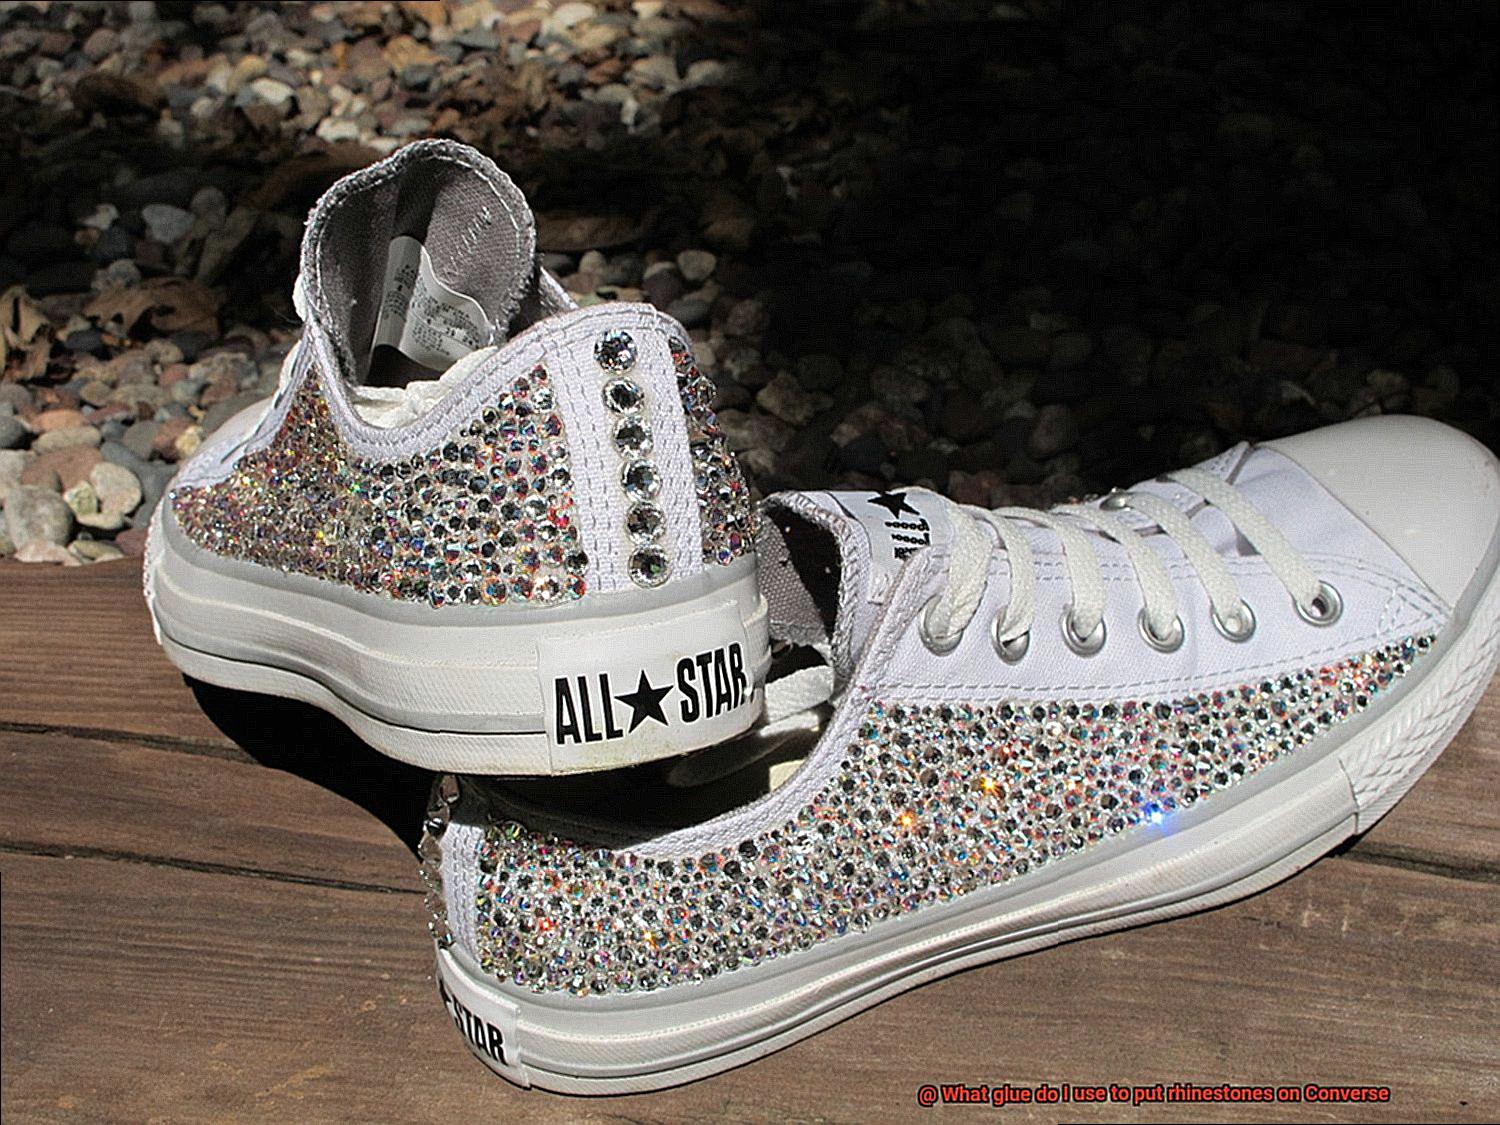
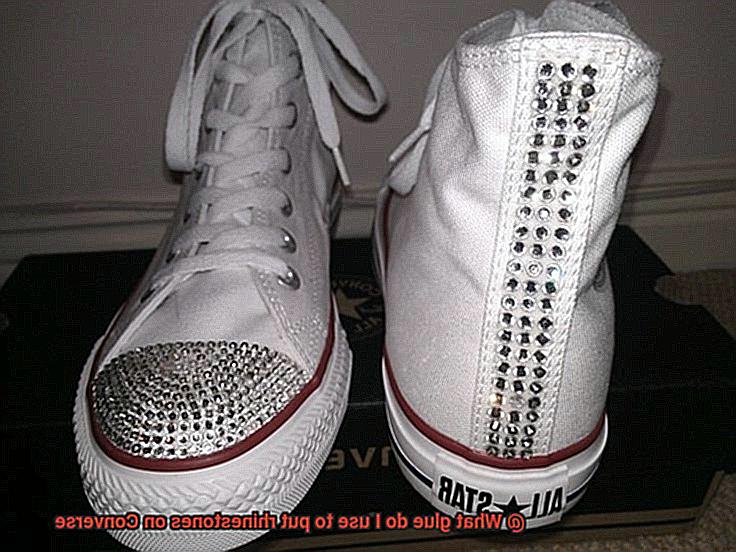
Are you tired of your plain old Converse shoes?
Want to add some sparkle and pizzazz to your kicks? Well, fear not my fellow shoe enthusiasts because rhinestones are here to save the day.
But before you start bedazzling your sneakers, there’s one important question we need to address: what glue should you use? Lucky for you, I’m here to be your trusty adhesive advisor.
So grab a cup of glittery coffee, kick back, and let’s dive into the realm of fabulous footwear transformations.
What Glue is Best for Rhinestones on Converse?
Contents
- 1 What Glue is Best for Rhinestones on Converse?
- 2 E6000: A Popular Choice for Attaching Rhinestones to Converse Shoes
- 3 Gem-Tac: Another Option for Embellishing Fabric with Gemstones and Rhinestones
- 4 Applying the Glue Directly onto the Back of Each Rhinestone
- 5 Working in Small Sections to Prevent Drying Out
- 6 Letting the Glue Dry Completely Before Wearing or Handling the Shoes
- 7 Alternative Glues to Consider
- 8 Testing a Small Area Before Applying Glue and Rhinestones to the Entire Surface
- 9 Conclusion
In this article, we will explore the top glue options for attaching rhinestones to your Converse shoes, ensuring a dazzling and long-lasting bling.
E6000: The Crafters’ Choice
For a strong and flexible bond, E6000 glue is a go-to option among crafters and DIY enthusiasts. This adhesive is perfect for attaching rhinestones to fabric surfaces like canvas, making it an ideal choice for Converse shoes. With its clear drying formula, E6000 ensures that your rhinestones shine without any unsightly residue.
Gem-Tac: The Gemstone Specialist
If you’re specifically looking for a glue designed for bonding rhinestones and gems, Gem-Tac is the answer. Known for its quick drying time and flexible hold, this adhesive is perfect for footwear. With Gem-Tac, your rhinestones will stay securely in place, even when your feet are on the move.
Fabric Glue: Budget-Friendly Brilliance
If you’re on a budget but still want a reliable option, fabric glue can also do the trick. Popular choices like Aleene’s Original Tacky Glue and Beacon Fabri-Tac bond well with fabric surfaces while being gentle on your wallet. Just ensure that the fabric glue you choose is suitable for both fabric and rhinestones.
Hot Glue: Proceed with Caution
While hot glue guns are versatile tools, they may not be the best choice for rhinestones on Converse shoes. Hot glue hardens quickly and can become brittle over time, potentially compromising the durability of your bling. Additionally, hot glue may lack the flexibility required for footwear, increasing the risk of rhinestones coming loose.
Application Tips:
- Clean the shoe surface thoroughly before application.
- Apply the glue sparingly and precisely to the back of each rhinestone.
- Press each rhinestone firmly onto the shoe and allow sufficient drying time.
- Follow manufacturer instructions for the chosen glue.
E6000: A Popular Choice for Attaching Rhinestones to Converse Shoes
Look no further than the adhesive that has taken the crafting world by storm – E6000. This remarkable glue has become the go-to choice for attaching rhinestones to Converse shoes, and it’s not hard to see why.
First and foremost, E6000 boasts unparalleled bonding properties. No matter if you’re working with fabric or rubber, this adhesive can handle the task with ease. It’s a true chameleon, adhering to various materials and ensuring that your precious rhinestones stay firmly in place.
But that’s not all. E6000 also possesses a flexibility that sets it apart from the competition. As you strut your stuff in your Converse shoes, you need an adhesive that can withstand movement and bending without causing your rhinestones to go flying. With E6000, you can rest easy knowing that your bling will remain intact for longer, no matter how active you are.
Not only does E6000 provide a rock-solid bond, but it also offers a clear and waterproof formula. Unlike other adhesives that yellow or degrade over time, E6000 keeps your rhinestones and shoes looking fresh and flawless. And with its lightning-fast drying time of just 10 to 20 minutes, you won’t have to wait long before showing off your bedazzled kicks. For maximum strength, though, it’s recommended to let the adhesive cure overnight.
Of course, there are a few things to keep in mind when using E6000. Its potent odor means it’s best to work in a well-ventilated area. And don’t forget to protect your skin by donning a pair of gloves during application.
To apply E6000, simply squeeze a small amount onto the back of each rhinestone and press firmly onto the shoe. Make sure to leave enough space between each rhinestone for proper adhesion. Once all the rhinestones are in place, allow them to dry completely before strutting your stuff.
While E6000 is a tried-and-true favorite for attaching rhinestones to Converse shoes, it’s always wise to test it on a small, inconspicuous area first. This will ensure that it’s compatible with your specific shoe material.
Gem-Tac: Another Option for Embellishing Fabric with Gemstones and Rhinestones
Whether you want to add some sparkle to a dress or jazz up a pair of Converse shoes, Gem-Tac has got you covered with its clear and non-staining formula, flexibility, easy application, and maximum durability.
Gem-Tac’s clear formula is a game-changer when it comes to embellishing fabric. No more worrying about visible glue marks stealing the spotlight from your beautiful gemstones. Gem-Tac dries clear, allowing your rhinestones to shine through without any residue. It’s all about letting your bling take center stage.
Flexibility is a key advantage of Gem-Tac. Unlike other glues that can become brittle over time, Gem-Tac remains flexible even after drying. This is especially important for shoes like Converse, which go through a lot of bending and movement. No more concerns about cracked or falling-off rhinestones. Gem-Tac keeps them securely in place for the long haul.
Applying Gem-Tac is a breeze. The handy bottle with a precision tip makes it easy to apply just the right amount of adhesive. First, clean the fabric surface with a gentle cleanser and let it dry. Then, simply apply a small amount of Gem-Tac directly onto the back of each rhinestone and press firmly onto the fabric. It’s as simple as that. You’ll be on your way to blinging out your favorite pair of shoes in no time.
To ensure maximum durability, it’s vital to let your newly embellished shoes sit undisturbed for at least 24 hours after applying Gem-Tac. This allows the glue to fully cure and bond with the fabric, giving you long-lasting results that can withstand wear and tear.
While Gem-Tac is known for its strength, it’s important to note that it’s not waterproof. It’s best to avoid excessive moisture or submerging your blinged-out Converse shoes in water. A little rain won’t hurt, but keeping them dry whenever possible will help maintain their pristine appearance.
Applying the Glue Directly onto the Back of Each Rhinestone
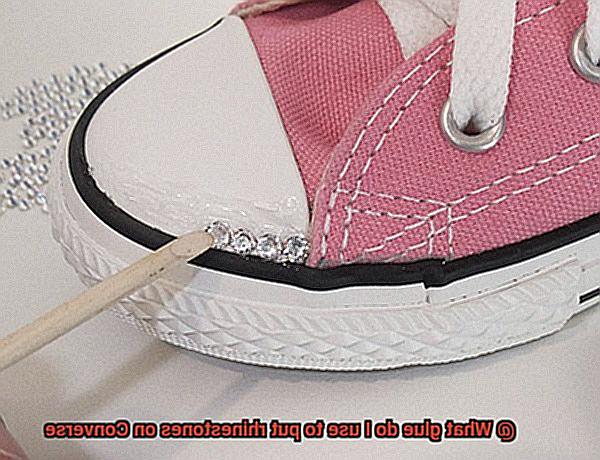
These sparkling gems can transform your plain sneakers into dazzling works of art, but how do you ensure they stay in place? The answer is simple – apply glue directly onto the back of each rhinestone.
Let’s dive deeper into this process, starting with the type of glue you’ll need. E6000 is a top choice among crafters and DIY enthusiasts alike. This industrial-strength adhesive not only provides a strong bond but also remains flexible enough to withstand the movements of your shoe. Its quick-drying formula ensures that your rhinestones stay securely in place.
Before you begin gluing, it’s important to prep your Converse shoes. Clean them thoroughly, removing any dirt or debris that could hinder the glue’s ability to adhere effectively. With clean shoes and your chosen rhinestones at the ready, it’s time to get started.
To control the amount of glue you apply, squeeze a small amount of E6000 onto a disposable surface such as wax paper or a plastic lid. Using a toothpick or a small brush, carefully pick up a dab of glue and apply it directly onto the back of each rhinestone. Make sure to cover the entire back surface with a thin layer of glue.
Once the glue is applied, firmly press each rhinestone onto the desired spot on your Converse shoe. Hold it in place for a few seconds, allowing the glue to bond properly. Repeat this process for each rhinestone, working on one at a time until all are securely in place.
Should you notice any excess glue smudges or strings, fear not. Simply dip a toothpick or cotton swab in nail polish remover or acetone and gently remove them without causing any damage to the shoe or rhinestones.
After all the rhinestones are applied, allow the glue to dry completely according to the manufacturer’s instructions. This may take a few hours or overnight, depending on the glue used. Once the glue has fully cured, your rhinestones will be securely attached to your Converse shoes, adding a touch of sparkle and personalization to your footwear.
Remember to always follow the manufacturer’s instructions and safety precautions when using any adhesive. Work in a well-ventilated area and avoid prolonged exposure to glue fumes.
Working in Small Sections to Prevent Drying Out
Adding rhinestones can transform your plain sneakers into dazzling works of art. But before you dive into this exciting DIY project, there’s one crucial technique you need to know: working in small sections. In this blog post, we’ll explore why this method is essential for preventing glue from drying out too quickly and ensuring a flawless application of rhinestones. So, grab your craft supplies and let’s get started.
Why Working in Small Sections Matters:
Preventing Premature Drying:
When applying rhinestones, preventing premature drying of the glue is crucial. Working in small sections allows you to apply a thin layer of glue that remains tacky enough to hold the rhinestones securely in place. No messiness or unevenness in your design.
Better Control and Precision:
Working in small sections gives you better control over the overall design of your embellished Converse shoes. Experiment with different patterns or arrangements of rhinestones, ensuring each section is cohesive and visually appealing. Achieve precision and stunning attention to detail.
Easy Corrections:
Don’t panic if the glue starts to dry out before finishing a section. Working in small sections allows for easy corrections. Remove any dried or excess glue with a toothpick or cotton swab, then reapply a thin layer before continuing. Perfect positioning for every rhinestone.
Letting the Glue Dry Completely Before Wearing or Handling the Shoes
While the excitement is understandable, exercising a little patience and allowing the glue to dry completely is crucial. In this article, we will delve into the importance of letting the glue dry before handling or wearing your stunning creations.
Ensuring Proper Adhesion:
- Adhering properly: To ensure a strong bond between the rhinestones and the shoe surface, it is essential to let the glue dry completely.
- Drying times: Different glues have varying drying times, so it is vital to follow the manufacturer’s instructions. Most glues require at least 24 hours to fully dry and cure.
Protecting Your Masterpiece:
- Avoid displacement and damage: Resist the temptation to handle or wear your shoes during the drying period. Doing so prevents accidental displacement or damage to the rhinestones.
- Optimal drying conditions: Speed up the drying process by placing your shoes in a well-ventilated area with proper air circulation.
- Stability matters: Keep your shoes in a flat and stable position during drying to prevent any movement or tilting that could cause rhinestone shifts or detachment.
Longevity and Maintenance:
- Flexibility and movement: Some glues become slightly flexible after drying, allowing for shoe flexibility without causing rhinestone detachment. However, excessive bending or twisting should still be avoided.
- Post-drying inspection: Once the glue has dried completely, inspect the rhinestones to ensure they are securely attached. Reinforce any loose or improperly adhered rhinestones with additional glue.
- Curing time variations: Certain glues require longer curing times, especially when exposed to moisture or high humidity. Allow extra drying time in these cases.
- Proper storage: To maintain the longevity of your rhinestone application, store your shoes in a cool and dry place when not in use. Extreme heat or humidity can weaken the adhesive bond over time.
Alternative Glues to Consider
We’ve got the lowdown on the best alternative glues to consider for attaching rhinestones to your sneakers.
First up, we have the ever-popular E6000. Crafters and DIY enthusiasts swear by this adhesive for its strong bonding properties and flexibility. It’s perfect for attaching rhinestones to the flexible canvas material of Converse shoes. Plus, it dries clear and is resistant to water and heat, ensuring that your bling stays intact even in different conditions.
Another great option is Gem-Tac. This adhesive is specifically designed for use with rhinestones and other small embellishments. It forms a strong bond and dries clear, making it an ideal choice for jazzing up your Converse shoes. The best part? It’s washable, so you don’t have to worry about losing any of your precious rhinestones after a spin in the washing machine.
If you’re looking for a versatile glue that can be used in various crafting projects, including attaching rhinestones to fabric, then Aleene’s Original Tacky Glue is for you. It provides a strong bond and dries clear, ensuring that your rhinestones stay securely in place. And yes, it’s machine washable too.
For those who prefer a more specialized option, fabric glue is a great choice. Many fabric glues are formulated to bond fabric materials together and work well on canvas materials like those found in Converse shoes. Just make sure to choose one that dries clear, provides a strong bond, and is compatible with both the fabric and rhinestones you’re using.
Lastly, we have hot glue. While not the most recommended option, hot glue can still be used for attaching rhinestones to Converse shoes. It’s easy to use and readily available, but be cautious as it can sometimes leave visible glue lines or may not provide a strong enough bond for long-lasting rhinestone application.
When choosing the right glue, consider factors like the strength of the bond, drying time, compatibility with fabric, and whether it dries clear or leaves a residue. Don’t forget to test the glue on a small area of the shoe before going all out to ensure compatibility and desired results.
Testing a Small Area Before Applying Glue and Rhinestones to the Entire Surface
Before you dive into the glitz and glam, there’s an essential step you must take: testing a small area before applying glue and rhinestones to the entire surface. This simple yet crucial step ensures that your bling not only sticks but also stays put for the long haul. Let’s explore why testing is necessary and discover how to achieve a successful and lasting rhinestone application.
Why Testing Is Crucial:
Before you bedazzle your beloved Converse shoes, it’s vital to test a small area first. This allows you to determine if the glue adheres well to the surface and if it’s compatible with the rhinestones you plan to use. After all, nobody wants their stunning creation falling apart or losing its sparkle after just a few wears.
Choosing the Right Glue:
Not all glues are created equal when it comes to rhinestone embellishments. Opt for glues specifically designed for jewelry making or fabric crafts. These adhesives offer strong adhesion and flexibility, ensuring your rhinestones stay in place during even the wildest dance moves.
Popular options include E6000 Craft Adhesive, Gem-Tac Permanent Adhesive, and Aleene’s Original Tacky Glue. These trusted glues are known for their strong bond and compatibility with various materials, including fabric.
Applying the Glue:
Now that you’ve chosen your adhesive, it’s time to put it to the test. Apply a small amount of glue onto a test area made of fabric or a material similar to your shoe’s surface. Spread the glue evenly and press a few rhinestones onto the glued area, ensuring they stick securely.
Drying Time and Examination:
Patience is key. Follow the manufacturer’s instructions for drying time, which can range from a few minutes to several hours depending on the glue type. Once the glue has dried, carefully examine the test area. Check if the rhinestones have adhered firmly and look out for any signs of lifting, peeling, discoloration, or fabric damage.
Conclusion
When it comes to embellishing your Converse shoes with rhinestones, choosing the right glue is crucial. You want a glue that will securely hold those sparkly gems in place, ensuring they stay put no matter where your adventures take you. After careful research and testing, we’ve found the perfect adhesive for this task: E6000 Craft Adhesive.
E6000 Craft Adhesive is a versatile and reliable choice for attaching rhinestones to various surfaces, including fabric and rubber. Its strong bond ensures that your precious stones won’t easily budge or fall off, even with regular wear and tear. This adhesive dries clear, leaving behind a seamless finish that won’t distract from the beauty of your Converse sneakers.
Applying E6000 Craft Adhesive is a breeze. Simply squeeze a small amount onto the back of each rhinestone and press firmly onto the desired area of your shoe. Allow it to dry completely before handling or wearing your newly bedazzled kicks. And don’t worry about any excess glue showing – once dried, it becomes practically invisible.
But remember, proper preparation is key to achieving long-lasting results. Before gluing on your rhinestones, make sure to clean the surface of your Converse shoes thoroughly with rubbing alcohol or acetone to remove any dirt or oils. This will help create an optimal bonding surface for the adhesive.
So go ahead and unleash your creativity by adding some bling to your Converse sneakers. With E6000 Craft Adhesive as your trusty companion, you can confidently strut around town knowing that your rhinestones are securely attached and ready to turn heads.