Looking to give your kitchen or bathroom a makeover on a budget? Look no further than laminate countertops. These affordable beauties can instantly transform any space, giving it a fresh new look without emptying your wallet. But, here’s the thing – if you want them to stay put for years to come, you need to know what you’re doing when it comes to gluing them down.
That’s where we come in. In this blog post, we’ll walk you through the step-by-step process of securely adhering laminate countertops. Whether you’re a seasoned DIY pro or just dipping your toes into the world of home improvement, we’ve got your back. We’ll cover everything from the right tools to the type of adhesive you need, so you’ll have all the info necessary to tackle this project like a boss.
So grab your safety goggles and get ready to dive into the secrets of gluing down laminate countertops. Say goodbye to wobbly surfaces and hello to a stylish, durable, and functional space that will make all your friends jealous. Let’s do this.
What Is Laminate Countertop?
Contents
When it comes to kitchen or bathroom renovations, finding the perfect countertop that combines style, durability, and affordability can be a challenge. Thankfully, laminate countertops offer an ideal solution for homeowners who want to create a beautiful space without breaking the bank.
Here, we’ll explore what laminate countertops are, their composition, benefits, and drawbacks, providing you with all the information you need to make an informed decision for your next project.
What is a Laminate Countertop?
Laminate countertops are crafted using layers of paper or fabric impregnated with resin and bonded together under high heat and pressure. The top layer features a decorative sheet that mimics the appearance of various materials such as granite, marble, or wood. This layer not only adds visual appeal but also protects the underlying layers from scratches and stains.
Beneath the decorative layer lies a core layer made of compressed paper or particleboard that provides stability and strength to the countertop. Finally, a protective backing layer prevents moisture from seeping into the countertop and causing damage.
Benefits of Laminate Countertops:
- Affordability: Laminate countertops are cost-effective compared to other options like granite or quartz. This makes them an excellent choice for budget-conscious homeowners who still want a high-quality countertop.
- Versatility: With a wide range of colors, patterns, and finishes available, laminate countertops allow you to achieve any desired aesthetic. Whether you prefer a classic look or something more modern and trendy, there is a laminate design to suit your style.
- Easy Installation: Laminate countertops are relatively easy to install, making them a popular choice for DIY enthusiasts. With some basic tools and the right adhesive, you can transform your kitchen or bathroom in no time.
- Low Maintenance: Unlike natural stone countertops, laminate surfaces are resistant to stains and require minimal effort to keep clean. Regular wiping with a damp cloth and mild detergent is usually sufficient to maintain their appearance.
- Resistance to Fading: Laminate countertops are designed to resist fading from sunlight exposure, ensuring that your countertop will maintain its vibrant colors for years to come.
Drawbacks of Laminate Countertops:
- Durability Limitations: While laminate countertops are durable, they are not as strong or heat-resistant as materials like granite or quartz. Extreme heat can cause laminate to warp or discolor, so it’s important to use trivets or hot pads to protect the surface.
- Susceptible to Scratches and Chips: Over time, laminate countertops can develop scratches and chips, especially if not handled with care. It’s important to avoid cutting directly on the surface and use cutting boards instead.
- Limited Repair Options: In the event of significant damage, repairing laminate countertops can be challenging. Small scratches or chips can be filled in using repair kits, but extensive damage may require replacing the entire countertop.
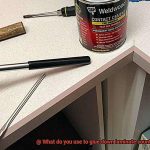
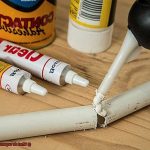
Adhesives Used for Glue Down Laminate Countertops
When it comes to gluing down laminate countertops, the right adhesive can make all the difference. With a myriad of options available, it’s crucial to understand the pros and cons of each adhesive. In this comprehensive guide, we will explore three commonly used adhesives: contact cement, construction adhesive, and epoxy resin.
Contact Cement:
Pros:
- Contact cement creates an unbreakable bond that stands the test of time.
- Applying contact cement is a breeze with a brush or roller.
- It’s perfect for high-traffic areas like bustling kitchens and luxurious bathrooms.
Cons:
- Quick-drying contact cement demands precise application.
- Mishandling can result in a sticky situation.
- Be ready for a potent odor during application.
Construction Adhesive:
Pros:
- Versatile and strong, construction adhesive is suitable for various applications.
- This adhesive ensures an unyielding bond between laminate and countertop.
- Easy to use and apply, it’s a reliable choice for both professionals and DIY enthusiasts.
Cons:
- Compared to other adhesives, construction adhesive requires more patience as it takes longer to dry.
- It might need clamping or support during the drying process.
- While construction adhesive is relatively water-resistant, prolonged exposure to water could be problematic.
Epoxy Resin:
Pros:
- Epoxy resin forms an indestructible bond that stands up to heavy use.
- Its exceptional water resistance makes it ideal for moisture-rich environments.
- It can even fill gaps and smooth out uneven surfaces.

Cons:
- Epoxy resin comes with a higher price tag compared to other adhesives.
- Mixing and applying epoxy resin requires meticulous attention to detail.
- Be prepared for a longer curing time compared to other adhesives.
Contact Cement
Contact cement is a remarkable adhesive that is widely used for bonding laminate countertops. This versatile glue creates a powerful and long-lasting bond, making it the go-to choice for professionals. But what exactly is contact cement, and why is it so effective?
First and foremost, contact cement is incredibly user-friendly. It comes in a liquid form that can be effortlessly applied with a brush or roller. Simply spread it evenly on both the countertop and the backside of the laminate sheet, and you’re ready to go. Once the adhesive has dried to a tacky consistency, it’s time to bring the two surfaces together. Apply firm pressure, and voila. You’ve achieved an unyielding and permanent bond.
One outstanding feature of contact cement is its ability to bond two non-porous surfaces. Laminate countertops boast smooth and non-porous surfaces, making them a perfect match for this adhesive. Contact cement has been specially formulated to adhere exceptionally well to these types of surfaces, ensuring a secure and enduring bond.
Moreover, contact cement is resistant to both moisture and heat, which are common occurrences in kitchen environments. Laminate countertops frequently come into contact with water and high temperatures, but fret not. Contact cement can withstand these conditions without compromising its bond strength or deteriorating over time.
Epoxy Resin
In the realm of laminate countertop adhesives, one product stands out as the ultimate solution for durability and seamless beauty: epoxy resin. With its exceptional bonding properties, resistance to moisture and heat, and versatility, epoxy resin is the unquestionable adhesive of choice. This article delves into the advantages of using epoxy resin, catering to those seeking comprehensive information about the world of adhesives.
Advantage 1: Impeccable Seamlessness and Smoothness
The first reason why epoxy resin reigns supreme as a laminate countertop adhesive lies in its unique ability to create an impeccable, seamless finish. Unlike its counterparts, epoxy resin effortlessly fills any gaps or imperfections, guaranteeing a flawlessly smooth appearance. This not only enhances the aesthetic allure of your countertops but also simplifies their cleaning and maintenance.
Advantage 2: Unyielding Resistance to Moisture and Heat
Given the frequent exposure of laminate countertops to water and heat, it is imperative to choose an adhesive that can withstand such challenges. Epoxy resin acts as an impenetrable shield, effectively safeguarding your countertops against water damage and unsightly stains. Moreover, it remains impervious to high temperatures, ensuring that your countertops won’t warp or melt under extreme culinary conditions.
Advantage 3: Unmatched Versatility
One of the most remarkable qualities of epoxy resin lies in its remarkable versatility. This adhesive can be used on various surfaces, including laminate, wood, and even concrete countertops. Consequently, regardless of the material or design of your laminate countertops—whether they are traditional or boast unique patterns or textures—epoxy resin guarantees a secure bond that will endure.
Manufacturer-Specific Adhesives
Manufacturer-specific adhesives are a game-changer when it comes to laminate countertop installations. These carefully formulated and recommended adhesives are designed to create a secure and long-lasting bond between your laminate countertops and their substrate. But what sets them apart from other adhesives on the market? Let’s dive into the world of manufacturer-specific adhesives and discover their advantages.
First and foremost, these adhesives are tailored to work best with the specific type of laminate material used in your countertops. Laminate materials can vary in surface texture, flexibility, and other properties, requiring a specific adhesive for optimal bonding. By following the manufacturer’s recommendations and using their recommended adhesive, you can be confident that you’re using the right product for your particular countertop.
Durability is another key advantage of manufacturer-specific adhesives. They are engineered to resist moisture, heat, and chemicals – all the elements that your countertops are likely to encounter on a daily basis. Whether it’s a spilled glass of red wine or a hot pan straight from the oven, these adhesives have got your back. They’ll keep your countertops securely attached and looking fabulous for years to come.
But wait, there’s more. Using manufacturer-specific adhesives can also make your installation process smoother and more efficient. These adhesives often provide excellent initial tack, grabbing hold of the laminate like a superhero saving the day. This allows for quick and secure positioning of the laminate onto the substrate, minimizing any potential issues or complications during installation.
When it comes to application methods, these adhesives come in various forms – tubes, cartridges, or cans – depending on the manufacturer’s preference. Some manufacturers may even provide specific instructions or guidelines on how to apply their adhesive for optimal results. It’s crucial to follow these instructions carefully to ensure proper bonding and avoid any headaches down the road.
Surface Preparation for Gluing Down Laminate Countertops
Just like a superhero needs a solid foundation, your laminate countertop needs a well-prepared surface to ensure a strong and secure bond. In this article, we’ll guide you through the essential steps to prepare your surface before gluing down your laminate countertop. So grab your tools and let’s get started.
Step 1: Clean it up.
Before diving into the gluing process, it’s crucial to clean your substrate thoroughly. Remove any dirt, dust, grease, or other contaminants that may be lurking on the surface. Use a mild detergent and water solution or a recommended cleaning agent designed for surface preparation. Rinse the surface thoroughly and allow it to dry completely before proceeding.
Step 2: Roughen it up.
To enhance adhesion, roughen up the surface by lightly sanding it with sandpaper or an electric sander. The aim is to create a slightly rough texture that will provide a better grip for the glue. Opt for a medium-grit sandpaper for this step.
Step 3: Edge it out.
Don’t forget about those edges. Use sandpaper or a file to shape and smooth any rough edges on your countertop. This step ensures a seamless finish once the countertop is installed.
Step 4: Dust-off duty.
After sanding, remove any dust or debris that may have accumulated. Use a vacuum cleaner or wipe down the surface with a clean cloth. Remember, a clean and dust-free environment is crucial for achieving a strong bond.

Step 5: Special considerations for glossy laminates
Certain laminates, like high-pressure laminates (HPLs), have glossy surfaces that require additional preparation. In this case, use a solvent-based cleaner or an abrasive pad specifically designed for HPLs to remove any residue or glossy finish. Always follow the manufacturer’s instructions for your particular laminate.
Step 6: Test-fit for success.

Before applying the glue, test-fit the countertop on the substrate. This allows you to ensure a proper fit and make any necessary adjustments before permanently gluing it down. Remember, it’s easier to make changes now than after the adhesive has been applied.
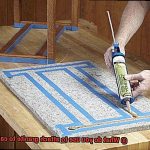
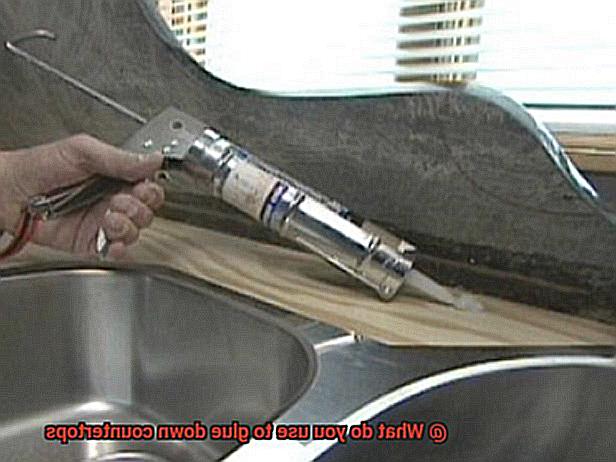
Applying the Adhesive Properly
Installing a laminate countertop requires careful attention to detail, particularly when it comes to applying the adhesive. The proper application of adhesive is essential for creating a robust and long-lasting bond. In this blog post, we will delve into the importance of applying the adhesive correctly and provide invaluable tips and best practices to ensure a successful installation.
Choosing the Right Adhesive:
The first step in achieving a successful installation is selecting the appropriate adhesive. With various options available, such as contact cement, construction adhesive, and specialty laminate adhesives, it is crucial to consider factors like the type of laminate material, countertop substrate, and manufacturer recommendations. Seek professional advice or consult with the laminate manufacturer to make an informed decision.
Preparing the Surfaces:
To guarantee optimal adhesion, both the countertop substrate and laminate surface must be meticulously cleaned. Remove any dust, grease, or debris by thoroughly washing both surfaces with a mild detergent or cleaner. Take care to wipe them dry with a clean cloth afterward. Failure to eliminate contaminants may compromise the bond strength.
Applying the Adhesive:
Achieving an even and consistent application of adhesive is key. Consider using a paint roller, notched trowel, or recommended applicator for this task. Follow the manufacturer’s instructions regarding the amount and application method for the adhesive. Ensure that it is evenly spread across both the countertop substrate and laminate sheet.
Allowing for Curing Time:
After applying the adhesive, exercise patience and allow it to set for a specified period before proceeding with the installation. This curing time is critical for ensuring optimal tackiness, facilitating better contact and bonding between the surfaces. Refer to the manufacturer’s instructions for guidance on curing time, as it may vary based on the adhesive type.
Proper Installation Techniques:
Accurate alignment of the laminate sheet and countertop substrate is crucial during installation. Utilize pre-marked lines or reference points as a guide. Apply firm pressure to the laminate sheet, starting from one edge and working your way across. Applying even pressure uniformly minimizes the risk of air bubbles or gaps and ensures a secure bond.

Enhancing Adhesion:
To further enhance adhesion, utilize a laminate roller or a clean cloth-wrapped block of wood to apply additional pressure to the laminate sheet after it bonds to the substrate. This step helps eliminate trapped air and guarantees full contact between the surfaces.
Allowing for Full Curing:
Lastly, allow sufficient time for the adhesive to fully cure before subjecting the countertop to heavy objects or usage. Rushing this step may compromise the bond strength and lead to a less durable countertop. Refer to the adhesive manufacturer’s guidelines for specific recommendations on curing time, considering factors like temperature and humidity.
DIY or Professional Installation?
When it comes to installing laminate countertops, the decision between DIY or professional installation can be a tough one. Both options have their pros and cons, so let’s explore them in more detail to help you make an informed decision.
- Cost: DIY installation is often more cost-effective since you won’t have to pay for labor. However, keep in mind that purchasing all the necessary tools and materials can still add up. On the other hand, professional installation will come at an additional cost but may be worth it for those who prefer a hassle-free experience or lack the necessary tools and equipment.
- Skills and Experience: DIY installation requires a certain level of skill and experience. If you have successfully completed similar projects in the past and feel confident in your abilities, then DIY installation may be a viable option for you. However, if you lack experience or are unsure about your skills, it may be best to opt for professional installation. This will ensure that the job is done correctly and efficiently, minimizing the risk of mistakes or damage to the countertops.
- Time: DIY installation can be time-consuming, especially if you are new to the process. You may need to allocate significant hours or even days to complete the project. On the other hand, professional installers are typically able to complete the job much more quickly, allowing you to enjoy your new countertops sooner.
- Tools and Equipment: DIY installation requires the use of specific tools and equipment. These may include a circular saw, jigsaw, router, adhesive spreader, clamps, and more. If you don’t already own these tools or are not comfortable using them, professional installation might be a better option for you.
- Types of Glue: Choosing the right adhesive is crucial for a successful laminate countertop installation. Options like contact cement, construction adhesive, and specialty laminate adhesives are available. It’s important to consider factors such as the type of laminate material, countertop substrate, and manufacturer recommendations when selecting the glue. Professional installers will have experience in choosing and applying the appropriate adhesive for your specific situation.
- Pitfalls to Avoid: DIY installation comes with the risk of making mistakes that could affect the final result. Common pitfalls include improper measuring, inaccurate cuts, uneven adhesive application, and poor alignment. Professional installers have the expertise to avoid these pitfalls, ensuring a smooth and flawless installation.
- Tips for Success: Whether you choose DIY or professional installation, there are some tips that can help ensure success. Properly clean and prepare the surfaces before applying the adhesive to ensure a strong bond. Follow the manufacturer’s instructions regarding adhesive quantity and application method. Allow sufficient curing time for the adhesive to set before proceeding with installation. And finally, apply firm pressure to the laminate sheet during installation to ensure a secure bond.
Conclusion
When it comes to gluing down laminate countertops, there are a few options you can consider.
One popular choice is using contact adhesive, which provides a strong and durable bond. Another option is using construction adhesive, which is designed for heavy-duty applications.
Remember, a well-glued countertop not only looks great but also ensures longevity and stability.