Are you a DIY enthusiast or a crafting aficionado? If so, then you’re probably familiar with the importance of having the right adhesive to keep your creations intact. That’s where Glue Dots come in: the ultimate solution to all your bonding needs. Whether you’re working on scrapbooking, home décor, or any other project, Glue Dots offer a versatile and mess-free way to attach items securely to almost any surface.
But how do you use Glue Dots exactly? It’s a breeze. These tiny adhesive wonders come in various sizes and strengths, making them perfect for every project. All you need to do is peel off the backing paper and apply the Glue Dot to the item you want to attach. Once you’ve determined the placement, press down firmly, and voila. Your item is now securely attached without any mess or fuss.
Whether you’re a seasoned crafter or just starting out, mastering the use of Glue Dots is an essential skill that will elevate your creations to new heights. With its user-friendly nature and excellent bonding capabilities, there are endless possibilities for their use. You can attach ribbons, buttons, or even delicate flowers to your projects without worrying about damaging delicate surfaces.
So, whether you’re looking to create something new or repair something old, Glue Dots are the perfect adhesive solution. If you haven’t already tried them out yet, grab yourself a pack of Glue Dots and let your creativity soar.
Choosing the Appropriate Size and Strength
Contents
When it comes to using Glue Dots, selecting the proper size and strength is crucial in ensuring a robust and long-lasting bond. With a variety of sizes and strengths available, it can be challenging to determine which one is right for your project.
Firstly, consider the weight of the materials you want to stick together. If you are working with lightweight items such as paper or foam, a thin or medium-strength Glue Dot will do the job. However, if you are dealing with heavier objects such as metal or wood, a stronger adhesive is necessary.
Another factor to take into account is the surface texture of the materials. Smooth surfaces require less adhesive than rough or porous surfaces, which require a more robust bond for maximum adhesion. Matching the Glue Dot’s size to the surface area of an object is also crucial for a strong bond. For smaller items, use smaller dots to avoid excess adhesive that may cause mess or weaken the bond. For larger objects, bigger dots or multiple dots may be necessary for maximum coverage.
In addition to size and strength, Glue Dots come in different colors. Clear Glue Dots work best on transparent surfaces or when you don’t want the adhesive visible. White Glue Dots are ideal for most surfaces and are easy to see, making them perfect for positioning and alignment.
To use Glue Dots, peel them off the backing sheet using your fingers or a tool such as tweezers. Place the dot on one of the surfaces you want to attach and press down firmly. Then, align the other surface with the first one and press them together. Keep in mind that once the Glue Dot is applied, it cannot be repositioned.
Peeling off the Backing Sheet
These little wonders come in various sizes and strengths, making them perfect for a wide range of applications. However, before you start using them, it’s essential to know how to properly peel off the backing sheet.
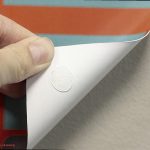
Firstly, ensure that the surface where you want to place the Glue Dot is clean and dry. Any dirt or moisture can affect the bond and cause it to weaken over time. Once you’ve achieved a clean surface, use your fingers to gently lift one corner of the backing sheet. It’s crucial to pull back the sheet at a 45-degree angle while avoiding touching the adhesive dot. If you accidentally touch it, the dot may lose its stickiness, and it won’t adhere correctly.
If you’re having trouble peeling off the backing sheet, don’t fret. Some Glue Dots require more force than others, so try using a pair of tweezers or a toothpick to lift the corner of the sheet. Additionally, note that Glue Dots come in different strengths, and some may require more force to peel off the backing sheet.
It’s crucial to handle Glue Dots with care when peeling off the backing sheet because they can be very sticky and difficult to remove once adhered. If you mistakenly place a Glue Dot in the wrong spot, it’s best to remove it immediately and reapply a new dot for optimal results.
Placing the Dot on One Surface
These versatile adhesives are perfect for all your crafting needs, and we’re here to help you master the art of placing a glue dot on one surface like a pro.
Step 1: Clean and Prepare the Surface
The first step is crucial for ensuring a strong bond between the surface and the glue dot. Make sure the surface is clean, dry, and free of any dirt, dust, or residue. You can use a damp cloth or cleaning solution to prepare the surface for the glue dot.
Step 2: Handle the Glue Dot with Care
Glue dots are tiny, but they pack a powerful adhesive punch. To avoid accidentally sticking them to your fingers or other surfaces, handle them with care. You can use your fingers or a tool like tweezers to pick up the glue dot and place it on the surface.
Step 3: Place the Glue Dot with Precision
When placing the glue dot, take your time to ensure it’s in the exact spot where you want it. Once you press it onto the surface, it’s challenging to reposition or remove it without damaging either the surface or the glue dot itself. If you need to make adjustments, try sliding the glue dot slightly before pressing it firmly into place.
Step 4: Apply Pressure for a Strong Hold
To activate the adhesive and improve the bond between the surface and the glue dot, apply pressure for several seconds after placing it. Use your fingers or a tool like a bone folder to press down firmly on the glue dot. If you’re using multiple glue dots in one area, make sure they’re spaced evenly and apply pressure to each one individually.
Bonus Tip: Experiment with Different Surfaces
Glue dots work on a variety of surfaces, including paper, plastic, metal, and even fabric. Experiment with different surfaces to see what works best for your project. Just remember to clean and prepare the surface before placing the glue dot for the best results.
Pressing Down Firmly
And when it comes to using Glue Dots, one detail that cannot be overlooked is pressing down firmly. This small step can make all the difference in creating a strong bond between surfaces.
To start, place the Glue Dot onto the surface. Using your fingers or a tool, apply gentle pressure to the dot, ensuring that it sticks to the surface. Hold the dot in place for a few seconds to allow it to adhere properly. But be careful not to apply too much pressure. Over-pressing can cause the glue dot to spread and make a mess, or even lose its shape and effectiveness.
When working with delicate surfaces like paper or fabric, it’s important to be extra gentle while pressing down firmly. Use a light touch and apply just enough pressure to adhere the dot without damaging the surface. And remember that holding the dot in place after applying pressure will help to ensure a stable bond.
So why is pressing down firmly so crucial? It’s simple – a strong bond between surfaces is necessary for any project to be successful. Without it, your creation may fall apart or not stick properly. But with Glue Dots, you can rest assured that pressing down firmly will help create a reliable bond that will last.
Aligning the Other Surface
Crafting is all about attention to detail, and aligning surfaces is a crucial step when using Glue Dots. As an expert in this field, I have researched and compiled some tips to help you properly align two surfaces when using this versatile adhesive.
To start, it’s essential to ensure that your surfaces are properly aligned. This step is especially crucial for paper crafts or scrapbook pages. Here are some steps to follow to align the other surface effectively:
- Apply the Glue Dot: Start by applying the Glue Dot to one surface. Be mindful of the amount you use, as using too much glue can cause your project to become messy.
- Place the Surface: Carefully place the other surface on top of the first surface, making sure it is aligned correctly. Patience and attention to detail are key.
- Press Firmly: Press down firmly to secure the two surfaces together. Applying gentle pressure will ensure a strong bond between the surfaces.
- Adjust if Necessary: If you find that the surfaces are not aligned properly, gently lift up the top surface and try again. Take your time to achieve perfection.
- Use a Ruler or Straight Edge: For larger projects or multiple surfaces, use a ruler or straight edge to ensure proper alignment before applying the Glue Dots.
In conclusion, aligning surfaces is a crucial step in using Glue Dots effectively and creating a strong bond between surfaces. Pressing down firmly with Glue Dots is like adding the final puzzle piece to complete a masterpiece – a small but crucial step that ensures a successful project.
Pressing Together Both Surfaces
As an expert in this field, I have some research notes that will guide you through this process with ease.
First and foremost, ensure that both surfaces are clean and free of any dust or debris. This will ensure that the Glue Dots adhere effectively, creating a strong bond that will last. So, take your time and make sure your surfaces are prepared properly before beginning your project.
Next, peel off the Glue Dot from the sheet by holding onto the clear liner and pulling it away from the adhesive dot. Carefully place the Glue Dot onto one of the surfaces and press it down firmly. Make sure that the adhesive is evenly distributed across the surface. Repeat this process for any additional Glue Dots needed; depending on the material being adhered together, you may need to use multiple Glue Dots for added strength.
Now it’s time to carefully press together both surfaces, ensuring that they are aligned correctly. Apply firm pressure for a few seconds to ensure a strong bond. And if necessary, adjust the alignment before the adhesive sets.
It is important to note that if you need to reposition or remove the adhesive, it is recommended to do so within the first few minutes of application before it fully sets. This will make it easier to adjust or remove without damaging your project.
In summary, by following these simple steps and with a little practice, you can effectively use Glue Dots for a variety of projects and applications. Here are some additional tips to keep in mind:
- Use clean hands when handling the Glue Dots to avoid transferring oils or dirt onto them.
- If you’re working with delicate materials, apply light pressure when pressing the surfaces together to avoid damaging them.
- When using Glue Dots on paper or cardstock, use them sparingly to prevent wrinkling or warping.
Repositioning After Application
While glue dots are known for their ability to create a strong bond, sometimes you might need to adjust the placement of your item. This is where repositionable glue dots come in handy.
Repositionable glue dots are specifically designed for this purpose. When using them, all you need to do is apply the dot to the back of your item and firmly press it onto the surface where you want it to be attached. If you need to reposition your item, gently lift it off the surface and adjust its placement. The beauty of repositionable adhesive is that it won’t leave any residue or damage on the surface. It’s a breeze.
But what if you’re working with permanent glue dots? No worries, there are ways to adjust your item’s placement without causing damage. Firstly, try lifting the item off the surface slowly and gently. If the glue dot is still tacky, you may be able to reposition it without causing any harm. If the glue dot has already set, you may need to apply a new one.
Another helpful tip is to use a heat gun or hairdryer to soften the glue dot before lifting the item off the surface. This will make it easier for you to remove and reposition without risking any damage.
It’s important to keep in mind that while repositionable glue dots are meant to be removable, they may not work on all surfaces. Always test a small area first before applying the glue dots to the entire surface.
Removing Glue Dots
Firstly, using a hairdryer is one of the simplest ways to remove Glue Dots. This method works best on delicate surfaces like paper or fabric. Begin by heating the Glue Dot with the hairdryer on high heat for a few seconds until it softens. Then, gently peel it off using either your fingers or a plastic scraper.
Another effective method involves using rubbing alcohol or vinegar. Apply a small amount of either liquid onto a cloth and rub it gently over the Glue Dot. The adhesive should dissolve, allowing you to remove it easily with a plastic scraper.
In case you don’t have rubbing alcohol or vinegar at home, don’t worry. You can use cooking oil or peanut butter instead. Apply a small amount of either oil or peanut butter onto the Glue Dot and let it sit for a few minutes. The oil will break down the adhesive, making it easier to remove.
For tougher Glue Dots, you may need to use solvents such as Goo Gone or WD-40. Apply a small amount of the solvent onto the Glue Dot and let it sit for a few minutes before using a plastic scraper to remove it. However, please note that you should always test the solvent on a small, inconspicuous area first to ensure that it won’t damage the surface.
It’s important to work slowly and carefully when removing Glue Dots. Rushing through the process could result in damaging the surface, and we certainly don’t want that. Take your time and follow these tips and tricks, and you’ll be able to remove those pesky Glue Dots without any trouble.
p0bZ-y3K21M” >
Conclusion
In summary, Glue Dots provide a mess-free and versatile solution for all your bonding needs. With an array of sizes and strengths available, it’s crucial to select the appropriate one for your project to ensure a sturdy and enduring bond. Precision is key when using Glue Dots – carefully peel off the backing sheet, place the dot on one surface with accuracy, press down firmly to activate the adhesive, align the other surface correctly, and finally press both surfaces together.
Repositionable glue dots are a game-changer when you need to adjust your item’s placement without causing damage. If you need to remove Glue Dots from a surface, there are several methods available such as using rubbing alcohol or vinegar, cooking oil or peanut butter, solvents like Goo Gone or WD-40 or even a hairdryer.
When using Glue Dots in your projects, remember that pressing down firmly is an essential step that cannot be overlooked. A strong bond between surfaces is necessary for any project to succeed. By mastering the use of Glue Dots and following these tips and tricks, you can elevate your creations without worrying about damaging delicate surfaces.