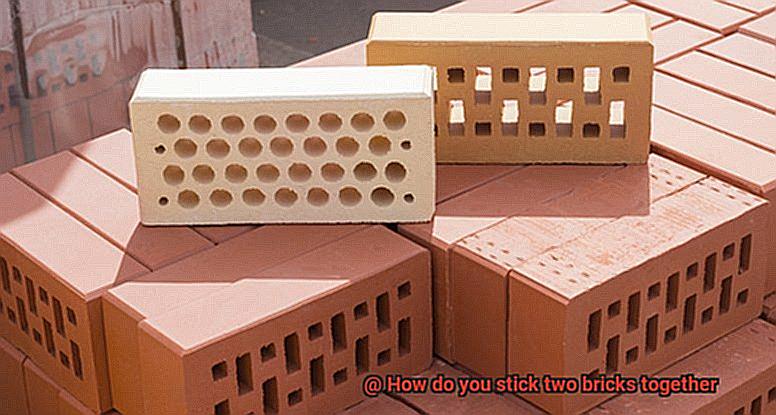
Bricks, those tough and timeless building blocks that have shaped magnificent structures throughout history. Whether you’re a DIY enthusiast or a seasoned masonry pro, the challenge of joining two bricks flawlessly can feel like an uphill battle. But fret not. In today’s blog post, we’re about to spill the beans on how to stick two bricks together with jaw-dropping precision.
Gone are the days of slapdash mortar slathering or relying on sketchy glues. We’re diving headfirst into the most effective and reliable methods that have stood strong in the world of construction for ages.
Get ready to discover the importance of prep work, explore adhesive options that will blow your mind, and arm yourself with expert tips for achieving a rock-solid brick bond that won’t budge. Whether you’re building an outdoor fireplace, sprucing up an interior brick wall, or tackling a structural repair job, this comprehensive guide has got your back.
Join us on this thrilling journey through the nitty-gritty of brick adhesion. By the time we’re done here, you’ll be equipped with the knowledge and confidence to tackle any project like a seasoned pro. So let’s dive right in and unlock the secrets to sticking two bricks together with unrivaled finesse.
Preparing the Surface of the Bricks
Contents
- 1 Preparing the Surface of the Bricks
- 2 Using Mortar to Bond Bricks Together
- 3 Adhesives for Bonding Bricks Together
- 4 Mechanical Methods for Bonding Bricks Together
- 5 Factors to Consider When Choosing a Bonding Method
- 6 Mortar: Pros and Cons
- 7 Adhesives: Pros and Cons
- 8 Mechanical Connectors: Pros and Cons
When it comes to joining bricks together, the secret to a robust and enduring bond lies in the meticulous preparation of the brick surfaces. By following a series of essential steps, you can ensure that the adhesive or mortar used will adhere with unwavering strength, preventing any potential separation or weakening over time.
Step 1: Thorough Cleaning
Before embarking on the bonding process, it is imperative to thoroughly clean the bricks. Utilize a stiff brush or a pressure washer to eliminate any loose dirt, dust, or grime that may impede the adhesive’s effectiveness. This meticulous cleaning guarantees that the surface is devoid of any contaminants that could compromise the bond. Furthermore, it is crucial to strip away any existing paint or coatings on the bricks before proceeding.
Step 2: Creating Texture
To enhance the bonding strength, it is necessary to impart a rough texture onto the brick surfaces. This can be accomplished by skillfully scoring or scratching the surfaces using a wire brush or a masonry chisel. These minute grooves and scratches yield an expanded surface area for the adhesive to tightly grip onto, thereby amplifying its overall effectiveness.
Step 3: Keying
An additional technique that should be considered is keying. By strategically creating diminutive indentations or holes in the brick’s surface with a pointed tool like a nail or screwdriver, anchor points are established for the adhesive. These indentations serve as secure footholds for the adhesive to firmly latch onto, fortifying the bond even further.
Step 4: Adhesive Selection
The choice of adhesive is pivotal and will dictate the preparation required for the brick surfaces. Certain adhesives may necessitate supplementary steps such as applying a primer or wetting the surface before application. It is imperative to diligently adhere to the manufacturer’s instructions to achieve optimal bonding results.
Using Mortar to Bond Bricks Together
Bricklaying is a timeless craft that requires skill and precision. One of the key elements in creating a solid and durable structure is using mortar to bond the bricks together. In this article, we will guide you through the steps to master this technique, ensuring your bricks stay put and your project stands the test of time.

Step 1: Preparing the Mortar Mixture
Step 2: Wetting the Bricks
Before applying the mortar, wet the bricks with water. This simple step prevents them from absorbing moisture from the mortar too quickly and improves adhesion. Think of it as priming the bricks for their bonding experience.
Step 3: Applying the Mortar
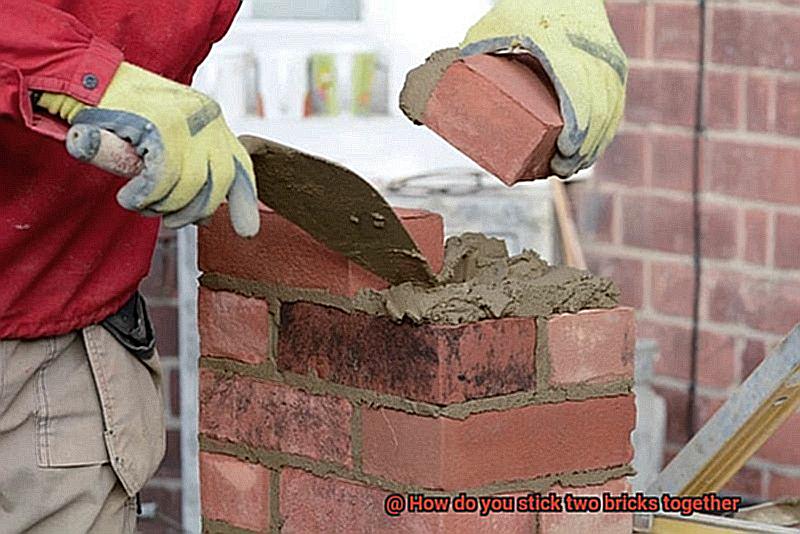
Using a trowel, scoop up a small amount of mortar and spread it onto one brick. The layer of mortar should be about 3/8 to 1/2 inch thick. Then, press the second brick firmly against the mortar, ensuring proper alignment. This bond between the bricks will form the foundation of your structure.

Step 4: Checking Alignment and Leveling
Take a moment to step back and assess. Use a level to ensure each brick is straight and even. Make adjustments by tapping lightly with a rubber mallet or adding/removing mortar as needed. This attention to detail ensures a stable and aesthetically pleasing result.
Step 5: Letting the Mortar Dry
Allow each row of bonded bricks to dry for approximately 24 hours before moving on to the next row. This patience allows the mortar to fully set and strengthen the bond. It’s like giving the bricks time to solidify their relationship.
Step 6: Finishing the Joints
Now it’s time to add the finishing touches. Use a jointer tool with a curved or V-shaped end to shape and smooth the mortar joints. This step not only provides a professional finish but also enhances the structural integrity of your brickwork. It’s like giving your project its own signature style.
Step 7: Curing and Protecting the Bonded Bricks
Protect the newly bonded bricks and mortar from excessive moisture during the curing process. Cover them with plastic sheeting or use a curing compound to allow the mortar to fully harden and achieve maximum strength. This step ensures that your bricks are solid and ready to withstand the test of time.
Adhesives for Bonding Bricks Together
When it comes to bonding bricks together, there are several adhesive options available. Let’s explore these options in detail and provide you with the necessary steps to ensure a successful bond.
- Mortar: The most traditional and commonly used adhesive for brick bonding is mortar. Made from a mixture of cement, sand, and water, mortar is applied between the bricks during construction and hardens over time, creating a strong bond. Its reliability and durability make it a popular choice for brick bonding.
- Construction adhesives: These adhesives come in various forms, such as liquid, gel, or caulk-like consistency. They are easy to apply with a caulking gun and provide excellent adhesion and flexibility. Construction adhesives are particularly useful when bonding bricks in areas where mortar may not be suitable or desired.
- Epoxy adhesives: Known for their high strength and durability, epoxy adhesives consist of two components – resin and hardener – which need to be mixed before application. Once mixed, epoxy adhesives form a strong chemical bond between the bricks. This makes them ideal for applications requiring an extra-strong bond.
- Polyurethane adhesives: Widely used for bonding bricks, polyurethane adhesives are known for their flexibility and resistance to moisture and temperature changes. They can be applied directly to the brick surfaces and create a strong bond once cured.
Now that we’ve covered the different adhesive options, let’s discuss the necessary steps to ensure a successful bond when using any adhesive for brick bonding:
- Prepare the brick surfaces properly by cleaning off any dirt or debris, ensuring the surfaces are dry, and roughening them slightly to improve adhesion.
- Follow the manufacturer’s instructions for the adhesive you are using regarding application, curing time, and other important factors.
- Consider using mechanical fasteners like screws or anchors in conjunction with adhesives for added support and stability in high-stress areas or for added peace of mind.
- Choose an adhesive that is compatible with the type of brick being used. Different types of bricks may have specific requirements for bonding, and using an incompatible adhesive can result in a weak or failed bond. Consult with experts or manufacturers to determine the best adhesive for your specific application.
Mechanical Methods for Bonding Bricks Together
Then, you must acquaint yourself with the numerous mechanical methods for bonding bricks together. These methods ensure a robust and enduring connection capable of withstanding the unforgiving forces of nature. So, let us plunge into the captivating world of brick bonding and uncover the secrets to crafting an unbreakable bond.
The first and foremost method is mortar, a time-honored technique that involves blending cement, sand, and water to form a paste-like substance. Applied between the bricks, mortar dries and hardens, creating a formidable bond. Not only does this method provide structural support, but it also enhances the brickwork’s resilience against weathering.
Metal connectors are another favored choice for bonding bricks together. Crafted from stainless steel or galvanized steel, these connectors come in an array of shapes and sizes. Embedded into the mortar joints, they offer additional reinforcement and stability. Wall ties, angle brackets, and strap anchors exemplify some common metal connectors. Working hand in hand with mortar, these connectors create an unyielding bond capable of enduring even the harshest conditions.
For cavity walls, brick ties play an indispensable role in uniting two layers of brickwork. These metallic fasteners are meticulously installed within the mortar joints of both layers of bricks. Available in various designs like helical ties or flat straps, brick ties are typically constructed from stainless steel or galvanized steel. By securely connecting both layers of bricks, they contribute strength and stability to the structure.
Dowels represent yet another mechanical method employed to bond bricks together. These cylindrical rods, fashioned from materials such as steel or fiberglass, are inserted into drilled holes within the bricks. Dowels establish a robust mechanical connection that prevents separation under load or movement.
Lastly, expansion bolts frequently secure heavy objects to brick surfaces. Comprised of a threaded bolt and an expansion sleeve, these bolts tighten to expand the sleeve, gripping the hole’s sides and forming a secure attachment point.
You may wonder if glue could be used in bonding bricks together. While glue is not typically utilized for this purpose, there exist specialized construction adhesives designed to bond porous materials like bricks. These adhesives offer a strong and durable connection. However, it is important to note that glue should not be solely relied upon for bonding bricks together, as it may not match the strength and durability provided by mortar or mechanical methods.
Factors to Consider When Choosing a Bonding Method
When it comes to choosing a bonding method for your construction project, such as building a patio with bricks, there are several factors you should consider. Let’s explore these factors in more detail to ensure you make the right choice.
First and foremost, strength and durability are paramount. Bricks are heavy, so it’s crucial to choose a bonding method that can handle the weight and pressure without weakening or breaking over time. Look for adhesives specifically designed for heavy-duty applications, ensuring your bond stands the test of time.
Weather resistance is another crucial factor. Since bricks are often used outdoors, your adhesive must be able to withstand extreme temperatures, moisture, and UV exposure. You don’t want your beautiful brickwork to crumble due to weathering, right? So make sure to choose an adhesive that can brave the elements.
Next, consider the ease of application. Some adhesives require special tools or equipment, while others have specific application instructions or curing times. Choose an adhesive that aligns with your skills and available resources for a smooth and successful bonding process.
Time efficiency is also important. If you’re working on a time-sensitive project, opt for fast-drying adhesives that allow for quicker completion. On the other hand, if time is on your side, you can choose an adhesive with longer curing times without worrying about delays.
Of course, we can’t forget about cost. Different bonding methods vary in cost, so consider your overall project budget when making your choice. Find that sweet spot where cost-effectiveness meets performance to get the best bang for your buck.
Flexibility is worth considering as well, especially if you’re working with curved or uneven surfaces. Look for adhesives that offer more flexibility, allowing better adherence to irregular shapes and surfaces. This way, you’ll achieve a seamless bond, even in challenging conditions.
Lastly, let’s touch on the environmental impact. As sustainable construction practices gain momentum, it’s essential to choose bonding methods with minimal environmental impact. Opt for water-based adhesives or low VOC options to reduce harmful chemicals and toxic fumes during application or curing.
Mortar: Pros and Cons
When it comes to construction, the right adhesive can make all the difference. In the world of brickwork, mortar has long been the go-to choice for creating a solid bond between bricks. But like any building material, mortar has its pros and cons. So, let’s dive into the advantages and disadvantages of using mortar in construction.
Strength and Durability:
One of the biggest advantages of using mortar is its strength and durability. When mixed and applied correctly, mortar forms a solid bond between bricks that can withstand the test of time. This is especially important in load-bearing structures where the stability of the building relies on the strength of the mortar. Moreover, mortar offers excellent fire resistance, making it a safe choice for areas prone to wildfires or other fire hazards.
Versatility:
Another great advantage of mortar is its versatility. With different proportions of sand, cement, and water, builders can customize mortar to meet specific construction needs. This means you can create mixtures with varying strengths and properties depending on your project requirements. Need a high-strength mortar for heavy loads? No problem. Require a more flexible mortar for seismic activity? Mortar can handle that too.
Weather Resistance:
Mortar also offers good weather resistance when properly cured. It prevents moisture from seeping into brickwork, protecting it from damage caused by water penetration. This is particularly beneficial in regions with high rainfall or extreme weather conditions. Additionally, mortar provides some insulation properties that help regulate temperature and improve energy efficiency in buildings.
Time-Consuming Application:
However, not everything about mortar is sunshine and rainbows. One of its downsides is the time-consuming application process. Mixing mortar requires precise measurements and proper technique to ensure consistency and effectiveness. Moreover, mortar needs ample time to cure and set before reaching maximum strength, which can slow down construction projects with tight deadlines or time constraints.
Susceptibility to Cracking:
Another drawback of mortar is its susceptibility to cracking. Unlike modern adhesives, mortar is not as flexible and can develop cracks over time due to temperature changes, settling of the building, or other factors. While these cracks may not compromise the building’s structural integrity, regular maintenance and repair are necessary to preserve its appearance.
Environmental Factors:
Mortar can also be affected by environmental factors such as extreme temperatures, freeze-thaw cycles, and chemical exposure. In cold climates, freezing and thawing can lead to mortar deterioration, weakening bonds between bricks. Additionally, exposure to certain chemicals or pollutants can cause premature deterioration of mortar, necessitating frequent repairs or replacements.
Adhesives: Pros and Cons
When it comes to sticking bricks together, adhesives offer a convenient and efficient alternative to traditional methods like mortar. They provide a simple and user-friendly solution that eliminates the need for complex mixing or specialized tools. However, before you grab that tube of adhesive, let’s delve into the pros and cons to ensure you make an informed decision.
Pros of using adhesives:
Ease of use:
Say goodbye to messy mixing and confusing ratios. With adhesives, all you need to do is apply and press – it’s as simple as that. Perfect for DIY enthusiasts seeking a hassle-free bonding experience.
Unyielding strength:
High-quality adhesives create an unbreakable bond between bricks, capable of withstanding significant loads and pressures. Rest assured, your brick structure will stand strong for years to come.
Versatility at its finest:
Concrete, clay, or stone bricks – adhesives can handle them all. No matter the material, these versatile wonders will ensure your construction project stays on track, offering unmatched flexibility in brick bonding.
Aesthetics on point:
If you’re aiming for a flawless finish, adhesives are your go-to choice. Unlike mortar, which leaves visible joints between bricks, adhesives create minimal joints, resulting in a visually appealing look that’s perfect for decorative or exposed brick surfaces.
Cons of using adhesives:
Time is of the essence:
Once applied, adhesives have a limited adjustment window before they set. Precision alignment or positioning of bricks can be a challenge, so swift yet accurate work is crucial.
Forever isn’t always better:
Unlike mortar that can be chiseled away and replaced if needed, removing adhesive is labor-intensive and may cause damage to the bricks. Committing to adhesive requires confidence in your brick layout.
Mind the environment:
Some adhesives contain potentially harmful chemicals like volatile organic compounds (VOCs). To minimize environmental impact, choose low VOC adhesives or environmentally friendly alternatives that stick to sustainability.
Temperature tantrums:
Extreme heat or cold conditions can affect adhesive performance. Ensure you select adhesives specifically designed for your intended application environment to prevent any unpleasant surprises.
Mechanical Connectors: Pros and Cons
When it comes to bonding bricks, mechanical connectors provide a robust and durable solution. These devices or systems physically hold bricks together, offering several advantages over adhesives or mortar. However, they also have their own set of drawbacks. In this article, we will explore the pros and cons of using mechanical connectors for brick bonding.
Pros of Mechanical Connectors:
Strength and Durability:
Mechanical connectors offer a reliable bond that can withstand tension, compression, and shear forces. Unlike adhesives that may weaken over time or mortar that can deteriorate due to weather conditions, mechanical connectors provide long-lasting strength and durability.
Easy Disassembly:
A significant advantage of mechanical connectors is their easy disassembly when needed. This feature proves useful for replacing bricks or making repairs without causing damage. By removing the mechanical connector, bricks can be separated cost-effectively, addressing any issues that may arise.
Versatility:
Mechanical connectors come in various types and sizes, offering flexibility for different construction projects. Whether it’s a small DIY project or a large-scale construction site, there are mechanical connectors available to suit different needs. This versatility makes them a popular choice among builders and contractors.
Cons of Mechanical Connectors:
Visible Connections:
Unlike adhesives or mortar that create seamless bonds between bricks, mechanical connectors are often visible. The presence of brackets, bolts, or other connectors can be visually unappealing, especially in architectural designs where aesthetics play a crucial role.
Time-Consuming Installation:
Installing mechanical connectors can be more time-consuming compared to using adhesives or mortar. It requires precise alignment and drilling or fastening processes. This additional time and effort involved in the installation can result in increased labor costs, particularly in large-scale projects.
Potential for Corrosion:
Depending on the material used for the mechanical connectors, there is a risk of corrosion over time, especially in outdoor or humid environments. Corrosion weakens the bond between bricks and compromises the overall structural integrity. Choosing high-quality connectors made from corrosion-resistant materials helps mitigate this risk.
C3tygDHdDc8″ >

