Rubber flooring is all the rage these days, whether you’re decking out your home gym, sprucing up your garage, or creating a fun playroom for the kids. But here’s the thing – you need to know how to properly stick that rubber to your concrete floor for it to last. In this blog post, we’re going to break it down step by step, so you can confidently attach rubber flooring to your concrete and enjoy a long-lasting and rock-solid installation.
Step 1: Prepping that Concrete Surface
Contents
- 0.1 Step 1: Prepping that Concrete Surface
- 0.2 Step 2: Choosing Your Adhesive Wisely
- 0.3 Step 3: Applying That Sticky Stuff
- 0.4 Step 4: Rubber Flooring Placement Party
- 1 What Materials are Needed to Stick Rubber to Concrete?
- 2 Preparing the Concrete Surface for Adhesive Bonding
- 3 Applying the Adhesive
- 4 Securing the Rubber Material with Pressure
- 5 Alternative Methods for Sticking Rubber to Concrete Floors
- 6 Double-Sided Adhesive Tapes and Strips
- 7 Mechanical Fasteners
- 8 Benefits of Using Adhesives vs Other Methods
- 9 Conclusion
Before you dive into sticking rubber like a pro, make sure your concrete floor is ready for action. Grab a broom, vacuum, or even a pressure washer if you’re feeling fancy and get rid of any dust, dirt, or grease. Take a good look at the floor and fix any cracks with some trusty concrete patch. And if there are any pesky uneven spots ruining your groove, smooth them out with a self-leveling compound. Patience is key here – give those repairs enough time to dry completely before moving on.
Step 2: Choosing Your Adhesive Wisely
Now it’s time for the adhesive magic. Don’t settle for just any old glue – be picky and choose an adhesive specifically made for rubber flooring. Trust us, this will make all the difference in adhesion and durability. If you’re not sure which one to go for, don’t hesitate to consult with an expert or reach out to the adhesive manufacturer themselves. Better safe than sorry.
Step 3: Applying That Sticky Stuff
Alrighty then, let’s get sticky. Crack open that adhesive container (after reading the instructions first.) and grab yourself a notched trowel or whatever applicator floats your boat. Spread that adhesive evenly across the concrete surface like you’re spreading butter on toast – smooth and steady wins the race. Take it one small section at a time, because some adhesives have a need for speed and dry up faster than you can say “rubber on concrete”. Oh, and don’t go overboard with the adhesive – too much of a good thing can seep through the rubber and weaken that bond we’re after.
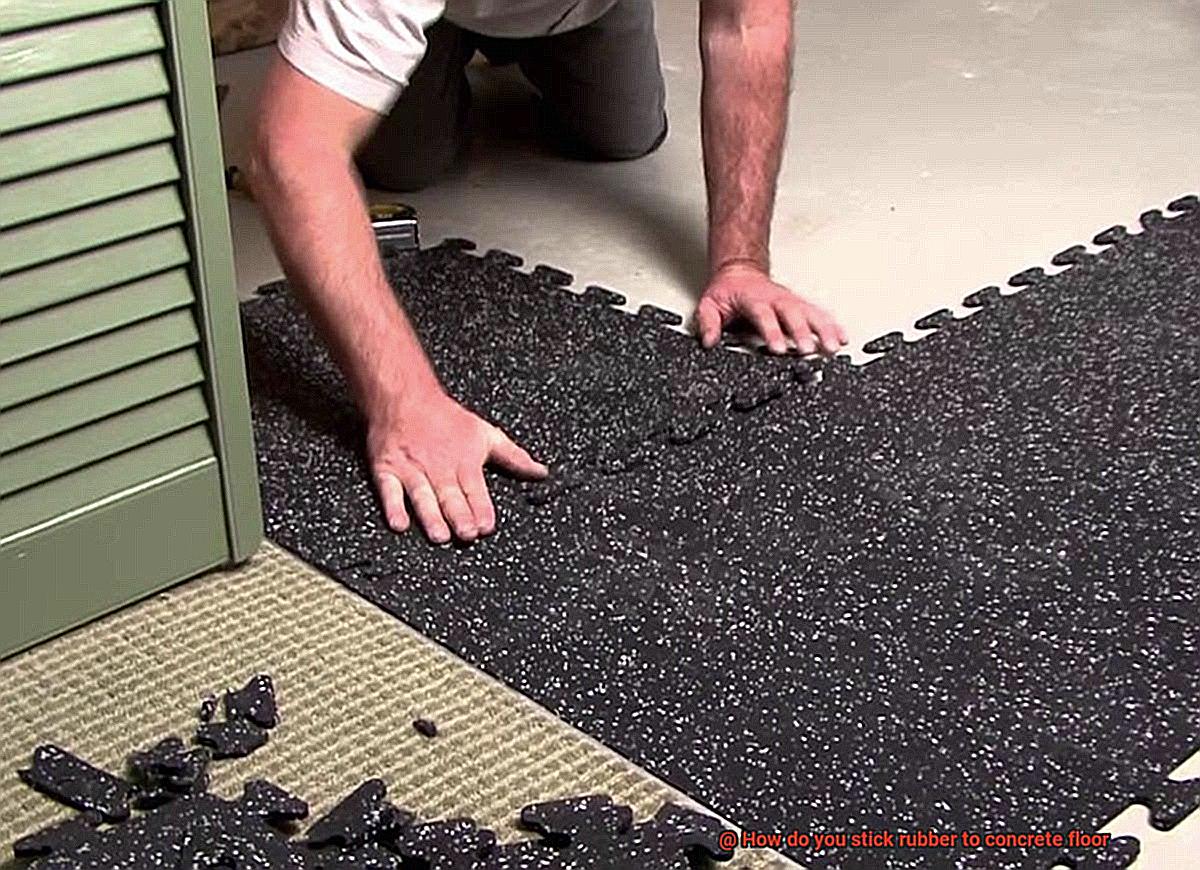
Step 4: Rubber Flooring Placement Party
Now comes the fun part – it’s time to put that rubber flooring in its place. Start at one corner and work your way across the room like a boss. Gently
What Materials are Needed to Stick Rubber to Concrete?
When it comes to sticking rubber to a concrete surface, you need the right materials and methods to ensure a strong and long-lasting bond. In this comprehensive guide, we will explore the different adhesive options available, as well as the proper preparation techniques for a successful installation. Whether you are working on a commercial flooring project or a DIY outdoor application, this guide has got you covered.

Materials for Adhesion:
- Adhesive Glues: Epoxy adhesives, polyurethane adhesives, and contact cement are commonly used for bonding rubber to concrete. Epoxy adhesives offer exceptional strength and durability, making them perfect for heavy-duty applications. Polyurethane adhesives are known for their flexibility and resistance to environmental conditions. Contact cement is a fast-drying adhesive suitable for large-scale installations.
- Primers: Primers are essential for improving adhesion and preventing the rubber from peeling or separating over time. They create a better surface for the adhesive to bond to. Consult with professionals or refer to manufacturer instructions to choose the right primer for your specific application.
Methods of Adhesion:
- Surface Preparation: Thoroughly clean the concrete surface, removing any dust, dirt, or debris. Repair any cracks or uneven areas to ensure a smooth and even surface.
- Adhesive Application: Follow manufacturer instructions for the specific adhesive being used. Apply the adhesive evenly using a trowel or roller, ensuring enough adhesive for a solid bond without excess.
- Placement and Alignment: Carefully position and align the rubber material on the concrete floor, ensuring proper coverage and adherence.
- Pressure Application: Apply pressure using a weighted object or by walking over the rubber surface, ensuring a strong bond with the adhesive.
Alternative Methods:
- Double-Sided Adhesive Tapes: These tapes offer an easy-to-use alternative, providing a strong initial bond. However, they may not offer the same durability as solvent-based adhesives.
- Mechanical Fasteners: Screws or nails can be used for temporary installations or situations where the rubber needs to be easily removed or replaced.
Preparing the Concrete Surface for Adhesive Bonding
In this comprehensive guide, we will walk you through the essential steps required to prepare the concrete surface for adhesive bonding. From thorough cleaning and repairing any imperfections to applying primer and considering environmental conditions, we’ve got you covered. So, let’s dive right in and ensure your project starts off on the right foot.
Step 1: Thoroughly Clean the Surface:
Before anything else, it is crucial to remove all dirt, dust, and debris from the concrete floor. Use a vacuum cleaner or broom to get rid of loose particles, followed by a mop with a mild detergent solution to tackle stubborn stains or residues. A clean surface provides the foundation for a solid adhesive bond.
Step 2: Ensure the Concrete Floor is Dry:
Moisture can wreak havoc on adhesive effectiveness. Therefore, it is vital to wait at least 24 hours after cleaning to allow the concrete floor to dry completely. This step is essential for achieving optimal bonding results.
Step 3: Repair Any Cracks or Uneven Surfaces:
Inspect the concrete floor for cracks, holes, or unevenness. These imperfections can compromise the adhesive bond. Use a suitable concrete patching compound or filler to repair and level any damaged areas. Follow the manufacturer’s instructions carefully for application and drying times.
Step 4: Roughen the Surface:
To enhance adhesion, it may be necessary to slightly roughen the concrete surface. Use coarse-grit sandpaper or a concrete grinder to create a textured finish that allows the adhesive to grip effectively. Remember, a little roughness goes a long way.
Step 5: Apply Primer:
Using a primer is a wise move as it improves adhesion and strengthens the bond between the rubber and concrete. Consult the adhesive manufacturer’s instructions for the recommended primer to use. Applying primer is a small step that can make a big difference in the longevity of your adhesive bond.
Step 6: Consider Temperature and Humidity:
Both the concrete and adhesive should be within the recommended temperature range for optimal bonding. Additionally, high humidity levels can affect drying times and performance. Ensure proper ventilation or utilize dehumidifiers if necessary to create an ideal environment for bonding.
Applying the Adhesive
Applying adhesive to stick rubber to a concrete floor requires attention to detail and the right techniques. Let’s dive into the nitty-gritty of this process and ensure your project gets off to a great start.
First and foremost, cleanliness is key. Before you begin, make sure both the rubber and concrete surfaces are free from any dirt or debris. A quick sweep or vacuum of the floor, along with a wipe-down of the rubber using a clean cloth, will do wonders.
Now comes the crucial decision of choosing the right adhesive. Epoxy, polyurethane, or contact cement – which one should you go for? To make an informed choice, consult with professionals or check out the instructions on the adhesive packaging. They’ll guide you towards the best option for your specific project.
Before fully committing to the adhesive application, it’s wise to conduct a test patch on a small area. This will help you identify any adjustments that need to be made before proceeding further.
When it’s time to apply the adhesive, be sure to carefully follow the manufacturer’s instructions on both quantity and application technique. Some adhesives may require spreading with a notched trowel, while others may need to be rolled or brushed on.
Patience is key during this process. Allow the adhesive to dry for the specified amount of time mentioned in the instructions. This waiting period ensures a strong bond between the rubber and concrete surfaces.
Once the adhesive has dried, it’s time to carefully place the rubber material onto the concrete surface. Pay close attention to alignment and apply even pressure across the entire surface.
To seal the deal, use a roller or a heavy object to press down on the rubber material. This step eliminates any pesky air bubbles and guarantees a super strong bond.
Lastly, exercise patience once more and allow enough time for the adhesive to fully cure before subjecting your rubber flooring to heavy traffic or any other stressors. Curing times can vary, so always refer to the manufacturer’s instructions for specific guidelines.
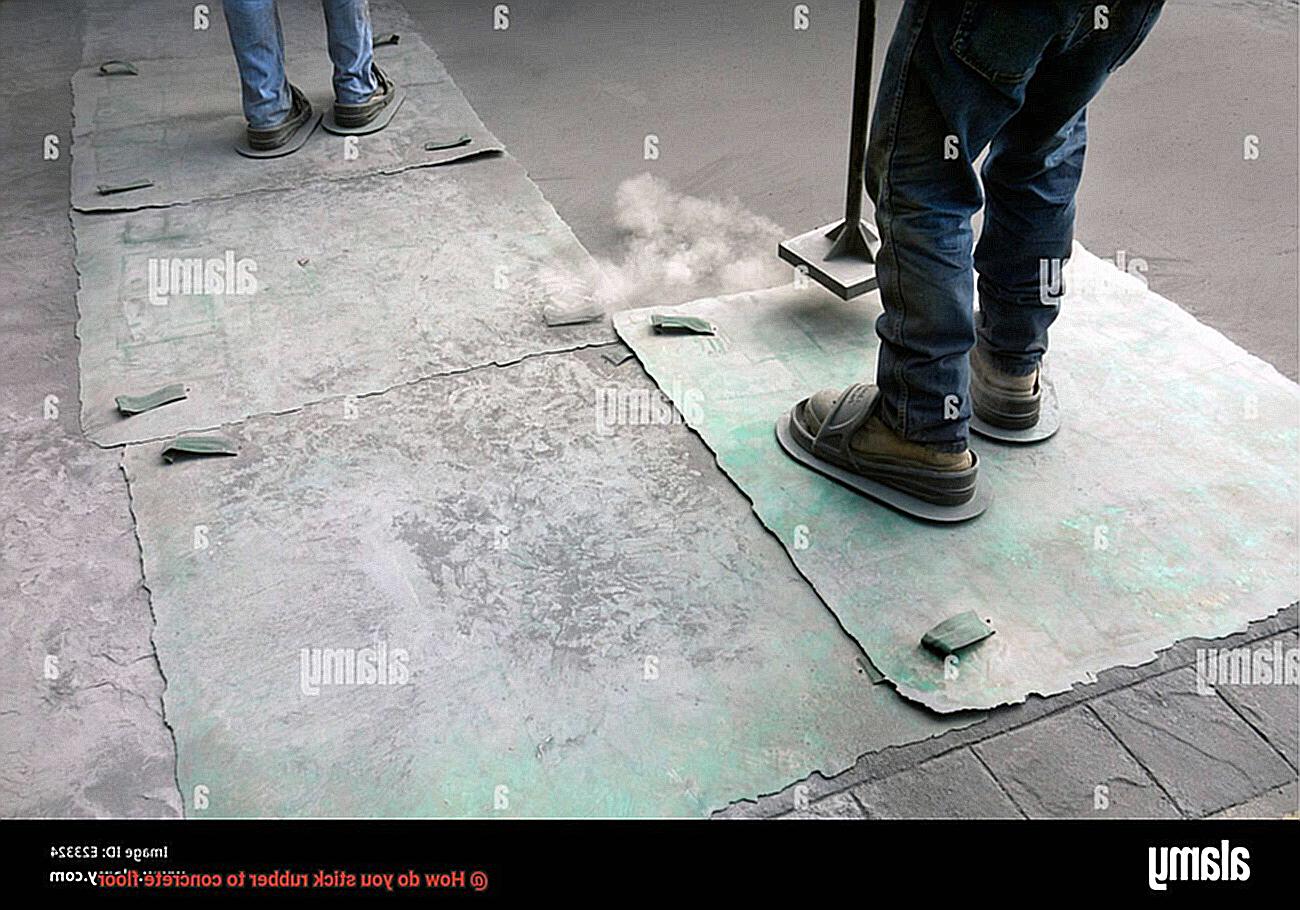
Securing the Rubber Material with Pressure
Whether you’re tackling an industrial project or enhancing a commercial space, establishing a strong and durable bond is essential. The answer lies in pressure-sensitive adhesive (PSA). In this comprehensive guide, we’ll walk you through the step-by-step process of using PSA to achieve a secure bond, allowing you to stick rubber to concrete like a seasoned professional.
Step 1: Cleanliness is Key
Before diving into the bonding process, it’s crucial to thoroughly clean the concrete floor. Remove any dirt, dust, or debris that could hinder the adhesive’s ability to create a firm bond. Grab some warm water, mix in a mild detergent, and give the floor a thorough scrub. Rinse it well and ensure it dries completely.
Step 2: Choose the Right PSA Adhesive
Not all adhesives are created equal. When it comes to bonding rubber to concrete, selecting a PSA adhesive specifically designed for this purpose is critical. Various options, including solvent-based and water-based adhesives, are available on the market. Consult the manufacturer’s instructions and choose an adhesive that suits your needs.
Step 3: Apply Adhesive Evenly
Once you have chosen your adhesive, apply it evenly to the backside of the rubber material. Be meticulous in covering the entire surface area for maximum bonding strength. Take your time as precision is key.
Step 4: Position and Align
Carefully position the rubber material onto the clean and dry concrete floor. Pay close attention to alignment and make any necessary adjustments before applying pressure.
Step 5: Exert Pressure for Optimal Bonding
To create a secure bond, apply pressure to the rubber material. This can be achieved by using a heavy roller or placing weighted objects on top. Applying pressure ensures maximum contact between the adhesive and the concrete floor, resulting in a robust bond. Follow the manufacturer’s instructions for the recommended pressure and duration.
Step 6: Allow Sufficient Curing Time
Patience is crucial when aiming for a long-lasting bond. Adhere to the manufacturer’s recommendations regarding curing time. Avoid any foot traffic or movement on the rubber material during this period to prevent compromising the bond.
Alternative Methods for Sticking Rubber to Concrete Floors
When it comes to sticking rubber to concrete floors, glue may be the go-to option, but there are alternative methods that offer convenience, durability, and flexibility. In this blog post, we’ll explore a range of techniques beyond traditional glue, opening up a world of possibilities for sticking rubber to concrete floors.
Adhesive Tapes:
Ditch the messy glue and opt for adhesive tapes specifically designed for bonding rubber to concrete floors. These tapes boast a powerful adhesive backing that securely bonds the rubber to the concrete surface.
Quick and easy to apply, they provide a convenient solution for both permanent and temporary installations. Just ensure the tape is compatible with both the rubber material and the concrete floor for optimal adhesion.
Rubber Flooring Adhesives:
For a more specialized approach, consider rubber flooring adhesives. Formulated specifically to bond rubber materials to various surfaces, including concrete, these adhesives come in liquid or paste form.
Proper surface preparation is essential before applying the adhesive. Spread it evenly on the concrete floor and press the rubber material onto it firmly.
Follow the manufacturer’s instructions regarding drying or curing time to achieve maximum bonding strength.
Mechanical Fastening Methods:
When high-traffic areas or frequent removal of the rubber material are factors, mechanical fastening methods become an effective alternative. Secure the rubber directly onto the concrete floor using screws, nails, or other fasteners. However, keep in mind that this method may create holes in the concrete and might not provide as seamless of a bond as adhesives.
Self-Adhesive Rubber Sheets:
Say goodbye to additional adhesives with self-adhesive rubber sheets. These hassle-free sheets come with an adhesive backing that allows for easy application directly onto the concrete floor.
Perfect for smaller areas or temporary installations, they eliminate the need for additional products.
Epoxy Resin:
For industrial or heavy-duty applications requiring maximum adhesion, epoxy resin is a top choice. This durable and strong adhesive excels at bonding different materials effectively.
However, meticulous surface preparation and precise mixing according to the manufacturer’s instructions are crucial for success.
Double-Sided Adhesive Tapes and Strips
Double-sided adhesive tapes and strips are a revolutionary solution when it comes to sticking rubber to concrete floors.
With their strong and durable bond, they eliminate the need for messy glues and provide a hassle-free experience. These magical wonders offer convenience and ease of use, making the rubber-sticking process a breeze.
One of the major advantages of double-sided adhesive tapes and strips is their remarkable convenience. Unlike traditional glue, there is no need for additional tools or equipment. Simply peel off the backing, stick one side onto the rubber, peel off the other backing, and firmly press it onto the concrete floor. It’s as simple as that. The days of struggling with messy glue are over.
Moreover, these tapes and strips allow for easy removal and repositioning without leaving any residue or damage. So, if you make a mistake or need to adjust the position of the rubber, there’s no need to worry. You can simply remove the tape or strip and reapply it without any hassle.
However, before embarking on your rubber-sticking adventure, there are a few considerations to keep in mind. First and foremost, ensure that both the rubber and concrete surfaces are clean and free from dirt, dust, or grease. A clean surface is crucial for achieving a strong bond between the two materials.
It’s also important to note that not all double-sided adhesive tapes and strips are created equal. To ensure the best adhesion and durability, it is essential to choose tapes or strips specifically designed for sticking rubber to concrete floors. These specialized products are formulated with high-quality adhesives that offer excellent bonding properties.
Furthermore, it’s advisable to test a small area before committing to a full application. While these tapes and strips generally work well with most rubbers and concrete floors, different surfaces may require different adhesives. Testing a small area will help determine if the tape or strip is suitable for your specific rubber and concrete combination.
Mechanical Fasteners
Get ready for a thrilling journey as we delve into the world of screws, nails, bolts, and anchors – your trusty allies in the battle for an unbreakable bond.
Let’s start with screws – those reliable companions perfect for attaching rubber mats or tiles to your concrete floor. With their easy installation and steadfast grip, it’s no wonder DIY enthusiasts adore them. But remember, before diving in, drill those pilot holes into the concrete to prevent unwanted cracks or splits from spoiling the show. Align your rubber mat or tile with precision, and then unleash the power of your power drill or screwdriver to secure them in place. Behold. Your rubber is now firmly fastened.
Now, let’s give nails a moment in the spotlight. While not as common as screws, nails work their magic on thinner rubber materials like sheets or rolls. Armed with a mighty hammer and specialized masonry nails crafted for concrete, you’re ready for action. Carefully place your rubber material on the stage, and with a gentle touch, let those nails pierce through it and into the concrete. Remember, even spacing of the nails ensures a grip that will make your rubber cling like never before.
For heavy-duty applications that demand Herculean strength, bolts rise to the occasion. When faced with high foot traffic or heavy equipment, these mighty warriors are your new best friends. Begin by drilling holes into the concrete floor using a fearsome masonry bit. Then, insert the bolts through the rubber material and into those holes. Secure them in place beneath the concrete floor with nuts and washers – an impenetrable fortress awaits.
But wait, there’s more. Anchors burst onto the scene, wielding the power of superheroes among mechanical fasteners. When vibrations or movement threaten to shake your bond, anchors step in to save the day. Drill those holes into the concrete floor, and with a flourish, insert the anchors. Use screws or bolts to connect the rubber material to these mighty anchors, and watch as an unyielding alliance forms, ready to withstand any challenge.
Remember, dear rubber enthusiasts, selecting the right fasteners is vital for a bond that stands the test of time. A weak match between rubber and concrete may crumble under pressure. Always heed the manufacturer’s instructions for installation and wield the appropriate tools and equipment for the job at hand.
Benefits of Using Adhesives vs Other Methods
In this blog post, we’ll explore why using adhesives is the ultimate choice for this task.
Seamless and Durable Bond:
Adhesives create a seamless connection between rubber and concrete surfaces, unlike screws, nails, or bolts. No visible hardware or fasteners disrupt the sleek appearance of your flooring. Plus, adhesives provide a strong and durable bond that won’t loosen or become damaged over time.
Aesthetically Pleasing:
Say goodbye to unsightly hardware on the surface. Adhesive bonding ensures a visually pleasing result by eliminating any pesky screws or nails that can detract from the overall appeal of your rubber-concrete combo.
Versatility:
Adhesives are incredibly versatile. They can be used on various types of concrete surfaces, whether smooth or rough. They also work well with different rubber materials, including natural rubber, synthetic rubber, or rubberized coatings. No matter what type of rubber you’re working with, adhesives have got you covered.
Easy Application and Customization:
Adhesives come in various forms: liquid adhesive, adhesive tapes, or adhesive sheets. This versatility allows for easy customization based on your specific project requirements. Whether you need precise application or broad coverage, there’s an adhesive product that suits your needs.
Resistance to Environmental Factors:
Adhesive bonding offers excellent resistance to moisture, chemicals, and temperature variations. Rest assured, your rubber will stay firmly in place even in the face of water exposure, chemical spills, or temperature fluctuations.
Non-Invasive Installation:
Using adhesives eliminates the need for drilling holes or making permanent modifications to your concrete floor. This is especially beneficial if you want to maintain the integrity of the floor or if drilling is not feasible or desirable.
Sound Insulation:
Adhesive bonding with rubber provides excellent sound-dampening qualities. So, when bonded to a concrete floor, it can help reduce noise transmission between floors or rooms. Say goodbye to those unwanted squeaks and creaks.
Cost-Effective Solution:
Compared to other methods, adhesive bonding offers a cost-effective solution. While the initial cost may vary, adhesives generally require fewer materials and labor compared to mechanical fasteners or complex installation methods.
Ccvj1sFWxw8″ >
Conclusion
When it comes to sticking rubber to a concrete floor, there are a few key steps you need to follow for success.
First and foremost, make sure the surface is clean and free of any dirt or debris. This will ensure proper adhesion between the rubber and the concrete.
Next, choose an appropriate adhesive that is specifically designed for bonding rubber to concrete. There are various options available, such as epoxy-based adhesives or adhesive tapes.
Apply the adhesive evenly onto the concrete floor using a trowel or a brush, making sure to cover the entire area where the rubber will be placed. Then, carefully place the rubber onto the adhesive, pressing down firmly to create a strong bond.
It’s also important to note that temperature and humidity can affect the bonding process, so ensure that you are working in suitable conditions.