Welcome to our blog post all about securing carpet to concrete.
Contents
- 1 Preparing the Concrete Surface
- 2 Using Adhesive to Secure Carpet to Concrete
- 3 Applying the Adhesive
- 4 Letting the Adhesive Dry or Cure
- 5 Using Tack Strips to Secure Carpet to Concrete
- 6 Using Double-Sided Carpet Tape to Secure Carpet to Concrete
- 7 Factors That Can Affect Carpet Installation
- 8 Tips for a Successful Installation
- 9 Conclusion
Whether you’re revamping your home, creating a snug basement space, or searching for an affordable flooring solution, we’ve got the answers you need. Don’t worry if the idea of securing carpet to concrete seems overwhelming – we’ve got the expertise to make it super simple.
So let’s jump right in and learn how to turn your cold concrete floors into a cozy and trendy retreat.
Preparing the Concrete Surface
A carpet installation is only as good as its foundation, and when it comes to concrete floors, proper surface preparation is the key to a successful and long-lasting result. Whether you’re using glue, tack strips, or double-sided carpet tape, taking the time to prepare your concrete surface correctly ensures a secure and durable bond. In this article, we will explore the essential steps for preparing your concrete surface before installing carpet using glue as the adhesive.
Cleanliness is Key:
Before applying any adhesive, it is crucial to start with a clean slate. Sweep or vacuum the area to remove loose particles, ensuring a debris-free surface. Next, use a mild detergent or concrete cleaner to eliminate stains or residues that might hinder the adhesive’s effectiveness. A pristine surface provides a solid foundation for the adhesive to establish a strong bond.
Repair Imperfections:
Inspect the concrete surface for cracks, holes, or uneven areas that could compromise the appearance and longevity of your carpet. Fill any cracks or holes with a concrete patching compound or crack filler, ensuring a level surface. This step guarantees a smooth and seamless installation while preventing future damage.
Moisture Testing:
Concrete is naturally porous and prone to moisture issues that can jeopardize the adhesion of your carpet. Conduct a moisture test using either a moisture meter or a moisture vapor emission rate (MVER) test kit. High moisture levels can lead to mold, mildew, or adhesive failure. If moisture levels are elevated, address these issues before installation by using a moisture barrier or applying a moisture-resistant sealer.
Smooth and Level the Surface:
To achieve an even and flawless carpet installation, it may be necessary to grind down high spots or fill in low areas on your concrete surface. This process eliminates any visible lines or bumps under the carpet, ensuring a visually pleasing result. Utilize a concrete grinder or self-leveling compound as needed to create a perfectly level surface.
Allow Ample Drying Time:
After completing repairs and adjustments, exercise patience and allow your concrete surface sufficient time to dry completely before proceeding with the carpet installation. The drying time varies depending on factors such as humidity and temperature. To determine the appropriate drying time, refer to the manufacturer’s instructions or consult a professional.
Conclusion:
Using Adhesive to Secure Carpet to Concrete
Look no further. In this comprehensive guide, we will walk you through the steps involved in using adhesive to secure your carpet to concrete like a seasoned professional. Bid farewell to those annoying carpet wrinkles and say hello to a seamless and secure flooring experience.
Step 1: Prepare the Surface for Success
Before diving into the gluing process, it is crucial to prepare the concrete surface properly. Thoroughly clean it, ensuring there is no debris, dust, or moisture present. A quick sweep followed by a mop will do the trick. Remember, a clean surface is the foundation for a successful carpet installation.
Step 2: Choose the Perfect Adhesive Companion
Now comes the fun part – selecting the ideal adhesive for your carpet and concrete. There are various types available, such as solvent-based and water-based options. It is essential to opt for an adhesive specifically designed for bonding carpet to concrete. This ensures maximum adhesion and longevity.
Step 3: Apply the Adhesive with Precision
Once you have chosen your adhesive, it’s time to apply it like a pro. Begin by pouring a small amount onto the concrete surface. Armed with a trusty trowel or notched trowel, spread the adhesive evenly. Remember, working in small sections prevents the adhesive from drying out prematurely, guaranteeing a secure bond.
Step 4: Lay Down the Carpet Gracefully
The moment has arrived to lay your carpet onto the prepared concrete surface. Start from one edge and carefully work your way towards the opposite side. Ensure good contact with the adhesive by firmly pressing down on the carpet, giving it no chance to wriggle free.
Step 5: Roll It Out for Unyielding Bondage
To ensure a rock-solid bond between the carpet and the concrete surface, grab a carpet roller or any weighted object and roll it over the installed carpet. This simple step helps to eliminate any air pockets and guarantees proper adhesion. Strut across your newly secured flooring with confidence.
Step 6: Exercise Patience for Long-Lasting Results
Before you joyfully dance on your newly carpeted floor, exercise patience. Allow the adhesive sufficient time to dry. Follow the manufacturer’s instructions regarding drying time, as it may vary depending on the type of adhesive used. Remember, patience is key to achieving long-lasting and secure results.
Applying the Adhesive
When it comes to securing carpet to concrete like a pro, there are secrets to be uncovered in the world of adhesive. So buckle up and get ready for a thrilling ride into the realm of perfectly bonded flooring.
First and foremost, before even thinking about applying the adhesive, it’s essential to prepare the concrete surface properly. This means getting down and dirty with a broom or vacuum cleaner to sweep away any loose particles that might disrupt the bond. Once that’s done, grab a mop and a mild detergent solution to tackle those stubborn stains and dirt that can hinder the adhesive’s effectiveness. And don’t forget to let the surface dry completely – patience is key.
Now that your concrete canvas is prepped and ready, it’s time to choose the perfect adhesive sidekick. Look for an adhesive specifically designed for securing carpet to concrete, ensuring that it has the right properties for a strong bond. Take a moment to read the instructions carefully and follow them religiously – there are no shortcuts when it comes to achieving long-lasting results.
Okay, showtime. Let’s dive into the actual application process. It’s best to work in small sections at a time, pouring a small amount of adhesive onto the concrete. Armed with a notched trowel or adhesive spreader, spread that adhesive evenly like an artist applying their masterpiece. Make sure every inch of the area where the carpet will go is covered – no gaps allowed.
Now for the fun part – laying down the carpet itself. Position one edge onto the adhesive and slowly roll it out, smoothing it down as you go. As you lay each section, press down firmly with a trusty carpet roller or clean towel, banishing any air bubbles or wrinkles with your expert touch.
As you progress, pay extra attention to those tricky corners and edges. They may be notorious for trying to make a break for it, but with your skills, they won’t stand a chance.
But remember, patience is your ally. Allow the adhesive to work its magic by respecting the manufacturer’s instructions for setting and curing time. This means keeping foot traffic at bay for a specific period, but trust us – it’s well worth it for the long-lasting, secure results you’ll achieve.
Letting the Adhesive Dry or Cure
When it comes to securing carpet to concrete, the process of letting the adhesive dry or cure properly is crucial for a long-lasting and secure bond. The drying or curing time will vary depending on the type of adhesive used, as different adhesives have different properties and requirements.
One common type of adhesive used for this purpose is solvent-based adhesive. These adhesives typically require a longer drying time compared to other types. It is important to carefully read and follow the manufacturer’s instructions regarding the recommended drying time. This ensures that the adhesive reaches its full strength before any weight or pressure is applied to the carpet.
During the drying process, proper ventilation is essential. This allows the solvents in the adhesive to evaporate, creating a strong bond between the carpet and concrete surface. Not only does ventilation aid in the drying process, but it also prevents any unpleasant odors that may arise from the adhesive.
Water-based adhesives are another common option for securing carpet to concrete. These adhesives generally have a shorter drying time compared to solvent-based adhesives. However, it is still important to allow sufficient time for the adhesive to dry completely before placing any heavy furniture or objects on the carpet.
To ensure proper drying or curing of the adhesive, it is crucial to avoid walking on or using the carpeted area until the adhesive has fully dried. This can take anywhere from 24 to 48 hours, depending on factors such as temperature and humidity.
Rushing the drying or curing process can have detrimental effects on the bond between the carpet and concrete. Applying weight or pressure too soon can result in loose or lifted carpet, requiring additional repairs. Therefore, exercising patience and allowing ample drying time is of utmost importance.
Using Tack Strips to Secure Carpet to Concrete
Securing carpet to concrete floors can seem like a daunting task, but with the right tools and techniques, it can be a straightforward process. In this guide, we will walk you through the step-by-step instructions on how to use tack strips to secure your carpet to concrete, ensuring a professional and long-lasting installation.
Step 1: Prepare the Concrete Surface
Before installing the tack strips, it’s essential to clean the concrete floor thoroughly. Remove any debris or dust using a broom or vacuum cleaner. A clean surface will ensure better adhesion of the tack strips.
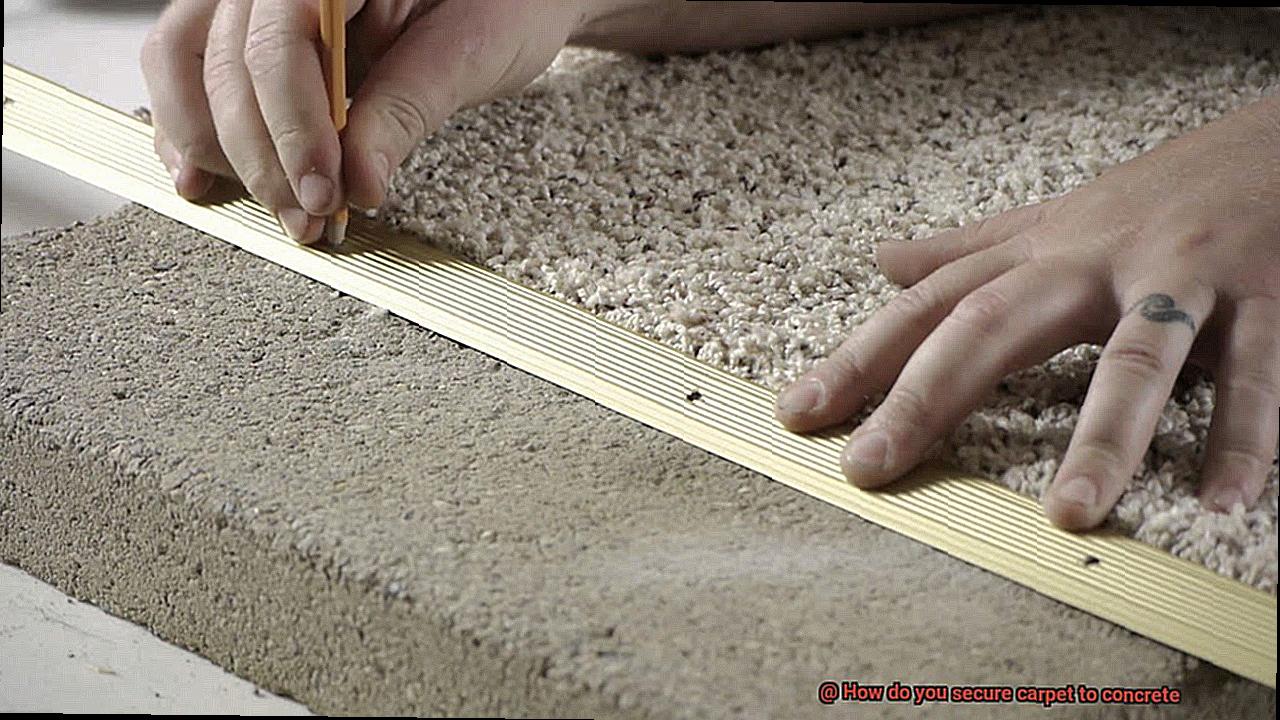
Step 2: Mark and Cut the Tack Strips
Measure and mark the areas where the tack strips will be placed. It’s crucial to leave a 1/4-inch gap between the wall and the tack strip for proper carpet installation. Cut the tack strips to fit the length of each wall using a saw or sturdy scissors.
Step 3: Apply Adhesive and Secure Tack Strips
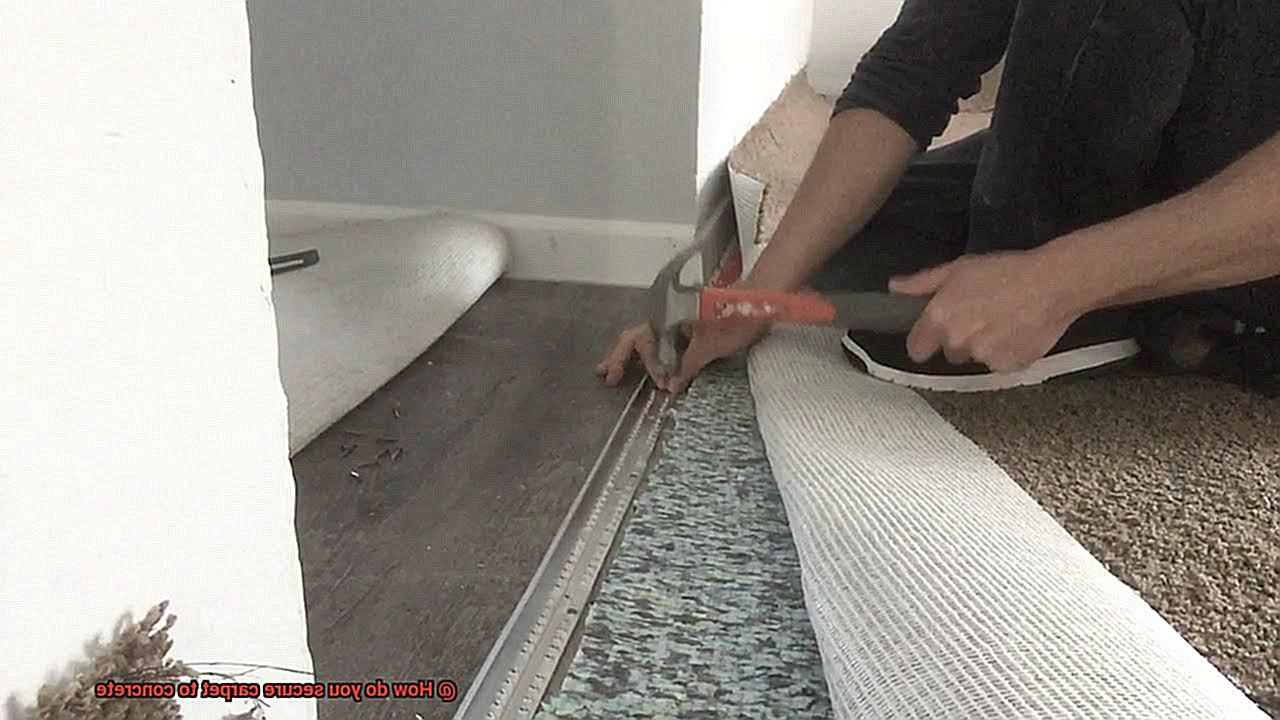
Apply a thin layer of adhesive to the back of each tack strip. Make sure to use an adhesive specifically designed for concrete surfaces. Press each tack strip firmly onto the concrete floor, aligning it with the marked areas. Use a hammer or rubber mallet to secure the strip in place.
Step 4: Install the Carpet
Lay out the carpet over the room, allowing it to overlap the edges by a few inches. Use a knee kicker tool or power stretcher to stretch and attach the carpet onto the tack strips. Start at one corner of the room and work your way towards the opposite corner, making sure it is taut and aligned.
Step 5: Trim Excess Carpet and Finish Edges
Use a carpet knife or utility knife to trim off any excess carpet along the edges of the room. Leave a small gap between the carpet edge and the wall for baseboards or moldings. Use a carpet tucker tool to push the edges of the carpet into the gap between the tack strip and the wall for a neat finish.
Using Double-Sided Carpet Tape to Secure Carpet to Concrete
Look no further. In this step-by-step guide, we will show you how to use double-sided carpet tape to securely fasten your carpet to the concrete surface. This method is not only effective but also easy to accomplish, making it a popular choice for both DIY enthusiasts and professionals alike.
Materials Needed:
- Double-sided carpet tape
- Measuring tape
- Scissors or utility knife
- Broom or vacuum cleaner
- Carpet roller (optional)
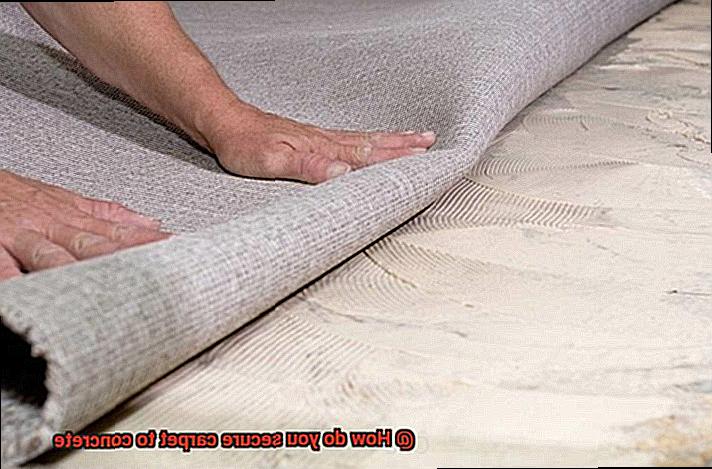
Step 1: Prepare the Concrete Surface
Ensure the concrete floor is clean and free from debris or dust. Thoroughly sweep or vacuum the area, paying close attention to stubborn dirt or loose particles that could affect adhesion.
Step 2: Measure and Cut the Tape
Measure the length and width of the area where you want to secure the carpet. Cut strips of double-sided carpet tape according to these measurements, ensuring they are slightly shorter than the carpet’s width.
Step 3: Apply the Tape
Start by placing strips of double-sided carpet tape along the edges of the concrete floor. Firmly press down on the tape to ensure proper adhesion. Then, create a grid pattern across the remaining area using additional strips of tape. The spacing between each strip depends on your carpet’s size and weight.
Step 4: Adhere the Carpet
Peel off the protective backing from one side of the double-sided carpet tape, revealing the adhesive side. Align one edge of the carpet with the concrete floor’s edge and firmly press it onto the exposed tape. Slowly unroll and press down on the carpet, smoothing out any wrinkles or bubbles as you go. Applying pressure with your hands or using a carpet roller can further enhance adhesion.
Step 5: Repeat and Enhance Adhesion
Repeat the process for each strip of double-sided carpet tape, gradually securing the entire carpet to the concrete floor. Once all strips are applied, walk over the carpet or use a carpet roller to enhance adhesion.
Factors That Can Affect Carpet Installation
Carpet installation is a significant investment, and ensuring its success and durability requires careful consideration of various factors. From moisture levels to adhesive quality, each aspect plays a crucial role in the longevity of the installation. In this comprehensive guide, we will explore these factors in detail, providing essential information for anyone undertaking a carpet installation project.
Moisture Levels:
Concrete, being a porous material, can absorb and retain moisture. Excessive moisture can lead to mold, mildew, and damage to the carpet over time. Before installing carpet on concrete, it is crucial to conduct a moisture test using specialized equipment or allow sufficient time for the concrete to cure, ensuring moisture levels are within an acceptable range.
Subfloor Preparation:
Proper preparation of the concrete subfloor is vital for a successful installation. The surface should be clean, dry, and free from debris or contaminants that may hinder the adhesion of the carpet glue. Repairing any cracks or uneven areas before installation is essential to create a smooth and stable base.
Type of Carpet:
Different types of carpets have varying installation requirements. Some carpets require padding or underlayment for added comfort and insulation, while others can be glued directly to the concrete surface. Choosing a carpet suitable for concrete installation and following manufacturer guidelines ensures a proper installation that meets both aesthetic and functional requirements.
Quality of Adhesive:
The adhesive used to secure the carpet plays a pivotal role in its longevity. Opting for high-quality adhesive specifically designed for carpet installation on concrete is essential. Using subpar adhesive or not following manufacturer instructions can result in poor adhesion and premature carpet failure.
Climate and Temperature:
Climate and temperature conditions in the installation area can significantly impact carpet performance. Extreme temperature fluctuations or high humidity levels can cause expansion or contraction, leading to buckling or wrinkling. Acclimating the carpet to the environment and maintaining consistent temperature and humidity levels is vital for a stable and long-lasting installation.
Professional Installation:
While carpet installation on concrete can be a DIY project, hiring a professional installer ensures the best results. Professionals possess the experience, knowledge, and tools to handle any challenges that may arise during the installation process. They can also provide valuable advice and recommendations based on their expertise, ultimately ensuring a seamless and durable carpet installation.
Tips for a Successful Installation
Installing carpet on concrete can be a challenging task, but with the right tips and techniques, you can achieve a successful and professional-looking installation. In this article, we will guide you through the steps needed to ensure a secure and long-lasting bond between the carpet and the concrete surface. Whether you’re a DIY enthusiast or considering hiring a professional, these tips will help you achieve the best results.
Start with a Clean Surface:
Before installing carpet on concrete, it’s essential to have a clean and dry surface. Begin by thoroughly vacuuming the area to remove any dirt or debris. Then, use a damp cloth to wipe away any remaining dust or residue. Treating any stains or spills on the concrete beforehand will also help ensure a smooth installation.
Choose the Right Adhesive:
Selecting the correct adhesive is crucial for a successful installation. There are various types available, such as solvent-based, latex-based, and pressure-sensitive adhesives. Look for an adhesive specifically designed for carpet installation on concrete surfaces. Follow the manufacturer’s instructions for application and drying time.
Apply Adhesive Evenly:
To ensure proper bonding between the carpet and concrete, it’s important to apply the adhesive evenly. Use a trowel or notched spreader to spread the adhesive over the entire surface, following the recommended coverage rate mentioned on the adhesive packaging. Avoid applying too much adhesive as it can lead to unevenness and lumps in the carpet.
Allow Sufficient Drying Time:
After applying the adhesive, allow sufficient drying time before laying down the carpet. The drying time can vary depending on the type of adhesive used and environmental conditions. It’s best to follow the manufacturer’s instructions for drying time. Avoid walking or placing heavy objects on the newly glued carpet until it is completely dry.
Stretch and Secure the Carpet:
Once the adhesive has dried, it’s time to lay down the carpet. Start by positioning one edge of the carpet along a wall and gradually unroll it across the floor. Use a knee kicker or power stretcher to stretch the carpet tightly across the room, ensuring there are no wrinkles or loose areas. Trim any excess carpet along the edges and secure it using a carpet trimmer or tucker.
VdwHDZiuvLc” >
Conclusion
Securing carpet to concrete may seem like a daunting task, but with the right techniques and materials, it can be done easily and effectively.
One method is by using adhesive or double-sided carpet tape. These strong adhesives create a bond between the carpet and the concrete, ensuring that it stays in place even with heavy foot traffic.
Another option is to use tack strips, which are thin pieces of wood with small nails that grip onto the carpet and hold it securely in place. Additionally, you can opt for interlocking carpet tiles that provide a flexible and easy-to-install solution.
Whichever method you choose, make sure to thoroughly clean the concrete surface before installation to ensure maximum adhesion.