Listen up. Can you hear it? That’s the sound of transformation calling your name. Whether you’re giving your home a facelift or diving headfirst into a remodel, ripping out that old, clingy vinyl flooring is a non-negotiable. But before you start swinging hammers and regretting your life choices, take a deep breath. Don’t worry, we’ve got your back.
Here’s the thing: removing glued-down vinyl flooring doesn’t have to be a nightmare of epic proportions. With some handy tools, clever techniques, and a sprinkle of know-how, this seemingly daunting task can become a walk in the park.
In this captivating guide, we’ll spill all the beans on gracefully saying goodbye to your sticky vinyl floors. Join us as we dive deep into the world of sweat, tears (mostly just sweat), and residue to explore the necessary steps for an effortless removal process. We’ll walk you through everything you need to know, sharing pro tips and tricks that will save you time, money, and frustration.
Let’s break it down:
- Assessing the Situation: Get to know the type of glue used and check for any asbestos concerns.
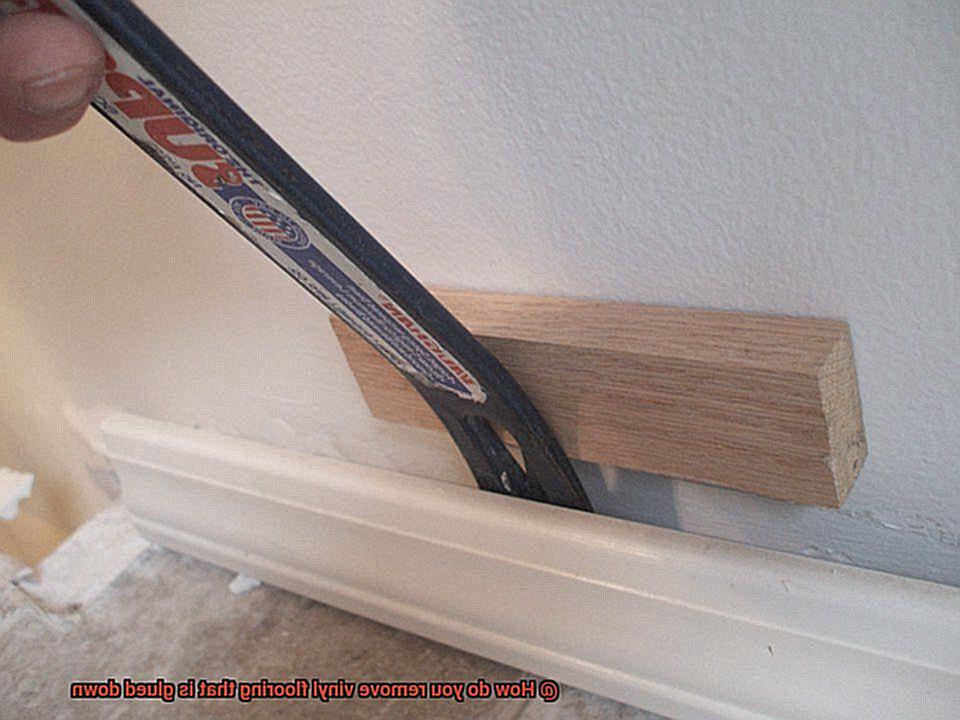
- Reveal and Conceal: Remove baseboards and trim while protecting nearby surfaces like a pro.
- Unleashing Your Inner Warrior: Gear up with heat guns, scrapers, knee pads – everything you need for battle.
- Tactical Maneuvers: Use strategic techniques like applying heat or moisture to loosen that stubborn glue.
- Say Goodbye to the Past: Dispose of your old vinyl flooring safely along with any adhesive residue left behind.
A Clean Slate: Prepare your subfloor for its fresh start or new flooring installation.
So grab yourself a cup of coffee, put on your game face, and get ready to uncover the hidden beauty beneath those clingy vinyl layers. With our easy-to-follow guide, removing glued-down vinyl flooring will become an adventure worth celebrating instead of a dreaded chore. Let’s embark on this transformative journey together.
What is Vinyl Flooring?
Contents
However, circumstances may arise where the need to remove glued-down vinyl flooring becomes necessary. In this all-encompassing guide, we will delve into the various methods and precautions involved in safely and efficiently removing glued-down vinyl flooring.
Heat and Scrape: An Artful Dance of Softening and Lifting
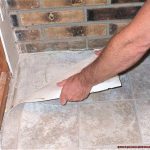
To embark on this method, use the power of heat to soften the adhesive, rendering it more pliable for removal. Employ a heat gun or hairdryer to delicately warm up the vinyl tiles or sheet flooring, coaxing the adhesive into submission. Then, with a deft hand, employ a putty knife or scraper to lift and separate the flooring from the subfloor with grace and precision.
Solvent-Based Adhesive Removers: The Magic Potions that Dissolve Bonds
For situations where heat alone is insufficient, enter solvent-based adhesive removers. These elixirs effectively break down the adhesive’s stronghold. Follow the manufacturer’s instructions meticulously as you apply the remover, allowing it to permeate the adhesive’s core. Armed with a scraper or putty knife, lift and liberate the vinyl flooring from its gluey prison. Remember to maintain proper ventilation throughout this process.
Mechanical Removal: A Battle Cry Against Stubborn Resistance
When faced with unyielding adhesive or multiple layers of flooring, mechanical removal stands as your stalwart ally. Equip yourself with a mighty floor scraper or a powered floor stripper to forcefully dismantle and extract the glued-down vinyl flooring. Approach this endeavor with caution and brawn, ensuring that your efforts are both effective and safe.
Professional Help: Enlisting Skilled Warriors in Your Quest
Should uncertainty cloud your path or difficulties arise during the removal process, it is wise to seek professional assistance. Flooring contractors, armed with specialized tools and extensive experience, possess the savoir-faire to vanquish any type of flooring, including glued-down vinyl. Entrusting them with this task ensures a seamless and damage-minimized removal, paving the way for your new installation.
Different Types of Adhesives Used for Vinyl Flooring
- Pressure-Sensitive Adhesive: The magic behind those effortlessly removable vinyl tiles lies in pressure-sensitive adhesive. This type of adhesive remains tacky and doesn’t fully cure, making it a breeze to remove the flooring if needed. With pressure-sensitive adhesive, you can simply pull up the tiles or planks without breaking a sweat.
- Vinyl Tile Adhesive: In commercial settings, vinyl tile adhesive is the go-to choice for a strong bond between the flooring and subfloor. However, this strength can make the removal process more challenging. To remove vinyl flooring glued with vinyl tile adhesive, you might have to unleash heat and wield a floor scraper to soften the adhesive and lift the tiles.
- Epoxy Adhesive: Known for its unyielding strength and durability, epoxy adhesives rule in industrial applications. If your vinyl flooring is glued down with epoxy adhesive, be prepared for a labor-intensive removal process. This might involve using heat, solvents, or mechanical methods to break down the adhesive and lift the flooring.
- Multipurpose Adhesive: Versatile by nature, multipurpose adhesives are used for various types of flooring, including vinyl. These adhesives form strong bonds that can be stubborn to remove once cured. To conquer vinyl flooring glued with multipurpose adhesive, you may need to combine heat, solvents, and scraping tools for effective removal.
- Acrylic Adhesive: Acrylic adhesives are the heroes of residential vinyl flooring installations. Being water-based, they offer good bonding strength and ease of use. Removing vinyl flooring glued with acrylic adhesive is usually less complicated compared to other types of adhesives. Heat and a floor scraper can often do the trick by loosening the adhesive and lifting the flooring.
It’s important to note that the removal process may vary depending on the specific brand and formulation of the adhesive used. Always prioritize safety by following instructions and wearing protective gear when working with adhesives and tools.
Heat and Scrape Method
Say goodbye to worn-out vinyl flooring in style with the heat and scrape method. In this guide, we’ll unveil a tried-and-true technique that will make even the most stubbornly glued-down vinyl surrender. So suit up, grab your tools, and let’s dive into the wonders of the heat and scrape method.
Safety First:
Before we embark on this exciting journey, let’s prioritize safety. Don your gloves, strap on your goggles, and make sure you’re in a well-ventilated area to keep any potential hazards at bay. Safety is key, my friend.
Step 1: Prepare for Action:
To kick-start the heat and scrape method, arm yourself with a trusty heat source. Whether it’s a heat gun or a hairdryer set to medium heat, make sure it’s ready for battle. Plug it in, and let’s get this show on the road.
Step 2: Softening the Adhesive:
Hold your heat gun or hairdryer about 6-8 inches away from the vinyl flooring’s surface. Now, with a sweeping motion, move it back and forth like an artist wielding a brush. As if by magic, the adhesive will begin to soften under the spell of the heat.
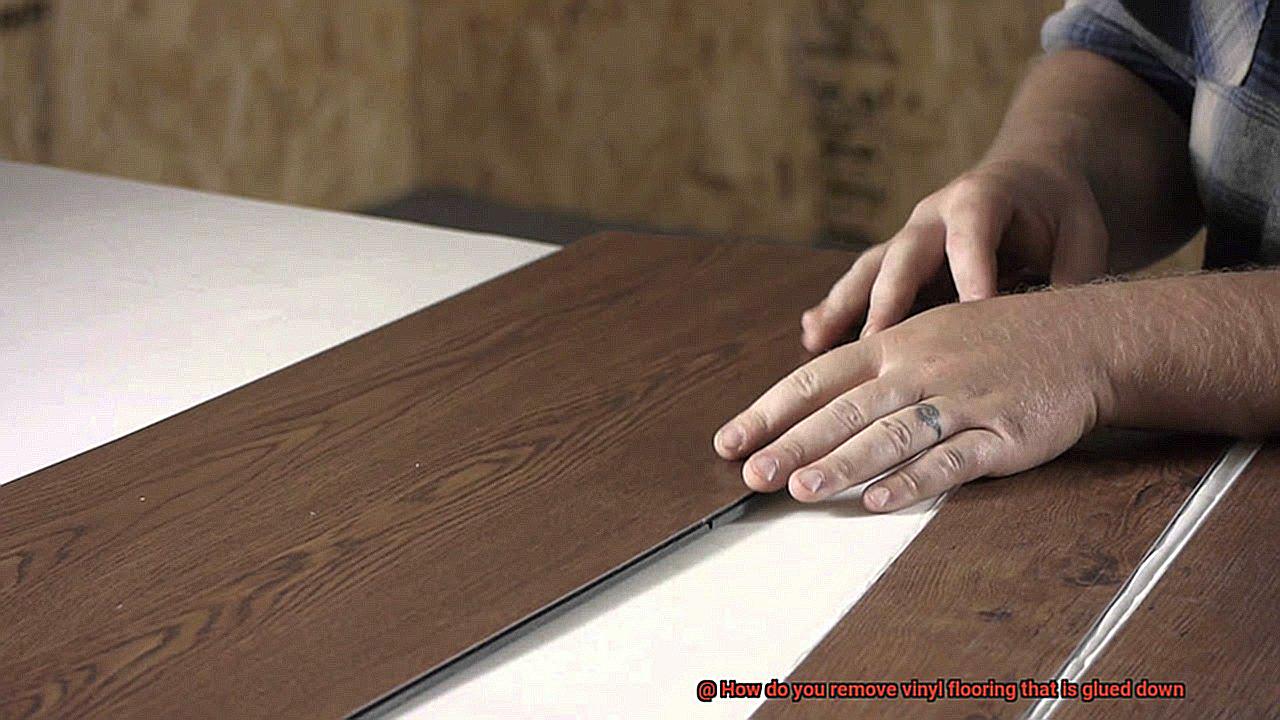
Step 3: Lift and Peel with Finesse:
Once the adhesive has succumbed to the heat’s enchantment, let your scraper take center stage. With grace and precision, gently lift one corner of the vinyl flooring using a putty knife or scraper. As you pull back at a daring 45-degree angle, remember to apply steady pressure. And like a conductor guiding an orchestra, direct that heat towards the adhesive beneath.
Step 4: Conquer Stubborn Territory:
In every great battle, there are always some stubborn foes. Likewise, you’ll encounter adhesive that refuses to surrender easily. Fear not, brave warrior. Focus your heat directly on those defiant spots, and see them crumble before your eyes. For extra measure, unleash your scraper or putty knife to vanquish any lingering adhesive from the subfloor.
Solvent-Based Adhesive Removers
Imagine yourself as a fearless warrior, armed with the power of chemicals and a determination to restore your floor to its former glory. Solvent-based adhesive removers are your secret weapon in this exhilarating battle against stubbornly glued-down vinyl flooring.
These removers are specially formulated with powerful chemicals that work their magic by breaking down the adhesive that holds the flooring in place. With their help, you can conquer this daunting task with ease and less frustration.
The advantages of using solvent-based adhesive removers are numerous. Their ability to dissolve and soften the adhesive is like having superpowers. These chemicals penetrate deep into the adhesive, weakening its bond with the floor. As a result, you can gracefully peel back the old vinyl, even conquering the most defiant spots as if leading an orchestra to victory.
However, it’s important to remember that these removers should be used with caution. They pack quite a punch with their strong fumes and potent chemicals. Safety should always come first. Make sure to work in a well-ventilated area and protect yourself with gloves and goggles during the removal process.
Now let’s dive into the details of using a solvent-based adhesive remover. The first rule is to carefully read and follow the manufacturer’s instructions. Different products may have varying application methods, so understanding their recommendations is crucial for success.
Typically, you’ll apply the adhesive remover directly onto the glued-down vinyl flooring and let it sit for the recommended period. This allows the solvent to work its magic and dissolve the adhesive effectively. Remember, patience is key. Removing stubborn vinyl flooring takes time and precision.
After waiting patiently, it’s showtime. Armed with your trusty putty knife or floor scraper, gently pry up one corner of the vinyl flooring. As you lift, you’ll notice that the adhesive has softened, making it easier to separate the flooring from the subfloor. Slowly continue lifting and scraping until you have successfully removed the entire piece of vinyl.
In some cases, stubborn adhesive residue may be left behind on the subfloor even after removing the vinyl flooring. If this happens, don’t despair. You can repeat the solvent-based adhesive remover application process or utilize additional techniques like heat or mechanical scraping to completely remove any remaining residue.
Mechanical Removal
Today, we embark on an exhilarating journey into the world of mechanical removal – a powerful technique that will free your floors from the clutches of stubbornly glued-down vinyl. Armed with tools and unwavering determination, we shall conquer this challenge and restore your space to its former glory. So, gather your courage, tighten your grip on your trusty scraper, and let’s delve into the art of mechanical removal.
Unleashing the Power of Physical Force:
In our quest to liberate your floors, mechanical removal is a formidable weapon. This method harnesses physical force and specialized tools to break the bond between the vinyl and adhesive. It’s particularly effective when confronting tenacious or aged adhesive that refuses to yield to other techniques.
Mighty Tools at Your Command:
Our first line of defense in this epic battle is the almighty floor scraper or putty knife. These tools are armed with razor-sharp blades, ready to pry up the vinyl flooring from its subfloor prison. Choose a scraper or putty knife with a sturdy handle and an unyielding blade to ensure effective removal without causing harm to the subfloor.
Step by Step: The Heroic Process:
Now that you’re equipped with your trusty tool, it’s time to embark on the heroic journey of mechanical removal. Begin by locating an edge or corner of the vinyl flooring and gently lift it up using your scraper or putty knife. With unwavering determination, apply consistent force as you traverse the battlefield, gradually freeing the vinyl from its adhesive shackles. In areas that put up a fierce resistance, fear not. Utilize pliers or a mighty pry bar for added leverage and strength.
Patience is Key:
As any seasoned warrior knows, rushing into battle can lead to disaster. Thus, in the art of mechanical removal, patience and methodicalness are your greatest allies. Take your time, work meticulously, and ensure that the bond between the vinyl and adhesive is decisively broken. Remember, fortune favors the slow and steady.
Professional Help for Removing Glued-Down Vinyl Flooring
Before you grab your tools and embark on a DIY adventure, let’s explore the advantages of hiring professionals for removing glued-down vinyl flooring. Not only can they save you time and effort, but they also possess the necessary expertise and specialized equipment to ensure a seamless removal process. Let’s delve into the reasons why professional help is the right choice for this challenging task.
Specialized Equipment:
Professionals bring a secret arsenal of specialized equipment to tackle the removal of glued-down vinyl flooring. Floor scrapers, heat guns, and adhesive removers are just a few of the tools they utilize. With these gadgets, they can swiftly and efficiently remove the flooring, sparing you from exhaustion and frustration.
Expertise in Proper Techniques:
Removing glued-down vinyl flooring requires finesse and precision to avoid damaging the subfloor. Professionals are well-versed in the proper techniques, knowing exactly how to apply heat or solvents to soften and loosen the adhesive effectively. Their expertise ensures a smooth removal process without leaving any traces or harming the underlying surface.
Minimizing Health Risks:
Safety should always be a top priority during home improvement projects, especially when dealing with potentially harmful substances. Some adhesives used in vinyl flooring contain chemicals or emit volatile organic compounds (VOCs) when disturbed or heated. Professional flooring removal specialists are equipped with appropriate safety gear and know-how to handle these substances safely. By hiring professionals, you can minimize health risks associated with the removal process.
Proper Disposal:
Disposing of vinyl flooring requires careful consideration to prevent environmental contamination. Professionals are well-informed about local regulations and can ensure that your old flooring is disposed of correctly. They take care of the logistics, saving you from the headache of figuring it out on your own.
Safety Precautions When Removing Glued-Down Vinyl Flooring
When it comes to removing glued-down vinyl flooring, safety should be at the forefront of your mind. By implementing a few key precautions, you can ensure both your personal well-being and the safety of your surroundings. In this comprehensive guide, we will delve into the essential safety measures to consider when tackling the task of removing glued-down vinyl flooring. So, let’s dive in and make this process as safe as it is satisfying.
Gear Up for Protection:
Before embarking on your removal journey, donning the proper protective gear is essential. Shield your eyes from potential hazards by wearing safety goggles that guard against debris and chemical splashes. Additionally, safeguard your hands from sharp edges or abrasive materials with sturdy gloves. Remember, safety attire is not only practical but also fashionable.
Ensure Optimal Air Quality:
Certain adhesives used in vinyl flooring removal may emit fumes that can pose health risks if inhaled excessively. To promote clean and breathable air, prioritize adequate ventilation in your workspace. Open windows and employ fans to enhance air circulation, minimizing any potential health hazards. Make every breath count.
Power Down for Peace of Mind:
Prevent a shocking surprise during your project by turning off all electrical power sources in the area before commencing the removal process. This simple step eliminates any electrical hazards while working near outlets or switches. Prioritize peace of mind as you power down.
Clear Obstacles for Unobstructed Progress:
To ensure a smooth and accident-free removal process, remove any furniture or obstacles that could impede your movement. Be proactive in eliminating tripping hazards by relocating rugs, chairs, or any other items that might pose a risk. Clearing the path paves the way to success.
Equip Yourself with Precision Tools:
Utilizing the appropriate tools not only facilitates the removal process but also minimizes the likelihood of accidents. Arm yourself with essential tools such as a heat gun, floor scraper, adhesive remover, and pry bar. Familiarize yourself with their proper usage before embarking on your removal journey. Remember, preparedness is the key to a safe and successful DIY endeavor.
epPJLQvHEaE” >
Conclusion
In conclusion, fear not the challenge of removing vinyl flooring that is stubbornly glued down. Arm yourself with the right tools, techniques, and safety measures, and you’ll conquer this project with confidence and grace.
Begin by assessing the situation – identify the type of adhesive used and check for any lurking asbestos concerns. Then, prepare the battleground by stripping away baseboards and safeguarding nearby surfaces.
Now comes the exciting part – choosing your method of attack. The heat and scrape technique is a popular choice. Utilize a heat gun or hairdryer to soften the adhesive’s grip, then deftly lift and peel away the flooring with a trusty putty knife or scraper. Another option is employing solvent-based adhesive removers to break down that sticky foe for easier removal.
But beware. If your adversary proves especially formidable or if multiple layers of flooring stand in your way, it may be time to call in reinforcements. Enter mechanical removal – armed with a floor scraper or powered floor stripper, you’ll forcefully vanquish that vinyl menace.
Of course, there’s no shame in seeking professional aid for this endeavor. Flooring contractors possess specialized tools and expertise to swiftly and skillfully remove glued-down vinyl flooring while minimizing harm to the subfloor.
Remember throughout this epic battle: safety first. Don your armor of protective gear – gloves and goggles are your allies. Ensure ample ventilation, deactivate electrical power sources, clear obstacles from your battlefield, and wield precision tools with care.
By following these battle-tested strategies and taking necessary precautions, you shall emerge victorious in removing glued-down vinyl flooring.