Ever found yourself in a sticky situation, desperately trying to peel off those pesky labels from your plastic jars? We’ve all been there, my friends. Whether it’s gooey residue or an infuriating price tag that just won’t budge, dealing with sticky labels on plastic jars can be a real headache. But fret not, for today we’re about to unlock the mystical art of label removal and reveal the secrets that will restore your jars to their pristine glory.
In this all-inclusive guide, we’ll dive deep into battle-tested techniques and nifty hacks that guarantee quick and effortless label removal. Say goodbye to frustration and hello to crystal-clear containers, ready to be repurposed or proudly displayed. But before we unveil this treasure trove of knowledge, let me give you a sneak peek into what awaits you in this article.

First up, we’ll explore the power of heat and its magical ability to soften stubborn adhesive, making labels peel off like a dream. From soothing boiling water baths to trusty hairdryers, we’ll uncover proven methods that banish glue residues once and for all. Next, get ready to witness the wonders of natural solvents like vinegar and baking soda – these superheroes have extraordinary powers when it comes to dissolving even the most persistent labels.
But wait, there’s more. We’ll introduce you to secret weapons like rubbing alcohol and citrus-based cleaners that effortlessly wipe away sticky labels without leaving a trace. And finally, we’ll share some handy tips and tricks that guarantee a smooth removal process, eradicating any last traces of frustration from your label removing endeavors.
So buckle up and get ready for an exhilarating journey into the world of sticky label removal from plastic jars. Grab your favorite jars – they’re about to embark on a new lease of life. Together, we’ll conquer those stubborn labels and unleash the true beauty of your jars. Let’s dive in, shall we?
What are Sticky Labels?
Contents
Sticky labels, also known as adhesive labels or self-adhesive labels, are the unsung heroes of organization and communication. From retail to manufacturing, logistics to healthcare, sticky labels play a vital role in labeling and organizing items. In this all-encompassing guide, we will delve into the fascinating world of sticky labels, exploring their versatile applications and the myriad of benefits they offer.
The Art of Label Removal:
When it comes to removing sticky labels from plastic jars, several tried-and-true methods exist. One popular approach involves the dynamic duo of hot water and dish soap. By immersing the jar in a steaming bath of soapy water for 10-15 minutes, the adhesive surrenders its grip, enabling you to effortlessly scrub off the label using a brush or sponge. For any pesky residue that remains, trusty allies like rubbing alcohol or nail polish remover can come to the rescue.
Another effective method involves harnessing the power of heat. By gently caressing the label with a hairdryer or heat gun set on low heat, the adhesive succumbs to the warmth, making it pliable enough to be peeled off with ease. Exercise caution during this process to avoid any unpleasant encounters with scorching surfaces.
For those moments when hot water or heat sources are not readily available, nature’s pantry provides an alternative. A dash of cooking oil or a splash of white vinegar applied onto a paper towel or cloth can work wonders. As these natural agents penetrate the adhesive, let their magic unfold by allowing them to sit for a few minutes. Once time has worked its charm, delicately peel off the label from one corner and revel in its newfound liberation. Stubborn remnants can be tamed by repeating this process or employing the assistance of rubbing alcohol.
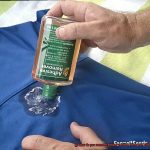
In cases where stubborn labels refuse to loosen their grip, a secret arsenal of commercial adhesive removers and solvents awaits. Products such as Goo Gone or WD-40 wield the power to dissolve even the most stubborn adhesives. Apply a small amount onto a cloth or sponge, allow it to work its magic for a few minutes, and then triumphantly peel off the label. As always, follow the instructions on the product label and prioritize safety.
Why is it Important to Remove Sticky Labels from Plastic Jars?
We all know the struggle of trying to peel off a stubborn sticky label from a plastic jar. But did you know that this seemingly mundane task holds great importance? In this article, we will explore the myriad reasons why it is crucial to remove sticky labels from plastic jars. From aesthetics to hygiene, information accessibility to eco-friendly practices, and even cost savings, we will uncover the hidden benefits that lie beneath those pesky labels. So grab your jar and let’s embark on a journey of label liberation.
Aesthetics: Embrace the Beauty of Cleanliness
Sticky labels on plastic jars are like blemishes on an otherwise flawless complexion. They make the jar appear dirty and unkempt, tarnishing its overall beauty. By removing these labels, we unveil the true potential of the jar, transforming it into a visually appealing storage solution.
Hygiene First: Safeguard Against Contamination
When using plastic jars to store food or other items, cleanliness is paramount. Sticky labels act as magnets for dirt, bacteria, and other particles, creating a breeding ground for contamination. By removing these labels, we create a clean and hygienic environment that ensures the freshness and safety of our stored goods.
Information Accessibility: Unlock the Secrets Within
Labels often hold vital information such as expiration dates and ingredient lists. However, when these labels obscure such crucial data, managing the contents of the jar becomes an arduous task. By liberating the jar from its sticky label prison, we regain easy access to this valuable information, enabling us to stay organized and well-informed.
Residue-Free Zone: Bid Farewell to Stickiness
The adhesive on labels can degrade over time, leaving behind sticky residue that clings stubbornly to the jar’s surface. This residue becomes a magnet for dust and debris, turning the jar into a constant battle against unwanted grime. By removing the label and its residue, we maintain the pristine cleanliness of the jar, ensuring it remains a sanctuary free from sticky remnants.
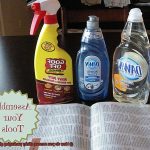
Hot Water and Dish Soap Method
This tried and true technique is not only effective but also incredibly easy to use. Get ready to bid farewell to sticky residue and hello to pristine, label-free jars.
Before you dive into the label liberation process, gather your supplies. You’ll need a sink or basin filled with comfortably hot water, some trusty dish soap, a sponge or cloth, and perhaps an old toothbrush or scrub brush for those extra stubborn spots. Now, let’s get down to business.
Immerse your plastic jar, complete with its stubborn label, into the soapy water. Ensure that the label is fully submerged and let it soak for approximately 10-15 minutes. This is where the magic happens – the hot water softens the adhesive while the dish soap breaks down its stickiness. It’s like a secret formula for liberation.
As you eagerly anticipate the triumphant moment when that label finally surrenders, take your sponge or cloth and gently scrub away. Watch in awe as the adhesive loosens its grip, making it easier than ever to peel off the label. It’s a satisfying sight to see that stubborn label bid its final farewell.
But wait. What about those pesky spots or residue that just won’t give up? Fear not. Grab that trusty old toothbrush or scrub brush and give them a gentle scrub. Remember, we’re aiming to remove residue, not damage the plastic surface of the jar. So be gentle yet firm as you work your magic.
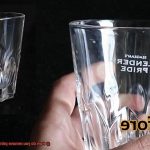
Once you’ve banished every last trace of stickiness, rinse your plastic jar thoroughly under running water. We want it squeaky clean. Then, grab a clean towel and dry it off or simply let it air dry before using or storing it. Voila – your jar is now ready for its new label-free life.
The hot water and dish soap method is not only effective but also safe, natural, and cost-effective. No need for harsh chemicals or specialized adhesive removers – just hot water and trusty dish soap from your very own kitchen. It’s like a rejuvenating spa treatment for your plastic jars.
Heat Method
Say goodbye to sticky labels and hello to a label-free future. If you’ve ever found yourself frustrated with stubborn adhesive residue on your plastic jars, then the heat method is here to save the day. This tried and true technique is like a magic spell that banishes stickiness, leaving your jars pristine and ready for their new life.
Now, let’s dive into the world of heat methods for removing sticky labels from plastic jars. We’ve done the research so you don’t have to, and we’re here to share all the juicy details.
First up, we have the classic hairdryer method. It’s simple, effective, and chances are you already have a trusty hairdryer lying around. Set it to its highest heat setting and direct that hot air towards the label. Move the dryer back and forth for about 30 seconds to a minute, or until you start to see those wrinkles and bubbles forming on the label. Once the adhesive is nice and heated, grab your fingernail or a plastic scraper and gently lift one corner of the label. With a little finesse, you’ll be able to peel off the label like a pro.
But what if you don’t have a hairdryer handy? No worries, we’ve got another heat method up our sleeves – hot water. Fill up a container with nice hot tap water and submerge that stubborn plastic jar with the sticky label. Let it soak for a few minutes, allowing the heat to work its magic on the adhesive. After soaking, grab your trusty fingernail or plastic scraper and lift one corner of the label. Slowly peel it off, savoring that satisfying feeling of liberation. If any residue remains, a quick scrub with a sponge or cloth soaked in hot soapy water will do the trick.
Now, if you’re feeling adventurous or just want to try something different, we have one more heat method for you – the iron. Set your iron to a low or medium heat setting without steam. Place a thin cloth or paper towel over the sticky label and press that iron onto it for about 10-15 seconds. The heat will transfer through the cloth, softening the adhesive beneath. And just like that, you’ll be able to peel off the label with ease.
Oil or Vinegar Method
No more scraping and peeling for hours on end – with just a few common household ingredients, you’ll be able to effortlessly peel off those stubborn labels. Let’s dive into the details and discover how to become a pro at using the oil or vinegar method.
First up, let’s explore the oil method. Grab your favorite cooking oil – whether it’s versatile vegetable oil, luxurious olive oil, or exotic coconut oil – and generously slather it onto the label. Don’t hold back – make sure every inch of that pesky label is coated in a luscious layer of oil. Give it a few minutes to work its magic, allowing the oil to penetrate the adhesive and break it down.
Once the oil has had ample time to do its job, take a soft cloth or sponge and start gently rubbing the label in circular motions. Watch as the adhesive dissolves before your very eyes, making it a breeze to peel off the label without leaving behind any sticky residue. If the label proves to be a tough nut to crack, fear not. You can bring out the big guns – a trusty plastic scraper or even a credit card – to lift the edges and give that stubborn label a little nudge.
Now, let’s shift our attention to vinegar. When it comes to adhesive removal, white vinegar is the hero of the story. Its acidic properties make it a formidable opponent against even the most stubborn labels. Soak a cloth or sponge in white vinegar and apply it directly onto the label. Allow it to sit for a few minutes, letting that powerful vinegar break down the adhesive like a pro.
After giving it some time to work its magic, grab that cloth or sponge again and start gently rubbing the label in circular motions. You’ll witness a marvelous transformation as the adhesive begins to loosen, making it a breeze to peel off the label without a trace. If any residue remains, don’t fret. Simply repeat the process or utilize that trusty plastic scraper to banish it for good.
Commercial Adhesive Removers or Solvents Method
Thankfully, commercial adhesive removers or solvents are here to save the day. These powerful potions, available in liquid or spray form, contain chemicals that can break down even the most stubborn adhesive. Say goodbye to frustration and hello to effortless label removal.
But before you dive headfirst into the world of commercial adhesive removers, there are a few things you need to know. Safety first. Always read the instructions carefully and follow the mentioned precautions. We wouldn’t want any accidents spoiling your label liberation mission.
Armed with your chosen adhesive remover, it’s time to tackle those sticky labels. Apply the remover directly onto the label or soak a cloth or sponge with the solvent and let it sit for a few minutes. Give the magic potion some time to work its way into the adhesive and dissolve it into oblivion.
Once the adhesive has softened, it’s time for some peeling action. Gently peel off the label using your fingers or a plastic scraper, taking care not to scratch the precious plastic surface of your jar. If there are any stubborn remnants of adhesive left behind, simply reapply the adhesive remover and let it work its magic for a bit longer.
With the label and adhesive residue conquered, it’s time for a spa treatment for your plastic jar. Rinse it thoroughly with warm soapy water to remove any leftover solvent and ensure a sparkling clean finish. And don’t forget to dry it thoroughly before putting it back into action. We wouldn’t want any slippery mishaps in your future label-free adventures.
Now, let’s talk safety. Always work in a well-ventilated area when using these products and avoid prolonged skin contact. These potions may be magical, but they can also be harmful if ingested or inhaled. So keep them out of reach of curious children and pets.
One last piece of advice before we part ways – remember that not all plastics are created equal. Some commercial adhesive removers may not be suitable for certain types of plastics. To avoid any damage or discoloration, it’s essential to do a small test on an inconspicuous area of your jar before going all-in. We want nothing but happy, label-free jars in your life.
Cleaning the Plastic Jar After Removing the Label
Now it’s time to give your jar a thorough cleaning to ensure it’s pristine and ready for use. Let’s dive into the step-by-step process of cleaning your plastic jar and say goodbye to any sticky residue.
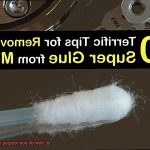
Gather your materials: warm soapy water, a soft sponge or cloth, rubbing alcohol or nail polish remover (optional), baking soda paste (optional), lemon essential oil (optional), and a clean cloth or paper towel for drying.
Fill a sink or basin with warm water and add a few drops of dish soap. Immerse the plastic jar in the soapy water and let it soak for a few minutes. This gentle soak will help loosen any remaining adhesive.
Take your soft sponge or cloth and gently scrub the surface of the plastic jar, paying extra attention to the areas where the label was previously attached. Use circular motions to effectively remove any stubborn residue. Be cautious not to scratch or damage the plastic.
Rinse the plastic jar thoroughly with clean water, both inside and outside, to eliminate any soap residue.
If there are still lingering residue or adhesive marks, try these additional methods:
- Rubbing alcohol or nail polish remover: Apply a small amount of either substance onto a clean cloth or cotton ball and gently rub it onto the residue. Remember to do a patch test on a small area of the jar first, as certain plastics may be sensitive to these substances.
- Baking soda paste: Create a thick paste by mixing baking soda with water. Apply the paste onto the residue and let it sit for a few minutes before scrubbing it off with your sponge or cloth. The baking soda acts as a gentle abrasive, aiding in residue removal.
- Lemon essential oil: For a natural and refreshing option, apply a few drops of lemon essential oil onto a cloth and rub it onto the residue. The oil dissolves the adhesive, making it easier to remove.
Once all residue has been successfully eliminated, give the plastic jar a final rinse with clean water to ensure all cleaning agents are washed away.
Allow the plastic jar to air dry completely before using or storing it. Drying it thoroughly is essential to prevent moisture buildup, which can lead to mold or mildew growth.
vAGunOLpjNs” >
Conclusion
Removing sticky labels from plastic jars can be a frustrating task, but fear not.
There are several effective methods that can help you conquer this sticky situation. One tried and true method is using heat to loosen the adhesive.
Simply grab a hairdryer and aim the hot air at the label for a few minutes. Once the adhesive softens, gently peel off the label with your fingers or a plastic scraper.
Another option is to use oil or lubricants to dissolve the sticky residue. Apply a generous amount of cooking oil, rubbing alcohol, or even peanut butter onto the label and let it sit for a few minutes.
Then, wipe away the residue with a cloth or paper towel. If all else fails, try using an adhesive remover specifically designed for removing sticky labels.
Remember to always test any cleaning solution on a small area of the plastic jar first to ensure it doesn’t cause any damage.