Ever had that gut-wrenching moment when your favorite shoes start falling apart? The sole, once inseparable from the upper, starts peeling away, threatening to abandon you forever. But don’t despair, my fellow shoe lovers. This blog post is here to save the day. Get ready for an epic journey into the world of reattaching soles – we’ll have your beloved footwear back on solid ground in no time.
The bond between the upper and sole is no joke. It endures countless stumbles, strides, and jumps, but even the mightiest adhesive can weaken over time. Lucky for you, with a little know-how and some crafty skills, you can resurrect your shoe’s former glory and extend its lifespan.

In this ultimate guide, we’ll explore all sorts of methods for reattaching soles. From traditional stitching techniques to DIY adhesive solutions straight outta your toolbox – we’ve got it all covered. We’ll unravel the mysteries behind shoe construction and dive deep into the anatomy of our beloved foot armor. You’ll learn about suitable materials and tools needed for this mission, empowering you to take matters into your own capable hands.
Whether you’re a master shoemaker or just obsessed with shoes (no judgment here), this blog post will arm you with everything you need to rescue those wayward soles and bring them back home where they belong. So get ready to unleash your inner DIY guru as we embark on this thrilling journey through sole reattachment expertise.
Remember: soles are the unsung heroes of our shoes; their reunion with the upper is a celebration of durability, comfort, and style. Stay tuned because we’re about to spill all the secrets on how to keep your shoes intact and your soles firmly attached – no matter what life throws at them.
What Materials are Needed for Reattaching a Sole to a Shoe?
Contents
- 1 What Materials are Needed for Reattaching a Sole to a Shoe?
- 2 Preparing the Shoe and Sole for Reattachment
- 3 Applying Adhesive Glue
- 4 Positioning the Sole onto the Shoe
- 5 Reinforcing with Clamps or Weights
- 6 Allowing the Glue to Dry Completely
- 7 Removing Clamps or Weights and Inspecting the Reattached Sole
- 8 Troubleshooting Tips for Reattaching Soles
- 9 Conclusion
With the right materials and a touch of know-how, you can reattach the sole and give your beloved footwear a new lease on life. In this comprehensive guide, we’ll take you through the essential materials needed for a successful sole reattachment, ensuring a bond that can withstand even the toughest of journeys.
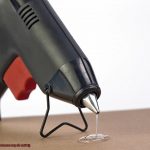
Shoe Glue: The Glue that Keeps it All Together
The real MVP of this repair mission is a top-notch shoe glue specially formulated for repairs. Seek out adhesives that boast flexibility, waterproof properties, and superior bonding strength. Look no further than E6000 Craft Adhesive, Barge All-Purpose Cement, or Shoe Goo – these reliable options will ensure your sole stays firmly in place, no matter where your feet take you.
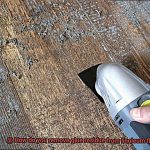
Sandpaper: Roughing it Up for a Stronger Bond
Before diving into the glue game, it’s crucial to prep both the shoe and sole surfaces for optimal adhesion. Enter medium-grit sandpaper – your trusty sidekick in roughening up those surfaces. Say goodbye to dirt, debris, and residue from previous adhesive attempts as you create a slightly textured surface that will supercharge the bond between the two materials.
Clamps or Weights: Applying Pressure Like a Pro
To achieve an impeccably secure and uniform bond, enlist the help of clamps or weights during the drying process. Clamps come to the rescue by holding the sole in place while the glue sets, ensuring an unwavering connection. Weights play their part too, distributing pressure evenly across the shoe’s surface and leaving no room for gaps or weak spots. Be strategic with their placement to preserve the shoe’s shape while achieving maximum adhesion.
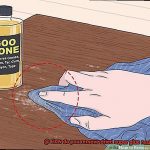
Cleaning Solution: A Fresh Start for Flawless Bonding
Before the reattachment magic happens, give both the shoe and sole a thorough cleaning. Harness the power of a cleaning solution like rubbing alcohol or acetone to banish any oils, dirt, or other contaminants that could sabotage the glue’s hold. Leave no trace of debris behind, and you’ll set the stage for a bond that will withstand the test of time.
Preparing the Shoe and Sole for Reattachment
Get ready to bring your beloved footwear back to life as we delve into the essential steps for preparing your shoes and soles for reattachment. With a little bit of patience and some expert techniques, you’ll soon have your shoes strutting their stuff once again. So, let’s roll up our sleeves and embark on this exciting journey together.
Step 1: Cleanliness is Key
To kick-start the revival process, we must ensure that both the shoe and sole are impeccably clean. Armed with a mild soap, warm water, and a soft brush, gently rid the surfaces of any dirt, debris, or remnants of past adhesive endeavors. Afterwards, take the time to thoroughly dry them – not a drop of moisture should remain.
Step 2: Inspect and Repair
With cleanliness checked off our list, it’s time for a thorough inspection. Examine every nook and cranny for loose threads, tears, or weak areas that require attention before reattachment. Addressing these issues beforehand guarantees a repair that stands the test of time. After all, we want your shoes to confidently strut their stuff.
Step 3: Bid Adieu to Old Adhesive
Creating a solid foundation for reattachment means bidding farewell to any lingering traces of old adhesive on both the shoe and sole. Arm yourself with adhesive removers or rubbing alcohol to dissolve stubborn residues. Remember to follow the manufacturer’s instructions and work in a well-ventilated area – safety is paramount.
Step 4: Roughen Things Up
Prepare for the fun part – roughening up the surfaces. Grab a trusty fine-grit sandpaper or utility knife and gently score or sand both the shoe and sole where they will be joined. This step creates a textured canvas that enhances adhesion, providing the new adhesive with ample surface area to bond with. Think of it as giving your shoes an extra grip for their grand return.
Step 5: Dry as a Bone
Patience, my friends, is the name of the game. Before we move on to the grand finale, ensure that both the shoe and sole are bone dry. Any hint of moisture can hinder the adhesive’s ability to bond effectively. Allow them ample time to air dry – trust me, the wait will be well worth it.
Applying Adhesive Glue
In our quest to resurrect your beloved footwear, we have already explored the importance of surface preparation. Now, prepare to be captivated as we delve into the enchanting world of applying adhesive glue – the magical elixir that will seamlessly reunite your sole and shoe. Grab your favorite pair and embark on an extraordinary repair journey, where every step brings you closer to sartorial triumph.
Step 1: Immaculate Surfaces for Unbreakable Bonds
Cleanliness reigns supreme as we embark on this adhesive adventure. Bid adieu to dirt, grease, and remnants of old adhesive by treating your surfaces to a mild soap and water solution or a trusty shoe cleaner. Remember, a pristine surface paves the way for an unyielding bond between sole and shoe.
Step 2: Choosing Your Super Glue
Now that cleanliness prevails, it’s time to select the adhesive glue that will perform heroic acts for your shoes. Seek out glues tailored specifically for shoe repair, such as rubber cement, contact cement, or shoe glue. These formidable allies possess unrivaled bonding properties, ensuring a seamless resurrection of your cherished footwear.
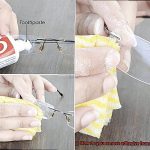
Step 3: The Art of Delicate Application
With glue in hand (or brush), we embark on the pinnacle of our repair odyssey. Apply a thin layer of adhesive glue to both the sole and shoe upper using a small brush or applicator. Employ finesse as you expertly spread the glue evenly over every nook and cranny awaiting union – leaving no area untouched in your pursuit of perfection.
Step 4: The Power of Tackiness
Patience becomes our ally as we allow the glue to bask in its tackiness. This crucial interval enhances adhesion when pressing the sole and upper together, ensuring an unbreakable bond. Take a moment to appreciate the anticipation; the masterpiece is just within reach.
Step 5: The Merging of Souls
The time has come for the grand reunion. Align the sole with the shoe upper, and with unwavering determination, press them together with conviction. Apply even pressure across the entire surface of the sole, forging a connection that defies all odds. Harness your inner craftsman – whether by hand or with a gentle tap from a rubber mallet – and witness the birth of a symbiotic relationship.
Positioning the Sole onto the Shoe

Prepare to witness the birth of a symbiotic relationship that defies all odds – a true masterpiece crafted by your skilled hands.
Let’s delve into our research notes and uncover the secrets behind this remarkable process. Follow these steps, and you’ll be well on your way to achieving a reattachment that extends the life of your beloved footwear.
Step 1: Cleanliness is Key
Bid farewell to dirt, dust, and remnants of old adhesive by meticulously cleaning both the shoe and sole surfaces. This essential step ensures a pristine canvas for your adhesive masterpiece.
Step 2: Choose Your Superhero Glue
Select a superhero adhesive specifically designed for shoe repair. Don’t settle for mediocrity – opt for a strong adhesive that will stand the test of time.
Step 3: Apply with Finesse
With grace and precision, apply a thin layer of adhesive onto both the shoe and sole surfaces. Spread it evenly, like butter on warm toast, guaranteeing maximum adhesion and an unyielding bond.
Step 4: Align with Precision
The moment of truth has arrived – aligning the sole with the shoe. Take heed of any markings or guides on the sole that indicate its proper placement. With surgeon-like precision, center it flawlessly, as though conducting a symphony.
Step 5: Press with Determination
Exert unwavering determination as you press down on the sole, creating even pressure. Utilize a roller or apply force with your hands, ensuring an unbreakable bond between sole and shoe. Tackiness is your ally in this endeavor.
Step 6: Patience is a Virtue
Dear repair wizards, practice patience. Allow the adhesive to dry according to the manufacturer’s instructions. While it typically takes around 24 hours, consult the adhesive packaging for specific drying time.
Step 7: Check and Reapply if Necessary
Once the adhesive has dried, scrutinize your handiwork. Seek out any gaps or areas where the sole may not be fully attached. If needed, apply additional adhesive and repeat the positioning process. Your commitment to perfection will pay off.
Reinforcing with Clamps or Weights
Today, we’re diving into the art of reinforcing soles using clamps or weights. This tried-and-true technique ensures a bond that’s strong enough to withstand the many adventures your shoes will take you on. So, grab your favorite pair of kicks, and let’s embark on this journey together.
The Power of Clamps:
Clamps, our trusty companions in the world of shoe repair, hold the key to reinforcing soles. These versatile tools provide consistent and even pressure on the sole, allowing the adhesive to work its magic. With various sizes and designs available, finding the perfect clamp for your shoe size and sole material is an easy task.
Cleanliness is Key:
Before we dive into the bonding process, it’s crucial to prepare the surfaces properly. Bid adieu to dirt, dust, and debris by thoroughly cleaning both the sole and the shoe surface. A clean canvas sets the stage for a flawless adhesion.
Adhesive Selection:
Choosing the right adhesive is paramount to a successful repair job. Don’t settle for subpar options but opt for a high-quality shoe glue or an industrial-strength adhesive specifically designed for footwear. This crucial step lays the foundation for our sole-ful bond.
The Perfect Alignment:
With adhesive applied, it’s time to perform a delicate ballet of alignment. Precision is key as we carefully position the sole onto the shoe surface. Press firmly and securely, ensuring there are no gaps or loose edges that might jeopardize our bond.
Clamp Placement:
Now, let’s put our clamps to work. Strategically position them along the edges of the sole, providing even pressure throughout. Remember, we’re not here to engage in a brute force contest – over-tightening can damage your precious shoes or distort their shape. So, tread lightly and let the clamps do their job.
Weights: An Alternative Approach:
We can still achieve a solid bond using weights. Gather heavy objects like books or bricks and place them on top of the sole. This improvised method applies the necessary pressure for proper adhesion. Who knew your old college textbooks could become shoe-saving heroes?
Allowing the Glue to Dry Completely
Join us on this journey as we explore why this seemingly simple step holds the key to preserving your beloved footwear. So grab a hot beverage, sit back, and prepare to be amazed by the power of patience and proper drying techniques.
Choosing the Right Adhesive:
Before we dive into the importance of drying time, let’s first unravel the mystery of selecting the perfect adhesive. Just as finding the right pair of shoes is crucial, choosing the correct glue is equally essential. Opt for a robust adhesive specifically designed for shoe repair, such as a shoe repair cement or a high-quality shoe glue with exceptional bonding properties. Remember, quality is paramount for lasting repairs.
Patience is Key:
Now that we have our trusty adhesive in hand, it’s time to embrace the virtue of patience. Once you’ve expertly applied the glue onto both the sole and shoe surface, resist the urge to rush ahead. Allow the glue sufficient time to dry completely. Yes, we know it can be tempting to flaunt your newly restored shoes, but remember that good things come to those who wait.
The Drying Process:
Ah, the enchanting process of drying – where liquid gold transforms into an unbreakable bond. During this critical phase, it’s imperative not to burden your shoe with any weight or pressure. Give your sole a well-deserved vacation and let it rest undisturbed for at least 24 hours. Keep in mind that drying times may vary based on factors like temperature and humidity, so adjust accordingly for optimal results.
Creating Optimal Drying Conditions:
To unlock your glue’s full potential, it craves ideal drying conditions. Seek out a well-ventilated area with generous airflow, allowing your shoes to revel in the gentle breeze. This not only accelerates the drying process but also enables any excess moisture to evaporate. However, be mindful of avoiding direct heat sources like radiators or heaters, as excessive heat can jeopardize the glue’s bonding properties. Let your shoes dry naturally, like a breath of fresh air.
Removing Clamps or Weights and Inspecting the Reattached Sole
In our previous discussions, we delved into the magical world of reattaching a sole to your beloved footwear. Today, we’ll explore a critical step in this process: removing clamps or weights and inspecting the reattached sole. Join me as we unravel the importance of this step and equip ourselves with essential knowledge to ensure a successful and long-lasting shoe revival.
Bid Farewell to Clamps or Weights:
Imagine clamps and weights as the unsung heroes behind a secure bond between your sole and shoe. These silent sentinels apply the perfect amount of pressure, ensuring a steadfast connection. However, their time has come to an end. Let’s bid them farewell.
Inspecting for Perfection:
Now that we’ve freed our soles from the clutches of clamps and weights, it’s time to embark on an inspection journey. This step is vital in ensuring a bond that will withstand the challenges life throws at your shoes. Let’s dive in.
- Visual Marvel: Take a moment to immerse yourself in the visual aesthetics of your reattached sole. Scan for any visible gaps that may have sneaked their way into the connection between sole and shoe. A seamless fusion is what we desire. Gently press on different areas of the sole, exploring its adherence and stability like an archeologist unraveling ancient mysteries.
- A Test of Strength: Flex and bend your shoe, subjecting it to the ultimate test of durability. A well-reattached sole should rise to the occasion, gracefully resisting any signs of detachment or movement. Pay homage to the high-stress areas, like the ball of the foot or heel, where strength is paramount for enduring comfort.
Seeking Excellence:
If, during your inspection, you unearth any concerns or imperfections in the reattached sole, fear not. Expert guidance awaits you on this journey towards perfection. Here’s a glimpse of what lies ahead:
Troubleshooting Tips for Reattaching Soles
Fear not, we’ve got you covered. In this blog post, we’ll delve into some troubleshooting tips that will help you skillfully reattach soles to your shoes, ensuring they stay in step with you. So, grab your glue and let’s embark on this journey together.
Cleanliness is Key:
Before embarking on the reattachment process, it’s crucial to prioritize cleanliness. Give both the sole and the shoe a meticulous clean using a gentle brush or cloth. Banish any lurking dirt or debris from the surfaces.
Stubborn stains can be tackled with a mild soap and water solution. Once cleaned, ensure thorough drying before proceeding. Remember, clean surfaces lay the foundation for an unyielding bond.
Choose the Right Glue:
Not all glues are created equal when it comes to shoe repair. Be discerning and select an adhesive specifically designed for this purpose. Shoe glue, contact cement, or epoxy are all excellent options to consider.
Take into account the materials used in your shoe and sole, as well as the challenging conditions they may encounter. With the right adhesive, you’ll forge an unbreakable connection.
Apply with Precision:
When it’s time to apply the adhesive, embrace the mantra of “less is more.” A thin and even layer on both surfaces ensures a robust bond without any unsightly residue. Refer to the instructions provided with your chosen glue to master proper application techniques. Exercise patience and meticulousness – precision guarantees perfection.
Press and Hold:
Once the adhesive is applied, it’s time to press the sole onto the shoe with unwavering determination. Align it flawlessly with any markings or patterns on the shoe for a seamless union.
To fortify the bond, employ clamps or distribute weight evenly on top of the sole. This imparts the ideal amount of pressure and allows the adhesive sufficient time to work its magic. Leave it undisturbed for the recommended drying time specified by the glue manufacturer.
Inspect and Reinforce:
After the glue has thoroughly dried, liberate your creation from any clamps or weights and conduct a meticulous inspection. Carefully scrutinize the bond for any discernible gaps or unevenness.
If your inspection yields a secure outcome, it’s time to put your shoe to the test. Gently flex and twist it to gauge its stability. Should any issues arise, do not despair. Simply reapply adhesive to bolster the bond or seek professional assistance if necessary.
ZO2wUzTvlbU” >
Conclusion
When it comes to reattaching a sole to a shoe, there are a few key steps to follow.
First, gather all the necessary materials: strong adhesive, clamps or weights, and a clean work surface. Next, carefully remove any remaining pieces of the old sole from both the shoe and the detached sole itself.
Once this is done, apply a generous amount of adhesive to both surfaces and press them firmly together. Use clamps or weights to ensure a secure bond while the adhesive dries.
By following these steps with precision and care, you can successfully reattach a sole to a shoe and extend its lifespan.