Brass, the versatile metal that shines in jewelry and stands strong in industrial applications, has captured our hearts with its unique blend of strength, beauty, and resistance. But have you ever wondered how brass pieces seamlessly come together?
In this captivating blog post, we embark on a journey into the enchanting world of brass bonding. Whether you’re a DIY enthusiast or an aspiring metalworker, get ready to uncover the techniques that transform separate brass pieces into a unified masterpiece. Let’s dive deep into the secrets that lie within.
Hook: Picture effortlessly connecting two brass pieces, creating a bond so unbreakable it defies time itself. Join me on an exhilarating adventure as we master the art of brass bonding.
Main Points:
- Soldering: Enter the realm of ancient wisdom where solder becomes your ally. With its lower melting point than brass, learn how to use solder to create robust bonds between brass pieces. Discover essential soldering techniques and tools needed for a durable connection.
- Welding: Harness the power of heat and electricity as we explore the mesmerizing world of brass welding. From TIG to MIG, witness the different welding techniques that fuse brass pieces together seamlessly.
- Mechanical Connections: Sometimes simplicity holds immense strength. Uncover the beauty behind mechanical connections like screws, bolts, and rivets—techniques that ensure both durability and visual appeal in joining brass pieces.
- Adhesives: Embrace modern solutions as we venture into the realm of adhesive magic for joining brass. From epoxy resins to high-strength glues, discover techniques that enable reliable bonding without heat or mechanical fasteners.
Whether you’re a hobbyist, an artisan, or yearning to become a true master of brass craftsmanship, joining two brass pieces flawlessly is both an art form and a skill. Through soldering, welding, mechanical connections, or the use of adhesives, these techniques will unlock boundless creative possibilities. Join us as we unravel the mysteries behind brass bonding and empower your craftsmanship to reach new heights.
What is Brass?
Contents
- 1 What is Brass?
- 2 Common Methods for Joining Two Pieces of Brass Together
- 3 Soldering
- 4 Flux and Solder
- 4.1 Flux: The Alchemist’s Elixir for Brass
- 4.2 Banishing Oxides and Contaminants:
- 4.3 Guardian against Oxidation:
- 4.4 Unveiling Flux’s Varieties: Flux manifests itself in various forms, each with its own unique strengths: Rosin Flux: The champion among flux types for joining brass is rosin flux. Crafted from natural tree resin, it possesses unparalleled abilities to eliminate oxides and encourage seamless integration with solder. Whether in paste, liquid, or nestled within solder wire cores, rosin flux reigns supreme. Solder: The Enchanted Alloy of Unity
- 5 Brazing
- 6 Welding
- 7 Adhesive Bonding
- 8 Considerations When Selecting a Joining Method
- 9 Cleanliness and Preparation for Joining Brass Pieces Together
- 10 Conclusion
Brass, a captivating metal alloy comprised primarily of copper and zinc, has captivated civilizations for ages. Renowned for its unrivaled blend of durability, versatility, and visual appeal, brass has become an indispensable material across a multitude of industries and applications.
This article embarks on a captivating journey through the world of brass, delving into its composition, historical significance, remarkable properties, and diverse range of uses.
Composition and Historical Significance:
The alchemic fusion of copper and zinc in varying proportions births the mesmerizing alloy known as brass. Its origins can be traced back to ancient civilizations like the Egyptians, Greeks, and Romans, who unearthed the beguiling properties hidden within this alloy. Malleability, corrosion resistance, and intricate detailing capabilities swiftly propelled brass into the spotlight of adoration.
Distinctive Color and Aesthetic Appeal:
Brass is adorned with a resplendent golden hue that dances with enchanting shades, courtesy of its unique composition. This distinct color renders brass an irresistible choice for artistic creations and decorative purposes alike. Whether meticulously polished to a mirror-like shine or left untreated to embrace a rustic allure, brass effortlessly infuses elegance and sophistication into any environment.
Versatility in Electrical and Thermal Conductivity:
Within brass courses exceptional electrical conductivity, bestowing it with an inherent suitability for electrical fittings, connectors, and terminals. Meanwhile, its thermal conductivity ensures seamless heat transfer, making it a cherished asset in heat exchangers and radiator cores. These extraordinary properties cement brass as an irreplaceable material within the realms of electricity and heating.
Superior Resistance to Corrosion and Tarnishing:
A remarkable advantage bestowed upon brass is its unwavering resistance to corrosion and tarnishing. This resilience makes it the ideal choice for outdoor applications or objects frequently exposed to moisture. Plumbing systems readily embrace brass fittings, knowing they will triumph over rusting and pitting caused by water’s relentless touch.
Ease of Workability:
With a hardness level residing between copper and bronze, brass embraces a natural affinity for cooperative craftsmanship. The ease with which it yields to common tools and techniques ensures machinists, drillers, tappers, benders, and solderers can effortlessly shape their artistic visions. Craftsmen are enamored by the precision and versatility offered by this remarkably workable material.
Common Methods for Joining Two Pieces of Brass Together
In our previous section, we explored the captivating allure of brass, from its golden hue to its exceptional properties. Now, let’s dive into the practical side of brass and discover the common methods for joining two pieces together. Whether you’re a DIY enthusiast or a professional craftsman, these techniques will help you create stunning creations that stand the test of time. So, grab your soldering iron and let’s embark on this fascinating journey.
Soldering – The Classic Technique:
Soldering takes center stage as one of the most widely used methods for joining brass pieces. With the aid of solder, a metal alloy with a lower melting point than brass, a strong bond is created. By skillfully heating the two brass pieces using a soldering iron or torch, the solder melts onto the joint and transforms into a solidified connection as it cools. Soldering is beginner-friendly and requires minimal equipment, making it an ideal choice for DIY enthusiasts seeking to bring their ideas to life.
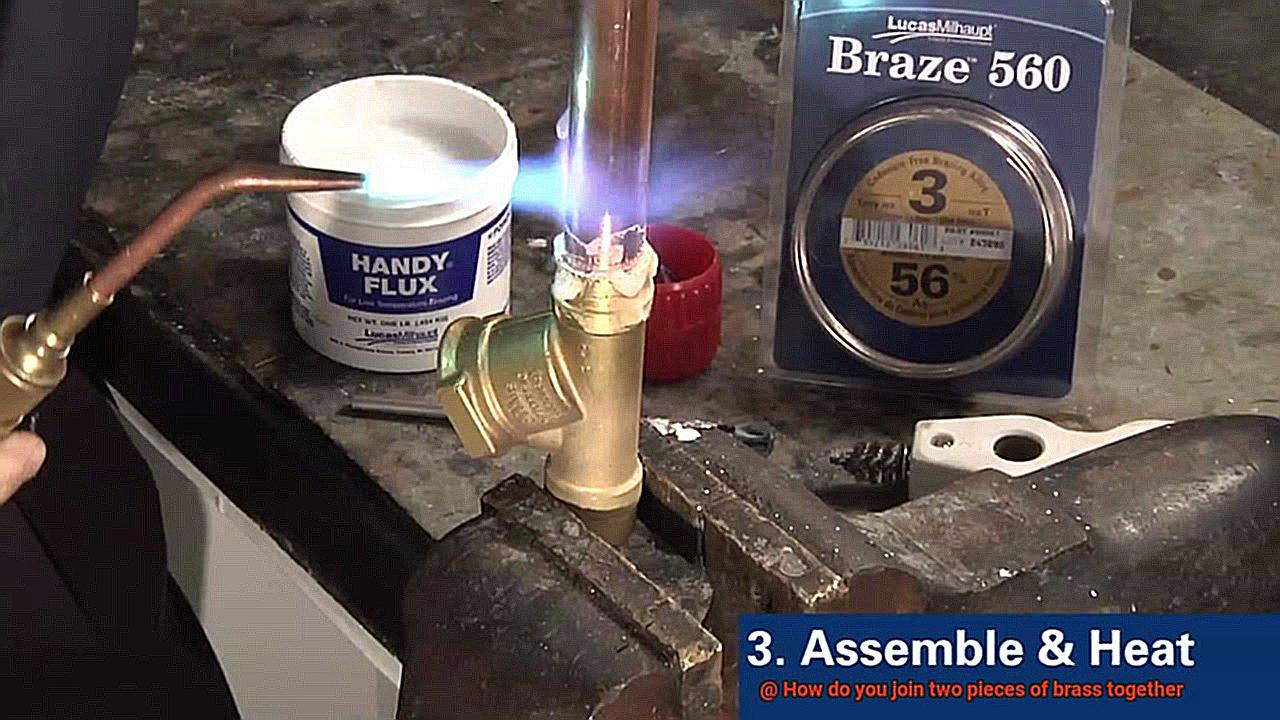
Brazing – For Strength and Durability:
When strength and durability are paramount, brazing emerges as the go-to technique. Similar to soldering, brazing utilizes a filler metal to join brass pieces. However, brazing demands higher temperatures (above 840°F or 450°C) to melt the filler metal. This method is commonly employed in demanding applications such as plumbing or HVAC systems where robust connections are required to withstand high temperatures and heavy loads.
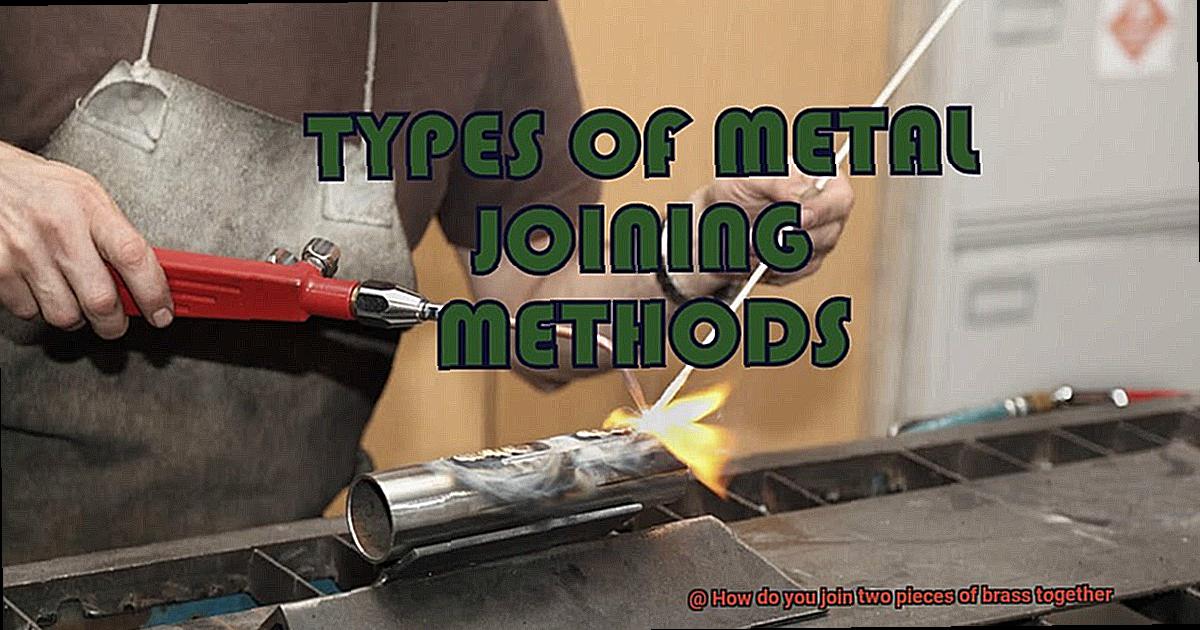
Welding – The Mighty Fusion:
Though less commonly used for brass bonding, welding commands attention for its unrivaled strength. Welding involves melting both the base metal and a filler metal with a similar composition using an electric arc or flame. This fusion creates an extraordinarily robust connection between the two brass pieces. With its requirement for specialized equipment and expertise, welding finds its true calling in industrial applications or in the skilled hands of professional welders seeking the utmost strength and endurance.
Soldering
In our previous section, we delved into the world of soldering, brazing, and welding, exploring the unique strengths they bring to creating stunning brass creations. Now, it’s time to put our soldering skills to the test as we unveil the secrets behind soldering two pieces of brass together. So grab your soldering iron and let’s embark on this fascinating journey.
Step 1: Gather Your Tools and Materials
Before we dive into the soldering process, make sure you have all the essentials at hand. You’ll need a soldering iron or torch, soldering flux, solder wire, and safety equipment such as goggles and gloves. Remember, safety always comes first.
Step 2: Prepare the Brass Pieces
To create a flawless solder joint, proper preparation is key. Polish the surfaces that will be joined using sandpaper or a wire brush. This step eliminates any traces of dirt, oxidation, or corrosion, ensuring optimal adhesion of the solder.
Step 3: Apply Flux to the Cleaned Surfaces
Now that your brass pieces shine like new pennies, it’s time to apply a hint of flux to the cleaned areas. This magical compound removes any lingering impurities and encourages the smooth flow of molten solder. Remember, a little goes a long way when it comes to flux.
Step 4: Heat up Your Soldering Tool
Prepare your trusty soldering iron or torch by heating it to an appropriate temperature. Aim for around 400-450 degrees Celsius (750-840 degrees Fahrenheit) – this sweet spot will melt the solder without causing the brass to overheat.
Step 5: Transfer Heat to the Brass Joint
Once your tool reaches its fiery peak, gently touch its tip to the joint where you want to connect the two brass pieces. Allow the heat to seep into the brass for a few suspenseful seconds before introducing the solder wire. Patience is the secret ingredient here.
Flux and Solder
In our journey to master the art of soldering brass, we have discovered two extraordinary allies that elevate our creations to perfection: flux and solder. These mystical components possess the power to transform mere brass pieces into a unified masterpiece. So, gather your tools and let us embark on a captivating exploration into the realm of flux and solder, where magic meets craftsmanship.
Flux: The Alchemist’s Elixir for Brass
Flux, the alchemist’s elixir, holds the key to unlocking the full potential of brass. Its powers are twofold:
Banishing Oxides and Contaminants:
Like an almighty warrior, flux eradicates any trace of oxides or contaminants from the surface of brass. This mighty cleansing ensures a pristine canvas for soldering, ensuring an unbreakable bond between the brass and solder.
Guardian against Oxidation:
Beyond cleansing, flux assumes the role of a vigilant guardian. It creates a protective shield over the brass surface, warding off oxidation during the heating process. This shield ensures that the bond formed by solder remains invincible.
Unveiling Flux’s Varieties:
Flux manifests itself in various forms, each with its own unique strengths:
Rosin Flux:
The champion among flux types for joining brass is rosin flux. Crafted from natural tree resin, it possesses unparalleled abilities to eliminate oxides and encourage seamless integration with solder. Whether in paste, liquid, or nestled within solder wire cores, rosin flux reigns supreme.
Solder: The Enchanted Alloy of Unity
Solder, the enchanted alloy of unity, weaves its enchantment to bind brass pieces as one. Witness its enchanting powers:
Tin-Lead Solder:
The chosen partner for brass, tin-lead solder emerges as the hero. Blending tin (Sn) and lead (Pb) in carefully measured proportions, it exemplifies simplicity in usage while forging bonds of unparalleled strength.
Brazing
Within this ancient technique lies the power to seamlessly fuse two pieces of brass together, using the fiery dance of heat and a mystical filler metal. Join me on a captivating journey as we unravel the secrets behind this alchemical process and unlock the potential to create awe-inspiring masterpieces.
The Ingredients of Success:
Before we embark on our brazing odyssey, let us acquaint ourselves with the fundamental elements that make this enchanting process possible. At the heart of it all is the filler metal, a magical alloy with a melting point lower than that of the brass pieces being joined. This wondrous substance possesses the ability to flow and forge an indomitable bond. Our arsenal includes copper-phosphorus alloys, silver-based alloys, and even gold-based alloys for those seeking specialized applications.
The Dance of Preparation:
To witness the fiery embrace of our brass pieces, meticulous preparation is key. With unwavering precision, we cleanse their surfaces of any impurities or treacherous oxides that might hinder their union. Armed with wire brushes and sandpaper, we vigorously scrub away dirt, grease, and stubborn oxides, creating a pristine canvas for our magical alchemy.
Aligning the Stars:
Now that our brass pieces are purified, it is time to bring them together in perfect alignment. The harmony of their union depends on it. We ensure a snug fit and leave ample room for our filler metal to work its enchantment. With precise alignment and generous clearance, our brazed creation will be an exquisite sight to behold.
Igniting the Flames of Transformation:
With preparations complete, we summon the elemental force of fire to breathe life into our brazing endeavor. There are myriad ways to invoke this fiery power, but none are as stirring as wielding a torch. Whether it be an oxy-acetylene torch or a trusty propane torch, we direct the flame onto the joint area, delicately heating it to a temperature surpassing the melting point of our filler metal. This careful orchestration ensures that only the filler metal melts and flows into the joint, preserving the integrity of our brass pieces.
Welding
Today, we embark on a new adventure, diving headfirst into the captivating world of welding brass. Brace yourselves as we explore the alchemical process that unites two brass pieces, forging an indomitable bond that will leave you in awe. But before we dive into the depths of this fiery dance, let’s ensure we’re equipped with the necessary knowledge and safety precautions. So, don your protective gear and let’s get started.
The Different Techniques:
Just like a master painter uses different brushes for various strokes, welders have an array of techniques at their disposal. Let’s discover three popular methods used to join brass:
- Gas Welding: Imagine wielding a torch, its flames gracefully heating the brass pieces until they reach their melting point. With skillful precision, a brass rod is introduced to create a bond so strong it defies time itself.
- Arc Welding: Step into a realm of dazzling electric sparks and molten brass. In arc welding, an electric arc ignites, generating intense heat that melts the brass pieces together. To ensure a secure joint, a filler material is employed.
- Spot Welding: The industrial favorite that focuses its power like a magnifying glass on a single point. Electrodes apply both pressure and heat to fuse specific spots on the brass pieces, seamlessly uniting them.
Safety First:
In this fiery affair, safety takes center stage. Remember these crucial precautions to protect yourself from burns and sparks:
- Suit up in protective gear: Don your trusty gloves, goggles, and aprons to shield yourself from the intense heat and flying sparks.
- Cleanliness is key: Before commencing your welding journey, ensure that the brass surfaces are free from contaminants and oxidation. A clean start guarantees a strong bond.
- Stay cool, stay cautious: After welding, allow the brass to cool naturally or employ techniques such as water quenching or air cooling. This prevents stress or distortion in your masterpiece.
The Art of Welding Brass:
Welding brass requires a delicate balance of skill, experience, and technique. Here are some essential tips to help you navigate this enchanting process:
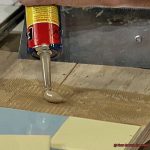
Adhesive Bonding
Adhesive bonding is a remarkable technique that brings together two pieces of brass with strength, flexibility, and aesthetic appeal. In this captivating guide, we will explore the intricacies of adhesive bonding, uncover the range of adhesives available, and learn the steps to create impeccable bonds in brass fabrication. So, let’s don our safety goggles and embark on this adhesive adventure.
The Power of Adhesive Bonding:
Adhesive bonding, unlike traditional methods such as welding or soldering, offers a perfect balance of strength and flexibility. This method utilizes specially formulated glues that create robust and durable bonds between brass surfaces. Its versatility makes it an ideal choice for various applications, providing an elegant solution with ease.
Choosing the Right Glue:
Just as there are different welding techniques for brass, the world of adhesive bonding offers a plethora of options. To achieve the best results, it is crucial to select the appropriate adhesive based on project requirements and brass type. Epoxy, cyanoacrylate (super glue), polyurethane, and acrylic adhesives are commonly used for bonding brass.
Preparation is Key:
Before diving into the realm of adhesive bonding, meticulous surface preparation is essential. Any hint of oil, grease, or dirt can jeopardize the effectiveness of the adhesive bond. A thorough cleaning using suitable solvents or degreasers followed by meticulous rinsing and drying ensures pristine surfaces ready for bonding.
Application Techniques:
Once the surfaces are immaculate, it’s time to apply the adhesive with finesse. Each adhesive type has its own unique application method. For instance, epoxy adhesives typically come in two parts that require precise mixing before application. On the other hand, cyanoacrylate adhesives can be effortlessly dispensed directly from the tube.
Follow the Instructions:
Adhesive manufacturers have provided us with comprehensive instructions for a reason. Adhering to these guidelines is critical for optimal results. Applying a thin layer of adhesive is usually sufficient, and any excess should be promptly removed before curing to achieve a seamless bond.
Holding it all Together:
With the adhesive expertly applied, it’s time to bring the brass pieces together and ensure they stay put until the adhesive sets. This can be accomplished using various clamping methods or by applying manual pressure. Perfect alignment during this process guarantees a robust and uniform bond that will withstand the test of time.
Considerations When Selecting a Joining Method
In this enlightening journey, we will explore the considerations that will lead you to the ideal method for your brass applications. So, fasten your seatbelts and prepare to be amazed by the possibilities.
Consideration #1: Tailoring to Application Requirements
Just like a bespoke suit, the joining method must be tailored to meet the specific needs of your application. Ask yourself: What load-bearing capacity is required? Do aesthetics play a role? Will environmental conditions pose a challenge? And let’s not forget the budget. By understanding these factors, you can choose a method that perfectly aligns with your requirements.
Consideration #2: Soldering – Melting Brass into Harmonious Unison
Soldering takes center stage as one of the most common joining methods for brass. It involves melting a filler metal, known as solder, to create a strong bond. With its ability to withstand high levels of stress and vibration, soldering is perfect for applications that demand strength. However, remember that soldering requires heat sources like soldering irons or torches, so ensure their availability before diving in.
Consideration #3: Brazing – Unleashing the Power of Strength
For those seeking even greater strength, brazing emerges as an excellent option. Like soldering, brazing involves melting filler metal, but at higher temperatures and with stronger fillers. This method results in joints that can endure extreme temperatures and mechanical stresses, making it an ideal choice for heavy-duty applications such as plumbing or automotive work.
Consideration #4: Welding – The Art of Fusion
Welding brass may seem daunting due to its high thermal conductivity and low melting point. Fear not. Specialized techniques like TIG welding or laser welding come to the rescue, enabling you to achieve flawless and durable welds. Welding offers unparalleled strength and durability, but keep in mind that it often requires advanced equipment and expertise.
Consideration #5: Mechanical Fastening – Where Simplicity Meets Functionality
Sometimes, simplicity holds its own charm. Mechanical fastening methods like screws or bolts provide a straightforward approach to joining brass pieces. While they may not offer the same level of strength as other methods, they prove to be reliable options for applications that don’t demand Herculean force. Plus, their simplicity means no need for specialized equipment or expertise.
Cleanliness and Preparation for Joining Brass Pieces Together
Today, we embark on a journey that uncovers the secrets of cleanliness and preparation when joining brass pieces together. Though seemingly trivial, these details hold the power to transform a feeble connection into a bond that defies time. So, let us delve into the realm of precision and discover the path to achieving unparalleled strength in our brass joints.
Cleanliness: The Foundation of Success
Imagine attempting to unite two brass pieces only to be hindered by dirt, grease, or oxidation. These adversaries not only obstruct the adhesive’s potential for strength but also pave the way for frustration and disappointment. To conquer this obstacle, begin by delicately wiping away loose debris with a clean cloth. Then unleash the might of a mild detergent or specialized brass cleaner, purposefully designed to vanquish stubborn stains. Behold the transformative power it brings.
Conquering Oxidation: A Triumph for All
Oxidation – the arch-nemesis of every brass enthusiast. This formidable layer has the ability to sabotage even the loftiest bonding aspirations. It is imperative that we face this challenge head-on. Armed with either a brass cleaner or a concoction of vinegar and salt, embark on a mission to liberate your brass surfaces. Apply these elixirs to the oxidized areas and gently scrub with a soft brush or cloth. Rinse away the remnants, allowing your brass to revel in its newfound glory.
The Art of Surface Preparation: A Gentle Caress
Sometimes, tender love and care are necessary for forging an unyielding bond. By softly sanding or roughening the brass surfaces, we create an expansive area that allows the adhesive to weave its magic, resulting in an unbreakable union. Yet, remember my friends, gentle hands are the key to success. Utilize fine-grit sandpaper or an abrasive pad, striking the perfect equilibrium between roughness and smoothness.
DM_aYkIFruI” >
Conclusion
Joining two pieces of brass together requires the use of specific techniques and materials. One common method is soldering, which involves heating a filler metal to its melting point and using it to join the brass pieces. Another option is brazing, where a higher temperature filler metal is used. Both processes require careful preparation and precise execution to ensure a strong and durable bond.
To begin, clean the surfaces of the brass pieces that will be joined. This step is crucial as any dirt or oxidation can hinder proper adhesion. Use a wire brush or sandpaper to remove any impurities and create a clean surface for bonding.
Next, apply flux to the cleaned areas. Flux helps prevent oxidation during the heating process and promotes better flow of the filler metal. It comes in various forms such as paste or liquid, so choose one that suits your specific application.
Once the flux is applied, heat the brass pieces using a torch or soldering iron. The heat should be sufficient to melt the filler metal but not excessively high that it damages the brass. Take care not to overheat as it can weaken the joint or cause distortion.
When the brass reaches the desired temperature, introduce the filler metal into the joint. For soldering, use a solder wire with a lower melting point than brass, allowing it to flow easily between the pieces. For brazing, select a brazing rod or alloy that matches your intended strength requirements.
Apply heat continuously while feeding in the filler metal until it flows throughout the joint and creates a solid connection between the two brass pieces. Ensure that all gaps are filled adequately for maximum strength.
Finally, allow sufficient time for cooling before handling or applying any stress on the joint. This will ensure that the bond fully solidifies and achieves its maximum strength potential.
In conclusion, joining two pieces of brass together requires careful preparation, proper technique, and suitable materials like solder or brazing alloys.
You may also like:
Flux manifests itself in various forms, each with its own unique strengths:
Rosin Flux:
The champion among flux types for joining brass is rosin flux. Crafted from natural tree resin, it possesses unparalleled abilities to eliminate oxides and encourage seamless integration with solder. Whether in paste, liquid, or nestled within solder wire cores, rosin flux reigns supreme.
Solder: The Enchanted Alloy of Unity
Solder, the enchanted alloy of unity, weaves its enchantment to bind brass pieces as one. Witness its enchanting powers:
Tin-Lead Solder:
The chosen partner for brass, tin-lead solder emerges as the hero. Blending tin (Sn) and lead (Pb) in carefully measured proportions, it exemplifies simplicity in usage while forging bonds of unparalleled strength.
Brazing
Within this ancient technique lies the power to seamlessly fuse two pieces of brass together, using the fiery dance of heat and a mystical filler metal. Join me on a captivating journey as we unravel the secrets behind this alchemical process and unlock the potential to create awe-inspiring masterpieces.
The Ingredients of Success:
Before we embark on our brazing odyssey, let us acquaint ourselves with the fundamental elements that make this enchanting process possible. At the heart of it all is the filler metal, a magical alloy with a melting point lower than that of the brass pieces being joined. This wondrous substance possesses the ability to flow and forge an indomitable bond. Our arsenal includes copper-phosphorus alloys, silver-based alloys, and even gold-based alloys for those seeking specialized applications.
The Dance of Preparation:
To witness the fiery embrace of our brass pieces, meticulous preparation is key. With unwavering precision, we cleanse their surfaces of any impurities or treacherous oxides that might hinder their union. Armed with wire brushes and sandpaper, we vigorously scrub away dirt, grease, and stubborn oxides, creating a pristine canvas for our magical alchemy.
Aligning the Stars:
Now that our brass pieces are purified, it is time to bring them together in perfect alignment. The harmony of their union depends on it. We ensure a snug fit and leave ample room for our filler metal to work its enchantment. With precise alignment and generous clearance, our brazed creation will be an exquisite sight to behold.
Igniting the Flames of Transformation:
With preparations complete, we summon the elemental force of fire to breathe life into our brazing endeavor. There are myriad ways to invoke this fiery power, but none are as stirring as wielding a torch. Whether it be an oxy-acetylene torch or a trusty propane torch, we direct the flame onto the joint area, delicately heating it to a temperature surpassing the melting point of our filler metal. This careful orchestration ensures that only the filler metal melts and flows into the joint, preserving the integrity of our brass pieces.
Welding
Today, we embark on a new adventure, diving headfirst into the captivating world of welding brass. Brace yourselves as we explore the alchemical process that unites two brass pieces, forging an indomitable bond that will leave you in awe. But before we dive into the depths of this fiery dance, let’s ensure we’re equipped with the necessary knowledge and safety precautions. So, don your protective gear and let’s get started.
The Different Techniques:
Just like a master painter uses different brushes for various strokes, welders have an array of techniques at their disposal. Let’s discover three popular methods used to join brass:
- Gas Welding: Imagine wielding a torch, its flames gracefully heating the brass pieces until they reach their melting point. With skillful precision, a brass rod is introduced to create a bond so strong it defies time itself.
- Arc Welding: Step into a realm of dazzling electric sparks and molten brass. In arc welding, an electric arc ignites, generating intense heat that melts the brass pieces together. To ensure a secure joint, a filler material is employed.
- Spot Welding: The industrial favorite that focuses its power like a magnifying glass on a single point. Electrodes apply both pressure and heat to fuse specific spots on the brass pieces, seamlessly uniting them.
Safety First:
In this fiery affair, safety takes center stage. Remember these crucial precautions to protect yourself from burns and sparks:
- Suit up in protective gear: Don your trusty gloves, goggles, and aprons to shield yourself from the intense heat and flying sparks.
- Cleanliness is key: Before commencing your welding journey, ensure that the brass surfaces are free from contaminants and oxidation. A clean start guarantees a strong bond.
- Stay cool, stay cautious: After welding, allow the brass to cool naturally or employ techniques such as water quenching or air cooling. This prevents stress or distortion in your masterpiece.
The Art of Welding Brass:
Welding brass requires a delicate balance of skill, experience, and technique. Here are some essential tips to help you navigate this enchanting process:
Adhesive Bonding
Adhesive bonding is a remarkable technique that brings together two pieces of brass with strength, flexibility, and aesthetic appeal. In this captivating guide, we will explore the intricacies of adhesive bonding, uncover the range of adhesives available, and learn the steps to create impeccable bonds in brass fabrication. So, let’s don our safety goggles and embark on this adhesive adventure.
The Power of Adhesive Bonding:
Adhesive bonding, unlike traditional methods such as welding or soldering, offers a perfect balance of strength and flexibility. This method utilizes specially formulated glues that create robust and durable bonds between brass surfaces. Its versatility makes it an ideal choice for various applications, providing an elegant solution with ease.
Choosing the Right Glue:
Just as there are different welding techniques for brass, the world of adhesive bonding offers a plethora of options. To achieve the best results, it is crucial to select the appropriate adhesive based on project requirements and brass type. Epoxy, cyanoacrylate (super glue), polyurethane, and acrylic adhesives are commonly used for bonding brass.
Preparation is Key:
Before diving into the realm of adhesive bonding, meticulous surface preparation is essential. Any hint of oil, grease, or dirt can jeopardize the effectiveness of the adhesive bond. A thorough cleaning using suitable solvents or degreasers followed by meticulous rinsing and drying ensures pristine surfaces ready for bonding.
Application Techniques:
Once the surfaces are immaculate, it’s time to apply the adhesive with finesse. Each adhesive type has its own unique application method. For instance, epoxy adhesives typically come in two parts that require precise mixing before application. On the other hand, cyanoacrylate adhesives can be effortlessly dispensed directly from the tube.
Follow the Instructions:
Adhesive manufacturers have provided us with comprehensive instructions for a reason. Adhering to these guidelines is critical for optimal results. Applying a thin layer of adhesive is usually sufficient, and any excess should be promptly removed before curing to achieve a seamless bond.
Holding it all Together:
With the adhesive expertly applied, it’s time to bring the brass pieces together and ensure they stay put until the adhesive sets. This can be accomplished using various clamping methods or by applying manual pressure. Perfect alignment during this process guarantees a robust and uniform bond that will withstand the test of time.
Considerations When Selecting a Joining Method
In this enlightening journey, we will explore the considerations that will lead you to the ideal method for your brass applications. So, fasten your seatbelts and prepare to be amazed by the possibilities.
Consideration #1: Tailoring to Application Requirements
Just like a bespoke suit, the joining method must be tailored to meet the specific needs of your application. Ask yourself: What load-bearing capacity is required? Do aesthetics play a role? Will environmental conditions pose a challenge? And let’s not forget the budget. By understanding these factors, you can choose a method that perfectly aligns with your requirements.
Consideration #2: Soldering – Melting Brass into Harmonious Unison
Soldering takes center stage as one of the most common joining methods for brass. It involves melting a filler metal, known as solder, to create a strong bond. With its ability to withstand high levels of stress and vibration, soldering is perfect for applications that demand strength. However, remember that soldering requires heat sources like soldering irons or torches, so ensure their availability before diving in.
Consideration #3: Brazing – Unleashing the Power of Strength
For those seeking even greater strength, brazing emerges as an excellent option. Like soldering, brazing involves melting filler metal, but at higher temperatures and with stronger fillers. This method results in joints that can endure extreme temperatures and mechanical stresses, making it an ideal choice for heavy-duty applications such as plumbing or automotive work.
Consideration #4: Welding – The Art of Fusion
Welding brass may seem daunting due to its high thermal conductivity and low melting point. Fear not. Specialized techniques like TIG welding or laser welding come to the rescue, enabling you to achieve flawless and durable welds. Welding offers unparalleled strength and durability, but keep in mind that it often requires advanced equipment and expertise.
Consideration #5: Mechanical Fastening – Where Simplicity Meets Functionality
Sometimes, simplicity holds its own charm. Mechanical fastening methods like screws or bolts provide a straightforward approach to joining brass pieces. While they may not offer the same level of strength as other methods, they prove to be reliable options for applications that don’t demand Herculean force. Plus, their simplicity means no need for specialized equipment or expertise.
Cleanliness and Preparation for Joining Brass Pieces Together
Today, we embark on a journey that uncovers the secrets of cleanliness and preparation when joining brass pieces together. Though seemingly trivial, these details hold the power to transform a feeble connection into a bond that defies time. So, let us delve into the realm of precision and discover the path to achieving unparalleled strength in our brass joints.
Cleanliness: The Foundation of Success
Imagine attempting to unite two brass pieces only to be hindered by dirt, grease, or oxidation. These adversaries not only obstruct the adhesive’s potential for strength but also pave the way for frustration and disappointment. To conquer this obstacle, begin by delicately wiping away loose debris with a clean cloth. Then unleash the might of a mild detergent or specialized brass cleaner, purposefully designed to vanquish stubborn stains. Behold the transformative power it brings.
Conquering Oxidation: A Triumph for All
Oxidation – the arch-nemesis of every brass enthusiast. This formidable layer has the ability to sabotage even the loftiest bonding aspirations. It is imperative that we face this challenge head-on. Armed with either a brass cleaner or a concoction of vinegar and salt, embark on a mission to liberate your brass surfaces. Apply these elixirs to the oxidized areas and gently scrub with a soft brush or cloth. Rinse away the remnants, allowing your brass to revel in its newfound glory.
The Art of Surface Preparation: A Gentle Caress
Sometimes, tender love and care are necessary for forging an unyielding bond. By softly sanding or roughening the brass surfaces, we create an expansive area that allows the adhesive to weave its magic, resulting in an unbreakable union. Yet, remember my friends, gentle hands are the key to success. Utilize fine-grit sandpaper or an abrasive pad, striking the perfect equilibrium between roughness and smoothness.
DM_aYkIFruI” >
Conclusion
Joining two pieces of brass together requires the use of specific techniques and materials. One common method is soldering, which involves heating a filler metal to its melting point and using it to join the brass pieces. Another option is brazing, where a higher temperature filler metal is used. Both processes require careful preparation and precise execution to ensure a strong and durable bond.
To begin, clean the surfaces of the brass pieces that will be joined. This step is crucial as any dirt or oxidation can hinder proper adhesion. Use a wire brush or sandpaper to remove any impurities and create a clean surface for bonding.
Next, apply flux to the cleaned areas. Flux helps prevent oxidation during the heating process and promotes better flow of the filler metal. It comes in various forms such as paste or liquid, so choose one that suits your specific application.
Once the flux is applied, heat the brass pieces using a torch or soldering iron. The heat should be sufficient to melt the filler metal but not excessively high that it damages the brass. Take care not to overheat as it can weaken the joint or cause distortion.
When the brass reaches the desired temperature, introduce the filler metal into the joint. For soldering, use a solder wire with a lower melting point than brass, allowing it to flow easily between the pieces. For brazing, select a brazing rod or alloy that matches your intended strength requirements.
Apply heat continuously while feeding in the filler metal until it flows throughout the joint and creates a solid connection between the two brass pieces. Ensure that all gaps are filled adequately for maximum strength.
Finally, allow sufficient time for cooling before handling or applying any stress on the joint. This will ensure that the bond fully solidifies and achieves its maximum strength potential.
In conclusion, joining two pieces of brass together requires careful preparation, proper technique, and suitable materials like solder or brazing alloys.