Surfing is more than just a hobby; it’s a dance with the waves, a connection to nature that ignites our souls. And if you want to master the art of riding those majestic swells, you need to ensure your surfboard has a reliable and secure traction pad.
Whether you’re a seasoned pro or a wide-eyed newbie eager to dive into the world of surfing, learning how to glue a traction pad onto your board is an essential skill.
In this comprehensive guide, we’ll take you through each step of the process, sharing expert tips and tricks that will guarantee a strong bond between your pad and board. So grab your surfboard and get ready to unleash your inner adhesive artist.
Step 1: Gather Your Tools
Contents
- 0.1 Step 1: Gather Your Tools
- 0.2 Step 2: Prep and Clean
- 0.3 Step 3: Position and Outline
- 0.4 Step 4: Cut and Customize
- 0.5 Step 5: Peel and Stick
- 1 Materials Needed to Glue a Traction Pad on a Surfboard
- 2 Step-By-Step Process of Gluing a Traction Pad onto a Surfboard
- 3 Preparing the Surface for Adhesion
- 4 Positioning the Traction Pad
- 5 Marking the Outline of the Traction Pad
- 6 Applying the Adhesive
- 7 Installing the Traction Pad
- 8 Letting it Cure
- 9 Conclusion
Before we dive in, make sure you have everything you need for this transformation. Grab yourself a traction pad with adhesive backing (trust me, it makes things easier), along with some surfboard cleaner or rubbing alcohol for surface prep. Don’t forget a pencil, masking tape, scissors, and even a hairdryer.
Step 2: Prep and Clean
To create that unbreakable bond between the adhesive and your board, start by giving the area where you’ll attach the traction pad a good clean. Use surfboard cleaner or rubbing alcohol to remove any dirt or wax residue. This ensures direct contact between the adhesive and your board’s surface.
Step 3: Position and Outline
Now comes the fun part. Find that sweet spot on your surfboard where you want your traction pad to live. Consider factors like your natural stance and pressure points while riding. Once you’ve found the perfect spot, lightly trace the outline of the pad using a pencil. You can also use masking tape to mark any additional sections you want to include.
Step 4: Cut and Customize
Time to get crafty. With the outline in place, grab those trusty scissors and carefully trim your traction pad to fit seamlessly onto your board. Precision is key here; a well-fitted pad ensures optimal balance and comfort as you conquer those waves.
Step 5: Peel and Stick
Now that you have your custom-cut traction pad, it’s time to peel off the backing (if there is one) and expose the adhesive side. Align it with the outline you created earlier, making sure it sits perfectly on your board. Once you’re
Materials Needed to Glue a Traction Pad on a Surfboard
Enhancing your surfing experience involves gluing a traction pad onto your surfboard. This vital step provides grip and stability, boosting your confidence while performing maneuvers. To ensure a secure and long-lasting bond, it’s crucial to gather the right materials and follow the proper gluing process. In this comprehensive guide, we will take you through the step-by-step process of gluing a traction pad onto your surfboard, using high-quality materials for optimal results.
Materials Needed:
- Traction Pad: Select a high-quality traction pad that perfectly fits the tail area of your surfboard. Consider its shape, size, color, and grip pattern to find one that suits your needs and preferences.
- Solvent or Cleaner: Use a specialized surfboard cleaner or solvent to thoroughly clean the surface where you intend to attach the traction pad. This step removes dirt, wax, and residue, ensuring maximum adhesion between the pad and the board.
- Sandpaper: Lightly sand the area where you will be gluing the traction pad to improve adhesion. Be cautious not to sand too aggressively, as it may damage the board’s finish. Opt for fine-grit sandpaper, creating a roughened surface that helps the adhesive grip better.
- Adhesive: Choose a compatible adhesive specifically designed for surfboard traction pads. Epoxy resin or marine-grade adhesive are commonly used options. Consult with an expert at your local surf shop or check the label to ensure you select an adhesive that works well with your surfboard material and traction pad.
- Mixing Container and Stir Stick: If using epoxy resin as your adhesive, you’ll need a mixing container and stir stick to blend the resin and hardener properly. Follow instructions provided with your epoxy resin to achieve the correct mixing ratio for optimal results.
- Applicator: Depending on the adhesive type, use a paintbrush or spreader as an applicator to evenly distribute the glue onto the surfboard’s surface. Make sure your applicator is clean and free from debris or residue.
- Masking Tape: Use masking tape to outline the desired placement of the traction pad. This helps create clean lines and prevents adhesive from spreading onto unwanted areas of the surfboard, protecting the board’s appearance.
- Weight or Pressure: Apply even pressure across the traction pad while the adhesive sets to ensure a strong bond. Use heavy objects or clamps to apply pressure evenly, preventing any warping or distortion of the board during the gluing process.
Step-By-Step Process of Gluing a Traction Pad onto a Surfboard
Enhancing your surfboard with a traction pad can provide the grip and stability needed to execute flawless maneuvers and boost your confidence on the waves. Let’s dive into the step-by-step process of gluing a traction pad onto your surfboard, ensuring a secure and long-lasting bond.
- First, gather all the necessary materials: a traction pad, surfboard wax remover, sandpaper, acetone, a clean cloth, adhesive glue, and a trusty razor blade. Now that we’re prepared, let’s embark on this journey.
- Step 1: Bid farewell to any lingering old wax in the area where the traction pad will rest. Utilize a surfboard wax remover or a razor blade to scrape it off. Ensure the area is impeccably clean for optimal adhesion.
- Step 2: Time to create texture on the board’s surface where the traction pad will be applied. Obtain sandpaper and delicately roughen the area. This will establish a stronger bond between the glue and the board.
- Step 3: After sanding, meticulously wipe down the sanded region with acetone and a pristine cloth. This will eliminate any remaining debris and guarantee a pristine surface for the glue.
- Step 4: Now it’s time to apply the adhesive glue. With finesse, apply a thin, even layer onto the back of the traction pad, ensuring complete coverage.
- Step 5: With glue applied, gently place the traction pad onto the desired location on your board. Apply firm pressure to establish optimal contact between the pad and the board.
- Step 6: Keep a clean cloth or sponge within reach to swiftly eradicate any excess glue that may have oozed out from beneath the pad. Attend to this promptly while the glue remains pliable, as it becomes stubborn once dry.
- Step 7: Demonstrating patience is now crucial. Allow the glue to dry completely, adhering to the manufacturer’s instructions. This typically necessitates several hours or an overnight period. Resist the temptation to prematurely touch or test the pad.
- Step 8: Once the glue is dry, conduct a gentle test by lightly pulling on the edges of the traction pad. If it feels secure and steadfast, congratulations are in order. You have successfully affixed your traction pad.
- Step 9: Finally, rinse your surfboard thoroughly with fresh water to eliminate any residue or residual adhesive. Your surfboard is now primed to conquer the waves with its new traction pad securely in place.
Preparing the Surface for Adhesion
Preparing the Surface for Adhesion: Your Surfboard’s Superhero Grip
Transforming your surfboard into a powerful ally on the waves, gluing a traction pad is like giving it a superhero grip, enabling flawless maneuvers and boosting your confidence. But before you can experience the thrill of riding those waves with precision, it’s crucial to properly prepare the surface for adhesion. So, let’s embark on this step-by-step journey to ensure a secure and long-lasting bond between your board and the traction pad that will make you ride the waves like a true champion.
Step 1: Cleanse and Purify
To lay the foundation for a strong bond, start by cleansing the surface of the surfboard. Picture it as a ritualistic purification, where you use a mild detergent and water to wash away any dirt, wax, or residue that may be lurking. A clean surface is like a blank canvas, ready to receive the magic of adhesion.
Step 2: Roughen Up
Now it’s time to unleash your inner artist. Grab a fine-grit sandpaper and gently roughen up the surface of the board. Imagine each stroke of the sandpaper as creating tiny grooves and scratches, like brushstrokes on an artist’s canvas. These imperfections provide more surface area for the glue to cling onto, ensuring a steadfast bond.
Step 3: Wipe Away the Past
With your surfboard now resembling a work of art, wipe away any remnants of your creative process. Use a clean, dry cloth to remove any dust or debris that may have accumulated. This pristine surface is essential for perfect adhesion.
Step 4: Mark Your Territory

Like an explorer marking their territory, determine the exact placement of the traction pad on your surfboard. Use a pencil or masking tape to leave your mark, ensuring accurate placement when applying the glue. This is where precision meets passion.
Step 5: Primer Power
Before diving into the gluing process, unleash the power of a primer or bonding agent specifically designed for surfboards. This secret ingredient amplifies adhesion and prolongs the life of your traction pad. It’s like giving your surfboard a dose of superhero strength.
Step 6: Applying the Glue
Now it’s time for the moment of truth – applying the glue. Choose a high-quality epoxy or marine adhesive that is specially formulated for bonding foam and fiberglass surfaces. With the grace of an artist, apply a generous amount of adhesive onto the prepared surface, spreading it out evenly with a putty knife or plastic spreader. Each stroke brings you closer to that superhero grip.
Step 7: Firmly Press
With your heart pounding in anticipation, carefully place the traction pad onto the adhesive, aligning it with the marked position on your surfboard. Channel your inner strength and press down firmly and evenly, forging an unbreakable connection between the pad and the board. This superhero grip needs to be secure.
Positioning the Traction Pad
Positioning the Traction Pad: Finding Your Perfect Stance
Are you ready to level up your surfing game? If so, let’s dive into the world of positioning the traction pad on your surfboard. This simple yet crucial step can make a huge difference in your performance and comfort on the waves. So grab your board and let’s get started.
Before we begin, let’s make sure we have a clean canvas to work with. Take a moment to clean the area of your surfboard where the traction pad will be placed. A mild soap and water solution will do the trick, removing any dirt, wax, or debris from the surface. We want a pristine slate for our masterpiece of a grip.
Now comes the fun part – finding your ideal foot placement. Every surfer is unique, with their own preferences and surfing style. Most surfers prefer to have their back foot positioned slightly towards the tail of the board, while the front foot is closer to the center. This provides stability and control, especially during quick turns and maneuvers. However, don’t be afraid to experiment and find what feels right for you.
To help with positioning, try using a piece of wax or a temporary adhesive to test various placements. This allows you to stand on the board and get a real feel for where the traction pad should be placed. Move it around, try different angles, and listen to what your feet are telling you. They know best.
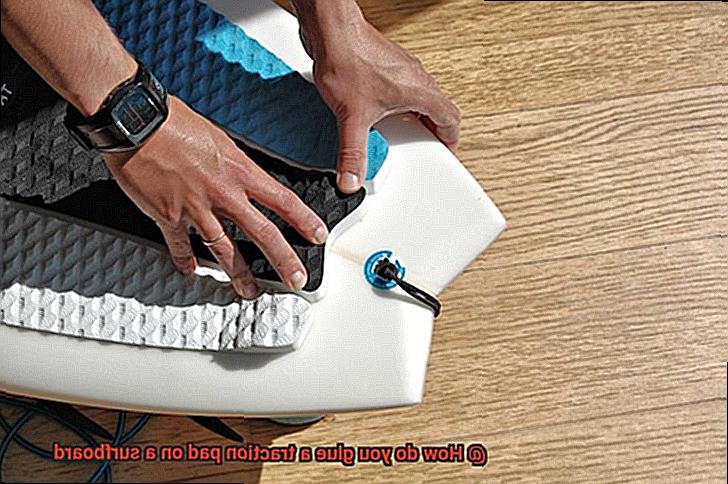
Once you’ve found that sweet spot, it’s time to mark your territory. Grab a pencil or marker and outline the edges of the traction pad on the surfboard. This will serve as your guide when applying the glue later on.
Speaking of glue, make sure you’re using a high-quality adhesive specifically designed for surfboards and traction pads. Regular glue just won’t cut it here. We want durability and longevity for our superhero grip.
Now it’s time to apply the glue. Take your time and do it with precision. We’re creating a bond that can withstand the power of the waves, after all. Apply a thin, even layer of glue on the marked area of the surfboard. Once the glue is applied, carefully place the traction pad on top, aligning it with the marked edges. Press down firmly to ensure proper adhesion. You want that pad sticking like it’s part of your board’s DNA.
Now, my friends, patience is key. Allow the glue to dry completely according to the manufacturer’s instructions. This usually takes several hours or overnight. Don’t rush it – good things come to those who wait.
Once the glue has dried, it’s time to put your surfboard to the test in the water. Ride those waves and feel the difference that a perfectly positioned traction pad makes. If you need to make any adjustments, now is the time to do it. Remember, this is all about finding what works best for you and your unique style.
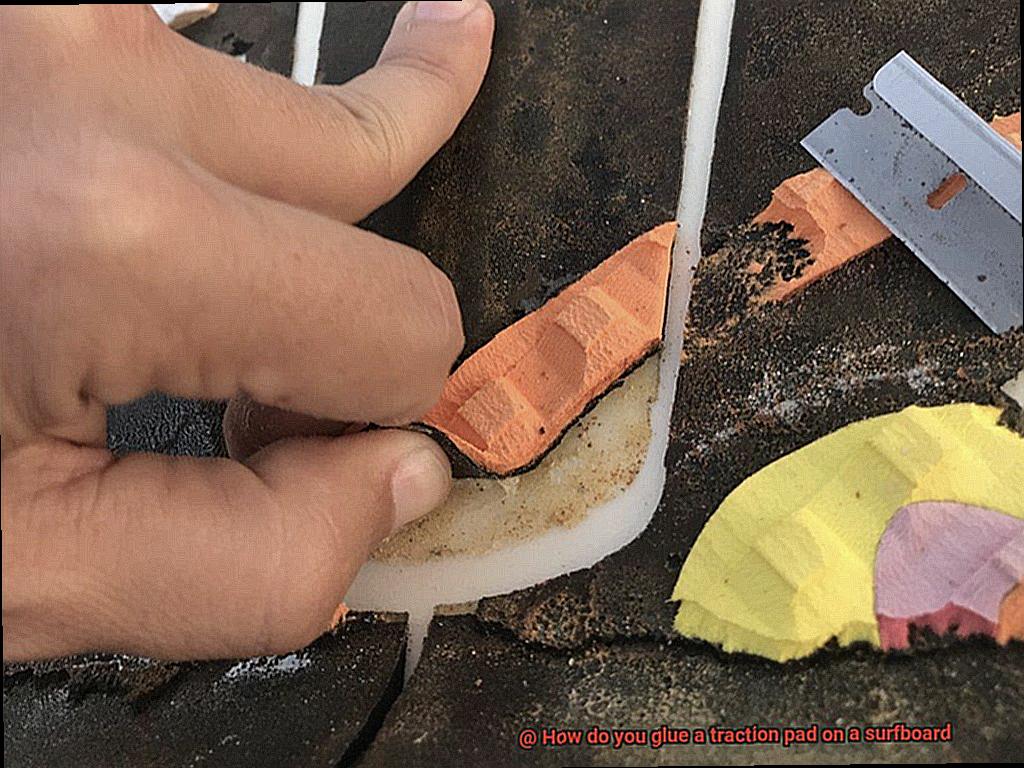
Marking the Outline of the Traction Pad
Surfers, get ready to elevate your wave-riding game with the ultimate surfboard upgrade. Picture yourself gliding effortlessly on those epic waves, feeling the perfect grip and control beneath your feet. Well, my friends, we’re about to embark on a thrilling journey into the world of marking the outline of a traction pad on your surfboard. So, let’s dive in and get our hands sticky with some serious gluing action.
Before you start marking away, let’s make sure your surfboard is as clean as a freshly waxed board. No dirt, wax, or oil residues allowed. Grab a mild detergent and water and give that surface a thorough scrubbing. Once it’s squeaky clean, dry it off with a clean cloth – we want that adhesive to stick like glue.
Now that your board is gleaming, it’s time to gather your tools for this mission. Grab a pencil or marker (your choice), a measuring tape or ruler, some masking tape, and if you’re feeling fancy, a template of the traction pad. Templates are awesome because they ensure accuracy and allow you to create a customized shape for your pad – talk about adding personal style to your ride.
Alright, now let’s get down to business. Position that template or actual traction pad on your desired spot. If you’re using a template, make sure it’s centered and aligned with your surfing stance. Now grab your trusty pencil or marker and start tracing those edges. Take your time and keep that hand steady for a precise outline – we don’t want any wonky lines here.
If you used a template, carefully remove it from the board once you’ve finished tracing. Check your lines – are they clear and well-defined? Any adjustments needed? Now’s the time to make them before moving on.
To protect your hard work from accidental smudging, grab that masking tape and place it along the traced lines. This step is crucial, especially if you’re using a pencil for marking. The tape acts as a superhero shield, keeping your lines intact throughout the gluing process.
Take a moment to admire your masterpiece. Is the outline symmetrical? Does it align with your desired stance? This is your last chance to make any changes before we dive into gluing the traction pad.
Marking the outline of the traction pad is like creating a roadmap for success. It ensures proper placement and alignment with your surfing style. So, take your time, clean that board, use a template or actual pad for reference, and trace those lines with precision. Get ready to level up your surfing game.
Applying the Adhesive
Get ready for an exciting adventure as we delve into the world of applying adhesive to secure a traction pad onto your surfboard. This process ensures a perfect grip and control as you carve through epic waves with ease.
To begin, gather all the necessary materials. You’ll need an adhesive specially designed for surfboard applications, such as a marine-grade epoxy resin or a specialized surfboard adhesive. Choose an adhesive that is strong and durable, ensuring your traction pad stays firmly in place while you conquer those gnarly waves.
Before applying the adhesive, it’s crucial to properly clean and prepare the surface of the surfboard where the traction pad will be attached. Rid the area of any dirt, wax, or residue that may hinder the adhesive’s bonding ability. Utilize a surfboard cleaner or solvent to achieve that squeaky clean surface.
With the surface clean, it’s time to mix the adhesive according to the manufacturer’s instructions. This often involves combining two parts of the adhesive, like a resin and a hardener, and thoroughly mixing them together. Pay close attention to recommended ratios and procedures to ensure proper curing and bonding.
Now comes the exciting part – applying the adhesive. Grab a small brush or applicator and start spreading an even layer over the area where the traction pad will go. Take your time, working in small sections to prevent premature drying.
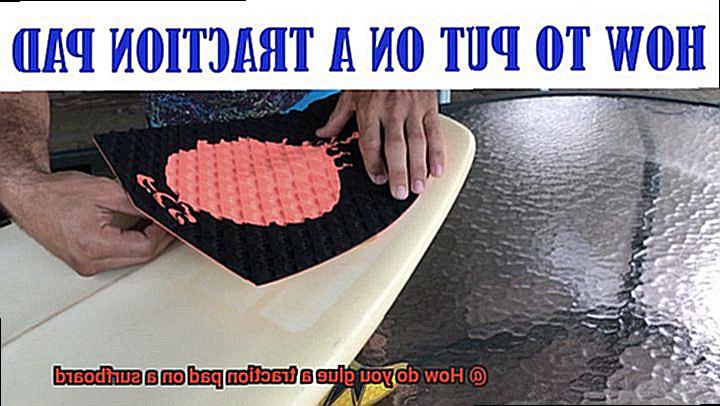
Once the adhesive is applied, carefully place the traction pad onto the surfboard. Ensure proper alignment before pressing it firmly onto the adhesive. This step requires patience as adjusting it once it makes contact can be tricky.
After placing the traction pad, apply firm pressure evenly across its surface. This promotes proper bonding and eliminates any air bubbles that may have formed during application. A roller or a flat object like a clean cloth or plastic squeegee works perfectly for this task.
Now for the hard part – waiting. Allow the adhesive to cure as instructed by the manufacturer. This could take a few hours to a day or more, depending on the adhesive you’ve chosen. During this time, avoid any movement or contact with the traction pad to ensure a rock-solid bond.
Once the adhesive has fully cured, inspect the bond for security. Gently tug on the edges of the traction pad to check for any signs of lifting or weakness. If everything looks good, congratulations. You’ve successfully applied adhesive to your traction pad and are ready to conquer the waves with confidence.
Installing the Traction Pad
Get ready for a journey that will take your surfing game to new heights and give you the grip and control you’ve always dreamed of. Let’s dive in and discover the steps to achieving this sacred ritual.
First things first, cleanliness is key. Before you begin this epic adventure, make sure your surfboard is squeaky clean. Use a mild detergent or surfboard cleaner to eliminate any dirt, wax, or residue that might hinder the bond. We want nothing but pure adhesion power here.
Now, let’s talk placement. Grab your trusty pencil or masking tape and mark the spot where your traction pad will call home. While it’s generally centered towards the back of the board, just above the tail, feel free to experiment and find the perfect spot that suits your personal style and preference. This is your chance to make your mark.
Alright, it’s time to mix some magic potion. Follow the instructions provided by the adhesive manufacturer and become a true alchemist. Thoroughly blend your epoxy resin or surfboard adhesive like a master craftsman. This two-component system needs to be perfectly mixed before application.
With your brush or foam roller in hand, it’s time to work your magic. Gently spread a thin layer of adhesive onto the marked area of your surfboard. Take your time here; this is where the real enchantment happens. Use even strokes and tackle small sections at a time for a flawless result.
Now comes the moment of truth – place that traction pad onto the freshly glued surface and press it down firmly. No air bubbles allowed. Smooth out any wrinkles or bubbles by applying even pressure with your hands. This is where you channel your inner Zen master and find balance in every inch.
Now, my friend, we must exercise patience. Let the adhesive dry and cure according to the manufacturer’s instructions. Don’t rush it; this bond needs time to solidify and become unbreakable. Trust in the process, and soon you’ll be riding those waves with unrivaled confidence.
Once the adhesive has cured, give your traction pad a thorough inspection. Check for any loose edges or areas that may need a little extra love. If necessary, apply a small amount of adhesive to reinforce any weak spots. We want that bond to be as strong as your love for surfing.
Letting it Cure
But before you hit the waves with your new companion, there’s a crucial step that cannot be overlooked – letting the glue cure properly. In this article, we will explore the significance of allowing sufficient time for the glue to cure and why it is the key to achieving a strong and long-lasting bond between your surfboard and traction pad.
Follow the Manufacturer’s Instructions:
Different glues have different curing times, and it is essential to choose the right adhesive for your surfboard. Trust the experts who have crafted these products specifically for surfers like you and follow the manufacturer’s recommended guidelines. Don’t take shortcuts or make assumptions – stick to the tried-and-true instructions.
Rushing Leads to Regret:
Impatience is a common pitfall when it comes to glue curing. We understand your eagerness to hit the water and show off your new setup, but rushing this process can have dire consequences. Insufficient curing time can result in poor adhesion, leading to peeling or even complete detachment of the traction pad from your board. Trust us, regretting a hasty decision is never fun.
The Art of Patience:
Patience truly is a virtue when it comes to letting the glue cure. The recommended curing time typically ranges from several hours to overnight, depending on the adhesive used. During this period, it is crucial not to exert any pressure or stress on the glued area. Give your surfboard some alone time in a controlled environment, away from extreme temperatures and high humidity.
Storage Matters:
While waiting for the glue to cure, ensure that your surfboard is stored in a cool, dry place. Extreme temperatures or excessive moisture can hinder the glue’s performance, compromising its ability to cure properly. Treat your surfboard like the delicate treasure it is, and it will reward you with a strong and resilient bond.
VUZFWVRh-V8″ >
Conclusion
In conclusion, gluing a traction pad on a surfboard requires careful preparation and attention to detail.
First, ensure that the surface of the board is clean and free from any wax or residue. Next, apply a thin layer of epoxy adhesive to both the back of the traction pad and the designated area on the board.
Press firmly to ensure proper adhesion, taking care to align the pad correctly. Allow sufficient drying time for the adhesive to fully cure before using your newly enhanced surfboard.
With these steps followed diligently, you can confidently hit the waves with your securely attached traction pad, enhancing your grip and control on the board.