Fiberglass – a game-changing material that’s tough as nails and used in all sorts of industries. From car bodies to boat hulls, this stuff is known for its strength and resistance to rust. But what do you do when you need to connect two pieces of fiberglass? How can you make sure they stay together for the long haul?
Don’t sweat it. In this blog post, we’re going to spill the beans on how the experts connect fiberglass. Picture this: you’re in your garage, tackling a DIY project with fiberglass panels. You’ve measured and cut everything just right, but now comes the tricky part – joining them seamlessly. That’s where our know-how comes into play.
One tried-and-true technique for connecting fiberglass is called the lay-up method. Here’s how it works: you layer resin-soaked fiberglass cloth between the two pieces you want to join. Then, you squish everything together tight as can be. The result? A rock-solid connection that won’t budge. Just remember, this method takes some serious precision and patience – those layers have got to be even, and that resin needs time to fully cure.
But wait, there’s another way. It’s gaining popularity fast: fiberglass adhesive. This special glue is made specifically for bonding fiberglass surfaces together. With the right adhesive and a little prep work, you can create a connection that’s just as strong as the original fiberglass itself – no complex lay-up process required.
In this blog post, we’re going deep into these techniques and throwing in some extra tips and tricks for good measure. Whether you’re a DIY diehard or a pro working with fiberglass every day, these insights are gold.
So if you’re ready to unlock the secrets of connecting fiberglass like a boss, keep reading. We’re about to reveal all the steps and insider info that’ll make your connections flawless. Get ready for an epic journey into the world of fiberglass bonding.
Fiberglass Bonding
Contents
- 1 Fiberglass Bonding
- 2 Preparing the Fiberglass Surfaces
- 3 Applying Adhesive to Fiberglass
- 4 Aligning and Securing the Pieces
- 5 Curing Time for the Adhesive Bond
- 6 Alternative Method: Fiberglass Resin and Matting
- 7 Cutting and Saturating the Matting with Resin
- 8 Encapsulating the Matting with Resin Conclusion
Fiberglass bonding is an art that requires precision and expertise. With its incredible strength, durability, and lightweight properties, fiberglass has become a popular material in multiple industries.
This guide aims to provide a comprehensive overview of the various techniques used to bond fiberglass seamlessly and create long-lasting connections. By delving into the world of adhesive bonding, resin and matting applications, and other methods, professionals and enthusiasts alike can elevate their fiberglass bonding projects to new heights.
Adhesive Bonding: Unleashing the Power of Strong Connections
Adhesive bonding stands as one of the most widely used techniques in fiberglass bonding, offering exceptional strength and resilience. Epoxy adhesives take center stage due to their remarkable adhesion properties, high strength, and resistance to chemicals and moisture. Polyester resin-based adhesives are also popular for laminating fiberglass layers and repairing damages.
Surface Preparation: The Gateway to Optimal Adhesion
Prepare for success by meticulously cleaning fiberglass surfaces, eliminating any traces of dirt, grease, or contaminants that could hinder the bonding process. Embrace the art of roughening the surface through sanding or using abrasive materials to enhance adhesion, ensuring a solid foundation for your masterpiece.
Adhesive Application: Brushing on Brilliance
Unleash the adhesive’s potential by applying it generously to one piece of fiberglass, coating every nook and cranny with care. Employ brushes or applicators to spread the adhesive evenly, following the manufacturer’s instructions to achieve perfection.
Alignment and Pressure: Merging Strength with Precision
Harmony is key when aligning the two pieces of fiberglass together. Forge a connection like no other by exerting pressure, ensuring maximum contact and banishing any air bubbles that dare to disrupt your creation. Embrace clamps or weights as loyal companions during the curing process, holding the pieces in place as they transform into a unified masterpiece.
Curing Time: The Essence of Patience

Time is of the essence during the curing process. Respect the bond’s journey by adhering to the manufacturer’s instructions regarding recommended curing time and environmental conditions. Treat your creation with care, avoiding stress or movement that may jeopardize its integrity.
Preparing the Fiberglass Surfaces
In this comprehensive guide, we will unlock the secrets to preparing fiberglass surfaces before joining two pieces. So, gear up and let’s dive into the realm of professional surface preparation.
Step 1: Embrace the Power of Cleanliness
Before we embark on our bonding journey, cleanliness takes center stage. Leave no room for a dirty bond – it’s time to banish dirt, grease, and wax. Equip yourself with a mild detergent or solvent, and give those surfaces a thorough scrub. Our mission is clear: a direct adhesive-to-fiberglass connection, free from any contaminants.
Step 2: Roughing Things Up with Sanding
Now, it’s time to unleash the power of sanding. Prepare to create a textured surface that revolutionizes adhesion. Grab medium-grit sandpaper (around 80-120) and commence the sanding symphony on the meeting points of your fiberglass pieces. Remember, sand in circular motions to ensure an even roughness across the surface. Perfection is our aim.
Step 3: A Dance with Acetone Wipe-down
After that exhilarating sanding action, it’s time for a dance with acetone. This enchanting liquid wipes away any remnants of dust or debris from our sanding extravaganza. It doesn’t stop there – acetone’s magic also degreases the surfaces, ensuring they are pristine for our adhesive adventure.
Step 4: Priming – The Extra Boost
Step 5: Masking Off – Neatness is Our Creed
In our pursuit of greatness, we must not disregard neatness. To maintain a pristine environment and prevent excess adhesive from trespassing onto unwanted areas, consider masking off the surroundings. Tape or plastic sheets become our allies, confining any rebellious adhesive and facilitating effortless cleanup.
Applying Adhesive to Fiberglass
Prepare to be amazed as we delve into the exciting world of applying adhesive to fiberglass. In this exhilarating journey, we will explore the secrets behind achieving flawless bonds and seamless connections. So, grab your brushes and spatulas, because we are about to embark on an adhesive adventure.
Preparing the Surface:
Cleanliness reigns supreme when it comes to achieving strong bonds. Before applying adhesive to your fiberglass masterpiece, bid farewell to dirt, grease, and contaminants. A thorough cleaning with a mild detergent or solvent is essential. Remember, patience is key – allow the surface to dry completely before proceeding.
Choosing the Right Adhesive:
Now that your surface is pristine, it’s time to select the perfect adhesive for your fiberglass bonding needs. Let’s explore three popular choices: epoxy resin, polyester resin, and polyurethane adhesives.
Epoxy Resin: The Strong and Durable Choice
When strength and durability are paramount, epoxy resin delivers. To unlock its full potential, mix it according to the manufacturer’s instructions. Apply the evenly mixed epoxy resin onto one surface using a brush or spatula. Witness the power of a bond that can withstand even the harshest conditions.
Polyester Resin: Cost-effective Bonding Brilliance
For those seeking budget-friendly options without compromising bonding strength, polyester resin is here to save the day. Thorough mixing is crucial before application. Spread the polyester resin evenly onto one surface using a brush or roller. The result? A seamless bond that defies expectations.
Polyurethane Adhesives: Flexibility and Resistance
Embrace flexibility, moisture resistance, and the ability to conquer temperature changes with polyurethane adhesives. With options in liquid, paste, or foam forms, these versatile adhesives can be applied using a brush or caulking gun. Watch as your fiberglass connections thrive under the power of polyurethane.
Application Techniques and Curing Times:
Now that you have chosen the adhesive that suits your needs, it’s time to put it to work. Remember, following the manufacturer’s instructions is vital for success. Some adhesives require specific temperature ranges or curing times to achieve optimal bonding strength. Adhere to these guidelines diligently, and your bond will stand the test of time.
Aligning and Securing the Pieces
In our previous section, we delved into the thrilling world of applying adhesive to fiberglass. Today, we’re going to take it a step further and explore the secrets behind aligning and securing those pieces. Get ready for a masterclass in creating flawless bonds and seamless connections.
Step 1: Prepare for Success
Before diving into the magical world of aligning and securing fiberglass pieces, we need to ensure we’re starting off on the right foot. Thoroughly clean and prepare the surfaces with a suitable solvent like acetone. Remove any dirt, grease, or loose fibers that could hinder adhesion. Follow this up with a gentle sanding to create a rough texture for better bonding.
Step 2: Clamps and Tapes – Your Trusty Sidekicks
Working with large or intricate shapes can be challenging when trying to hold the pieces together manually. Thank goodness for clamps and tapes, the heroes of alignment. Use these trusty tools to provide even pressure across the joint, ensuring a secure bond while the adhesive cures. Clamp it or tape it, and let them work their magic.
Step 3: Align Perfectly with Alignment Pins
Precision is key when aligning fiberglass pieces for that flawless finish. Enter alignment pins or dowels – your secret weapons. These little wonders help you position the pieces accurately before bonding them together. Insert them into pre-drilled holes in both pieces, creating a temporary alignment aid. Once the adhesive is applied, remove the pins, et voila – perfectly aligned fiberglass pieces.
Step 4: Choose Your Weapon – Epoxy Resin
Now that we have our surfaces prepped and our alignment game strong, it’s time to choose the adhesive that will bring it all together. Enter epoxy resin – the superhero of adhesives. With its outstanding bonding properties, epoxy resin creates a strong and durable connection between fiberglass pieces. Follow the manufacturer’s instructions for mixing and applying the epoxy resin, as proper application is crucial for a robust bond.
Curing Time for the Adhesive Bond
Today, we are delving into the fascinating world of curing time for the adhesive bond. Just like a delicious cake needs time to bake to perfection, our adhesive bond also requires some patience to reach its full strength and durability. So, let’s explore the factors that affect the curing time for our superhero adhesive and unlock the secrets to a powerful bond.
First up on our list is the type of adhesive being used. Just like every hero has their own unique superpower, different adhesives have varying curing times. Some adhesives work their magic in mere minutes, while others require several hours or even days to fully cure. To ensure success, always consult the manufacturer’s instructions and follow them diligently to determine the exact curing time needed for your adhesive.
Next, let’s discuss the impact of temperature and humidity conditions on the curing process. Just like superheroes are influenced by their surroundings, so too is our adhesive bond. Higher temperatures and lower humidity levels generally result in faster curing times, while lower temperatures and higher humidity levels can slow down the curing process. Pay attention to the climate you’re working in and adjust your expectations accordingly.
Now, let’s talk about size and thickness. We all know that superheroes come in all shapes and sizes, and so do our fiberglass pieces. The size and thickness of the fiberglass being bonded can affect the curing time. Larger and thicker pieces require more time for the adhesive to fully penetrate and create a strong bond. Patience is key here; give those larger pieces the time they need to form an unbreakable connection.
But wait, there’s more. Sometimes, our adhesive might need a little extra assistance to speed up or control the curing time. Just like superheroes have their sidekicks, adhesives can utilize heat, pressure, or even special curing agents and accelerators to accelerate or manipulate the curing rate. If you’re in a rush or require precise control over the curing process, these additional steps can be your secret weapon.
It’s important to note that premature stressing or loading of the bond before it has fully cured can weaken or break the bond. So, my fellow adhesive enthusiasts, exercise patience and resist the temptation to test that bond too soon. Allow the adhesive enough time to work its magic and reach its full strength before subjecting it to any load or stress.
Alternative Method: Fiberglass Resin and Matting
Look no further. Allow me to introduce you to the alternative method of using fiberglass resin and matting. While it may not have the glitz and glamour of other bonding techniques, this method certainly delivers when it comes to creating a robust and long-lasting connection.
Before we dive into the step-by-step process, let’s quickly review what fiberglass resin and matting are all about. Fiberglass resin is an adhesive that, when combined with a hardener, forms an incredibly strong bond. Think of it as the foundation of your connection. Meanwhile, fiberglass matting acts as the trusty sidekick, adding extra strength and stability to ensure your bond can withstand even the toughest challenges. Together, they make a formidable duo in the world of fiberglass bonding.
Now, let’s get into the nitty-gritty of how to connect two pieces of fiberglass using fiberglass resin and matting:
- Step 1: Gather your materials – Prepare yourself for this bonding adventure by assembling all the necessary tools. You’ll need fiberglass resin, hardener, fiberglass matting, disposable gloves, mixing containers, a paintbrush or roller, and a trusty squeegee. Safety is paramount, so remember to work in a well-ventilated area and suit up with protective clothing.
- Step 2: Prepare the surface – Just like superheroes need a clean slate to save the day, your fiberglass pieces require a pristine surface for maximum adhesion. Give those surfaces a thorough cleaning, ensuring they are free from any dirt, dust, or grease. This will provide the perfect canvas for your resin and matting to work their magic.
- Step 3: Mix it up – It’s time to unleash your inner chemist. Follow the manufacturer’s instructions to mix the fiberglass resin and hardener in the correct ratio. Be sure to blend them together thoroughly to ensure proper curing and a rock-solid bond.
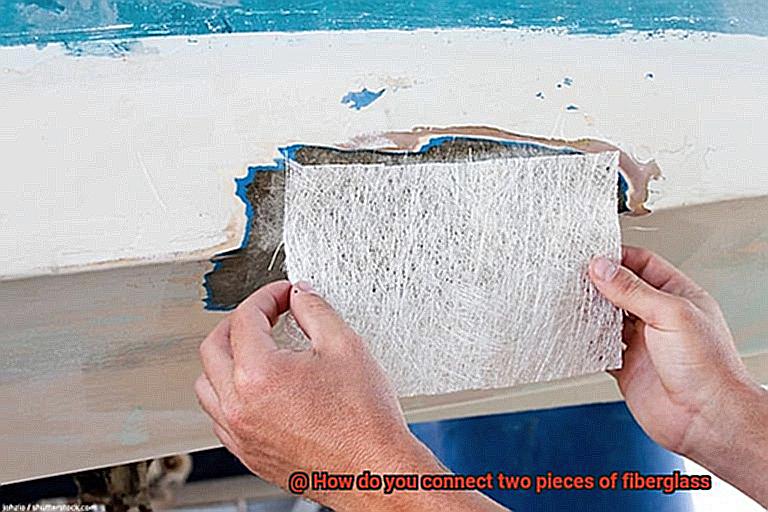
- Step 4: Saturate the matting – Take your fiberglass matting and, if necessary, cut it into smaller pieces to fit your desired area. Place the matting on top of one of the fiberglass pieces and begin saturating it with the resin. Use a paintbrush or roller to apply the resin evenly, ensuring that the matting is completely saturated but not excessively soaked. We want just the right amount of resin here – no more, no less.
Cutting and Saturating the Matting with Resin
Title: Mastering the Art of Cutting and Saturating Fiberglass Matting with Resin
Introduction:
Welcome back, fellow fiberglass enthusiasts. In our previous section, we explored the powerful combination of fiberglass resin and matting, which forms the backbone of any successful fiberglass project. Today, we’ll dive deeper into the process of cutting and saturating the matting with resin, a crucial step in connecting two pieces of fiberglass. So grab your utility knife and let’s embark on this fascinating journey.

Measure and Mark:
Precision is paramount in creating a seamless connection between fiberglass pieces. Begin by measuring and marking the desired size and shape of the fiberglass matting on both pieces. Leave some overlap to strengthen the bond between them. Take your time to ensure accuracy and a perfect fit.
Cut with Precision:
Armed with a sharp utility knife or scissors, it’s time to unleash your inner surgeon. Cut along the marked lines with finesse, creating clean and straight edges that will result in a flawless finish. Neat cuts are essential for a professional-looking final product.
Saturate for Strength:
Prepare to witness the transformative power of resin as it saturates the matting. Follow the manufacturer’s instructions to mix the resin with a catalyst, igniting its adhesive properties and strengthening the connection. This superhero duo is ready to work its magic.
The Art of Application:
Channel your inner artist as you apply a generous amount of resin onto one side of the fiberglass matting. Grab a disposable brush or roller and ensure every inch is thoroughly saturated. Say goodbye to dry spots – they have no place in this masterpiece in the making.
Align and Press:
The moment of truth has arrived – aligning the resin-saturated side of the matting perfectly with one of the fiberglass pieces. Press down firmly, using your fingertips as an instrument to remove any air bubbles or excess resin. This harmonious connection is the epitome of strength.
Repeat for Reinforcement:
As they say, teamwork makes the dream work. Apply resin and align the matting on the other side of the fiberglass connection, mirroring the previous steps. This symmetrical saturation guarantees equal strength and reinforces the bond between the pieces.
Encapsulating the Matting with Resin
In our previous guide, we explored the art of cutting and saturating fiberglass matting with resin, creating a bond that would make even the Greek gods envious. Now, let’s take it up a notch and dive into the mesmerizing process of encapsulating the matting with resin when connecting two pieces of fiberglass. Get ready to witness the magic unfold before your very eyes.
Step 1: Preparing the Surface
The key to a masterpiece lies in its foundation. With gentle strokes, sand the fiberglass surface, awakening its hidden potential through a rough texture that facilitates resin adhesion. This is where artistry meets science.
Step 2: Matting Placement
The stage is set for greatness. Lay down the canvas of fiberglass matting over the destined connection area, ensuring it extends slightly beyond for flawless coverage. This is where the ordinary becomes extraordinary.
Step 3: Resin Application
Behold, the pièce de résistance. With brush or roller in hand, channel your inner maestro and apply a layer of resin over the matting. Each fiber should be caressed by this liquid embrace, ensuring an even distribution that leaves no strand untouched. It’s like giving your creation a luxurious bath. Time is of the essence, my friends, as this masterpiece must be created swiftly.
Step 4: Thin Layers Are Key
In this delicate dance between power and finesse, avoid excessive resin that can mar your work of art. Instead, add multiple thin layers, each one a delicate brushstroke building upon the last. This is how strength is forged and beauty emerges.
Step 5: Safety First.
As artists, we must protect ourselves from harm. Don your protective gloves and ensure you’re working in a well-ventilated area. The health and safety of our creators is of utmost importance. Take care, my fellow artisans.
Step 6: Cure and Repeat
Once the first layer of resin has been applied, allow it to cure, for patience is the secret ingredient to greatness. As each layer solidifies, add another, allowing the bond to grow stronger with each passing moment. This process creates a connection that will withstand the test of time, a testament to your skill and dedication.
wb_B7gj88TI” >
Conclusion
Connecting two pieces of fiberglass requires careful consideration and the right technique. To achieve a strong and durable bond, there are a few methods you can use.
One common approach is to use epoxy resin, which acts as both an adhesive and a filler. Begin by sanding the surfaces that will be joined to create a rough texture for better adhesion. Apply the epoxy resin evenly on both pieces, ensuring complete coverage. Then, press the two pieces together firmly and secure them with clamps or tape until the resin cures.
Alternatively, you can use fiberglass cloth and polyester resin to connect the two pieces. Start by cutting a piece of fiberglass cloth slightly larger than the area you want to join. Lay it over one of the pieces, making sure it overlaps onto the other piece. Apply polyester resin generously, saturating the cloth and allowing it to seep into the fibers. Press the two pieces together firmly and remove any excess resin with a squeegee or roller.
For more intricate connections or repairs, fiberglass matting can be used in conjunction with polyester resin. Cut small sections of matting and apply them between the two pieces, saturating each layer with resin as you go. Build up multiple layers until you achieve the desired strength.
Remember to follow safety precautions when working with epoxy resins or polyester resins, such as wearing protective gloves and working in a well-ventilated area.
In conclusion, connecting two pieces of fiberglass requires attention to detail and using appropriate materials like epoxy resin or polyester resin with fiberglass cloth or matting.