Today, we’re diving headfirst into the captivating realm where wood meets bricks. It’s a magical fusion that adds a touch of rustic charm and rock-solid stability to all sorts of projects. Whether you’re crafting a cozy fireplace, a nifty garden bench, or a stylish decorative shelf, securely attaching wood to bricks can be quite the challenge. But fear not. We’ve got your back with this ultimate guide.
In this comprehensive blog post, we’ll explore foolproof techniques and spill the beans on the essential tools and materials you’ll need for seamless integration. From classic methods involving nails and screws to the intriguing world of adhesive bonding agents, we won’t leave any stone unturned.
So grab those trusty work gloves, pop on your thinking cap, and join us on an adventure that will equip you with the knowledge to confidently attach wood to bricks. Get ready to blend creativity and practicality with finesse, ensuring your projects withstand the test of time. Let’s dive right in.
Cleaning and Preparation of Surfaces
Contents
- 1 Cleaning and Preparation of Surfaces
- 2 Adhesives for Attaching Wood to Bricks
- 3 Applying Adhesive to the Wood and Brick Surfaces
- 4 Fastening Wood to Bricks with Screws or Nails
- 5 Drilling Pilot Holes into the Brick and Wood Surfaces
- 6 Inserting Fasteners Through the Wood and Into the Pilot Holes
- 7 Additional Hardware for Added Support and Stability
- 8 Conclusion
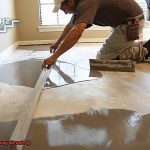
When it comes to attaching wood to bricks, the key to success lies in the meticulous cleaning and preparation of surfaces. By following the right techniques and steps, you can achieve a bond that is not only strong but also capable of withstanding the test of time. In this blog post, we will delve into the importance of cleaning and preparing surfaces for wood-to-brick attachment, providing you with comprehensive instructions for a successful outcome.
The Art of Cleaning the Brick Surface
- A Clean Surface: The Foundation for Proper Adhesion
- Tools Needed: Stiff brush or broom, mild detergent, water
- Step-by-Step Cleaning Process: Removing loose debris with vigor using a stiff brush or broom. Gently scrubbing stubborn stains with a mixture of mild detergent and water. Rinsing off the detergent with clean water and allowing the bricks to bask in the sun until dry.
The Craft of Preparing the Wood Surface
- Enhancing Grip and Aesthetics
- Inspecting and Sanding: Identifying imperfections like knots or rough spots and meticulously sanding them down until smooth and even.
- Applying Primer or Wood Sealer: Shielding the wood from moisture and fortifying its bond with the bricks by applying a primer or wood sealer according to the manufacturer’s instructions.
Choosing and Mastering Adhesive Application
- Selecting an Adhesive That Stands the Test of Time
- Importance of Choosing Wisely: Opting for construction adhesives specifically engineered for wood-to-brick attachment.
- Applying Adhesive: Generously spreading adhesive on the prepared wood surface, ensuring complete coverage.
- Positioning and Securing: With precision, aligning the wood onto the pristine brick surface, applying pressure to foster a steadfast bond. Utilizing clamps or supports to maintain alignment until the adhesive cures.
Adhesives for Attaching Wood to Bricks
When it comes to attaching wood to bricks, finding the right adhesive is essential. You want a bond that’s as strong as Hercules and as durable as a diamond. Luckily, there are adhesives out there that can make this dream a reality.
Construction adhesive is the go-to choice for many DIY enthusiasts. This mighty adhesive comes in various forms, from tubes to cartridges, making it easy to apply using a trusty caulking gun. Just make sure you select an adhesive specifically designed for bonding wood and brick together.
Preparation is key before diving into the bonding process. Your surfaces need to be clean, dry, and free from any debris. Think of it as giving your wood and brick a spa day. To ensure a strong bond, roughen the surface of the brick with some sandpaper or a wire brush. This helps the adhesive grip onto the surface like a gecko on a wall.
Now it’s time for the magic to happen. Apply a generous amount of construction adhesive onto the wood surface that will be cozying up to the brick. Spread it evenly using a putty knife or another suitable tool. Time is of the essence here, as some adhesives dry faster than lightning.
Once you’ve applied the adhesive, press the wood firmly against the brick surface. Make sure everything aligns perfectly, like stars in the night sky. Apply some pressure for a few minutes to allow the adhesive to work its magic and create an unbreakable bond. You can even use clamps or weights to keep everything in place while the adhesive cures.
Speaking of curing, different adhesives have different drying times. Some may take hours, while others may take days to reach their full strength. Be patient and follow the manufacturer’s instructions for recommended drying times – trust in their wisdom.
Keep in mind that construction adhesive may not be suitable for all wood and brick combinations. If you’re feeling unsure about compatibility, don’t hesitate to consult the manufacturer or seek guidance from an expert. They’ll help you find the perfect adhesive match made in heaven.
In certain cases, epoxy adhesives steal the show when it comes to attaching wood to bricks. These bad boys are known for their exceptional strength and durability. However, be prepared for some careful mixing and application – follow the instructions provided by the manufacturer to ensure success.
For added support and stability, consider using mechanical fasteners like screws or nails alongside your adhesive. This dynamic duo can handle even the heaviest loads and keep everything in place like a superhero team.
Applying Adhesive to the Wood and Brick Surfaces
Discover the secret to creating a bond between wood and brick surfaces that is as unyielding as Thor’s hammer. In this guide, we will explore the art of applying adhesive to wood and brick, ensuring a connection that stands the test of time. So grab your caulk gun and let’s delve into the world of adhesion.
Choosing the Right Adhesive:
Like assembling your dream team, selecting the right adhesive is crucial for a successful attachment. Construction adhesives specifically designed for bonding wood and masonry are your go-to choice. These adhesives possess the strength of Hercules and the durability of a diamond, ensuring a bond that can withstand any challenge.
Preparation is Key:
Before you unleash the power of your adhesive, it’s essential to prepare both the wood and brick surfaces. Imagine wiping away the dust before embarking on an epic battle. Use a brush or vacuum cleaner to remove any dirt or debris, ensuring a clean canvas for your adhesive masterpiece. If there are any paint or coatings on either surface, strip them away to enhance adhesion.
The Application Process:
Now comes the exciting part – applying the adhesive. Load up your caulk gun and squeeze that trigger like a superhero in action. Follow the manufacturer’s instructions for your specific adhesive, as application techniques may vary. Apply a generous amount of adhesive onto the wood surface, ensuring sufficient coverage.
Creating an Unbreakable Bond:
Once you’ve unleashed the adhesive onto the wood surface, firmly press it against the brick surface. Remember, even pressure across the entire area is key to achieving a bond that even Hulk couldn’t break. For added support during the curing process, consider using clamps or braces to hold the wood in place until the adhesive sets.
The Power of Patience:
Just like waiting for the next Marvel movie to hit the big screen, curing time requires patience. Refer to the manufacturer’s instructions for accurate drying times. Avoid subjecting the bond to any stress or load until the adhesive is fully cured. This waiting game can range from a few hours to several days, but trust us, it’s worth it.
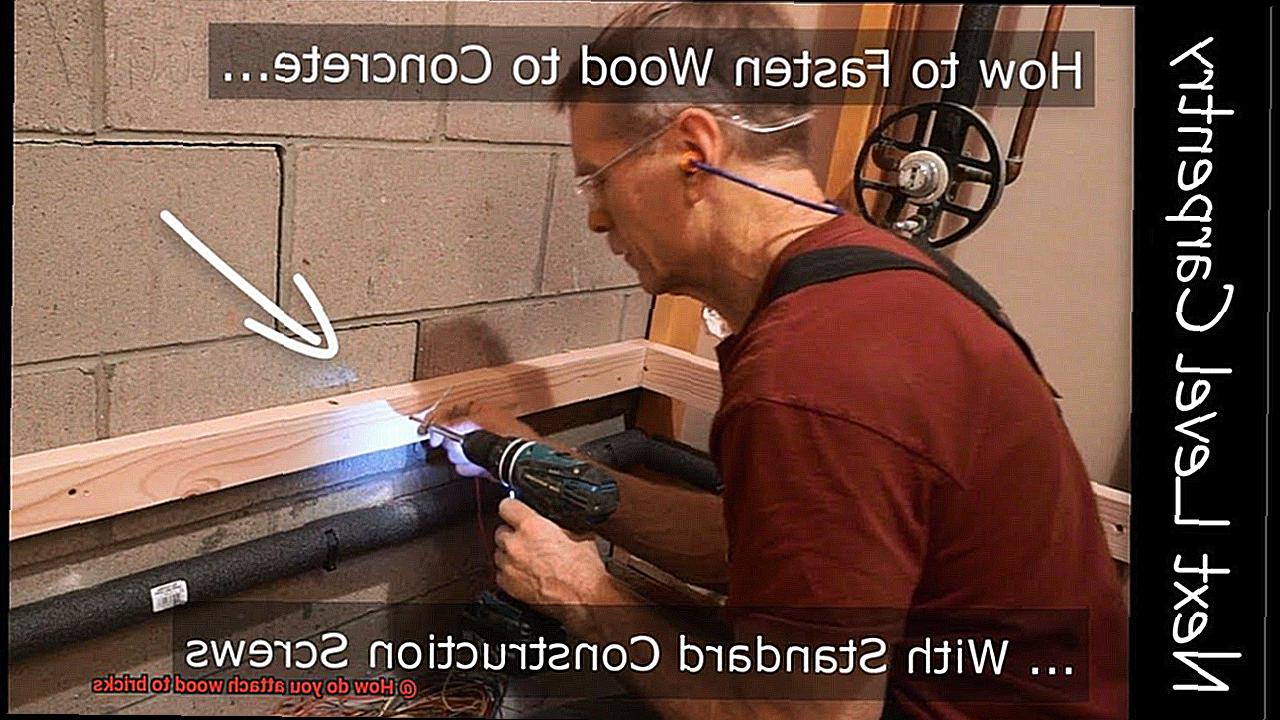
Fastening Wood to Bricks with Screws or Nails
Fastening wood to bricks may seem like a daunting task, but with the right tools and techniques, it can be done easily. Whether you choose screws or nails, there are a few steps and considerations to keep in mind for a secure and durable attachment.
First things first, make sure the bricks are clean and free from any debris or dust. This will ensure a better grip for the screws or nails. Give the surface a good brush or wipe before you start.
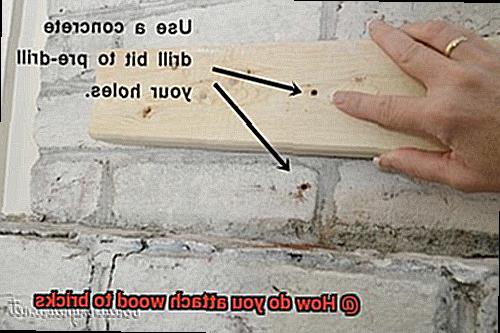
If you opt for screws, it’s essential to choose the right type and size for the job. Masonry screws or concrete screws are recommended for attaching wood to bricks. These screws have special threads that provide better grip in the brick material.
Once you have your screws ready, mark the desired location on the brick where the wood will be attached. Use a drill with a masonry bit to create pilot holes in the brick at these marked points. The size of the pilot holes should correspond to the diameter of the screws being used.
Now it’s time to align your wood with the holes and insert the screws through the wood and into the pilot holes. Use a screwdriver or power drill with a screwdriver bit to drive the screws into the brick. Apply sufficient force while driving the screws to ensure a tight and secure attachment. But be careful not to overtighten, as this can damage both the wood and the bricks.
If you prefer nails, masonry nails or concrete nails are your best bet for attaching wood to bricks. These nails have fluted shafts that provide better grip in masonry materials. As with screws, mark the desired location on the brick where the wood will be attached. Use a hammer and nail punch tool to create starter holes in the brick at these marked points.
Position your wood against these starter holes and insert nails through the wood and into the starter holes. Use a hammer to drive the nails into the brick, ensuring a tight fit. Again, apply sufficient force while driving the nails, but avoid excessive force that may cause damage.
For both screws and nails, it’s advisable to use multiple fasteners to evenly distribute the load and provide a more secure attachment. This will ensure that your wood stays put and withstands any challenges.
Additionally, consider pre-drilling the wood to prevent splitting when using screws or nails. Create pilot holes in the wood before attaching it to the bricks. This extra step can save you from headaches later on.
Lastly, make sure you choose appropriate screws or nails based on the weight and size of the wood being attached. If you’re unsure about the specific requirements for your project, consult with a hardware store or professional for guidance.
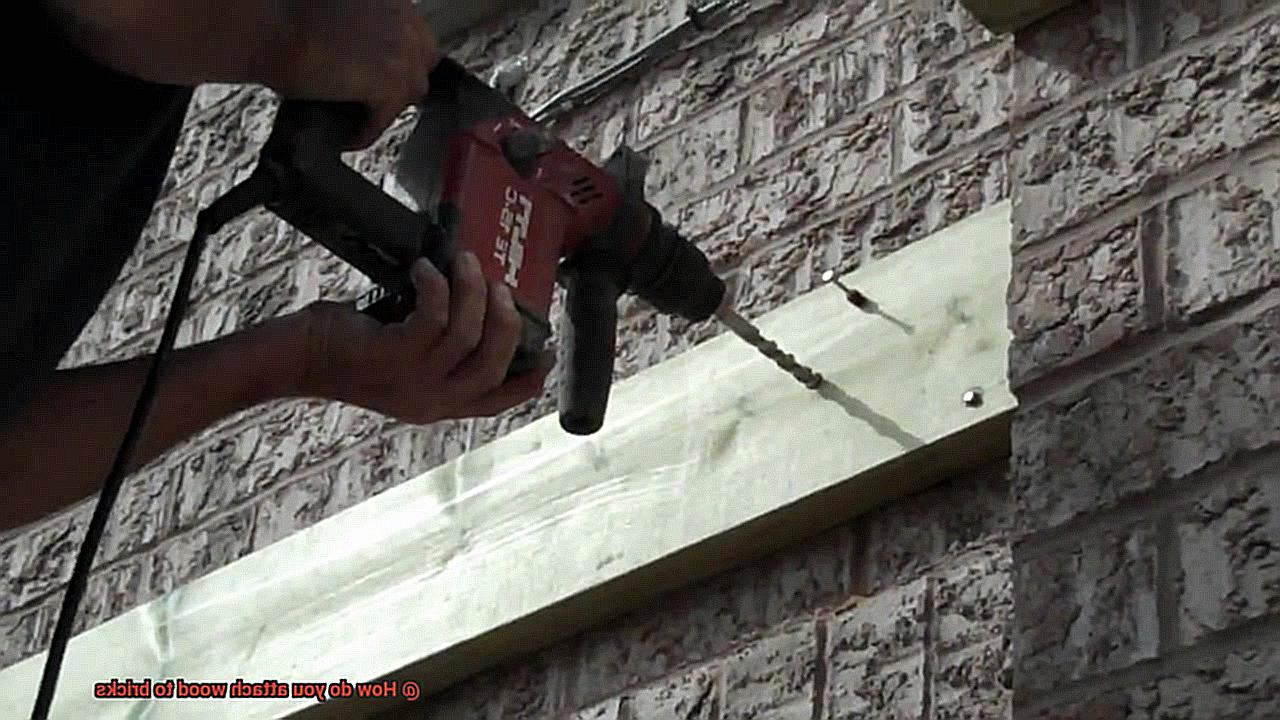
Drilling Pilot Holes into the Brick and Wood Surfaces
Fantastic. But hold your hammers for a moment and let’s discuss a crucial step that will save you from potential headaches (and wood casualties). We’re talking about drilling pilot holes. In this comprehensive guide, we’ll take you through the process of creating these essential guiding holes in both brick and wood surfaces. Get ready, grab your safety goggles, and let’s dive into the world of drilling.
Step 1: Gather the Right Tools
First things first, equip yourself with the right tools for the job. To drill into brick, you’ll need a masonry drill bit with a tough carbide tip—a true hero that effortlessly cuts through stubborn bricks. And don’t forget your trusty drill with a hammer function to make drilling a breeze.
Step 2: Marking the Spot
Before drilling, precisely mark the locations on both the wood and brick surfaces where the holes will be made. Accuracy is key to ensure proper alignment and a clean installation. Use a pencil or template to make your marks—no room for guesswork here.
Step 3: Drilling into Brick
Now it’s time to get down to business. Place the masonry drill bit on the marked spot on the brick surface and apply gentle pressure. Start drilling slowly and steadily, allowing the bit to gradually penetrate the brick’s tough exterior. Remember, no need for excessive force. Periodically pull back on the drill to clear debris from the hole—smooth sailing ahead.
Step 4: Moving on to Wood
With your pilot hole in the brick complete, shift gears to the wood surface. Select a drill bit for wood slightly smaller in diameter than your screws or anchors. With your drill in hand, position the bit on the marked spot on the wood surface and start drilling slowly. Gradually increase speed, but be cautious not to push too hard or drill too deep—precision is key.
Step 5: The Final Connection
Congratulations, you’ve successfully drilled pilot holes in both brick and wood surfaces. Now it’s time to bring them together. Align the wood with the desired position on the brick and insert your screws or anchors through the pilot holes in the wood and into the brick. Use a screwdriver or drill to tighten them securely, following the manufacturer’s instructions to ensure a rock-solid connection.
Inserting Fasteners Through the Wood and Into the Pilot Holes
But fear not. In this comprehensive guide, we will walk you through the step-by-step process of inserting fasteners through wood and into pilot holes. By following these simple yet effective techniques, you can achieve a strong and secure connection between wood and bricks.
Step 1: Preparing the Wood and Marking Locations
Begin by marking the specific locations on the wood where you intend to attach it to the bricks. To determine the appropriate depth of the pilot hole, measure the length of the fastener using a tape measure or ruler.
Step 2: Creating Pilot Holes
Select a drill bit that matches the diameter of your fastener, ensuring a snug fit. Attach the drill bit to your drill and position it at one of the marked locations on the wood. With precision and control, drill straight down until you reach the desired depth. Repeat this process for each marked location.
Step 3: Choosing the Right Fasteners
For optimum holding power and durability, screws are generally recommended over nails when attaching wood to bricks. Consider factors such as length and material compatibility when selecting screws for your project.
Step 4: Inserting Fasteners
Align the wood with the bricks, ensuring proper positioning. Take one screw at a time and insert it into a pilot hole. Employ a screwdriver or power drill with a screwdriver bit to drive the screw into the wood until it is securely fastened. Repeat this process for each pilot hole.
Step 5: Testing Stability
Once all screws are inserted, put your construction skills to the test by gently tugging or shaking the wood to check for any movement. If slight instability is detected, tighten each screw slightly until the wood feels sturdy and immovable.
The Role of Glue:
While not always necessary, glue can provide additional strength and stability to the connection between wood and bricks. If you choose to use glue, apply it to the surface of the wood before inserting the fasteners. Ensure that the adhesive is suitable for both wood and brick surfaces.
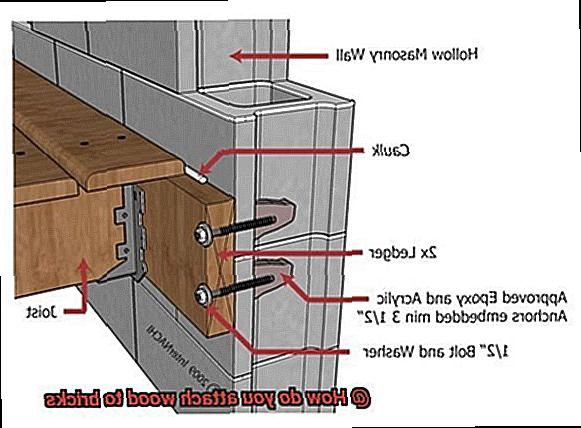
Additional Hardware for Added Support and Stability
Attaching wood to bricks requires meticulous consideration of stability and support. While screws or clips may suffice for lighter loads, additional hardware can provide the added support needed for heavier structures. In this article, we will explore different types of hardware and techniques that can be used to enhance stability when attaching wood to bricks.
Brick Clips:
Brick clips are a popular choice due to their ease of use and versatility. These metal clips securely attach to brick edges, providing a stable surface for wood attachment. Available in various sizes and styles, brick clips accommodate different wood thicknesses.
Masonry Screws or Anchors:
Specifically designed for masonry materials like bricks and concrete, masonry screws feature a sharp, pointed end for easy penetration and a secure hold. Depending on weight requirements, they can be used with or without anchors.
Metal Brackets or Braces:
For larger structures, such as shelving units or pergolas, metal brackets or braces are essential for additional support and stability. Made of sturdy materials like steel or aluminum, these brackets are used in conjunction with screws or clips for a long-lasting connection.
Construction Adhesive or Epoxy:
To reinforce attachment further, construction adhesive or epoxy can be used in conjunction with other hardware. These adhesives create a strong bond between wood and brick surfaces, enhancing stability. However, adhesive alone may not suffice for heavy loads and should be used alongside other hardware.
91aKz0_thRM” >
Conclusion
In conclusion, attaching wood to bricks requires meticulous preparation, the correct tools and materials, and a comprehensive understanding of various techniques. Whether you opt for adhesive bonding agents, screws, or nails, each method offers unique advantages and considerations.
When utilizing adhesive bonding agents, thorough cleaning and preparation of both the brick and wood surfaces are paramount. This guarantees a resilient bond that can withstand the test of time. Opting for construction adhesives specifically formulated for wood-to-brick attachment is highly recommended due to their exceptional strength and durability. Applying the adhesive generously and evenly, aligning the wood with precision, and providing support during the curing process are pivotal steps in achieving a secure attachment.
For those inclined towards mechanical fasteners like screws or nails, selecting the appropriate type and size is indispensable. Masonry screws or concrete screws are optimal choices when attaching wood to bricks. Pre-drilling pilot holes in both the brick and wood surfaces not only prevents splitting but also ensures a snug fit. Utilizing multiple fasteners evenly distributes the load for enhanced stability.
Moreover, contemplating additional hardware such as brick clips, metal brackets, or braces can furnish supplementary support for weightier structures. To further fortify attachment, construction adhesive or epoxy can be employed in conjunction with other hardware.
All in all, by adhering to meticulous cleaning techniques, employing suitable tools and materials, and implementing adept attachment methods, you can confidently fasten wood to bricks while ensuring unwavering stability and longevity for your projects.