Do you want to update your walls but dread the thought of removing old wallpaper and dealing with its sticky residue? Fear not, because we have a solution that might save you time and effort. You may have heard that mudding over wallpaper glue is an easy fix, but you’re unsure if it’s a good idea. Well, we’ve got you covered.
In this blog post, we’ll explore the age-old question: can you mud over wallpaper glue? We’ll weigh the pros and cons of this method and reveal potential risks and pitfalls to avoid. Plus, we’ll share techniques and tips for ensuring the best results, including proper surface preparation and selecting the right mud for the job.
By the end of this post, you’ll have a definitive answer on whether or not you can mud over wallpaper glue. You’ll also gain a comprehensive understanding of the process and tools required. With expert advice at your fingertips, you’ll be equipped to achieve a smooth and sturdy wall finish. Let’s dive in and discover everything there is to know about this intriguing DIY topic.
Types of Wallpaper Glue
Contents
- 1 Types of Wallpaper Glue
- 1.1 Cellulose Glue
- 1.2 Vinyl Glue
- 1.3 Wheat Paste Glue
- 1.4 Pre-Mixed Glue
- 1.5 Powdered Glue
- 1.6 In addition to choosing the right type of glue, it is important to follow some tips to ensure a successful installation. Always check the manufacturer’s instructions before purchasing and using any type of wallpaper glue. Properly prepare the surface before application by cleaning the wall thoroughly and removing any old wallpaper or adhesive residue. This will help provide a smooth and even surface for the wallpaper to adhere to.
- 2 Preparing the Surface for Mudding
- 3 Evaluating the Condition of the Wallpaper Glue
- 4 Types of Joint Compound for Mudding
- 5 Pros and Cons of Mudding Over Wallpaper Glue
- 6 Tips for Applying Joint Compound on Wallpaper Glue
- 7 Common Mistakes to Avoid When Mudding Over Wallpaper Glue
- 8 Expert Advice for Mudding Over Wallpaper Glue
- 9 Conclusion
When it comes to wallpaper installation, choosing the right type of wallpaper glue is crucial. The type of glue you choose will depend on the type of wallpaper you plan to install. Here are the different types of wallpaper glue available in the market and their best uses.
Cellulose Glue
Cellulose glue is a popular choice for lightweight papers because it is easy to mix and apply. It is made from a mixture of methylcellulose and water, which makes it user-friendly, especially for DIY enthusiasts. However, it is not recommended for heavy or textured wallpapers as it may not provide adequate support.
Vinyl Glue
Vinyl glue is formulated with polyvinyl acetate (PVA) and is best suited for vinyl wallpaper. It dries clear and is easy to clean up with water, making it perfect for those who prefer a hassle-free installation. Vinyl glue is also suitable for heavy or textured wallpapers as it provides strong adhesion.
Wheat Paste Glue
Wheat paste glue is a natural glue made from wheat flour and water. It has been used for centuries as a traditional wallpaper adhesive. Wheat paste is eco-friendly, non-toxic, and easy to make at home. It is best suited for heavyweight papers and is perfect for those who prefer natural or organic products.
Pre-Mixed Glue
Pre-mixed wallpaper glue comes ready-to-use straight from the container, making it the easiest option for beginners. It tends to be less messy than powdered glue and has a longer shelf life too. However, pre-mixed glue can be more expensive than its powdered counterpart.

Powdered Glue
Powdered wallpaper glue needs to be mixed with water before use. Professional installers prefer powdered glue because it can be customized to suit the specific needs of the job, making it more cost-effective for larger jobs. However, it requires more preparation time and can be messy if not mixed properly.
In addition to choosing the right type of glue, it is important to follow some tips to ensure a successful installation. Always check the manufacturer’s instructions before purchasing and using any type of wallpaper glue. Properly prepare the surface before application by cleaning the wall thoroughly and removing any old wallpaper or adhesive residue. This will help provide a smooth and even surface for the wallpaper to adhere to.
In conclusion, the right type of wallpaper glue is essential for a successful installation. By selecting the appropriate glue for your wallpaper, you can ensure that it remains intact and looks beautiful for years to come.
Preparing the Surface for Mudding
Preparing the surface for mudding is a critical step that requires careful attention to detail. Here are some essential tips:
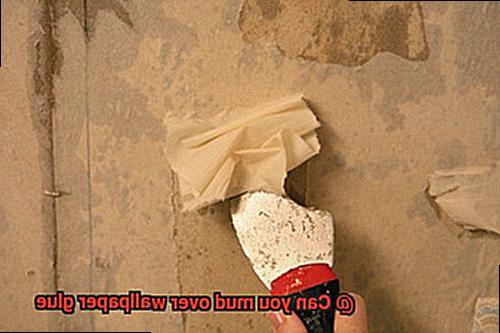
- Removing Loose Wallpaper and Backing Paper: The first step is to remove any loose wallpaper or backing paper that could cause bumps and ridges on the surface. Use a scraper or putty knife to gently scrape away any loose material. For stubborn spots, a solution of warm water and dish soap can be applied to soften the glue and make it easier to remove.
- Cleaning and Sanding the Surface: Once all loose material has been removed, the surface should be thoroughly cleaned and sanded. Sanding helps to rough up the surface, allowing the mud to adhere better. Any remaining wallpaper glue should be sanded off until the surface is smooth and free of bumps or ridges.
- Priming the Surface: Before applying mud, it’s crucial to prime the surface with a drywall primer. This seals any remaining wallpaper glue and prepares the surface for mudding. A good primer also helps prevent moisture from penetrating through the surface, which can cause the mud to crack or peel.
- Using a Setting-Type Joint Compound: When mudding over wallpaper glue, using a setting-type joint compound is essential. These compounds dry faster and are more durable, making them ideal for use on surfaces that may have residual wallpaper glue. They are also less prone to cracking or shrinking as they dry.
Evaluating the Condition of the Wallpaper Glue
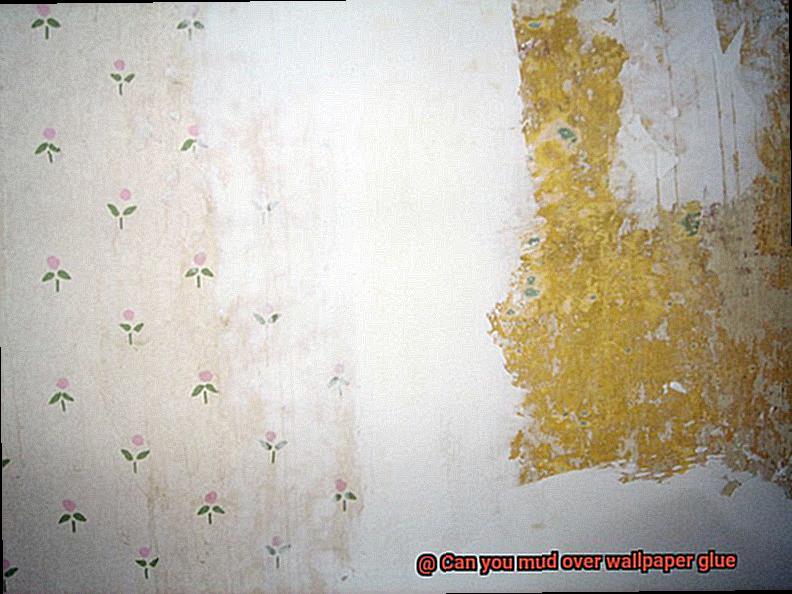
Hold your horses. You must first assess the condition of the wallpaper glue before mudding over it. As the authority on evaluating wallpaper glue, I have some exclusive tips to help you determine if your walls are ready for the mud makeover.
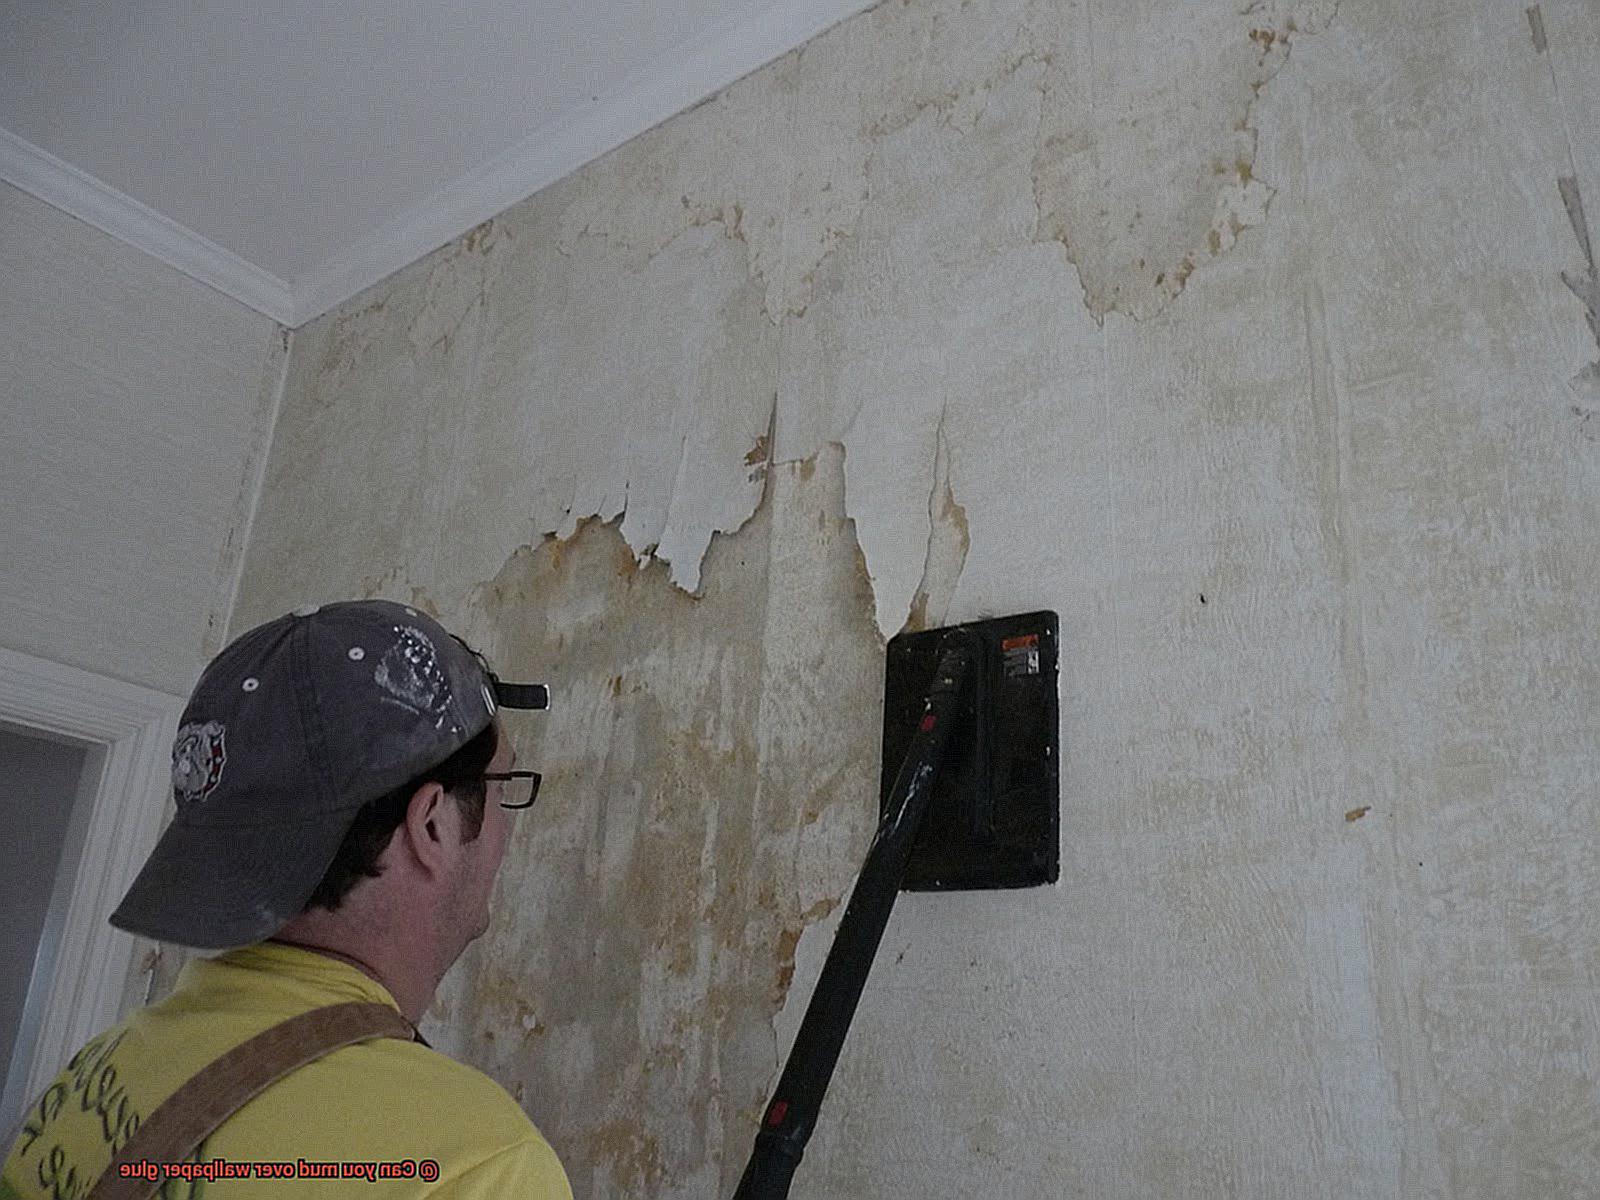
The first step is to inspect your wallpaper closely. Is it flat and smooth or does it show signs of wrinkling and bubbling? Any form of deterioration, like peeling or bubbling, could mean that the glue may no longer be suitable for mudding over. Next, examine the edges and corners of the wallpaper to make sure they are still firmly attached to the wall.
To test the strength of the glue, gently press on it with your finger or a putty knife. If it feels stable and firm, there is a high chance that the glue is still in good condition and can handle the weight of joint compound. However, if it feels loose or starts to peel away from the wall when pressure is applied, you may need to remove the wallpaper before proceeding with mudding.
Another critical factor to consider is the age of both the wallpaper and glue. Older wallpaper may have a weaker adhesive that can easily fail under stress from joint compound. If you are uncertain about your wallpaper glue’s condition or how to proceed, always seek professional guidance.
In summary, evaluating your wallpaper glue’s condition is vital in preparing your walls for a mud makeover. By meticulously examining your wallpaper and testing the strength of its glue, you can determine whether it is ready for mudding over or requires complete removal before proceeding. Remember, taking time to evaluate your wallpaper glue can save you time and frustration in the long run. Here’s a checklist to guide you:
Types of Joint Compound for Mudding
Mudding over wallpaper glue can be a daunting task, but it can be made easier by choosing the right type of joint compound. Here are five sub-sections to consider when selecting the best joint compound for mudding over wallpaper glue:
Types of Joint Compound
There are three main types of joint compound – setting-type, pre-mixed, and all-purpose. Setting-type joint compound, also known as quick-setting or hot mud, is a powder that sets quickly and is ideal for larger projects. Pre-mixed joint compound comes in a tub and is ready to use right out of the container and is great for small projects or repairs. All-purpose joint compound is versatile and can be used for both taping and finishing.
Advantages and Disadvantages of Each Type
Setting-type joint compound dries harder and stronger than the other two types, making it resistant to cracking and shrinking in areas with high humidity or temperature changes. Pre-mixed joint compound is easy to work with, but it may shrink when drying and may not be as strong as other types. All-purpose joint compound is easy to sand and dries relatively quickly, but it may not be as strong as setting-type joint compound.
Bonding Properties
Choosing a joint compound with strong bonding properties ensures that the compound adheres well to the surface and provides a smooth finish. Some joint compounds are specifically formulated for use on previously painted surfaces or over wallpaper glue.
Drying Time
Setting-type joint compound sets quickly due to a chemical reaction with water, making it ideal for larger projects or when time is of the essence. Ready-mixed joint compound dries quickly, making it great for small projects or repairs.
Surface Preparation
Proper preparation of the surface before applying any joint compound is crucial. The surface should be clean, dry, and free of any debris or loose material. Any bumps or lumps caused by the glue residue should be sanded down before applying joint compound to ensure a smooth finish.
Pros and Cons of Mudding Over Wallpaper Glue
Mudding over wallpaper glue may be the solution you need to save time and money. However, before you start, it’s important to weigh the pros and cons to ensure that you achieve the best possible results.
Let’s start with the advantages. One major benefit of mudding over wallpaper glue is that it saves time and eliminates the need for additional materials or tools. This can be especially beneficial if you have multiple layers of wallpaper or if the wallpaper has been painted over. By applying joint compound directly over the glue, you can achieve a smooth and even surface that’s ready for painting or wallpapering.
In addition to saving time and money, mudding over wallpaper glue can also create a seamless surface that will make your final project look professional and polished. Avoiding the uneven bumps or textures caused by leftover glue is a major advantage of this technique.
However, there are also potential drawbacks to consider. The joint compound may not adhere properly to the glue, leading to cracking or peeling over time. To prevent this from happening, use a high-quality joint compound designed for use over wallpaper glue. Additionally, mudding over wallpaper glue may not be suitable for all types of walls. While it can work well on drywall or plaster surfaces, it could cause damage to wood or brick.
Tips for Applying Joint Compound on Wallpaper Glue
If you’re looking to renovate or redecorate a room, removing wallpaper can be a messy and tedious task. But what if you decide to paint or apply new wallpaper over the existing one? You may encounter some issues with the wallpaper glue residue left behind. Mudding is the process of applying joint compound to walls or ceilings to create a smooth surface for painting or wallpapering. Here are some tips and tricks for applying joint compound on wallpaper glue.
Ensure that the wallpaper glue is completely dry before beginning the mudding process. This can take anywhere from a few hours to a few days, depending on the type of glue and the humidity levels in your home. If you start applying joint compound before the glue dries completely, it can cause the compound to bubble, crack or peel off.
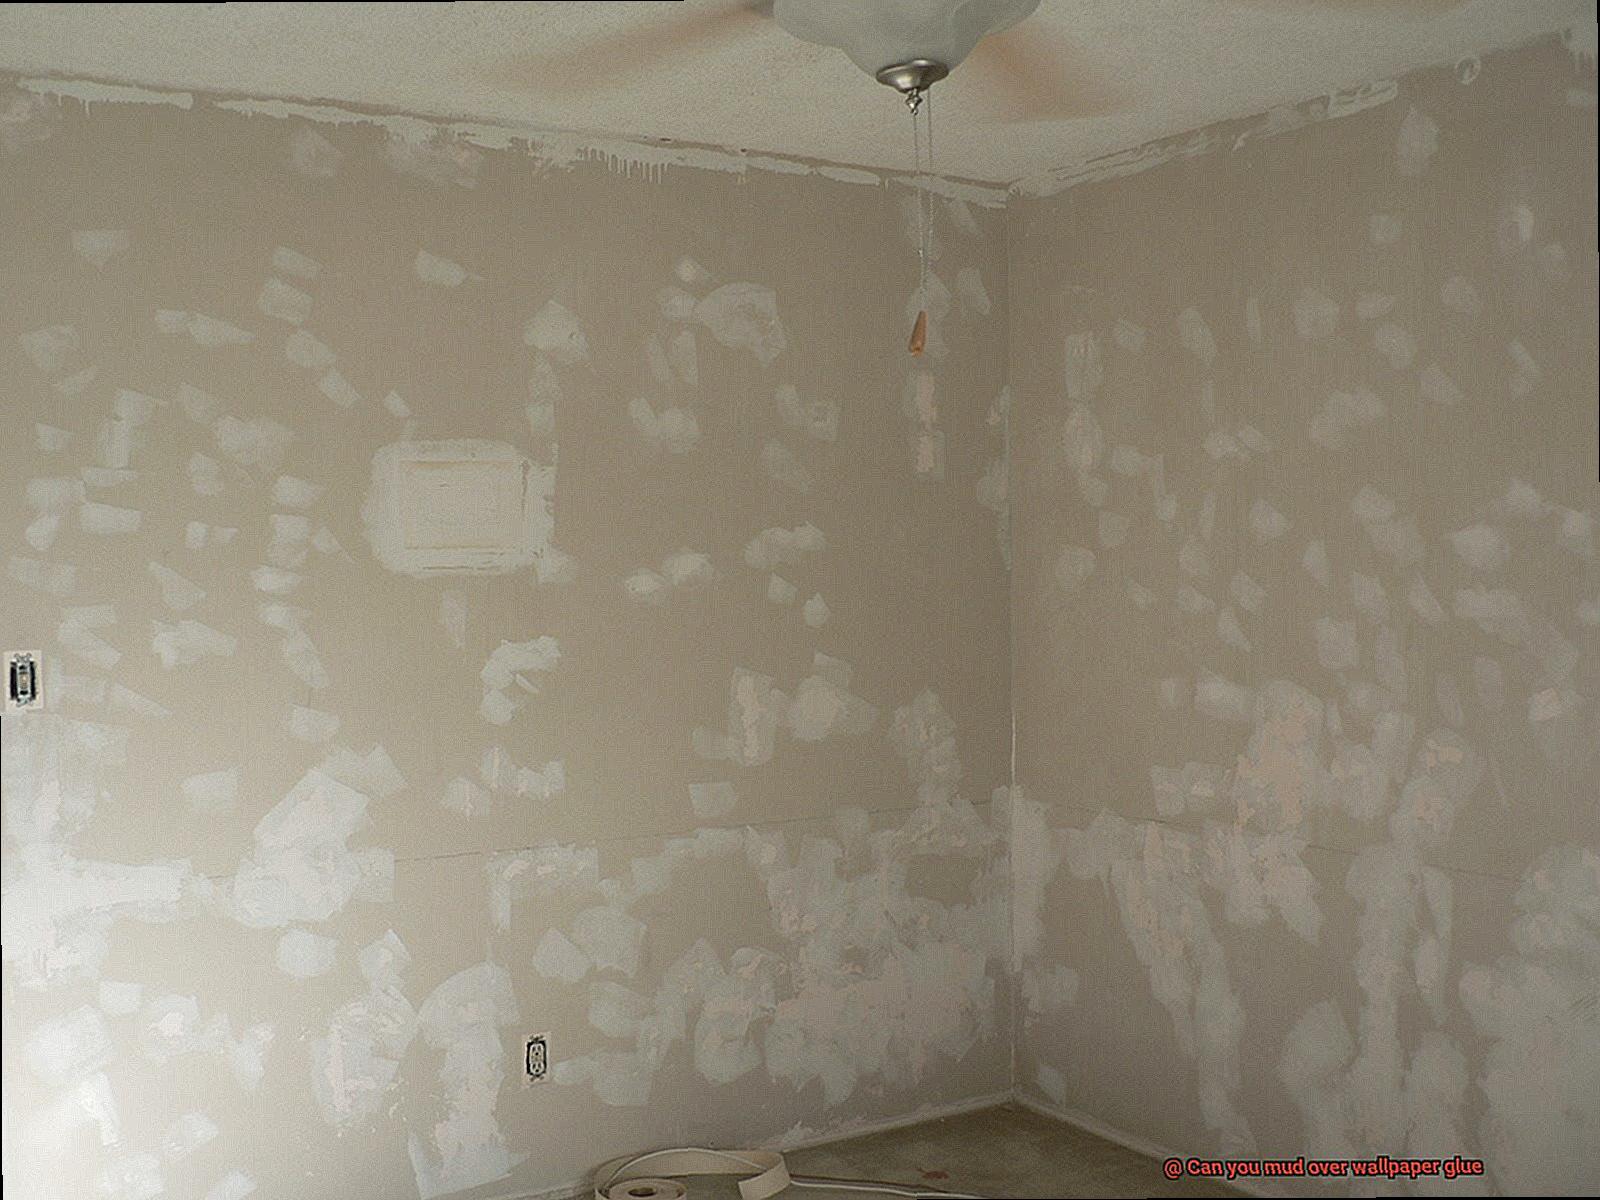
Apply a thin layer of joint compound over the top using a wide putty knife or trowel. Spread the compound evenly and avoid leaving any bumps or ridges. It’s better to apply multiple thin layers rather than one thick layer of joint compound, as it will dry faster and be less likely to crack.
Pay close attention to the edges of the wallpaper, as these can be more difficult to cover with joint compound. You may need to use a smaller putty knife or even your fingers to smooth out any bumps or wrinkles before applying the joint compound. Using a smaller tool will help you control the amount of joint compound you apply and avoid excess buildup.
Use a primer specifically designed for use over wallpaper glue before applying joint compound. This will help the joint compound adhere better and prevent it from cracking or peeling. Follow the manufacturer’s instructions carefully and allow enough time for the primer to dry completely before mudding.
Use a light touch and work in small sections at a time when applying joint compound over wallpaper glue. Avoid using too much pressure, as this can cause the joint compound to crack. Wait for each layer to dry completely before sanding and applying the next one. This will help you achieve a smooth and even surface.
Allow the joint compound to dry completely before sanding and smoothing the surface with fine-grit sandpaper. This may take several hours or even overnight, depending on the humidity and temperature in the room. Sanding down any rough spots or ridges will help create a smooth and even surface for painting or further wall treatments.
Common Mistakes to Avoid When Mudding Over Wallpaper Glue
Mudding over wallpaper glue can be a great solution, but it’s essential to avoid common mistakes that can lead to a messy and unprofessional finish. As an expert in this area, I have compiled a list of tips to help you achieve a smooth and flawless finish.
The first mistake to avoid when mudding over wallpaper glue is not removing all of the wallpaper before applying the mud. Wallpaper that has not been removed will cause the mud to crack and peel over time, leading to an unsightly finish. Take the time to remove all of the wallpaper before starting your project.
The second mistake is failing to clean the walls adequately before applying the mud. Wallpaper glue can be stubborn and difficult to remove, and any remaining residue on the walls can cause the mud to adhere unevenly or not at all. Use a degreaser or wallpaper remover solution to thoroughly clean the walls before beginning the mudding process.
Using the wrong type of mud is another common mistake that people often make. Joint compound, spackle, and plaster are some of the different types of mud available, and each type has its own unique properties. It’s crucial to choose the right type of mud for your project to avoid a brittle or soft finish that could easily crack or chip.
Lastly, many people fail to properly sand the walls before applying the mud. Sanding is critical to ensure that the surface is smooth and free of imperfections that could affect the adhesion of the mud. Failure to sand can result in a rough, bumpy finish that is difficult to paint or wallpaper over.
Expert Advice for Mudding Over Wallpaper Glue
Firstly, prepare the surface by removing any loose or peeling wallpaper and washing the walls with a strong cleaner. To prevent future bubbling or peeling, apply a high-quality primer specifically designed for use over wallpaper glue.
When it comes to choosing the right type of mud, go for a lightweight joint compound as it’s easier to work with and dries faster than heavier compounds. Apply the mud in thin layers, allowing each layer to dry completely before applying the next.
To achieve a smooth finish, pay attention to texture. Experts recommend using a drywall knife with a rounded edge and avoiding any sharp angles or lines that may be visible through the final coat of paint.
qPIFSu-FJ0Q” >
Conclusion
In conclusion, mudding over wallpaper glue can be a game-changer when it comes to updating your walls. However, it’s important to take the necessary steps to ensure that the end result is smooth and long-lasting.
To begin with, selecting the right type of wallpaper glue and joint compound is crucial. Consider factors such as weight, texture, ease of use, bonding properties, drying time and surface preparation. By doing so, you’ll be able to achieve a seamless finish that will make your walls look brand new.
Properly preparing the surface is also key. This involves removing any loose wallpaper and backing paper, cleaning and sanding the surface thoroughly, and priming it with a drywall primer before applying a setting-type joint compound.
Before proceeding with mudding over the wallpaper glue, evaluating its condition is essential. Testing its strength and examining signs of deterioration will help determine whether it’s suitable for this process or requires complete removal.
It’s important to avoid common mistakes such as not removing all of the wallpaper before applying mud or failing to clean the walls adequately before beginning. These mistakes can result in an uneven finish that will detract from the overall look of your project.
By following expert advice for mudding over wallpaper glue, you can achieve a smooth finish that will make your final project look professional and polished.