Welcome to our blog. Today, we’re diving into the world of Liquid Nails and answering the burning question on every DIY enthusiast’s mind: “How long does it take for Liquid Nails to bond?”
Liquid Nails is the go-to adhesive for strong and reliable bonding in home renovations and crafty DIY projects. It can securely connect a wide range of materials, from wood and metal to concrete and ceramics.
Now, let’s get straight to the point: how long does it take for Liquid Nails to bond? Well, it depends on factors like humidity, temperature, material surfaces, and the amount of adhesive applied.
On average, Liquid Nails starts forming a strong bond within 24 hours. But full curing and maximum strength can take up to seven days. Remember, these times are approximate, so be patient as your specific project conditions may affect the bonding process.
Liquid Nails is designed to withstand harsh weather conditions and extreme temperatures. It’s a reliable choice for both indoor and outdoor applications. Its versatility and high bond strength make it perfect for various projects around your home or workshop.
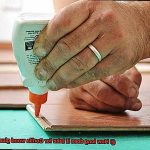
Not only does Liquid Nails offer quick bonding speed and strength, but it’s also super easy to apply. Just squeeze it out of the tube onto your desired surface for an even application that ensures optimal results.
So whether you’re assembling furniture, attaching trim or baseboards, or unleashing your creativity with a DIY project, count on Liquid Nails for a sturdy and long-lasting bond. Just remember to give it enough time to fully cure and reach its maximum strength.
Stay tuned for future blog posts where we’ll share more helpful tips, tricks, and insights for all your DIY needs. Until then, happy bonding.
What is Liquid Nails?
Contents
- 1 What is Liquid Nails?
- 2 Factors Affecting the Curing Time of Liquid Nails
- 2.1 Temperature: The Heat Factor:
- 2.2 Humidity: The Damp Dilemma:
- 2.3 Substrate Material: The Surface Sensation:
- 2.4 Thickness of Application: The Power of Precision:
- 2.5 Ventilation: The Breath of Fresh Air:
- 2.6 Quality and Age of Glue: The Freshness Factor:
- 2.7 Pressure and Clamping: The Squeeze Effect:
- 3 General Curing Times for Liquid Nails
- 4 Application Tips for Maximum Bond Strength
- 5 Impact of Temperature and Humidity on Curing Time
- 6 Following Manufacturer’s Instructions and Guidelines
- 7 Additional Considerations for Faster Cure Times
- 8 Conclusion
In the world of construction and home improvement, finding a reliable adhesive to create strong bonds between different materials is crucial. Enter Liquid Nails, the go-to brand for professionals and DIY enthusiasts alike. In this article, we will delve into the world of Liquid Nails, exploring its formulations, applications, and tips for optimal use.
What is Liquid Nails?
Liquid Nails is a high-quality adhesive specifically designed to create enduring bonds between a wide range of materials. Whether you’re working with wood, metal, concrete, or more, Liquid Nails has got you covered. With various formulations tailored to specific purposes and applications, this versatile adhesive has become a staple in the construction industry.
The Bonding Process:
The magic behind Liquid Nails lies in its chemical bonding process. When applied to a surface, it chemically reacts and forms an unbreakable bond. This unique reaction ensures that even heavy loads and vibrations won’t compromise the integrity of your project. It’s important to note that drying and curing times may vary based on factors like temperature, humidity, and the materials being bonded.
Curing Time:
For optimal strength, Liquid Nails typically requires a minimum of 24 hours to cure completely. However, initial bond strength can be achieved within 10-15 minutes after application. It’s imperative to follow the specific instructions provided by the manufacturer as different formulations may have different curing times. Temperature and humidity also play a role in the curing process; higher temperatures and lower humidity levels accelerate curing while colder temperatures and higher humidity levels can slow it down.
Application Tips:
To achieve the best results with Liquid Nails, apply firm and even pressure during the bonding process. For added support as the adhesive cures, consider clamping or taping the materials together. Always check the expiration date before use, as using expired adhesive may compromise its performance. Following the manufacturer’s guidelines for proper application and curing is essential to maximize the adhesive’s effectiveness.
Factors Affecting the Curing Time of Liquid Nails
In this blog post, we’ll delve into the factors that influence the curing time of Liquid Nails, unraveling the science behind this adhesive wonder.
Temperature: The Heat Factor:
The temperature of the environment plays a vital role in the curing process. Higher temperatures hasten curing, while lower temperatures slow it down. Freezing or scorching conditions can impede bond development. So, stick to the recommended temperature range for optimal results.
Humidity: The Damp Dilemma:
Humidity, or moisture in the air, also affects curing time. High humidity slows it down, while low humidity speeds it up. Excessive moisture delays drying and weakens the bond, while drier environments expedite curing.
Substrate Material: The Surface Sensation:
The material being bonded impacts curing time. Porous materials like wood or concrete generally take longer to dry than non-porous surfaces like metal or glass. Varying porosity and absorbency levels determine how quickly the adhesive cures.
Thickness of Application: The Power of Precision:
The amount of Liquid Nails applied determines curing time. Thick beads or layers take longer to dry than thin applications. Following recommended amounts ensures optimal bonding and curing time.
Ventilation: The Breath of Fresh Air:
Proper ventilation promotes faster curing. Good airflow removes excess moisture, allowing quicker drying for a stronger bond. Poorly ventilated areas prolong curing time.
Quality and Age of Glue: The Freshness Factor:
Using high-quality, fresh Liquid Nails ensures reliable bonding. Older or expired adhesives may take longer to cure or not bond as effectively. Check expiration dates before use.
Pressure and Clamping: The Squeeze Effect:
Applying pressure or clamping during curing enhances bond strength and shortens curing time. Proper contact between adhesive and substrate facilitates quicker adhesion.
General Curing Times for Liquid Nails
Liquid Nails, the adhesive wonder that can bond almost anything together, has a curing time that can vary depending on several factors. So, let’s dive into the fascinating world of curing times and uncover the secrets behind this adhesive’s drying process.
Temperature plays a crucial role in the curing time of Liquid Nails. Higher temperatures can actually accelerate the process, while colder temperatures can slow it down. Imagine working in a cozy warm environment, where your Liquid Nails dries faster than expected, or in chilly conditions, where you have to exercise a little more patience. Temperature truly has a dramatic impact on the speed of bonding.
But temperature is not the only element at play here. Humidity levels also come into play. Higher humidity can slow down the curing process, while lower humidity can speed it up. Picture yourself working in a humid environment, where you might want to give your Liquid Nails a little extra time to dry. Conversely, if you’re lucky enough to be working in a dry climate, that bond could form in no time at all.
Materials themselves contribute to curing times as well. Liquid Nails can bond a wide range of materials together, each with its own properties and porosities. The different characteristics of wood, metal, concrete, and ceramics affect how quickly the adhesive cures. So, keep in mind that curing times may vary depending on what you’re bonding.
Now let’s talk ventilation. You may not think about it often, but adequate ventilation can significantly impact the drying process. It allows moisture to evaporate more quickly, expediting the curing time. Picture some fresh air flowing through your workspace, helping your Liquid Nails set faster and stronger.
And what about freshness? Using high-quality, fresh glue is essential for reliable bonding and can expedite the curing process. Check the expiration date on your Liquid Nails before getting started to ensure you’re working with the best stuff.
If you’re looking to speed up the curing time even further, applying pressure or using clamps can enhance bond strength and help the adhesive set faster. Just make sure to follow the instructions provided by the manufacturer to avoid any mishaps.
Application Tips for Maximum Bond Strength
Are you searching for an adhesive that can provide you with a strong and reliable bond between various materials? Look no further than Liquid Nails. This versatile construction adhesive is renowned for its durability. However, to achieve maximum bond strength, it’s essential to follow some crucial application tips. In this article, we will explore the key tips that will help you unleash the full potential of Liquid Nails.
Start with meticulous surface preparation:
Before applying Liquid Nails, ensure that the surfaces you intend to bond are pristine. Rid them of any dirt, dust, grease, or loose particles that may hinder the adhesion process. Utilize a scraper or sandpaper to eliminate any remnants of old adhesive or paint residues. This meticulous preparation will pave the way for a smooth and solid surface, allowing the adhesive to bond effectively.
Ensure optimal temperature and humidity conditions:
Liquid Nails performs at its best when applied within a temperature range of 40°F to 100°F (4°C – 38°C). Extreme temperatures can negatively impact the curing process and compromise the strength of the bond. Additionally, working in a well-ventilated area with moderate humidity levels will create an ideal environment for optimal bonding conditions.
Apply an ample amount of adhesive:
To achieve maximum bond strength, it is imperative to apply an adequate amount of Liquid Nails. Follow the manufacturer’s instructions meticulously regarding the recommended bead size or coverage area per tube. Applying too little adhesive may result in feeble bonds, while using an excessive amount can lead to messy installations.
Allow for sufficient curing time:
Liquid Nails requires ample time to cure and reach its maximum bond strength. Although it may feel tacky shortly after application, full curing typically takes up to 7 days, depending on factors such as temperature, humidity, and the materials being bonded. During this period, avoid disturbing or stressing the bond, and refrain from placing heavy objects on the bonded surfaces.
Consider additional support through clamping or bracing:
When bonding heavier materials or vertical surfaces, it is advisable to provide extra support through clamps or braces while the adhesive cures. This additional reinforcement ensures that gravity does not compromise the strength of the bond. Refer to the manufacturer’s recommendations for specific clamping requirements, if applicable.
Impact of Temperature and Humidity on Curing Time
Waiting for glue to dry can be a tedious and time-consuming process. However, the secret to achieving a strong bond in no time lies in understanding the impact of temperature and humidity on curing time.
Let’s start with temperature. Higher temperatures can significantly accelerate the curing process, while lower temperatures can slow it down. This is because at higher temperatures, the chemical reaction that occurs during curing happens more rapidly, resulting in a faster bond formation. On the flip side, colder temperatures can extend the curing time, and in some cases, prevent proper bonding altogether. So, if you’re looking for a quick drying time, make sure to work in a warm environment.
But beware. Extreme temperatures can actually have a detrimental effect on the effectiveness of your glue. Both scorching hot and freezing cold conditions can lead to weaker bonds or complete failure. Therefore, it’s crucial to find the sweet spot between too hot and too cold.
Now let’s talk about humidity. Surprisingly, humidity levels also influence how quickly your glue cures. Higher humidity levels tend to extend the curing time, while lower humidity levels may speed it up. This is because humidity affects the moisture content in the air surrounding the adhesive, which impacts how well it cures. In high humidity conditions, excessive moisture in the air hinders the evaporation of solvents present in the adhesive, resulting in longer curing times. Conversely, low humidity conditions promote faster solvent evaporation, accelerating the curing process.
So what does all this mean? When using adhesives like Liquid Nails, considering both temperature and humidity is crucial for optimal bonding results. Manufacturers typically provide recommended temperature and humidity ranges for optimum curing performance. Following these guidelines ensures that you achieve the best results.
Lastly, proper ventilation is essential when working with adhesives. Good airflow prevents fume buildup and excessive moisture that can affect curing times.
Following Manufacturer’s Instructions and Guidelines
Today, let’s embark on an exploration of the world of Liquid Nails, a versatile adhesive that can revolutionize your projects. To ensure optimal results, it is crucial to understand the importance of following the manufacturer’s instructions and guidelines. Whether you’re embarking on a home improvement endeavor or unleashing your artistic talents, adherence to proper usage will guarantee a bond that is unyielding.
Read and Understand the Instructions:
Before diving into any project, take a moment to immerse yourself in the manufacturer’s instructions. These guidelines provide invaluable insights into application methods, surface preparation, and drying time. Embrace this knowledge now to spare yourself potential headaches later.
Allow Adequate Drying Time:
Patience truly is a virtue. Different types of Liquid Nails possess varying curing times, influenced by factors such as temperature and humidity levels. By patiently allowing sufficient drying time before subjecting your bond to stress or load, you’ll guarantee an unbreakable connection that defies detachment. Remember, good things come to those who wait.
Surface Preparation is Key:
Consider surface preparation as the foundation for an unshakable bond. The manufacturer’s instructions may specify suitable surfaces for Liquid Nails application, along with any necessary cleaning or priming steps. Neglecting these preparatory measures jeopardizes the effectiveness of your bond—never underestimate the power of a thorough foundation.
Proper Storage and Handling:
Liquid Nails deserves tender care when it comes to storage and handling. By adhering to guidelines regarding storage conditions, such as temperature range and shelf life, you safeguard against degradation or loss of adhesive effectiveness over time. Additionally, donning protective gloves and avoiding skin or eye contact ensures your safety throughout your adhesive adventures.
Warranty and Guarantees:
The security of a warranty is a beautiful thing. By faithfully following the manufacturer’s instructions and guidelines, you preserve any warranties provided in case of product failure. Uphold the recommended usage guidelines, and revel in the peace of mind that comes from utilizing Liquid Nails in the most effective and safe manner possible.
Additional Considerations for Faster Cure Times
In our previous blog post, we explored the wonders of Liquid Nails and its transformative capabilities for your projects. Today, we’re taking it up a notch by diving into additional considerations that can expedite the curing time of this incredible adhesive. So, grab your tools and let’s delve into the secrets of rapid bonding.
Temperature:
Liquid Nails thrives in warm weather. To achieve optimal curing, ensure that the temperature ranges between 60°F and 80°F (15°C and 27°C). If you find yourself working in colder conditions, consider using a space heater to raise the temperature and speed up the curing process.
Humidity:
High humidity levels are formidable foes to rapid bonding. Avoid using Liquid Nails in extremely humid conditions as it significantly slows down curing. If you must work in a humid environment, employ dehumidifiers or fans to reduce moisture levels and accelerate the process.
Surface Type:
Porous surfaces like wood or concrete have a sneaky way of absorbing some adhesive, resulting in longer curing times. Ensure your surfaces are clean and free from dirt, dust, or grease that might hinder bonding. Enhance both speed and strength by utilizing Liquid Nails’ specific formulations for porous surfaces.
Pressure:
Apply pressure to bonded surfaces to expedite curing time. Clamps or weights can hold them together during the process. Follow manufacturer’s instructions regarding pressure intensity and duration for optimal results.
Ventilation:
A breath of fresh air works wonders. Adequate ventilation allows volatile compounds in the adhesive to dissipate, hastening the curing process. Promote faster bonding by opening windows, using fans, or creating airflow through other means.
Adhesive Type:
Liquid Nails offers various formulations tailored to specific projects. Different types have different cure times, so select the right product based on your requirements. Consult manufacturer’s guidelines or seek expert advice to make an informed choice.
WSoaX4kgMeg” >
Conclusion
In conclusion, the time it takes for Liquid Nails to bond can vary based on multiple factors. These include temperature, humidity, material surfaces, and the amount of adhesive used. On average, Liquid Nails begins forming a strong bond within 24 hours. However, achieving full curing and maximum strength can take up to seven days.
Temperature is a key player in the curing process of Liquid Nails. Higher temperatures can speed things up, while lower temperatures slow it down. It’s crucial to avoid extreme temperatures as they can compromise the adhesive’s effectiveness.
Humidity also has an impact on curing time. Higher humidity levels tend to prolong the process, whereas lower humidity levels may expedite it. Proper ventilation is essential for faster curing by eliminating excess moisture from the air.
The type of material being bonded also influences how long it takes for Liquid Nails to dry. Porous materials like wood or concrete generally require more time compared to non-porous surfaces such as metal or glass.
To achieve maximum bond strength with Liquid Nails, it is vital to adhere to the manufacturer’s instructions and guidelines meticulously. This includes thorough surface preparation, applying an appropriate amount of adhesive, allowing ample drying time, and considering additional support through clamping or bracing when necessary.