Joining brass to wood can be a delightful challenge for both DIY enthusiasts and seasoned professionals.
Luckily, there are numerous techniques available to create a robust and enduring bond between these two materials. One tried-and-true method involves the use of screws, which adds an extra touch of mechanical strength.
To begin, carefully pre-drill holes in the wood to avoid any pesky splitting mishaps. Next, align the brass piece with these meticulously crafted holes and employ the power of a trusty drill to secure it firmly in place.
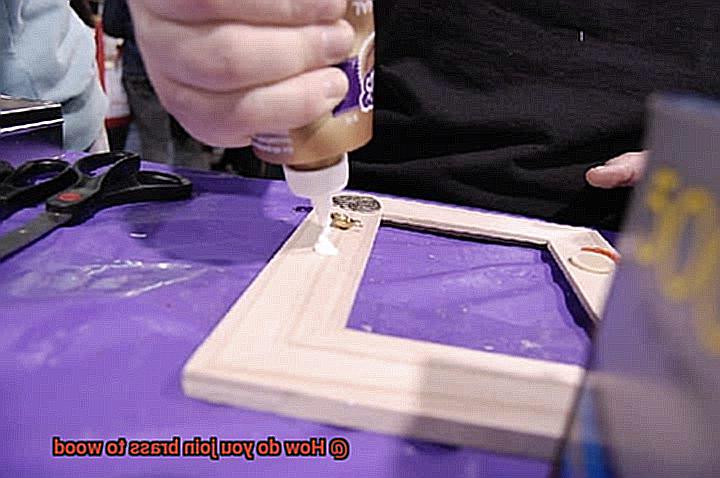
Another approach is utilizing adhesive wonders like epoxy or wood glue, which offer a more seamless aesthetic appeal. Simply apply a thin layer of adhesive goodness onto both the brass and wood surfaces, ensuring an even spread that would make Picasso proud.
Regardless of your chosen technique, always remember to prioritize proper fit and alignment for an enchantingly successful join that will leave your friends marveling at your craftsmanship prowess.
Adhesive Methods for Joining Brass to Wood
Contents
- 1 Adhesive Methods for Joining Brass to Wood
- 2 – Epoxy Glue
- 3 Polyurethane Glue
- 4 Mechanical Fasteners for Joining Brass to Wood
- 5 Screws
- 6 Nails
- 7 Inserts for Joining Brass to Wood
- 8 Preparing the Surfaces Before Joining Brass to Wood
- 9 Tips and Tricks for a Strong Bond when Joining Brass to Wood
- 10 Benefits of Joining Brass to Wood with Adhesives, Fasteners, and Inserts
- 11 Disadvantages of Joining Brass to Wood with Adhesives, Fasteners, and Inserts
- 12 Considerations When Choosing the Best Method for Joining Brass to Wood
- 13 Conclusion
In the realm of woodworking, the art of joining brass to wood requires more than just precision and craftsmanship. It demands the right adhesive method to create a bond that withstands the test of time. Whether you’re a seasoned woodworker or a hobbyist, understanding the different adhesive methods available for this unique combination is crucial. So, let’s explore the world of glues and discover the secret to creating a strong and durable connection between brass and wood.
Epoxy Resin: The Unyielding Bond
When it comes to sheer strength and versatility, epoxy resin takes the crown. This two-component adhesive forms a chemical bond that can withstand moisture, heat, and chemicals, making it an ideal choice for both indoor and outdoor applications. To achieve maximum bond strength, ensure that the surfaces are clean and free from dirt or oil before applying epoxy resin. Clamp the parts together during the curing process for a bond that stands the test of time.
Polyurethane Adhesive: The Flexible Warrior
If your project requires movement or vibration, polyurethane adhesive is your best bet. Known for its flexibility and durability, this adhesive can handle changes in temperature and resist water with ease. Prior to application, lightly sand both surfaces to create a rough texture that enhances adhesion. Once applied evenly on both surfaces, clamp them together until the adhesive cures completely.
Cyanoacrylate Adhesive (Super Glue): The Quick Fix
For small-scale projects or quick fixes, cyanoacrylate adhesive – commonly known as super glue – is a reliable option. Although not as strong as epoxy or polyurethane adhesives, super glue offers convenience and ease of use. Work on clean and smooth surfaces for optimum results. Apply a small amount of adhesive on one surface, press the parts together firmly, and hold them in place until the adhesive sets.
Contact Cement: The Versatile Ally
If you require instant bonding capabilities, contact cement is your versatile ally. Available in solvent-based or water-based formulas, this adhesive allows for immediate bonding once the surfaces come into contact. However, precision is key with contact cement, as it offers little room for repositioning. Align the parts accurately and work in a well-ventilated area due to strong fumes.
Urethane Adhesive: The Strong and Flexible Companion
Urethane adhesives are a trusted companion in construction and woodworking industries. Offering both strength and flexibility, these adhesives are perfect for applications subjected to movement or stress. Like polyurethane adhesives, urethane adhesives require lightly sanded surfaces for optimal adhesion. Apply the adhesive evenly on both surfaces and clamp them together for a bond that endures.
– Epoxy Glue
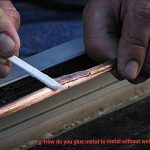
Brace yourself, because I’m about to reveal the secret power of epoxy glue. This adhesive material is like a magical potion that can join brass to wood with strength and durability that will blow your mind.
Let me break it down for you. Epoxy glue is a two-part adhesive consisting of a resin and a hardener. When these two components are mixed together, they undergo a chemical reaction that transforms them into a mighty bond capable of withstanding any challenge that comes their way.
But before we dive into the superhero action, we need to prepare the surfaces. Cleanliness is crucial. Make sure both the brass and wood are free from any dirt, dust, or grease. And don’t forget about sanding – it’s like giving them a superhero makeover, removing any existing finishes or coatings and creating an ideal surface for the epoxy glue to work its magic.
Now, let’s mix things up. Follow the instructions carefully – we don’t want any superhero mishaps here. Once the epoxy resin and hardener are thoroughly mixed, apply a thin layer of this amazing concoction to both the brass and wood surfaces using a brush or applicator. Remember, a little goes a long way.
Now comes the thrilling part – joining the brass and wood together. Align them perfectly, ensuring their union is seamless. Apply gentle pressure, urging them to embrace each other tightly. Any excess glue can be easily wiped away with a damp cloth or scraped off once it’s cured.
Ah, yes, curing time – the moment when our superhero bond gains its full strength. Different epoxy glues have different curing times, so be patient and let it work its magic. The reward will be worth it – a bond so powerful it can withstand moisture, heat, chemicals – you name it. Your brass and wood creation will become an unstoppable force.
Polyurethane Glue
Polyurethane glue is a superhero in the adhesive world, with the power to create an unbreakable bond between different materials, particularly brass and wood. Its unique qualities set it apart from other adhesives and make it a top choice for various projects.
The first superpower of polyurethane glue is its expansion ability. As it cures, this adhesive has the incredible power to expand, filling in any gaps or irregularities between surfaces. This results in a tight and secure bond, eliminating worries about weak connections. It’s like magic.
But that’s not all. Polyurethane glue also possesses resistance to moisture. Unlike other adhesives that crumble or lose strength when faced with water or humidity, polyurethane glue stands tall, maintaining its adhesive properties even in wet conditions. So whether you’re building outdoor furniture or fixtures that may come into contact with moisture, polyurethane glue is your go-to.
Now, let’s talk about how to use this superhero adhesive. First, carefully read and follow the manufacturer’s instructions – they hold the key to success. Once you’ve got that covered, it’s time to get down to business.
Apply the polyurethane glue to both the brass and wood surfaces that need joining. Then, firmly clamp them together. As the glue cures, it will start to foam and expand, so maintaining pressure until full curing is crucial – it’s all part of the magic.
But be warned – polyurethane glue can be a bit messy. Its foaming nature may cause spills or drips. However, taking precautions like wearing disposable gloves and protecting the surrounding area will save the day. And if any excess foam squeezes out from the joint, simply remove it once cured using a chisel or sandpaper.
Mechanical Fasteners for Joining Brass to Wood
Mechanical fasteners are the ultimate solution that will firmly unite these materials, forging a bond as strong as best friends forever. Let’s explore the exciting world of mechanical fasteners and discover the various options available to achieve this seamless connection.
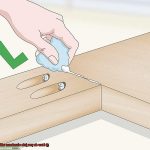
- Screws: These trusty companions are specifically designed for joining brass to wood. With their exceptional resistance to corrosion, they securely hold the two materials together. To ensure a tight fit, choose the appropriate size and length. Don’t forget to pre-drill pilot holes in the wood to prevent unwanted splitting or cracking.
- Nails: For a more traditional approach, nails can also be employed. However, keep in mind that they may not provide as robust of a connection as screws, especially for heavier brass components. Opt for woodworking nails like finishing nails or brads to minimize any damage to the brass surface.
- Dowels: If you crave an unyielding and stable connection, dowels are your go-to option. These cylindrical wooden rods can be inserted into pre-drilled holes in both the brass and wood, creating an unshakable bond. For an added dose of strength, consider using glue alongside the dowels.
- Clamps: Need to keep things in place while the glue dries or when using dowels? Clamps are your trusty sidekicks. They ensure a tight and secure bond between the brass and wood, holding everything together until it’s time to unveil your masterpiece.
- Wood joinery techniques: For those who relish a challenge, wood joinery techniques like mortise and tenon or dovetail joints can be utilized to join brass to wood. These techniques involve delicately cutting precise interlocking shapes in both materials, resulting in an indomitable and seamless connection that will make you feel like a true woodworking superhero.
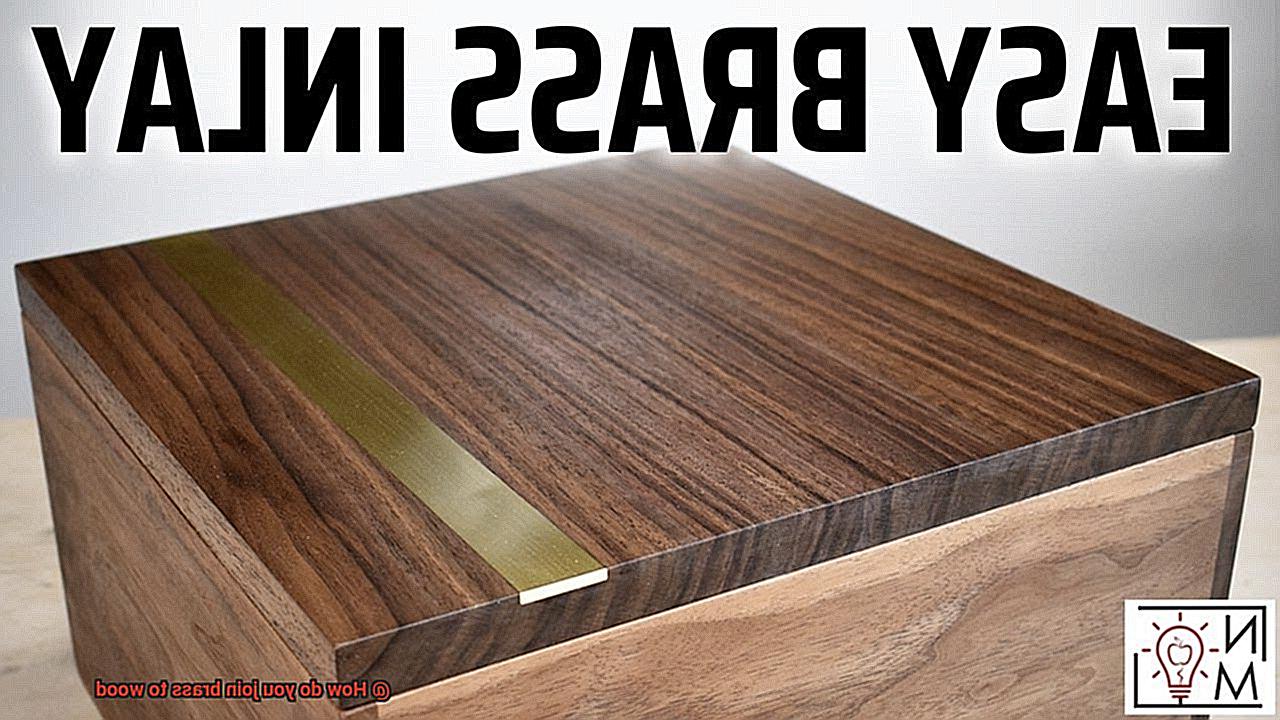
Don’t forget to consider the aesthetics of your joint. Depending on your project, you can choose to countersink or cover the fasteners with decorative elements, creating a visually captivating finish that will leave onlookers in awe.
Screws
Screws are a vital tool in the world of DIY projects and construction. They are a type of fastener that is used to join materials together, such as brass and wood. Screws consist of a threaded cylindrical shaft with a head at one end. The shaft is designed to be inserted into a pre-drilled hole in the materials being joined, and the threads on the shaft provide grip and hold the materials together.
When it comes to selecting screws for joining brass to wood, there are a few important factors to consider. Firstly, it is crucial to choose screws that are specifically designed for this purpose. Brass screws are an excellent choice due to their corrosion-resistant properties and ability to provide a secure connection. These screws ensure that your brass and wood remain tightly joined for years to come.
In order to achieve a successful join, proper preparation is key. Before inserting the screws, it is important to pre-drill pilot holes in both the brass and wood. This step prevents the wood from splitting and allows for easier insertion of the screws. Remember, measure twice, drill once.
The size and length of the screws are also essential considerations. The thickness of your wood and the type of brass being used will determine the appropriate size for your project. It is important to select screws that are long enough to securely penetrate both materials without protruding too much.
When it comes time to drive the screws into place, it is crucial to use the correct torque setting on your screwdriver or drill. Over-tightening can cause damage to the materials, while under-tightening can result in a loose join. Finding the right balance is key.

To enhance the strength and stability of your join, consider using washers. These small but mighty components play a big role in preventing screw heads from sinking into the surface of the brass. Additionally, they add a professional touch to your project.
For a flush and seamless finish, you may need to countersink the screw heads into the wood. This can be achieved by using a countersink bit or drilling a larger hole in the wood to accommodate the screw head. Paying attention to these finishing touches will elevate the overall look of your project.
If you’re looking for a cost-effective option without compromising on aesthetics, consider using brass-plated screws instead of solid brass screws. These screws provide a similar appearance while being more budget-friendly.
Regular maintenance is crucial for screws joining brass to wood, especially in outdoor or high-moisture environments. It is important to periodically inspect and tighten the screws to ensure a strong and secure connection over time.
Nails
Today, we’re diving into the world of joining brass to wood using nails. It may sound like a simple task, but there’s an art to it that can elevate your projects to new heights. So grab your hammers and let’s get started.
Choosing the Right Nails:
When it comes to joining brass to wood, brass nails are the go-to choice. Not only do they offer a visually appealing finish, but they also provide excellent durability and corrosion resistance. With various sizes and styles available, you can find the perfect nail for your specific application.
Preparing for Success:
To ensure a secure connection without any mishaps, pre-drilling pilot holes is essential. This step prevents the wood from splitting or cracking when the nails are inserted. Use a drill bit slightly smaller than the nail diameter for a snug fit. This simple precaution will save you from potential headaches later on.
Driving the Nails:
Now it’s time to align the brass piece with the wood surface and drive those nails in. Whether you choose a hammer or a nail gun specifically designed for this purpose, make sure to strike with precision. Be mindful not to overdrive the nails, as this can weaken the connection or cause damage.
Enhancing the Bond:
For added strength and stability, consider using adhesive alongside nails. A small amount of wood glue or epoxy adhesive applied on both surfaces before joining them together acts as an extra layer of support. This ensures that your joint stands the test of time.
Finishing Touches:
To achieve a professional look, countersink nail heads for a flush finish. Using a countersink drill bit, create a small recess around the nail head, allowing it to sit below the surface of the wood. Fill these recesses with wood filler or putty for a seamless appearance.
Alternatives and Considerations:
While nails are a reliable option, they may not be suitable for every project or material combination. Depending on the requirements, screws, dowels, or adhesive bonding can provide concealed or refined connections. Always consider the specific needs of your project and consult professionals if needed.
Inserts for Joining Brass to Wood
Look no further. Let me introduce you to the world of inserts – the secret ingredients for a secure and long-lasting connection. Not only do they provide strength and stability, but they also add a touch of elegance to your projects.
Now, let’s explore the different types of inserts available. First up, we have threaded inserts. These little metal wizards have internal threads that make it a breeze to screw in bolts or screws, creating a robust bond between the brass and wood. They are perfect for applications where disassembly may be required.
Next on the list are helical inserts, also known as coil inserts. With their unique spiral shape, they offer excellent resistance against pull-out forces. This makes them ideal for projects that require extra durability, such as furniture or cabinetry.
If you’re concerned about sinking too deep into the wood, flanged inserts are here to save the day. Their handy dandy flange provides additional stability and prevents them from going too far into the wood. These inserts are perfect for applications where precise depth control is crucial, like musical instrument construction.
Now, before you start inserting these marvels into your wooden masterpiece, there’s one important step – drilling the hole. Remember to make the hole slightly smaller than the insert diameter for a snug fit. This ensures a secure and reliable connection between the brass and wood.
When it comes to inserting the inserts themselves, you have two options. You can either press them in by hand (hello forearm workout.) or utilize tools like hammers or threaded insert installation tools for some extra oomph. Whichever method you choose, make sure those inserts are securely embedded in the wood.
And now for the grand finale – threading in screws or bolts into the inserts. This step completes the joining process, providing a rock-solid connection that will stand the test of time. Whether you’re building furniture, musical instruments, or decorative pieces, inserts are the superheroes of the woodworking world.
So, next time you’re working on a project that involves joining brass to wood, don’t forget about inserts. They offer strength, durability, and an elegant touch that will elevate your craftsmanship. Embrace the power of inserts and create connections that will last a lifetime.
Preparing the Surfaces Before Joining Brass to Wood
Elevate your woodworking projects to new heights by incorporating the timeless beauty and strength of brass. When joining brass to wood, proper surface preparation is essential for creating a bond that withstands the test of time. In this comprehensive guide, we will delve into the key steps required to ensure a successful connection between these two materials.
Step 1: Thoroughly Clean the Surfaces
To achieve a strong bond, start by meticulously cleaning both the brass and wood surfaces. Remove any dust, dirt, or grease that may impede the effectiveness of adhesives or other joining methods. Utilize a mild detergent or cleaner specifically designed for these surfaces, ensuring they are dry and free from contaminants.
Step 2: Sanding for Optimal Adhesion
Enhance adhesion by creating a textured surface on both the brass and wood. Begin with a coarse-grit sandpaper to eliminate any existing finishes or coatings. This step allows for better penetration of adhesives or mechanical fasteners. Transition to a finer-grit sandpaper to achieve a smoother finish that enhances the aesthetic appeal.
Step 3: Applying a Bonding Primer
Depending on your chosen adhesive or joining method, applying a bonding primer may be necessary. This primer serves as an intermediary layer, enhancing the compatibility between brass and wood surfaces and promoting adhesion. Opt for primers specifically formulated for bonding metal to wood, following the manufacturer’s instructions meticulously.
Step 4: Eliminating Dust Particles
After sanding, it is vital to remove any residual dust or debris that may have accumulated on the surfaces. Utilize a clean cloth or compressed air to gently wipe away these particles. A pristine surface is crucial for achieving a robust bond between brass and wood, ensuring structural integrity.
Step 5: Compatibility Testing
Before committing to a specific adhesive or joining method, conduct a compatibility test on a small, inconspicuous area. This step ensures that the chosen adhesive will effectively bond brass to wood without causing damage or discoloration. Adhere to the manufacturer’s instructions for conducting this crucial test.
Tips and Tricks for a Strong Bond when Joining Brass to Wood
Joining brass to wood requires careful attention to detail and the use of effective techniques. By following these tips and tricks, you can create a strong and durable bond that will withstand the test of time. From choosing the right adhesive to properly preparing the surfaces, these steps will ensure a successful brass-wood joint.
Choose the Right Adhesive:
When it comes to bonding brass to wood, not all adhesives are created equal. Epoxy resin is highly recommended for its exceptional bonding properties. Look for an epoxy adhesive specifically designed for metal-to-wood bonding. This two-part adhesive, composed of a resin and a hardener, creates a chemical reaction that forms a robust bond.
Properly Prepare the Surfaces:
Before applying the adhesive, proper surface preparation is crucial. Clean both the brass and wood surfaces thoroughly, ensuring they are free from dirt, grease, or contaminants. Use a mild detergent or rubbing alcohol to achieve a pristine surface. Lightly sanding the surfaces will also enhance adhesion by creating a rougher texture for the epoxy to grip onto.
Apply the Adhesive Evenly:
Follow the manufacturer’s instructions carefully when applying epoxy resin. Mix the resin and hardener in the specified ratios and apply the adhesive evenly onto both surfaces using a small brush or toothpick. Avoid using too much glue, as excess squeeze-out can create a messy joint.
Secure the Joint Firmly:

Once the adhesive has been applied, securely clamp or fasten the brass and wood together. This ensures that the bond is strong and secure while the epoxy cures. Utilize clamps or other securing methods that distribute pressure evenly across the joint. Wipe off any excess glue that squeezes out during clamping.
Allow Sufficient Curing Time:
Patience is key when aiming for a strong bond. Allow the epoxy to cure fully before subjecting the joined pieces to stress or load. This typically takes several hours or overnight, depending on the specific epoxy used. Avoid disturbing the joint until the adhesive has fully cured to ensure a durable bond.
Benefits of Joining Brass to Wood with Adhesives, Fasteners, and Inserts
Joining brass to wood can be accomplished using a combination of adhesives, fasteners, and inserts. Each method offers unique benefits that contribute to the overall strength and durability of the joint. Let’s explore the advantages of using these three techniques together.
Adhesives are a popular choice for joining brass to wood because they create a strong and seamless bond. Whether you opt for epoxy, polyurethane, or cyanoacrylate (super glue), adhesives provide a clean and aesthetically pleasing finish. With no visible fasteners or inserts, the joint appears seamless, enhancing the overall appearance of the project. Additionally, adhesives distribute stress evenly across the joint, reducing the risk of failure due to localized stress concentration.
Fasteners, such as screws or nails, offer a mechanical connection that reinforces the joint between brass and wood. This method provides exceptional strength and allows for easy disassembly if necessary. By choosing the appropriate type and size of fastener, you can ensure a secure connection that can withstand high levels of stress. Pre-drilling pilot holes in the wood before inserting fasteners is crucial to prevent splitting or cracking.
Inserts are threaded metal components that are installed into pre-drilled holes in the wood. They provide a robust connection point for fasteners, allowing for repeated disassembly and assembly without causing damage to the wood. Inserts made from materials like brass, stainless steel, or zinc-plated steel distribute stress more evenly compared to fasteners alone. This reduces the likelihood of wood damage or joint failure over time.
By combining adhesives, fasteners, and inserts, you can enjoy the benefits of each method while mitigating their individual limitations. Adhesives provide strength and a seamless finish, while fasteners offer mechanical reinforcement and easy disassembly. Inserts add an extra layer of durability and distribute stress evenly across the joint.
The choice of joining method depends on factors such as aesthetics, strength requirements, and ease of disassembly. Adhesives are often preferred when a clean, seamless finish is desired. Fasteners and inserts provide flexibility for disassembly and reassembly, making them suitable for projects that may require adjustments or repairs.
Disadvantages of Joining Brass to Wood with Adhesives, Fasteners, and Inserts
Joining brass to wood can be quite challenging due to the different properties of these materials. While adhesives, fasteners, and inserts provide options for this task, they also come with their own set of disadvantages that can compromise the strength and durability of the bond.
Adhesives, for instance, may not create a strong or long-lasting bond between brass and wood. This is because adhesives are designed to bond similar materials, and the unique characteristics of brass and wood can hinder the effectiveness of the adhesive. The smooth and non-porous surface of brass may also pose challenges for adhesion, resulting in a weak bond that easily breaks under stress or over time.
Fasteners, such as screws, nails, or bolts, offer another option for joining brass to wood. However, they can create unsightly holes in the wood, which may not be desirable in applications where aesthetics are important. Moreover, if not properly installed or if there is movement or vibration in the joint, fasteners can become loose over time, compromising the integrity of the connection. In some cases, fasteners may even cause splitting or cracking of the wood if excessive force is applied during installation.
Inserts like threaded inserts or helicoils provide a threaded hole in the wood for securing the brass component. While these inserts can be effective, they can be challenging to install correctly. Harder woods or small and delicate pieces may pose difficulties during installation, leading to stripped threads or weakened wood around the insert. Additionally, inserts can add complexity and cost to the joining process.
Considerations When Choosing the Best Method for Joining Brass to Wood
Joining brass to wood can be a challenging task, like trying to unite two people from different worlds. The properties and characteristics of these materials can make it a puzzle to find the best method for their union. But fear not, because I’m here to give you the inside scoop on the considerations that will help you choose the perfect method.
First and foremost, consider the purpose of the joint. Is it meant to be a permanent bond or a temporary one? Will the joint be subjected to stress or movement? Understanding the purpose will guide you towards the most suitable method.
Compatibility is key. Brass and wood have different properties, so it’s crucial to choose a method that is compatible with both materials. You don’t want a joint that corrodes or weakens over time. It’s like mixing a firecracker with a water balloon – explosive but short-lived.
Strength requirements should not be overlooked. Different methods offer varying levels of strength, so pick one that can withstand the intended load or stress. It’s like finding a partner who can handle your baggage without breaking a sweat.
Aesthetics matter too. If the joint will be visible, you want it to look seamless and visually appealing. Some methods may leave visible marks or require additional finishing work, so choose wisely. You don’t want your joint to be an eyesore at family gatherings.
Ease of installation is another consideration. Some methods may require specialized tools or skills, while others are more straightforward and accessible. Just like finding a partner who effortlessly fits into your life, you want a method that is easy to work with.
And last but not least, think about reversibility. If there’s a chance you might need to disassemble the joint in the future, consider choosing a method that allows for easy disassembly without causing damage. No one wants a messy breakup.
jqetrLcfiGU” >
Conclusion
Joining brass to wood requires careful consideration and the use of appropriate techniques.
One method is to use brass screws or nails to secure the two materials together. These fasteners provide a strong and reliable connection, ensuring that the brass and wood remain securely joined.
Another option is to use adhesives specifically designed for bonding metal and wood surfaces. These adhesives create a durable bond that can withstand various stresses and strains.
This will help promote better adhesion and improve the overall strength of the joint.